


一 发布功能
- 功能有动画效果,动态最好用代码实现
- 标语代码实现
- 建数组,填充按钮内容
- 创建/添加按钮
// 屏幕尺寸
#define XMGScreenH [UIScreen mainScreen].bounds.size.height
#define XMGScreenW [UIScreen mainScreen].bounds.size.width
@interface XMGPublishViewController ()
/** 标语 */
@property (nonatomic, weak) UIImageView *sloganView;
@end
- (void)viewDidLoad {
[super viewDidLoad];
// 标语
UIImageView *sloganView = [[UIImageView alloc] initWithImage:[UIImage imageNamed:@"app_slogan"]];
sloganView.y = XMGScreenH * 0.15;
sloganView.centerX = XMGScreenW * 0.5;
[self.view addSubview:sloganView];
self.sloganView = sloganView;
// 按钮
// 数据
NSArray *images = @[@"publish-video", @"publish-picture", @"publish-text", @"publish-audio", @"publish-review", @"publish-offline"];
NSArray *titles = @[@"发视频", @"发图片", @"发段子", @"发声音", @"审帖", @"离线下载"];
// 一些参数
NSUInteger count = images.count;
int maxColsCount = 3; // 一行的列数
NSUInteger rowsCount = (count + maxColsCount - 1) / maxColsCount;
// 按钮尺寸
CGFloat buttonW = XMGScreenW / maxColsCount;
CGFloat buttonH = buttonW * 0.85;
CGFloat buttonStartY = (XMGScreenH - rowsCount * buttonH) * 0.5;
for (int i = 0; i < count; i++) {
// 创建、添加
XMGPublishButton *button = [XMGPublishButton buttonWithType:UIButtonTypeCustom];
[button addTarget:self action:@selector(buttonClick:) forControlEvents:UIControlEventTouchUpInside];
[self.view addSubview:button];
// frame
CGFloat buttonX = (i % maxColsCount) * buttonW;
CGFloat buttonY = buttonStartY + (i / maxColsCount) * buttonH;
button.frame = CGRectMake(buttonX, buttonY, buttonW, buttonH);
// 内容
[button setImage:[UIImage imageNamed:images[i]] forState:UIControlStateNormal];
[button setTitle:titles[i] forState:UIControlStateNormal];
}
}
- 添加\布局子控件的方法
- 在viewDidLoad方法中创建、添加子控件(只创建/添加一次)
- 在viewDidLayoutSubviews方法中布局子控件
- 自定义按钮PublishButton
- (instancetype)initWithFrame:(CGRect)frame
{
    if (self = [super initWithFrame:frame]) {
        self.titleLabel.textAlignment = NSTextAlignmentCenter;
        self.titleLabel.font = [UIFont systemFontOfSize:15];
        [self setTitleColor:[UIColor blackColor] forState:UIControlStateNormal];
    }
    return self;
}

- (void)layoutSubviews
{
    [super layoutSubviews];

    self.imageView.y = 0;
    self.imageView.centerX = self.width * 0.5;

    self.titleLabel.width = self.width;
    self.titleLabel.y = CGRectGetMaxY(self.imageView.frame);
    self.titleLabel.x = 0;
    self.titleLabel.height = self.height - self.titleLabel.y;
}- label高度有点高,调整按钮尺寸方法:
- 方法1. CGFloat buttonH = buttonW * 0.85;
- 方法2. 调整图片的y值往下移
二 动画弹簧效果
- 方法1:根据y值做动画效果,在做弹簧效果
- 方法2:苹果系统自带框架:Core Animation
- 动画只能作用在CALayer上
- 无法监听到动画的中间值
- 方法3:第三方框架:pop
- 动画能作用在任何对象上
- 能监听到动画的中间值
- pop动画效果代码
    POPSpringAnimation *anim = [POPSpringAnimation animationWithPropertyNamed:kPOPViewFrame];
   anim.fromValue = [NSValue valueWithCGRect:CGRectMake(buttonX, buttonY - XMGScreenH, buttonW, buttonH)];
   anim.toValue = [NSValue valueWithCGRect:CGRectMake(buttonX, buttonY, buttonW, buttonH)];
     anim.springSpeed = 10;
     anim.springBounciness = 10;
// CACurrentMediaTime()获得的是当前时间
     anim.beginTime = CACurrentMediaTime() + 0.2 * i;
[button pop_addAnimation:anim forKey:nil];- 弹簧效果代码
    CGFloat sloganY = XMGScreenH * 0.2;
// 动画
  POPSpringAnimation *anim = [POPSpringAnimation animationWithPropertyNamed:kPOPLayerPositionY];
  anim.toValue = @(sloganY);
  anim.springSpeed = 10;
  anim.springBounciness = 10;
    // CACurrentMediaTime()获得的是当前时间
  anim.beginTime = CACurrentMediaTime() + [self.times.lastObject doubleValue];
[sloganView.layer pop_addAnimation:anim forKey:nil];- 如何实现指定下来按钮顺序
    // 数据
    NSArray *images = @[@"publish-video", @"publish-picture", @"publish-text", @"publish-audio", @"publish-review", @"publish-offline"];
NSArray *titles = @[@"发视频", @"发图片", @"发段子", @"发声音", @"审帖", @"离线下载"];- 标语加入动画:
- (void)setupSloganView
{
    CGFloat sloganY = XMGScreenH * 0.2;

    // 添加
    UIImageView *sloganView = [[UIImageView alloc] initWithImage:[UIImage imageNamed:@"app_slogan"]];
    sloganView.y = sloganY - XMGScreenH;
    sloganView.centerX = XMGScreenW * 0.5;
    [self.view addSubview:sloganView];
    self.sloganView = sloganView;

    // 动画
    POPSpringAnimation *anim = [POPSpringAnimation animationWithPropertyNamed:kPOPLayerPositionY];
    anim.toValue = @(sloganY);
    anim.springSpeed = 10;
    anim.springBounciness = 10;
    // CACurrentMediaTime()获得的是当前时间
    anim.beginTime = CACurrentMediaTime() + [self.times.lastObject doubleValue];
    [sloganView.layer pop_addAnimation:anim forKey:nil];
}
- 时间间隔调整
- (NSArray *)times
{
    if (!_times) {
        CGFloat interval = 0.1; // 时间间隔
        _times = @[@(5 * interval),
                   @(4 * interval),
                   @(3 * interval),
                   @(2 * interval),
                   @(0 * interval),
                   @(1 * interval),
                   @(6 * interval)]; // 标语的动画时间
    }
    return _times;
}
按钮的尺寸为0,还是能看见文字缩成一个点,设置按钮的尺寸为负数,那么就看不见文字了 // button.width = -1;
三 退出控制器
- 先执行动画,再退出控制器
- 动画执行过程中,开始和取消过程中,都不能点击按钮,禁止交互作用
   // 禁止交互
  self.view.userInteractionEnabled = NO;
- (IBAction)cancel {
// 让按钮执行动画
for (int i = 0; i < self.buttons.count; i++) {
XMGPublishButton *button = self.buttons[i];
POPBasicAnimation *anim = [POPBasicAnimation animationWithPropertyNamed:kPOPLayerPositionY];
anim.toValue = @(button.layer.position.y + XMGScreenH);
// CACurrentMediaTime()获得的是当前时间
anim.beginTime = CACurrentMediaTime() + [self.times[i] doubleValue];
[button.layer pop_addAnimation:anim forKey:nil];
}
XMGWeakSelf;
// 让标题执行动画
POPBasicAnimation *anim = [POPBasicAnimation animationWithPropertyNamed:kPOPLayerPositionY];
anim.toValue = @(self.sloganView.layer.position.y + XMGScreenH);
// CACurrentMediaTime()获得的是当前时间
anim.beginTime = CACurrentMediaTime() + [self.times.lastObject doubleValue];
[anim setCompletionBlock:^(POPAnimation *anim, BOOL finished) {
[weakSelf dismissViewControllerAnimated:NO completion:nil];
}];
[self.sloganView.layer pop_addAnimation:anim forKey:nil];
}- 点击蒙板也可以实现取消功能:
  - (void)touchesBegan:(NSSet *)touches withEvent:(UIEvent *)event
  {
    [self cancel];
  }
四 按钮点击功能完善
- 动画结束完毕后,实现点击按钮对应功能
- 建一个“发段子”控制器
- 点击“发段子”,动画退出,弹出“发段子”控制器
- (void)viewDidLoad {
    [super viewDidLoad];

    self.title = @"发表文字";
    self.navigationItem.leftBarButtonItem = [[UIBarButtonItem alloc] initWithTitle:@"取消" style:UIBarButtonItemStyleDone target:self action:@selector(cancel)];
}
- (void)cancel {
[self dismissViewControllerAnimated:YES completion:nil];
}// 关闭当前控制器
[weakSelf dismissViewControllerAnimated:YES completion:nil];
// 按钮索引
NSUInteger index = [self.buttons indexOfObject:button];
switch (index) {
case 2: { // 发段子
// 弹出发段子控制器
XMGPostWordViewController *postWord = [[XMGPostWordViewController alloc] init];
[self.view.window.rootViewController presentViewController:[[XMGNavigationController alloc] initWithRootViewController:postWord] animated:YES completion:nil];
}五 代码重构
- 动画退出每次退出都要执行一次
- 点击功能按钮退出,执行完退出动画,在弹出一个新的view
- 传block进去,执行动画退出后的操作
#pragma mark - 退出动画
- (void)exit:(void (^)())task
{
    // 禁止交互
    self.view.userInteractionEnabled = NO;

    // 让按钮执行动画
    for (int i = 0; i < self.buttons.count; i++) {
        XMGPublishButton *button = self.buttons[i];

        POPBasicAnimation *anim = [POPBasicAnimation animationWithPropertyNamed:kPOPLayerPositionY];
        anim.toValue = @(button.layer.position.y + XMGScreenH);
        // CACurrentMediaTime()获得的是当前时间
        anim.beginTime = CACurrentMediaTime() + [self.times[i] doubleValue];
        [button.layer pop_addAnimation:anim forKey:nil];
    }

    XMGWeakSelf;
    // 让标题执行动画
    POPBasicAnimation *anim = [POPBasicAnimation animationWithPropertyNamed:kPOPLayerPositionY];
    anim.toValue = @(self.sloganView.layer.position.y + XMGScreenH);
    // CACurrentMediaTime()获得的是当前时间
    anim.beginTime = CACurrentMediaTime() + [self.times.lastObject doubleValue];
    [anim setCompletionBlock:^(POPAnimation *anim, BOOL finished) {
        [weakSelf dismissViewControllerAnimated:NO completion:nil];
  // block调空的时候会报错,增加判断:
   // 可能会做其他事情
       if (task) task();
//     !task ? : task();
    }];
    [self.sloganView.layer pop_addAnimation:anim forKey:nil];
}
#pragma mark - 点击
- (void)buttonClick:(XMGPublishButton *)button
{
[self exit:^{
// 按钮索引
NSUInteger index = [self.buttons indexOfObject:button];
switch (index) {
case 2: { // 发段子
// 弹出发段子控制器
XMGPostWordViewController *postWord = [[XMGPostWordViewController alloc] init];
[self.view.window.rootViewController presentViewController:[[XMGNavigationController alloc] initWithRootViewController:postWord] animated:YES completion:nil];
break;
}
case 1:
XMGLog(@"发图片");
break;
default:
XMGLog(@"其它");
break;
}
}];
}五 占位文字
- UITextField
- 有占位文字
- 最多只能输入一行文字
- UITextView
- 没有占位文字
- 能输入任意行文字
如何实现既有占位文字,也能输入任意行文字?
- 解决方案:继承自UITextView,增加一个功能有占位文字
有导航栏的话,苹果系统会自动增加64间距,如果不需要的话:
- 方法1:不要自动调整scrollView的contentInet属性
self.automaticallyAdjustsScrollViewInsets = NO;- 方法2: 开始就设置contentInset
textView.contentInset = UIEdgeInsetsMake(-64, 0, 0, 0);
六 占位文字实现1
- 占位文字画到view上
/**
 * 每次调用drawRect:方法,都会将以前画的东西清除掉
 */
- (void)drawRect:(CGRect)rect
{
    // 如果有文字,就直接返回,不需要画占位文字
//    if (self.text.length || self.attributedText.length) return;
    if (self.hasText) return;

    // 属性
    NSMutableDictionary *attrs = [NSMutableDictionary dictionary];
    attrs[NSFontAttributeName] = self.font;
    attrs[NSForegroundColorAttributeName] = self.placeholderColor;
    // 画文字
    // 光标和占位文字对不上调整
    rect.origin.x = 5;
    rect.origin.y = 8;
    rect.size.width -= 2 * rect.origin.x;
    [self.placeholder drawInRect:rect withAttributes:attrs];
}- 使用通知监听文字多少改变
- (instancetype)initWithFrame:(CGRect)frame
{
    if (self = [super initWithFrame:frame]) {
        // 设置默认字体
        self.font = [UIFont systemFontOfSize:15];

        // 设置默认颜色
        self.placeholderColor = [UIColor grayColor];

        // 使用通知监听文字改变
        [[NSNotificationCenter defaultCenter] addObserver:self selector:@selector(textDidChange:) name:UITextViewTextDidChangeNotification object:self];
    }
    return self;
}

- (void)textDidChange:(NSNotification *)note
{
    // 会重新调用drawRect:方法
    [self setNeedsDisplay];
}
// 移除通知
- (void)dealloc
{
    [[NSNotificationCenter defaultCenter] removeObserver:self];
}- 监听属性修改,重写set方法
#pragma mark - setter
// 占位文字变化
- (void)setPlaceholder:(NSString *)placeholder
{
    _placeholder = [placeholder copy];

    [self setNeedsDisplay];
}
// 占位文字颜色变化
- (void)setPlaceholderColor:(UIColor *)placeholderColor
{
    _placeholderColor = placeholderColor;

    [self setNeedsDisplay];
}
// 占位文字字体变化
- (void)setFont:(UIFont *)font
{
    [super setFont:font];

    [self setNeedsDisplay];
}
// 占位文字变化(用户操作)
- (void)setText:(NSString *)text
{
    [super setText:text];

    [self setNeedsDisplay];
}- textView尺寸发生变化时,
- (void)layoutSubviews
{
    [super layoutSubviews];

    [self setNeedsDisplay];
}- 往下拖拽可以退出键盘:
- 遵守UITextView代理
// 不管内容有多少,竖直方向上永远可以拖拽
   textView.alwaysBounceVertical = YES;

#pragma mark - <UITextViewDelegate>
- (void)scrollViewWillBeginDragging:(UIScrollView *)scrollView
{
    [self.view endEditing:YES];
}
七 占位文字实现2
- TextView内部添加UILabel,控制Label是否隐藏
- (void)textDidChange:(NSNotification *)note
{
    self.placeholderLabel.hidden = self.hasText;
}
- (instancetype)initWithFrame:(CGRect)frame
{
if (self = [super initWithFrame:frame]) {
// 创建label
UILabel *placeholderLabel = [[UILabel alloc] init];
placeholderLabel.numberOfLines = 0;
[self addSubview:placeholderLabel];
self.placeholderLabel = placeholderLabel;
// 设置默认字体
self.font = [UIFont systemFontOfSize:15];
// 设置默认颜色
self.placeholderColor = [UIColor grayColor];
// 使用通知监听文字改变
[[NSNotificationCenter defaultCenter] addObserver:self selector:@selector(textDidChange:) name:UITextViewTextDidChangeNotification object:self];
}
return self;
}- 监听改变,重写 set方法,直接操作label
#pragma mark - setter
- (void)setPlaceholder:(NSString *)placeholder
{
    _placeholder = [placeholder copy];

    self.placeholderLabel.text = placeholder;
    [self.placeholderLabel sizeToFit];
}

- (void)setPlaceholderColor:(UIColor *)placeholderColor
{
    _placeholderColor = placeholderColor;

    self.placeholderLabel.textColor = placeholderColor;
}

- (void)setFont:(UIFont *)font
{
    [super setFont:font];

    self.placeholderLabel.font = font;
    [self.placeholderLabel sizeToFit];
}
- UILabel自动垂直居中,不换行
- (void)layoutSubviews
{
    [super layoutSubviews];

    self.placeholderLabel.x = 5;
    self.placeholderLabel.y = 8;
    self.placeholderLabel.width = self.width - 2 * self.placeholderLabel.x;
    [self.placeholderLabel sizeToFit];
}
八 发表功能实现
- 发表功能,有文字时可以点击
- (void)textViewDidChange:(UITextView *)textView
{
  self.navigationItem.rightBarButtonItem.enabled = textView.hasText;
}- 设置Navigation标题大小、ButtonItem颜色
+ (void)initialize
{
/** 设置UINavigationBar */
    UINavigationBar *bar = [UINavigationBar appearance];
    // 设置背景
    [bar setBackgroundImage:[UIImage imageNamed:@"navigationbarBackgroundWhite"] forBarMetrics:UIBarMetricsDefault];
    // 设置标题文字属性
    NSMutableDictionary *barAttrs = [NSMutableDictionary dictionary];
    barAttrs[NSFontAttributeName] = [UIFont boldSystemFontOfSize:20];
    [bar setTitleTextAttributes:barAttrs];

/** 设置UIBarButtonItem */
    UIBarButtonItem *item = [UIBarButtonItem appearance];

    // UIControlStateNormal
    NSMutableDictionary *normalAttrs = [NSMutableDictionary dictionary];
    normalAttrs[NSForegroundColorAttributeName] = [UIColor blackColor];
    normalAttrs[NSFontAttributeName] = [UIFont systemFontOfSize:17];
    [item setTitleTextAttributes:normalAttrs forState:UIControlStateNormal];

    // UIControlStateDisabled
    NSMutableDictionary *disabledAttrs = [NSMutableDictionary dictionary];
    disabledAttrs[NSForegroundColorAttributeName] = [UIColor grayColor];
    [item setTitleTextAttributes:disabledAttrs forState:UIControlStateDisabled];
}
- 强制更新刷新,能马上刷新现在的状态
// 强制更新(能马上刷新现在的状态)
  [self.navigationController.navigationBar layoutIfNeeded];
类似方法对比
- [tempView layoutIfNeeded];
// 重新刷新自己和子控件的所有内容(状态、尺寸) - [tempView setNeedsLayout];
// 重新调用tempView的layoutSubviews(重新排布子控件的frame) - [tempView setNeedsDisplay];
// 重新调用tempView的drawRect:方法(重新绘制tempView里面的内容,一般不包括子控件)
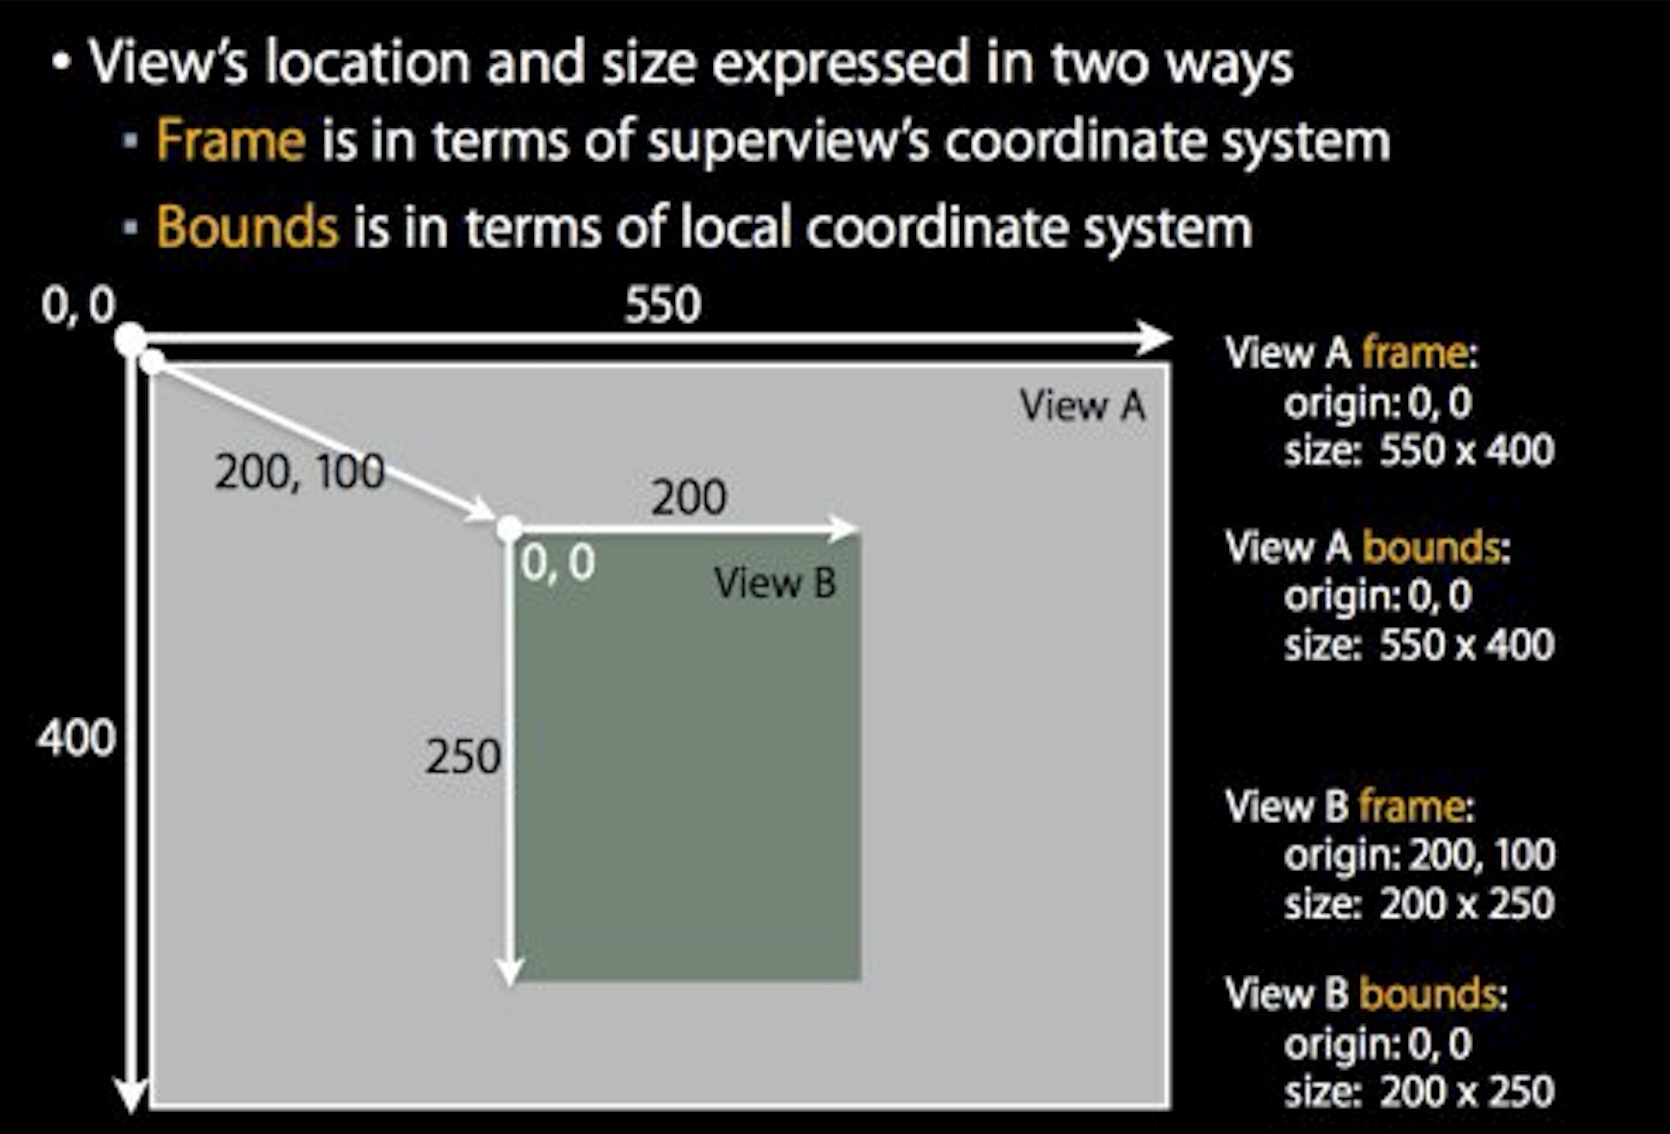
九 bounds
- [tempView layoutIfNeeded];
frame指的是该view在父view坐标系统中的位置和大小。(参照点是父控件的坐标系统)
bounds指的是该view在本身坐标系统中的位置和尺寸。(参照点是本身内容左上角为坐标原点)
- 一个控件bounds的x\y是正数,这个控件的内容会往外面跑
- 一个控件bounds的x\y是负数,这个控件的内容会往里面跑
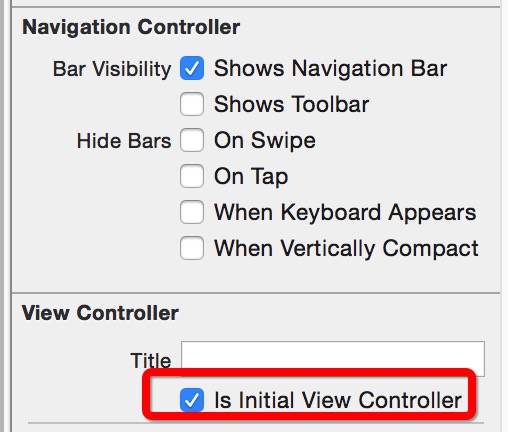
当控制器是导航控制器,并有导航栏时,bounds自动设置64间距
storyboard调整如下:
同上,设置self.automaticallyAdjustsScrollViewInsets = NO;
- scrollView.contentSize; // 滚动范围(内容的尺寸)
- scrollView.contentInset; // 内边距
- scrollView.frame; // 以父控件内容的左上角为坐标原点,scrollView矩形框的位置和尺寸
- scrollView.bounds; // 以自己内容的左上角为坐标原点,scrollView矩形框的位置和尺寸
- scrollView.contentOffset; // 偏移量(scrollView.bounds.origin)


 1671
1671

 被折叠的 条评论
为什么被折叠?
被折叠的 条评论
为什么被折叠?
 到【灌水乐园】发言


