


一 基本骨架
- 建一个控制器,2个tableView共用一个数据源(连线)
- 左右表格统一设置
static NSString * const XMGCategoryCellId = @"category";
static NSString * const XMGUserCellId = @"user";

- (void)viewDidLoad {
    [super viewDidLoad];

    self.title = @"推荐关注";
    self.automaticallyAdjustsScrollViewInsets = NO;
    UIEdgeInsets inset = UIEdgeInsetsMake(XMGNavBarMaxY, 0, 0, 0);
    // 左边表格
    self.categoryTableView.contentInset = inset;
    self.categoryTableView.scrollIndicatorInsets = inset;
    [self.categoryTableView registerNib:[UINib nibWithNibName:NSStringFromClass([XMGCategoryCell class]) bundle:nil] forCellReuseIdentifier:XMGCategoryCellId];
    // 右边表格
    self.userTableView.contentInset = inset;
    self.userTableView.scrollIndicatorInsets = inset;
    [self.userTableView registerNib:[UINib nibWithNibName:NSStringFromClass([XMGUserCell class]) bundle:nil] forCellReuseIdentifier:XMGUserCellId];
}- 左右边cell设置
- (UITableViewCell *)tableView:(UITableView *)tableView cellForRowAtIndexPath:(NSIndexPath *)indexPath
{
    if (tableView == self.categoryTableView) { // 左边的类别表格  ←
        XMGCategoryCell *cell =  [tableView dequeueReusableCellWithIdentifier:XMGCategoryCellId];
   //   cell.textLabel.text = [NSString stringWithFormat:@"---%zd", indexPath.row];
        return cell;
    } else { // 右边的用户表格 →
        XMGUserCell *cell = [tableView dequeueReusableCellWithIdentifier:XMGUserCellId];
   //    cell.textLabel.text = [NSString stringWithFormat:@"%zd---", indexPath.row];
        return cell;
    }
二 左边类别数据
- 发送请求,加载数据
- (void)loadCategories
{
    // 弹框
    [SVProgressHUD show];

    // 请求参数
    NSMutableDictionary *params = [NSMutableDictionary dictionary];
    params[@"a"] = @"category";
    params[@"c"] = @"subscribe";

    // 发送请求
    XMGWeakSelf;
    [self.manager GET:XMGRequestURL parameters:params success:^(NSURLSessionDataTask *task, id responseObject) {
        [SVProgressHUD dismiss];

        // 字典数组 -> 模型数组
        weakSelf.categories = [XMGCategory objectArrayWithKeyValuesArray:responseObject[@"list"]];

        // 刷新表格
        [weakSelf.categoryTableView reloadData];
    } failure:^(NSURLSessionDataTask *task, NSError *error) {
        [SVProgressHUD dismiss];
    }];
}- cell设置子控件
- (void)setCategory:(XMGCategory *)category
{
    _category = category;
    // 设置文字
    self.textLabel.text = category.name;
}- cell中label挡住了分割线(清除label背景色)
 - (void)awakeFromNib
 {
    // 清除文字背景色(这样就不会挡住分割线)
    self.textLabel.backgroundColor = [UIColor clearColor];
}- 点击选中,文字颜色变红,增加左侧width = 5的红色View
- 当一个cell(selectionStyle != None)被选中时,里面子控件会自动进入highlighted状态
- 重写setSelected方法监听cell选中和取消
- (void)setSelected:(BOOL)selected animated:(BOOL)animated
{
    [super setSelected:selected animated:animated];

    self.textLabel.textColor = selected ? [UIColor redColor] : [UIColor darkGrayColor];
    self.selectedIndicator.hidden = !selected; //红色View
}
三 用户数据
- 右侧数据刷新
- (void)loadNewUsers
{
    // 取消之前的请求
    [self.manager.tasks makeObjectsPerformSelector:@selector(cancel)];

    // 请求参数
    NSMutableDictionary *params = [NSMutableDictionary dictionary];
    params[@"a"] = @"list";
    params[@"c"] = @"subscribe";
    // 左边选中的类别的ID
    XMGFollowCategory *selectedCategory = self.categories[self.categoryTableView.indexPathForSelectedRow.row];
    params[@"category_id"] = selectedCategory.ID;
    // 发送请求
    XMGWeakSelf;
    [self.manager GET:XMGRequestURL parameters:params success:^(NSURLSessionDataTask *task, id responseObject) {
        // 存储用户数据
        selectedCategory.users = [XMGFollowUser objectArrayWithKeyValuesArray:responseObject[@"list"]];
        // 刷新右边表格
        [weakSelf.userTableView reloadData];
        // 结束刷新
        [weakSelf.userTableView.header endRefreshing];
    } failure:^(NSURLSessionDataTask *task, NSError *error) {
        // 结束刷新
        [weakSelf.userTableView.header endRefreshing];
    }];
}- 用户cell数据
- (void)setUser:(XMGFollowUser *)user
{
    _user = user;

    [self.headerImageView setHeader:user.header];
    self.screenNameLabel.text = user.screen_name;

    if (user.fans_count >= 10000) {
        self.fansCountLabel.text = [NSString stringWithFormat:@"%.1f万人关注", user.fans_count / 10000.0];
    } else {
        self.fansCountLabel.text = [NSString stringWithFormat:@"%zd人关注", user.fans_count];
    }
}- 类别对应用户数,一个Category对应一组User,需要存储每一组数据
- 字典(扩展性不强)
- 一个组对应一个模型属性
/** 这个类别对应的用户数据 */
@property (nonatomic, strong) NSMutableArray *users;
// 左边选中的类别的ID
FollowCategory *selectedCategory = self.categories[self.categoryTableView.indexPathForSelectedRow.row];- 右边cell数据存储到users数组
- (UITableViewCell *)tableView:(UITableView *)tableView cellForRowAtIndexPath:(NSIndexPath *)indexPath
{
    if (tableView == self.categoryTableView) { // 左边的类别表格 ←
        XMGCategoryCell *cell =  [tableView dequeueReusableCellWithIdentifier:XMGCategoryCellId];

        cell.category = self.categories[indexPath.row];
        return cell;
    } else { // 右边的用户表格→
        XMGUserCell *cell = [tableView dequeueReusableCellWithIdentifier:XMGUserCellId];

        // 左边选中的类别
        XMGFollowCategory *selectedCategory = self.categories[self.categoryTableView.indexPathForSelectedRow.row];
        cell.user = selectedCategory.users[indexPath.row];
        return cell;
    }
}- 点击左侧cell判断需要需要刷新数据:
- 二次点击不需要再显示刷新请求
#pragma mark - <UITableViewDelegate>
- (void)tableView:(UITableView *)tableView didSelectRowAtIndexPath:(NSIndexPath *)indexPath
{
    if (tableView == self.categoryTableView) { // 左边的类别表格 ←  只要点击左边,就会刷新右边数据
        XMGFollowCategory *selectedCategory = self.categories[indexPath.row];
        // 判断是否有过用户数据
        if (selectedCategory.users.count) { // 已经有用户数据
         [self.userTableView reloadData];
         } else {
            // 加载右边的用户数据
            [self.userTableView.header beginRefreshing];
        }
    } else { // 右边的用户表格 →
        XMGLog(@"点击了→的%zd行", indexPath.row);
    }
}- 上拉刷新
[self.manager GET:XMGRequestURL parameters:params success:^(NSURLSessionDataTask *task, id responseObject) {
        // 设置当前的最新页码
        selectedCategory.page = page;

        // 存储总数
        selectedCategory.total = [responseObject[@"total"] integerValue];

        // 追加新的用户数据到以前的数组中
        NSArray *newUsers = [XMGFollowUser objectArrayWithKeyValuesArray:responseObject[@"list"]];
        [selectedCategory.users addObjectsFromArray:newUsers];

        // 刷新右边表格
        [weakSelf.userTableView reloadData];

        if (selectedCategory.users.count >= selectedCategory.total) {
            // 这组的所有用户数据已经加载完毕
            weakSelf.userTableView.footer.hidden = YES;
        } else { // 还可能会有下一页用户数据
            // 结束刷新
            [weakSelf.userTableView.footer endRefreshing];
        }
    } failure:^(NSURLSessionDataTask *task, NSError *error) {
        // 结束刷新
        [weakSelf.userTableView.footer endRefreshing];
    }];
- 页码设置
 NSInteger page = selectedCategory.page + 1;
params[@"page"] = @(page);- footer显示隐藏:
#pragma mark - <UITableViewDelegate>
- (void)tableView:(UITableView *)tableView didSelectRowAtIndexPath:(NSIndexPath *)indexPath
{
    if (tableView == self.categoryTableView) { // 左边的类别表格 ←  只要点击左边,就会刷新右边数据
        XMGFollowCategory *selectedCategory = self.categories[indexPath.row];

        // 刷新右边的用户表格 →
        // (MJRefresh的默认做法:表格有数据,就会自动显示footer,表格没有数据,就会自动隐藏footer)
        [self.userTableView reloadData];

        // 判断footer是否应该显示
        if (selectedCategory.users.count >= selectedCategory.total) {
            // 这组的所有用户数据已经加载完毕
            self.userTableView.footer.hidden = YES;
        }
        // 判断是否有过用户数据
        if (selectedCategory.users.count == 0) { // 从未有过用户数据
            // 加载右边的用户数据
            [self.userTableView.header beginRefreshing];
        }
    } else { // 右边的用户表格 →
        XMGLog(@"点击了→的%zd行", indexPath.row);
    }
}- 默认选中第0行cell
   // 选中左边的第0行
[weakSelf.categoryTableView selectRowAtIndexPath:[NSIndexPath indexPathForRow:0 inSection:0] animated:NO scrollPosition:UITableViewScrollPositionTop];
   // 让右边表格进入下拉刷新
[weakSelf.userTableView.header beginRefreshing];
四 自定义UIWindow重置scrollView偏移量
UIWindow的级别,级别越高,越显示在上层(级别高的window盖在级别低的window上面)
- UIWindowLevelNormal < UIWindowLevelStatusBar < UIWindowLevelAlert
- 窗口的hidden默认 = YES
顶部添加topWindow:实现点击状态栏回弹
- (void)topWindowClick
{
    // 取出所有的window
    NSArray *windows = [UIApplication sharedApplication].windows;

    // 遍历程序中的所有控件
    for (UIWindow *window in windows) {
        [self searchSubviews:window];
    }
}- 递归搜索遍历所有子控件
- (void)searchSubviews:(UIView *)superview
{
    for (UIScrollView *scrollView in superview.subviews) {
        [self searchSubviews:scrollView];

        // 判断是否为scrollView
        if (![scrollView isKindOfClass:[UIScrollView class]]) continue;
        // 计算出scrollView在window坐标系上的矩形框
        CGRect scrollViewRect = [scrollView convertRect:scrollView.bounds toView:scrollView.window];
        CGRect windowRect = scrollView.window.bounds;
        // 判断scrollView的边框是否和window的边框交叉
        if (!CGRectIntersectsRect(scrollViewRect, windowRect)) continue;

        // 让scrollView滚动到最前面
        CGPoint offset = scrollView.contentOffset;
        // 偏移量不一定是0
        offset.y = - scrollView.contentInset.top;
        [scrollView setContentOffset:offset animated:YES];
    }
}
五 坐标系转换
- 4种写法
- from后面2个参数以谁为坐标系原点,找出矩形框在哪
- to参考前面2个参数
- 应用场景:确定一个控件在不在View上
 // self.blueView以前以blueView左上角为原点,转化为以self.view左上角为原点(to后面是目标)
  CGRect rect = [self.blueView.superview convertRect:self.blueView.frame toView:self.view];

// self.blueView以前以self.blueView.superview左上角为原点,转成以self.view左上角为原点
  CGRect rect = [self.view convertRect:self.blueView.frame fromView:self.blueView.superview];

// self.blueView.bounds以前以blueView左上角为原点,转化为以self.view左上角为原点
  CGRect rect = [self.blueView convertRect:self.blueView.bounds toView:self.view];
  CGRect rect = [self.view convertRect:self.blueView.bounds fromView:self.blueView];
注意:自定义View会覆盖状态栏变黑色
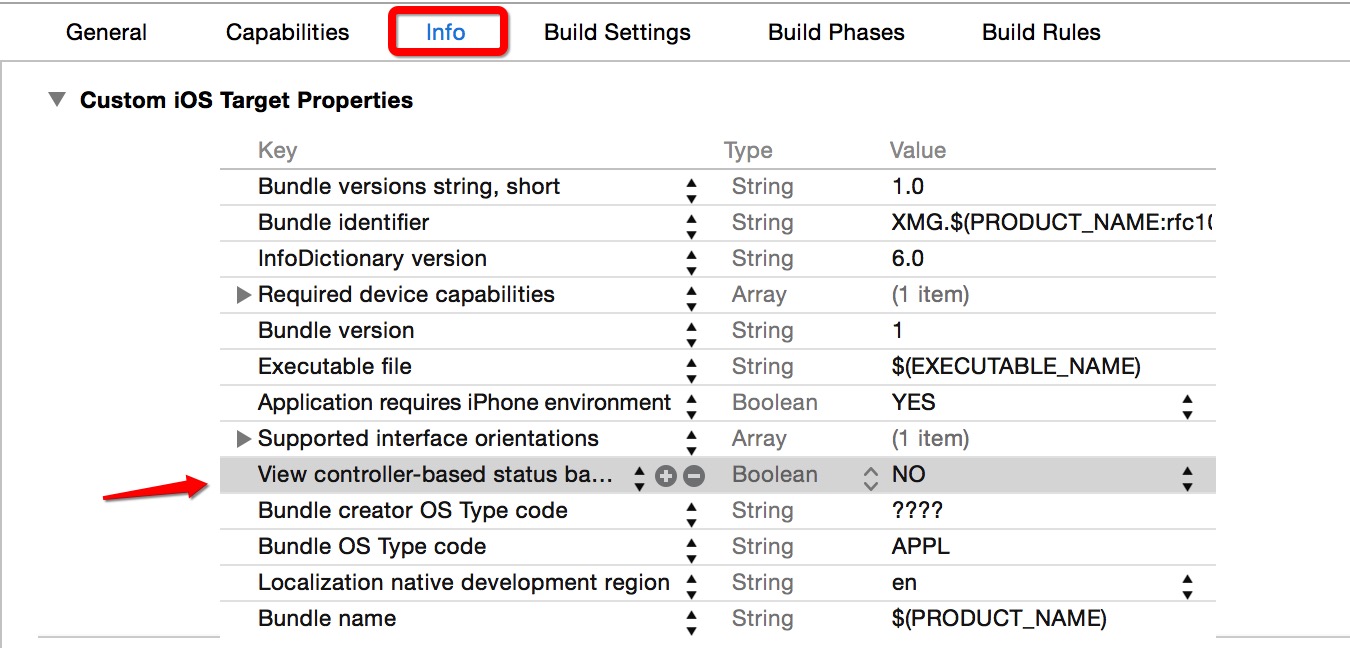
下图设置:状态栏不在基于控制器,基于UIApplication
- (void)viewDidAppear:(BOOL)animated  // 已经显示了
{
[super viewDidAppear:animated];

[UIApplication sharedApplication].statusBarStyle = UIStatusBarStyleLightContent;
}
退出后状态栏变黑
- (void)viewWillDisappear:(BOOL)animated
{
[super viewWillDisappear:animated];

[UIApplication sharedApplication].statusBarStyle = UIStatusBarStyleDefault;
}


 1394
1394

 被折叠的 条评论
为什么被折叠?
被折叠的 条评论
为什么被折叠?
 到【灌水乐园】发言


