


SpringBoot集成RabbitMQ
RabbitMQ官方提供的Java 客户端编码相对复杂,一般生产环境下我们更多会结合Spring 来使用。而Spring 的官方刚好基于RabbitMQ 提供了这样一套消息收发的模板工具SpringAMQP。并且还基于SpringBoot 对其实现了自动装配,使用起来非常方便。
SpringAmqp的官方地址:Spring AMQP
SpringAMQP提供了三个功能:
- 自动声明队列、交换机及其绑定关系
- 基于注解的监听器模式,异步接收消息
- 封装了
RabbitTemplate工具,用于发送消息
一、搭建springBoot项目
包括三部分:
mq-demo:父工程,管理项目依赖publisher:消息的发送者consumer:消息的消费者
在 mq-demo 这个父工程中,已经配置好了 SpringAMQP 相关的依赖:
<?xml version="1.0" encoding="UTF-8"?>
<project xmlns="http://maven.apache.org/POM/4.0.0"
         xmlns:xsi="http://www.w3.org/2001/XMLSchema-instance"
         xsi:schemaLocation="http://maven.apache.org/POM/4.0.0 http://maven.apache.org/xsd/maven-4.0.0.xsd">
    <modelVersion>4.0.0</modelVersion>

    <groupId>cn.itcast.demo</groupId>
    <artifactId>mq-demo</artifactId>
    <version>1.0-SNAPSHOT</version>
    <modules>
        <module>publisher</module>
        <module>consumer</module>
    </modules>
    <packaging>pom</packaging>

    <parent>
        <groupId>org.springframework.boot</groupId>
        <artifactId>spring-boot-starter-parent</artifactId>
        <version>2.7.12</version>
        <relativePath/>
    </parent>

    <properties>
        <maven.compiler.source>8</maven.compiler.source>
        <maven.compiler.target>8</maven.compiler.target>
    </properties>

    <dependencies>
        <dependency>
            <groupId>org.projectlombok</groupId>
            <artifactId>lombok</artifactId>
        </dependency>
        <!--AMQP依赖,包含RabbitMQ-->
        <dependency>
            <groupId>org.springframework.boot</groupId>
            <artifactId>spring-boot-starter-amqp</artifactId>
        </dependency>
        <!--单元测试-->
        <dependency>
            <groupId>org.springframework.boot</groupId>
            <artifactId>spring-boot-starter-test</artifactId>
        </dependency>
    </dependencies>
</project>
二、消息发送
首先配置MQ 地址,在publisher 服务的application.yml 中添加配置:
spring:
  rabbitmq:
    host: 192.168.137.120
    port: 5672
    username: admin
    password: 123456
    virtual-host: /
    connection-timeout: 600000
然后在publisher 服务中编写测试类SpringAmqpTest,并利用RabbitTemplate 实现消息发送:
package com.itheima.publisher;

import org.junit.jupiter.api.Test;
import org.springframework.amqp.rabbit.core.RabbitTemplate;
import org.springframework.beans.factory.annotation.Autowired;
import org.springframework.boot.test.context.SpringBootTest;

/**
 * @author db
 * @version 1.0
 * @description SpringAmqpTest
 * @since 2023/11/29
 */
@SpringBootTest
public class SpringAmqpTest {

    @Autowired
    private RabbitTemplate rabbitTemplate;

    @Test
    public void testSimpleQueue() {
        // 队列名称
        String queueName = "simple.queue";
        // 消息
        String message = "hello, spring amqp!";
        // 发送消息
        rabbitTemplate.convertAndSend(queueName, message);
    }
}
启动生成者程序,测试是否能连接上MQ

注意:如果之前MQ 管理界面没有此队列,生成者程序启动成功之后,MQ 管理界面就不会显示创建的队列,主要是因为此时没有消费者,所以生成者不会产生队列。
三、消息接收
首先配置MQ 地址,在consumer 服务的application.yml 中添加配置:
spring:
  rabbitmq:
    host: 192.168.137.120
    port: 5672
    username: admin
    password: 123456
    virtual-host: /
    connection-timeout: 600000
然后在consumer 服务的com.itheima.consumer.listener 包中新建一个类SpringRabbitListener, 代码如下:
package com.itheima.consumer.listener;

import org.springframework.amqp.rabbit.annotation.Queue;
import org.springframework.amqp.rabbit.annotation.RabbitListener;
import org.springframework.stereotype.Component;

/**
 * @author db
 * @version 1.0
 * @description SpringRabbitListener
 * @since 2023/11/29
 */

@Component
public class SpringRabbitListener {
    // 利用RabbitListener来声明要监听的队列信息
    // 将来一旦监听的队列中有了消息,就会推送给当前服务,调用当前方法,处理消息。
    // 可以看到方法体中接收的就是消息体的内容
    @RabbitListener(queuesToDeclare = @Queue(value = "simple.queue"))
    public void listenSimpleQueueMessage(String msg) throws InterruptedException {
        System.out.println("spring 消费者接收到消息:【" + msg + "】");
    }
}
@RabbitListener 参数queuesToDeclare 表示如果此队列不存在,就会新建此队列。
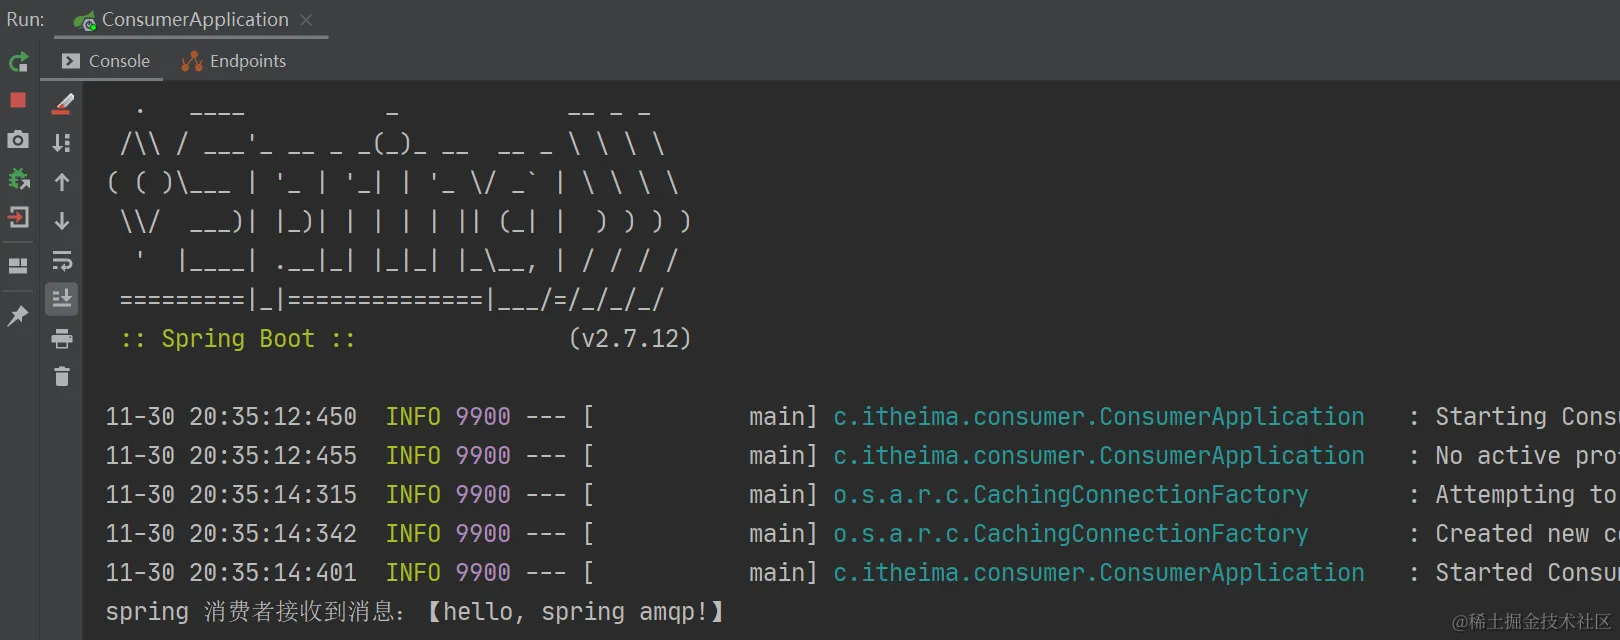
四、测试
启动consumer 服务,然后在publisher 服务中运行测试代码,发送MQ 消息。最终consumer 收到消息:
问题解决
SpringBoot 连接RabbitMQ 时一直显示Socket Closed 或者An unexpected connection driver error occured,但是能正常访问Web管理台解决办法:网上查了好久才解决,我是因为修改过虚拟机的主机名导致的,
具体解决办法参考下面链接。
https://blog.csdn.net/weixin_44398687/article/details/115906743
五、work模型
让多个消费者绑定到一个队列,共同消费队列中的消息。
5.1、消息发送
这次循环发送,模拟大量消息堆积现象。在publisher 服务中的SpringAmqpTest 类中添加一个测试方法:
package com.itheima.publisher;

import org.junit.jupiter.api.Test;
import org.springframework.amqp.rabbit.core.RabbitTemplate;
import org.springframework.beans.factory.annotation.Autowired;
import org.springframework.boot.test.context.SpringBootTest;

/**
 * @author db
 * @version 1.0
 * @description SpringAmqpTest
 * @since 2023/11/29
 */
@SpringBootTest
public class SpringAmqpTest {

    @Autowired
    private RabbitTemplate rabbitTemplate;

    @Test
    public void testWorkQueue() {
        for(int i= 0;i<20;i++){
            // 队列名称
            String queueName = "work.queue";
            // 消息
            String message = "hello, work.queue!";
            // 发送消息
            rabbitTemplate.convertAndSend(queueName, message + i);
        }

    }
}
5.2、消息接收
要模拟多个消费者绑定同一个队列,我们在consumer服务的SpringRabbitListener 中添加2个新的方法:
package com.itheima.consumer.listener;

import org.springframework.amqp.rabbit.annotation.Queue;
import org.springframework.amqp.rabbit.annotation.RabbitListener;
import org.springframework.stereotype.Component;

/**
 * @author db
 * @version 1.0
 * @description SpringRabbitListener
 * @since 2023/11/29
 */

@Component
public class SpringRabbitListener {

    @RabbitListener(queuesToDeclare = @Queue(value = "work.queue"))
    public void listenWorkQueueMessage1(String msg) throws InterruptedException {
        System.out.println("消费者1接收到消息:【" + msg + "】");
    }

    @RabbitListener(queuesToDeclare = @Queue(value = "work.queue"))
    public void listenWorkQueueMessage2(String msg) throws InterruptedException {
        System.out.println("消费者2接收到消息:【" + msg + "】");
    }
}
5.3、测试
启动ConsumerApplication 后,在执行publisher 服务中刚刚编写的发送测试方法testWorkQueue。最终结果如下:
    D:\environment\jdk8\bin\java.exe -XX:TieredStopAtLevel=1 -noverify -Dspring.output.ansi.enabled=always -Dcom.sun.management.jmxremote -Dspring.jmx.enabled=true -Dspring.liveBeansView.mbeanDomain -Dspring.application.admin.enabled=true "-javaagent:D:\software\Idea2020\IntelliJ IDEA 2020.1.4\lib\idea_rt.jar=59895:D:\software\Idea2020\IntelliJ IDEA 2020.1.4\bin" -Dfile.encoding=UTF-8 -classpath D:\environment\jdk8\jre\lib\charsets.jar;D:\environment\jdk8\jre\lib\deploy.jar;D:\environment\jdk8\jre\lib\ext\access-bridge-64.jar;D:\environment\jdk8\jre\lib\ext\cldrdata.jar;D:\environment\jdk8\jre\lib\ext\dnsns.jar;D:\environment\jdk8\jre\lib\ext\jaccess.jar;D:\environment\jdk8\jre\lib\ext\jfxrt.jar;D:\environment\jdk8\jre\lib\ext\localedata.jar;D:\environment\jdk8\jre\lib\ext\nashorn.jar;D:\environment\jdk8\jre\lib\ext\sunec.jar;D:\environment\jdk8\jre\lib\ext\sunjce_provider.jar;D:\environment\jdk8\jre\lib\ext\sunmscapi.jar;D:\environment\jdk8\jre\lib\ext\sunpkcs11.jar;D:\environment\jdk8\jre\lib\ext\zipfs.jar;D:\environment\jdk8\jre\lib\javaws.jar;D:\environment\jdk8\jre\lib\jce.jar;D:\environment\jdk8\jre\lib\jfr.jar;D:\environment\jdk8\jre\lib\jfxswt.jar;D:\environment\jdk8\jre\lib\jsse.jar;D:\environment\jdk8\jre\lib\management-agent.jar;D:\environment\jdk8\jre\lib\plugin.jar;D:\environment\jdk8\jre\lib\resources.jar;D:\environment\jdk8\jre\lib\rt.jar;D:\project\lxproject\practice-code\mq-demo\consumer\target\classes;D:\environment\maven-repository\org\projectlombok\lombok\1.18.26\lombok-1.18.26.jar;D:\environment\maven-repository\org\springframework\boot\spring-boot-starter-amqp\2.7.12\spring-boot-starter-amqp-2.7.12.jar;D:\environment\maven-repository\org\springframework\boot\spring-boot-starter\2.7.12\spring-boot-starter-2.7.12.jar;D:\environment\maven-repository\org\springframework\boot\spring-boot\2.7.12\spring-boot-2.7.12.jar;D:\environment\maven-repository\org\springframework\boot\spring-boot-autoconfigure\2.7.12\spring-boot-autoconfigure-2.7.12.jar;D:\environment\maven-repository\org\springframework\boot\spring-boot-starter-logging\2.7.12\spring-boot-starter-logging-2.7.12.jar;D:\environment\maven-repository\ch\qos\logback\logback-classic\1.2.12\logback-classic-1.2.12.jar;D:\environment\maven-repository\ch\qos\logback\logback-core\1.2.12\logback-core-1.2.12.jar;D:\environment\maven-repository\org\apache\logging\log4j\log4j-to-slf4j\2.17.2\log4j-to-slf4j-2.17.2.jar;D:\environment\maven-repository\org\apache\logging\log4j\log4j-api\2.17.2\log4j-api-2.17.2.jar;D:\environment\maven-repository\org\slf4j\jul-to-slf4j\1.7.36\jul-to-slf4j-1.7.36.jar;D:\environment\maven-repository\jakarta\annotation\jakarta.annotation-api\1.3.5\jakarta.annotation-api-1.3.5.jar;D:\environment\maven-repository\org\yaml\snakeyaml\1.30\snakeyaml-1.30.jar;D:\environment\maven-repository\org\springframework\spring-messaging\5.3.27\spring-messaging-5.3.27.jar;D:\environment\maven-repository\org\springframework\spring-beans\5.3.27\spring-beans-5.3.27.jar;D:\environment\maven-repository\org\springframework\amqp\spring-rabbit\2.4.12\spring-rabbit-2.4.12.jar;D:\environment\maven-repository\org\springframework\amqp\spring-amqp\2.4.12\spring-amqp-2.4.12.jar;D:\environment\maven-repository\org\springframework\retry\spring-retry\1.3.4\spring-retry-1.3.4.jar;D:\environment\maven-repository\com\rabbitmq\amqp-client\5.14.2\amqp-client-5.14.2.jar;D:\environment\maven-repository\org\springframework\spring-context\5.3.27\spring-context-5.3.27.jar;D:\environment\maven-repository\org\springframework\spring-aop\5.3.27\spring-aop-5.3.27.jar;D:\environment\maven-repository\org\springframework\spring-expression\5.3.27\spring-expression-5.3.27.jar;D:\environment\maven-repository\org\springframework\spring-tx\5.3.27\spring-tx-5.3.27.jar;D:\environment\maven-repository\org\springframework\boot\spring-boot-starter-test\2.7.12\spring-boot-starter-test-2.7.12.jar;D:\environment\maven-repository\org\springframework\boot\spring-boot-test\2.7.12\spring-boot-test-2.7.12.jar;D:\environment\maven-repository\org\springframework\boot\spring-boot-test-autoconfigure\2.7.12\spring-boot-test-autoconfigure-2.7.12.jar;D:\environment\maven-repository\com\jayway\jsonpath\json-path\2.7.0\json-path-2.7.0.jar;D:\environment\maven-repository\net\minidev\json-smart\2.4.11\json-smart-2.4.11.jar;D:\environment\maven-repository\net\minidev\accessors-smart\2.4.11\accessors-smart-2.4.11.jar;D:\environment\maven-repository\org\ow2\asm\asm\9.3\asm-9.3.jar;D:\environment\maven-repository\org\slf4j\slf4j-api\1.7.36\slf4j-api-1.7.36.jar;D:\environment\maven-repository\jakarta\xml\bind\jakarta.xml.bind-api\2.3.3\jakarta.xml.bind-api-2.3.3.jar;D:\environment\maven-repository\jakarta\activation\jakarta.activation-api\1.2.2\jakarta.activation-api-1.2.2.jar;D:\environment\maven-repository\org\assertj\assertj-core\3.22.0\assertj-core-3.22.0.jar;D:\environment\maven-repository\org\hamcrest\hamcrest\2.2\hamcrest-2.2.jar;D:\environment\maven-repository\org\junit\jupiter\junit-jupiter\5.8.2\junit-jupiter-5.8.2.jar;D:\environment\maven-repository\org\junit\jupiter\junit-jupiter-api\5.8.2\junit-jupiter-api-5.8.2.jar;D:\environment\maven-repository\org\opentest4j\opentest4j\1.2.0\opentest4j-1.2.0.jar;D:\environment\maven-repository\org\junit\platform\junit-platform-commons\1.8.2\junit-platform-commons-1.8.2.jar;D:\environment\maven-repository\org\apiguardian\apiguardian-api\1.1.2\apiguardian-api-1.1.2.jar;D:\environment\maven-repository\org\junit\jupiter\junit-jupiter-params\5.8.2\junit-jupiter-params-5.8.2.jar;D:\environment\maven-repository\org\junit\jupiter\junit-jupiter-engine\5.8.2\junit-jupiter-engine-5.8.2.jar;D:\environment\maven-repository\org\junit\platform\junit-platform-engine\1.8.2\junit-platform-engine-1.8.2.jar;D:\environment\maven-repository\org\mockito\mockito-core\4.5.1\mockito-core-4.5.1.jar;D:\environment\maven-repository\net\bytebuddy\byte-buddy\1.12.23\byte-buddy-1.12.23.jar;D:\environment\maven-repository\net\bytebuddy\byte-buddy-agent\1.12.23\byte-buddy-agent-1.12.23.jar;D:\environment\maven-repository\org\objenesis\objenesis\3.2\objenesis-3.2.jar;D:\environment\maven-repository\org\mockito\mockito-junit-jupiter\4.5.1\mockito-junit-jupiter-4.5.1.jar;D:\environment\maven-repository\org\skyscreamer\jsonassert\1.5.1\jsonassert-1.5.1.jar;D:\environment\maven-repository\com\vaadin\external\google\android-json\0.0.20131108.vaadin1\android-json-0.0.20131108.vaadin1.jar;D:\environment\maven-repository\org\springframework\spring-core\5.3.27\spring-core-5.3.27.jar;D:\environment\maven-repository\org\springframework\spring-jcl\5.3.27\spring-jcl-5.3.27.jar;D:\environment\maven-repository\org\springframework\spring-test\5.3.27\spring-test-5.3.27.jar;D:\environment\maven-repository\org\xmlunit\xmlunit-core\2.9.1\xmlunit-core-2.9.1.jar com.itheima.consumer.ConsumerApplication

      .   ____          _            __ _ _
     /\\ / ___'_ __ _ _(_)_ __  __ _ \ \ \ \
    ( ( )\___ | '_ | '_| | '_ \/ _` | \ \ \ \
     \\/  ___)| |_)| | | | | || (_| |  ) ) ) )
      '  |____| .__|_| |_|_| |_\__, | / / / /
     =========|_|==============|___/=/_/_/_/
     :: Spring Boot ::               (v2.7.12)

    11-30 20:52:57:985  INFO 26412 --- [           main] c.itheima.consumer.ConsumerApplication   : Starting ConsumerApplication using Java 1.8.0_251 on LAPTOP-HTHCCEQH with PID 26412 (D:\project\lxproject\practice-code\mq-demo\consumer\target\classes started by duanb in D:\project\lxproject\practice-code)
    11-30 20:52:57:986  INFO 26412 --- [           main] c.itheima.consumer.ConsumerApplication   : No active profile set, falling back to 1 default profile: "default"
    11-30 20:52:58:828  INFO 26412 --- [           main] o.s.a.r.c.CachingConnectionFactory       : Attempting to connect to: [192.168.137.120:5672]
    11-30 20:52:58:847  INFO 26412 --- [           main] o.s.a.r.c.CachingConnectionFactory       : Created new connection: rabbitConnectionFactory#72a85671:0/SimpleConnection@37d80fe7 [delegate=amqp://admin@192.168.137.120:5672/, localPort= 59905]
    11-30 20:52:58:918  INFO 26412 --- [           main] c.itheima.consumer.ConsumerApplication   : Started ConsumerApplication in 1.201 seconds (JVM running for 1.982)
    消费者1接收到消息:【hello, work.queue!0】
    消费者2接收到消息:【hello, work.queue!1】
    消费者1接收到消息:【hello, work.queue!2】
    消费者2接收到消息:【hello, work.queue!3】
    消费者1接收到消息:【hello, work.queue!4】
    消费者2接收到消息:【hello, work.queue!5】
    消费者1接收到消息:【hello, work.queue!6】
    消费者2接收到消息:【hello, work.queue!7】
    消费者1接收到消息:【hello, work.queue!8】
    消费者2接收到消息:【hello, work.queue!9】
    消费者1接收到消息:【hello, work.queue!10】
    消费者2接收到消息:【hello, work.queue!11】
    消费者1接收到消息:【hello, work.queue!12】
    消费者2接收到消息:【hello, work.queue!13】
    消费者1接收到消息:【hello, work.queue!14】
    消费者2接收到消息:【hello, work.queue!15】
    消费者1接收到消息:【hello, work.queue!16】
    消费者2接收到消息:【hello, work.queue!17】
    消费者2接收到消息:【hello, work.queue!19】
    消费者1接收到消息:【hello, work.queue!18】
可以看到消费者1和消费者2竟然每人消费了10条消息,公平消费。能者多劳在Spring 中有一个简单的配置,可以解决这个问题。我们修改consumer 服务的application.yml 文件,添加配置:
logging:
  pattern:
    dateformat: MM-dd HH:mm:ss:SSS

spring:
  rabbitmq:
    host: 192.168.137.120
    port: 5672
    username: admin
    password: 123456
    virtual-host: /
    connection-timeout: 600000
    listener:
      simple:
        prefetch: 1 # 每次只能获取一条消息,处理完成才能获取下一个消息
再次测试,发现结果如下:
    D:\environment\jdk8\bin\java.exe -XX:TieredStopAtLevel=1 -noverify -Dspring.output.ansi.enabled=always -Dcom.sun.management.jmxremote -Dspring.jmx.enabled=true -Dspring.liveBeansView.mbeanDomain -Dspring.application.admin.enabled=true "-javaagent:D:\software\Idea2020\IntelliJ IDEA 2020.1.4\lib\idea_rt.jar=58943:D:\software\Idea2020\IntelliJ IDEA 2020.1.4\bin" -Dfile.encoding=UTF-8 -classpath D:\environment\jdk8\jre\lib\charsets.jar;D:\environment\jdk8\jre\lib\deploy.jar;D:\environment\jdk8\jre\lib\ext\access-bridge-64.jar;D:\environment\jdk8\jre\lib\ext\cldrdata.jar;D:\environment\jdk8\jre\lib\ext\dnsns.jar;D:\environment\jdk8\jre\lib\ext\jaccess.jar;D:\environment\jdk8\jre\lib\ext\jfxrt.jar;D:\environment\jdk8\jre\lib\ext\localedata.jar;D:\environment\jdk8\jre\lib\ext\nashorn.jar;D:\environment\jdk8\jre\lib\ext\sunec.jar;D:\environment\jdk8\jre\lib\ext\sunjce_provider.jar;D:\environment\jdk8\jre\lib\ext\sunmscapi.jar;D:\environment\jdk8\jre\lib\ext\sunpkcs11.jar;D:\environment\jdk8\jre\lib\ext\zipfs.jar;D:\environment\jdk8\jre\lib\javaws.jar;D:\environment\jdk8\jre\lib\jce.jar;D:\environment\jdk8\jre\lib\jfr.jar;D:\environment\jdk8\jre\lib\jfxswt.jar;D:\environment\jdk8\jre\lib\jsse.jar;D:\environment\jdk8\jre\lib\management-agent.jar;D:\environment\jdk8\jre\lib\plugin.jar;D:\environment\jdk8\jre\lib\resources.jar;D:\environment\jdk8\jre\lib\rt.jar;D:\project\lxproject\practice-code\mq-demo\consumer\target\classes;D:\environment\maven-repository\org\projectlombok\lombok\1.18.26\lombok-1.18.26.jar;D:\environment\maven-repository\org\springframework\boot\spring-boot-starter-amqp\2.7.12\spring-boot-starter-amqp-2.7.12.jar;D:\environment\maven-repository\org\springframework\boot\spring-boot-starter\2.7.12\spring-boot-starter-2.7.12.jar;D:\environment\maven-repository\org\springframework\boot\spring-boot\2.7.12\spring-boot-2.7.12.jar;D:\environment\maven-repository\org\springframework\boot\spring-boot-autoconfigure\2.7.12\spring-boot-autoconfigure-2.7.12.jar;D:\environment\maven-repository\org\springframework\boot\spring-boot-starter-logging\2.7.12\spring-boot-starter-logging-2.7.12.jar;D:\environment\maven-repository\ch\qos\logback\logback-classic\1.2.12\logback-classic-1.2.12.jar;D:\environment\maven-repository\ch\qos\logback\logback-core\1.2.12\logback-core-1.2.12.jar;D:\environment\maven-repository\org\apache\logging\log4j\log4j-to-slf4j\2.17.2\log4j-to-slf4j-2.17.2.jar;D:\environment\maven-repository\org\apache\logging\log4j\log4j-api\2.17.2\log4j-api-2.17.2.jar;D:\environment\maven-repository\org\slf4j\jul-to-slf4j\1.7.36\jul-to-slf4j-1.7.36.jar;D:\environment\maven-repository\jakarta\annotation\jakarta.annotation-api\1.3.5\jakarta.annotation-api-1.3.5.jar;D:\environment\maven-repository\org\yaml\snakeyaml\1.30\snakeyaml-1.30.jar;D:\environment\maven-repository\org\springframework\spring-messaging\5.3.27\spring-messaging-5.3.27.jar;D:\environment\maven-repository\org\springframework\spring-beans\5.3.27\spring-beans-5.3.27.jar;D:\environment\maven-repository\org\springframework\amqp\spring-rabbit\2.4.12\spring-rabbit-2.4.12.jar;D:\environment\maven-repository\org\springframework\amqp\spring-amqp\2.4.12\spring-amqp-2.4.12.jar;D:\environment\maven-repository\org\springframework\retry\spring-retry\1.3.4\spring-retry-1.3.4.jar;D:\environment\maven-repository\com\rabbitmq\amqp-client\5.14.2\amqp-client-5.14.2.jar;D:\environment\maven-repository\org\springframework\spring-context\5.3.27\spring-context-5.3.27.jar;D:\environment\maven-repository\org\springframework\spring-aop\5.3.27\spring-aop-5.3.27.jar;D:\environment\maven-repository\org\springframework\spring-expression\5.3.27\spring-expression-5.3.27.jar;D:\environment\maven-repository\org\springframework\spring-tx\5.3.27\spring-tx-5.3.27.jar;D:\environment\maven-repository\org\springframework\boot\spring-boot-starter-test\2.7.12\spring-boot-starter-test-2.7.12.jar;D:\environment\maven-repository\org\springframework\boot\spring-boot-test\2.7.12\spring-boot-test-2.7.12.jar;D:\environment\maven-repository\org\springframework\boot\spring-boot-test-autoconfigure\2.7.12\spring-boot-test-autoconfigure-2.7.12.jar;D:\environment\maven-repository\com\jayway\jsonpath\json-path\2.7.0\json-path-2.7.0.jar;D:\environment\maven-repository\net\minidev\json-smart\2.4.11\json-smart-2.4.11.jar;D:\environment\maven-repository\net\minidev\accessors-smart\2.4.11\accessors-smart-2.4.11.jar;D:\environment\maven-repository\org\ow2\asm\asm\9.3\asm-9.3.jar;D:\environment\maven-repository\org\slf4j\slf4j-api\1.7.36\slf4j-api-1.7.36.jar;D:\environment\maven-repository\jakarta\xml\bind\jakarta.xml.bind-api\2.3.3\jakarta.xml.bind-api-2.3.3.jar;D:\environment\maven-repository\jakarta\activation\jakarta.activation-api\1.2.2\jakarta.activation-api-1.2.2.jar;D:\environment\maven-repository\org\assertj\assertj-core\3.22.0\assertj-core-3.22.0.jar;D:\environment\maven-repository\org\hamcrest\hamcrest\2.2\hamcrest-2.2.jar;D:\environment\maven-repository\org\junit\jupiter\junit-jupiter\5.8.2\junit-jupiter-5.8.2.jar;D:\environment\maven-repository\org\junit\jupiter\junit-jupiter-api\5.8.2\junit-jupiter-api-5.8.2.jar;D:\environment\maven-repository\org\opentest4j\opentest4j\1.2.0\opentest4j-1.2.0.jar;D:\environment\maven-repository\org\junit\platform\junit-platform-commons\1.8.2\junit-platform-commons-1.8.2.jar;D:\environment\maven-repository\org\apiguardian\apiguardian-api\1.1.2\apiguardian-api-1.1.2.jar;D:\environment\maven-repository\org\junit\jupiter\junit-jupiter-params\5.8.2\junit-jupiter-params-5.8.2.jar;D:\environment\maven-repository\org\junit\jupiter\junit-jupiter-engine\5.8.2\junit-jupiter-engine-5.8.2.jar;D:\environment\maven-repository\org\junit\platform\junit-platform-engine\1.8.2\junit-platform-engine-1.8.2.jar;D:\environment\maven-repository\org\mockito\mockito-core\4.5.1\mockito-core-4.5.1.jar;D:\environment\maven-repository\net\bytebuddy\byte-buddy\1.12.23\byte-buddy-1.12.23.jar;D:\environment\maven-repository\net\bytebuddy\byte-buddy-agent\1.12.23\byte-buddy-agent-1.12.23.jar;D:\environment\maven-repository\org\objenesis\objenesis\3.2\objenesis-3.2.jar;D:\environment\maven-repository\org\mockito\mockito-junit-jupiter\4.5.1\mockito-junit-jupiter-4.5.1.jar;D:\environment\maven-repository\org\skyscreamer\jsonassert\1.5.1\jsonassert-1.5.1.jar;D:\environment\maven-repository\com\vaadin\external\google\android-json\0.0.20131108.vaadin1\android-json-0.0.20131108.vaadin1.jar;D:\environment\maven-repository\org\springframework\spring-core\5.3.27\spring-core-5.3.27.jar;D:\environment\maven-repository\org\springframework\spring-jcl\5.3.27\spring-jcl-5.3.27.jar;D:\environment\maven-repository\org\springframework\spring-test\5.3.27\spring-test-5.3.27.jar;D:\environment\maven-repository\org\xmlunit\xmlunit-core\2.9.1\xmlunit-core-2.9.1.jar com.itheima.consumer.ConsumerApplication

      .   ____          _            __ _ _
     /\\ / ___'_ __ _ _(_)_ __  __ _ \ \ \ \
    ( ( )\___ | '_ | '_| | '_ \/ _` | \ \ \ \
     \\/  ___)| |_)| | | | | || (_| |  ) ) ) )
      '  |____| .__|_| |_|_| |_\__, | / / / /
     =========|_|==============|___/=/_/_/_/
     :: Spring Boot ::               (v2.7.12)

    11-30 21:07:54:422  INFO 488 --- [           main] c.itheima.consumer.ConsumerApplication   : Starting ConsumerApplication using Java 1.8.0_251 on LAPTOP-HTHCCEQH with PID 488 (D:\project\lxproject\practice-code\mq-demo\consumer\target\classes started by duanb in D:\project\lxproject\practice-code)
    11-30 21:07:54:424  INFO 488 --- [           main] c.itheima.consumer.ConsumerApplication   : No active profile set, falling back to 1 default profile: "default"
    11-30 21:07:55:322  INFO 488 --- [           main] o.s.a.r.c.CachingConnectionFactory       : Attempting to connect to: [192.168.137.120:5672]
    11-30 21:07:55:341  INFO 488 --- [           main] o.s.a.r.c.CachingConnectionFactory       : Created new connection: rabbitConnectionFactory#297ea53a:0/SimpleConnection@1a15b789 [delegate=amqp://admin@192.168.137.120:5672/, localPort= 58952]
    11-30 21:07:55:401  INFO 488 --- [           main] c.itheima.consumer.ConsumerApplication   : Started ConsumerApplication in 1.257 seconds (JVM running for 2.047)
    消费者1接收到消息:【hello, work.queue!0】
    消费者2接收到消息.............:【hello, work.queue!1】
    消费者2接收到消息.............:【hello, work.queue!2】
    消费者2接收到消息.............:【hello, work.queue!3】
    消费者2接收到消息.............:【hello, work.queue!4】
    消费者2接收到消息.............:【hello, work.queue!5】
    消费者2接收到消息.............:【hello, work.queue!6】
    消费者2接收到消息.............:【hello, work.queue!7】
    消费者2接收到消息.............:【hello, work.queue!8】
    消费者1接收到消息:【hello, work.queue!9】
    消费者2接收到消息.............:【hello, work.queue!10】
    消费者2接收到消息.............:【hello, work.queue!11】
    消费者2接收到消息.............:【hello, work.queue!12】
    消费者2接收到消息.............:【hello, work.queue!13】
    消费者2接收到消息.............:【hello, work.queue!14】
    消费者1接收到消息:【hello, work.queue!15】
    消费者2接收到消息.............:【hello, work.queue!16】
    消费者2接收到消息.............:【hello, work.queue!17】
    消费者2接收到消息.............:【hello, work.queue!18】
    消费者2接收到消息.............:【hello, work.queue!19】
能者多劳,这样充分利用每一个消费者的处理能力,可以有效避免消息积压问题。
六、fanout模型
广播,将消息交给所有绑定到交换机的队列。
6.1、消息发送
在publisher 服务的SpringAmqpTes 类中添加测试方法:
package com.itheima.publisher;

import org.junit.jupiter.api.Test;
import org.springframework.amqp.rabbit.core.RabbitTemplate;
import org.springframework.beans.factory.annotation.Autowired;
import org.springframework.boot.test.context.SpringBootTest;

/**
 * @author db
 * @version 1.0
 * @description SpringAmqpTest
 * @since 2023/11/29
 */
@SpringBootTest
public class SpringAmqpTest {

    @Autowired
    private RabbitTemplate rabbitTemplate;
    @Test
    public void testFanoutQueue() {
        // 队列名称
        String exchangeName = "logs";
        // 消息
        String message = "hello, fanout!";
        // 发送消息 参数1:交换机名称 参数2:路由key 参数3:消息
        rabbitTemplate.convertAndSend(exchangeName, "",message);


    }
}
6.2、消息接收
在consumer服务的SpringRabbitListener 中添加两个方法,作为消费者:
@RabbitListener(bindings = @QueueBinding(value = @Queue, // 创建临时队列
                                         exchange = @Exchange(name="logs",type="fanout")  // 绑定交换机
                                        ))
public void listenFanoutQueueMessage1(String msg) throws InterruptedException {
    System.out.println("消费者1接收到消息:【" + msg + "】");
}

@RabbitListener(bindings = @QueueBinding(value = @Queue, // 创建临时队列
                                         exchange = @Exchange(name="logs",type="fanout")  // 绑定交换机
                                        ))
public void listenFanoutQueueMessage2(String msg) throws InterruptedException {
    System.out.println("消费者2接收到消息。。。。:【" + msg + "】");
}
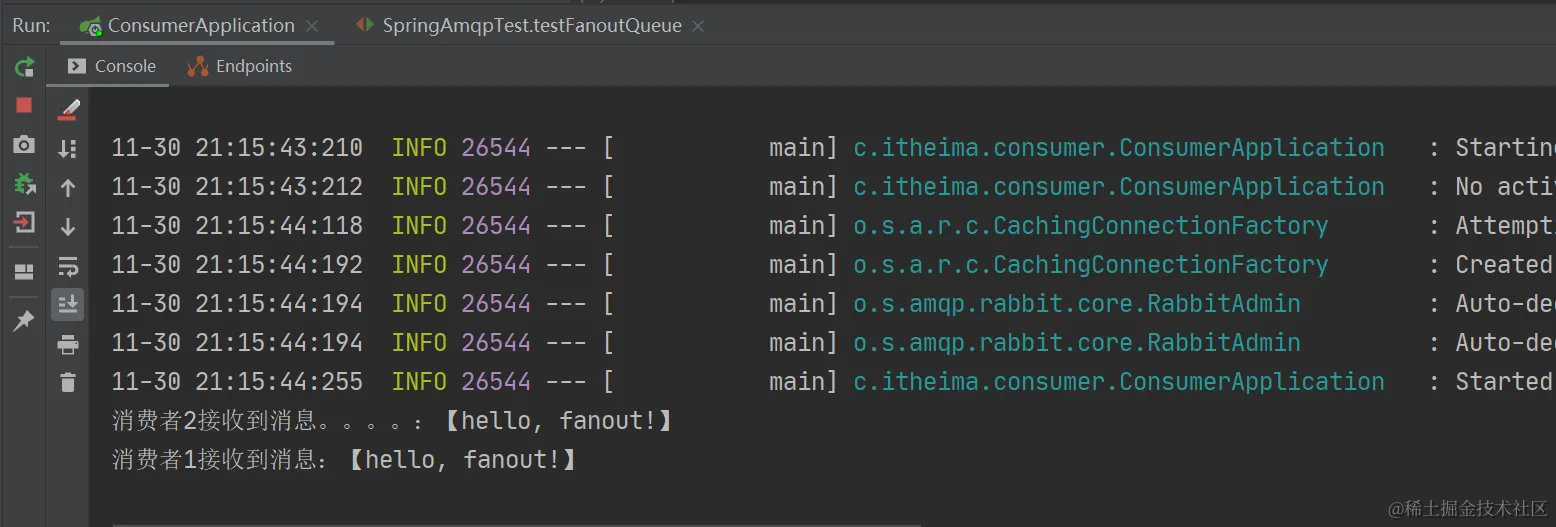
6.3、测试
七、Direct
在某些场景下,我们希望不同的消息被不同的队列消费。这时就要用到Direct 类型的Exchange。
7.1、消息发送
在publisher 服务的SpringAmqpTest 类中添加测试方法:
package com.itheima.publisher;

import org.junit.jupiter.api.Test;
import org.springframework.amqp.rabbit.core.RabbitTemplate;
import org.springframework.beans.factory.annotation.Autowired;
import org.springframework.boot.test.context.SpringBootTest;

/**
 * @author db
 * @version 1.0
 * @description SpringAmqpTest
 * @since 2023/11/29
 */
@SpringBootTest
public class SpringAmqpTest {

    @Autowired
    private RabbitTemplate rabbitTemplate;

    @Test
    public void testDirectQueue() {
        // 队列名称
        String exchangeName = "logs";
        // 消息
        String message = "hello, fanout!";
        // 发送消息 参数1:交换机名称 参数2:路由key 参数3:消息
        rabbitTemplate.convertAndSend(exchangeName, "error",message);

    }
}
7.2、消息接收
在consumer 服务的SpringRabbitListener 中添加方法:
package com.itheima.consumer.listener;

import org.springframework.amqp.rabbit.annotation.Exchange;
import org.springframework.amqp.rabbit.annotation.Queue;
import org.springframework.amqp.rabbit.annotation.QueueBinding;
import org.springframework.amqp.rabbit.annotation.RabbitListener;
import org.springframework.stereotype.Component;

/**
 * @author db
 * @version 1.0
 * @description SpringRabbitListener
 * @since 2023/11/29
 */

@Component
public class SpringRabbitListener {

    @RabbitListener(bindings = @QueueBinding(value = @Queue, // 创建临时队列
            key = {"info","error"},  //路由key
            exchange = @Exchange(name="logs",type="direct")  // 绑定交换机
    ))
    public void listenDirectQueueMessage1(String msg) throws InterruptedException {
        System.out.println("消费者1接收到消息:【" + msg + "】");
    }

    @RabbitListener(bindings = @QueueBinding(value = @Queue, // 创建临时队列
            key = {"error"},  //路由key
            exchange = @Exchange(name="logs",type="direct")  // 绑定交换机
    ))
    public void listenDirectQueueMessage2(String msg) throws InterruptedException {
        System.out.println("消费者2接收到消息。。。。:【" + msg + "】");
    }

}
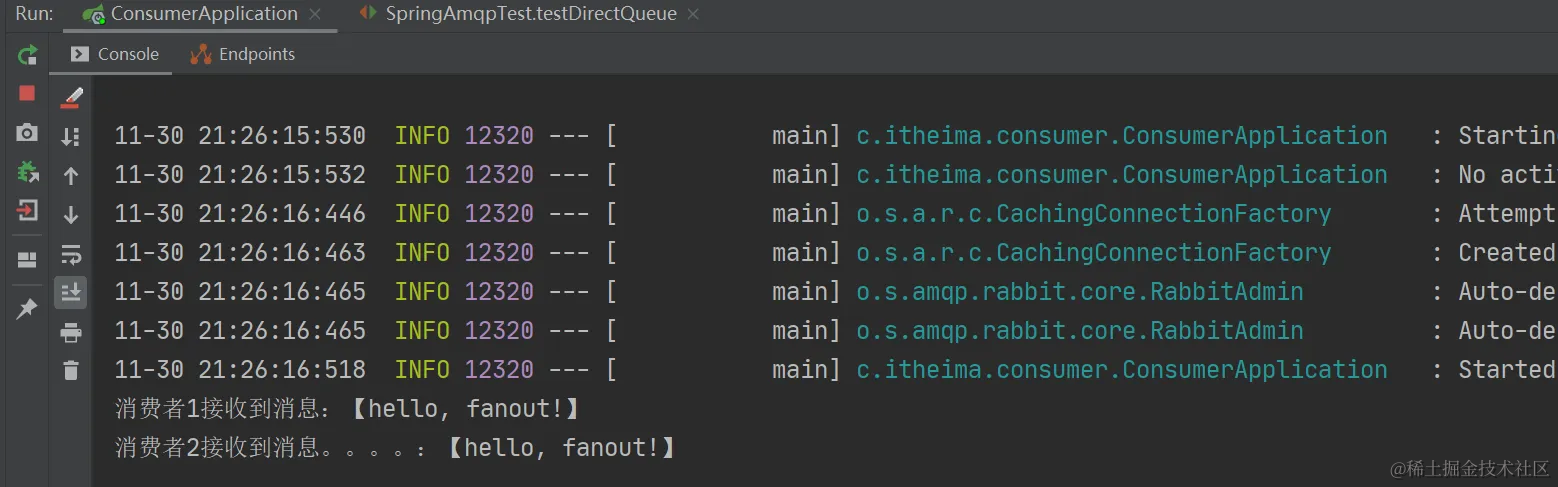
7.3、测试
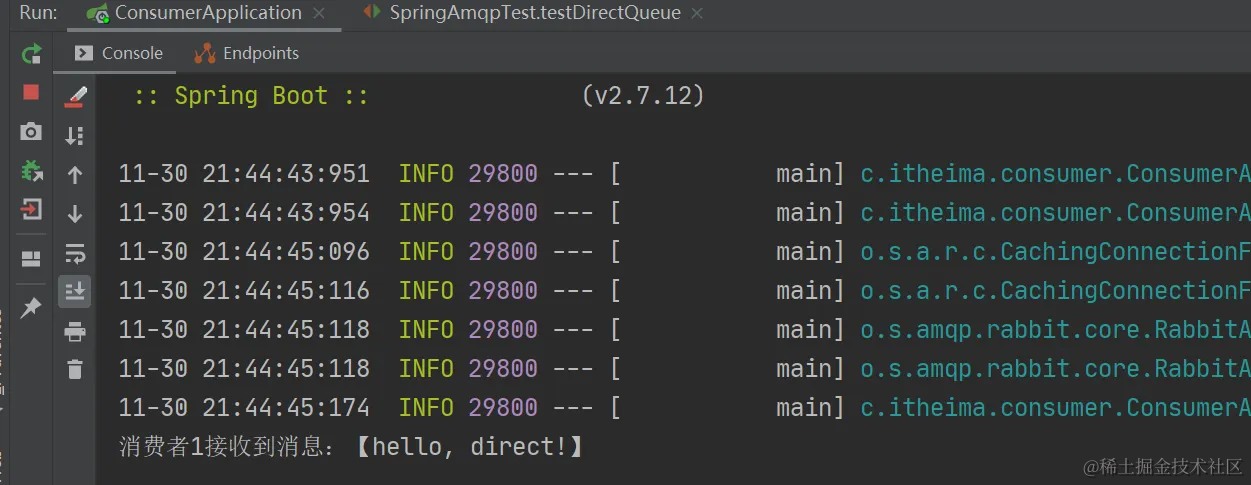
由于使用的error 这个key,所以两个消费者都收到了消息:
修改生成者的路由key,修改为info,查看测试结果。
八、topic交换机
8.1、消息发送
在publisher服务的SpringAmqpTest 类中添加测试方法:
package com.itheima.publisher;

import org.junit.jupiter.api.Test;
import org.springframework.amqp.rabbit.core.RabbitTemplate;
import org.springframework.beans.factory.annotation.Autowired;
import org.springframework.boot.test.context.SpringBootTest;

/**
 * @author db
 * @version 1.0
 * @description SpringAmqpTest
 * @since 2023/11/29
 */
@SpringBootTest
public class SpringAmqpTest {

    @Autowired
    private RabbitTemplate rabbitTemplate;
    @Test
    public void testTopicQueue() {
        // 队列名称
        String exchangeName = "topics";
        // 发送消息 参数1:交换机名称 参数2:路由key 参数3:消息
        rabbitTemplate.convertAndSend(exchangeName, "user.save.findAll","user.save.findAll的消息");


    }
}
8.2、消息接收
在consumer 服务的SpringRabbitListener 中添加方法:
package com.itheima.consumer.listener;

import org.springframework.amqp.rabbit.annotation.Exchange;
import org.springframework.amqp.rabbit.annotation.Queue;
import org.springframework.amqp.rabbit.annotation.QueueBinding;
import org.springframework.amqp.rabbit.annotation.RabbitListener;
import org.springframework.stereotype.Component;

/**
 * @author db
 * @version 1.0
 * @description SpringRabbitListener
 * @since 2023/11/29
 */

@Component
public class SpringRabbitListener {
    @RabbitListener(bindings = @QueueBinding(value = @Queue, // 创建临时队列
            key = {"user.*"},  //路由key
            exchange = @Exchange(name="topics",type="topic")  // 绑定交换机
    ))
    public void listenTopicQueueMessage1(String msg) throws InterruptedException {
        System.out.println("消费者1接收到消息:【" + msg + "】");
    }

    @RabbitListener(bindings = @QueueBinding(value = @Queue, // 创建临时队列
            key = {"user.#"},  //路由key
            exchange = @Exchange(name="topics",type="topic")  // 绑定交换机
    ))
    public void listenTopicQueueMessage2(String msg) throws InterruptedException {
        System.out.println("消费者2接收到消息:【" + msg + "】");
    }

}
8.3、测试
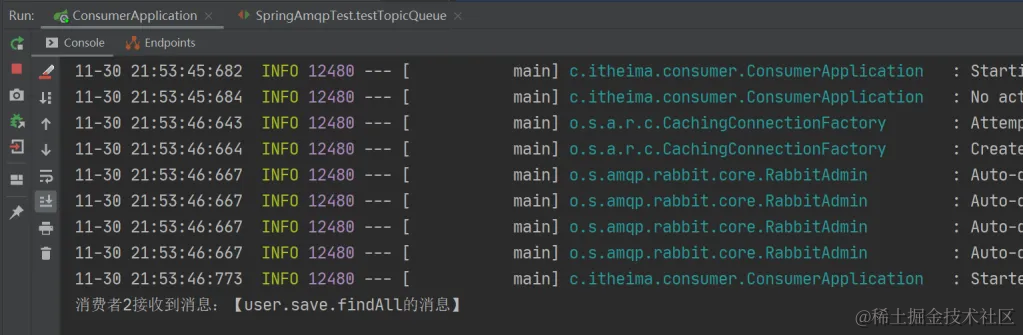
九、测试默认转换器
9.1、创建测试队列
首先,在consumer服务中声明一个新的配置类。
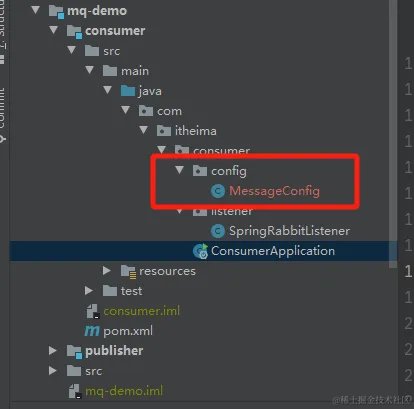
在config包下,创建一个队列。
package com.itheima.consumer.config;

import org.springframework.amqp.core.Queue;
import org.springframework.context.annotation.Bean;
import org.springframework.context.annotation.Configuration;


/**
 * @author db
 * @version 1.0
 * @description MessageConfig
 * @since 2023/12/5
 */
@Configuration
public class MessageConfig {

    @Bean
    public Queue objectQueue(){
        return new Queue("object.queue");
    }
}
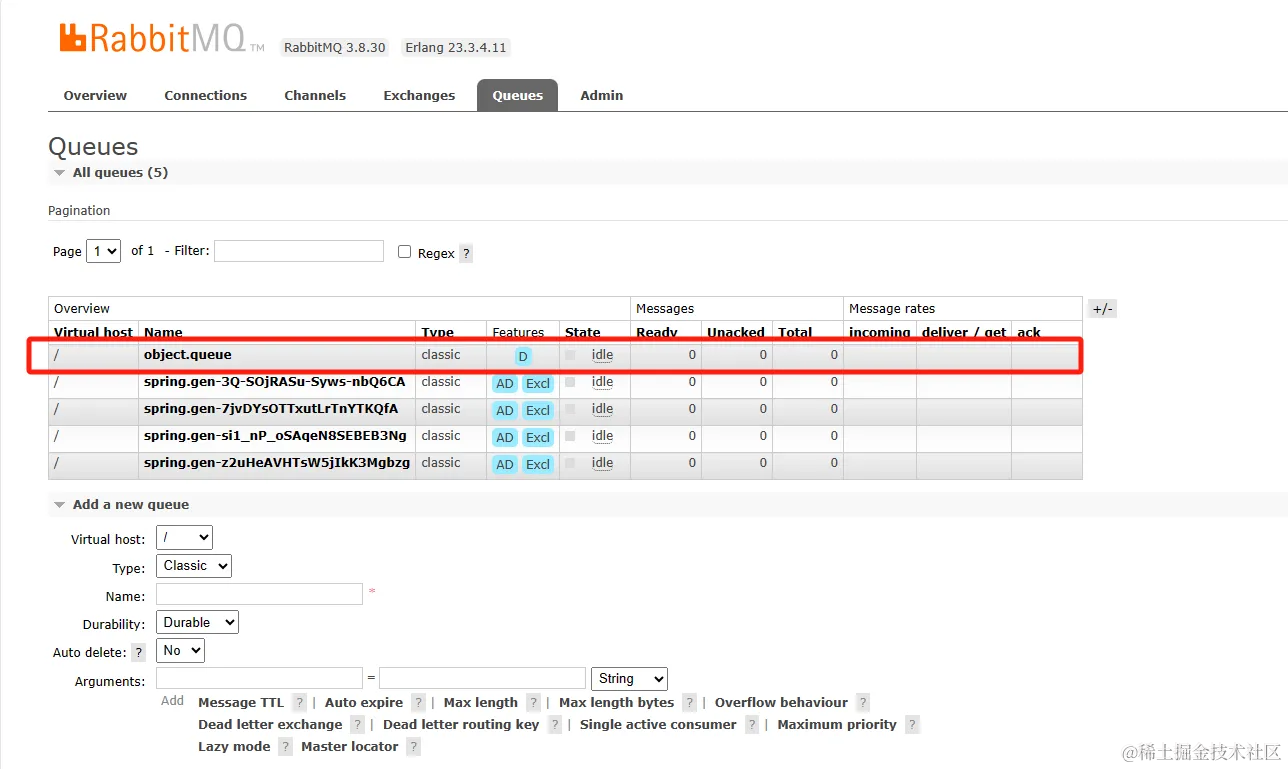
重启consumer服务以后,该队列就会被自动创建出来了。
9.2、发送消息
在publisher 模块的SpringAmqpTest 中新增一个消息发送的代码。发送一个map消息。
package com.itheima.publisher;

import org.junit.jupiter.api.Test;
import org.springframework.amqp.rabbit.core.RabbitTemplate;
import org.springframework.beans.factory.annotation.Autowired;
import org.springframework.boot.test.context.SpringBootTest;

import java.util.HashMap;
import java.util.Map;

/**
 * @author db
 * @version 1.0
 * @description SpringAmqpTest
 * @since 2023/11/29
 */
@SpringBootTest
public class SpringAmqpTest {

    @Autowired
    private RabbitTemplate rabbitTemplate;

    @Test
    public void testObjectQueue() {
        Map<String, Object> map = new HashMap<>();
        map.put("name","rabbitMq");
        map.put("version","3.8.30");
        rabbitTemplate.convertAndSend("object.queue",map);

    }
}
查看控制台
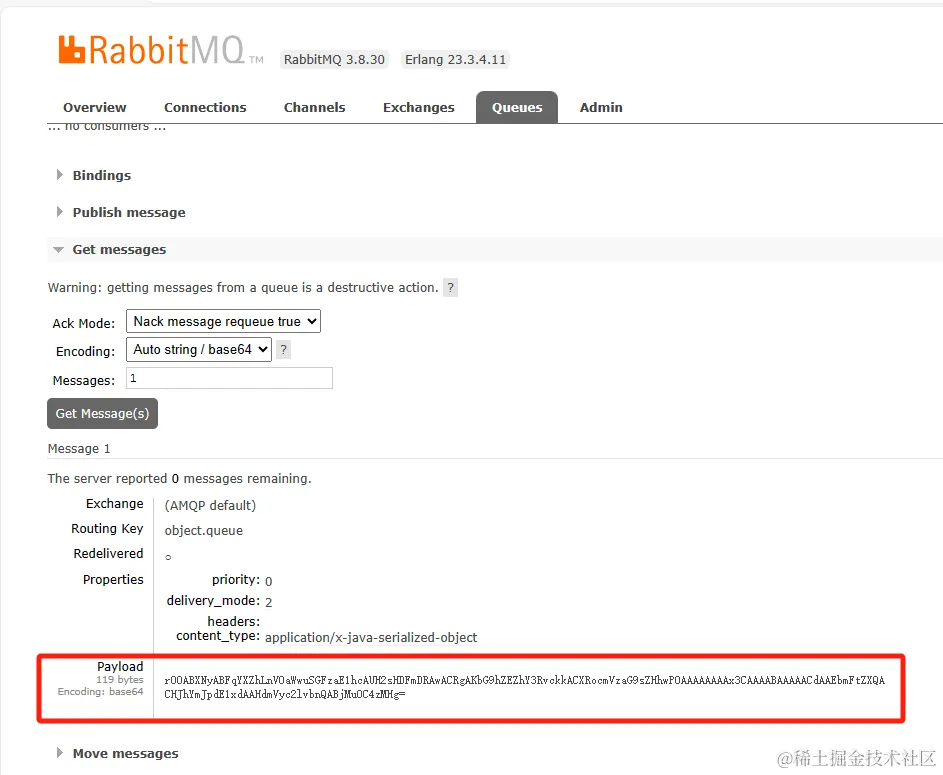
可以看到结果不是读取出来。
十、配置JSON 转换器
查看源码,发现rabbitMQ默认使用的是JDK序列化方式,由于JDK序列化的消息可读性差、消息太大等问题,所以要改变它的消息转换器,建议采用JSON序列化替代默认的JDK序列化。
在父工程的pom 中引入jackson 依赖,这样子工程就可以继承父工程的依赖。
<dependency>
  <groupId>com.fasterxml.jackson.core</groupId>
  <artifactId>jackson-databind</artifactId>
  <version>2.10.3</version>
</dependency>
注意,如果项目中引入了 spring-boot-starter-web 依赖, 则无需再次引入Jackson依赖。
配置消息转换器,在 publisher 和 consumer 两个服务的配置包中, 新建rabbitmq 配置类,添加一个Bean 即可。
package com.itheima.publisher.config;

import org.springframework.amqp.support.converter.Jackson2JsonMessageConverter;
import org.springframework.amqp.support.converter.MessageConverter;
import org.springframework.context.annotation.Bean;
import org.springframework.context.annotation.Configuration;

/**
 * @author db
 * @version 1.0
 * @description RabbitmqMessageConfig
 * @since 2023/12/5
 */
@Configuration
public class RabbitmqMessageConfig {

    @Bean
    public MessageConverter messageConverter(){
        return new Jackson2JsonMessageConverter();
    }
}
执行刚才的消息发送的代码,到MQ的控制台查看消息结构:
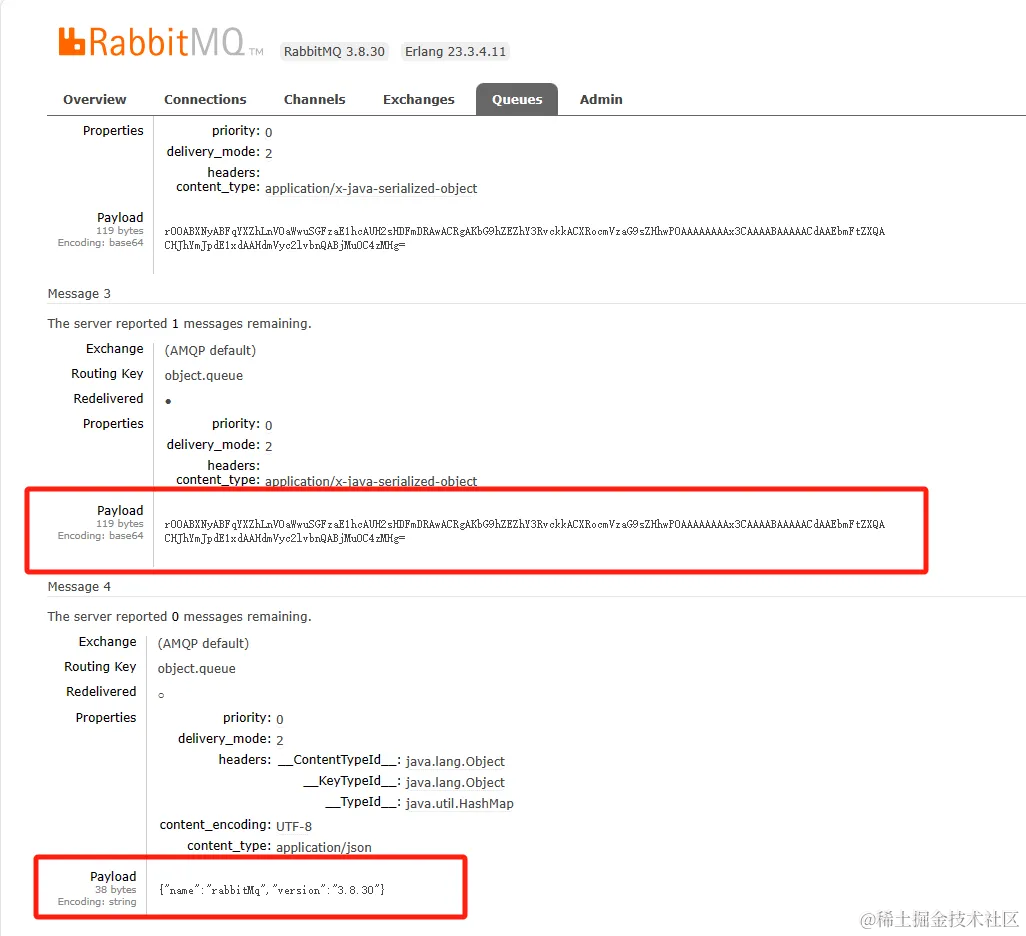
消费者接收Object
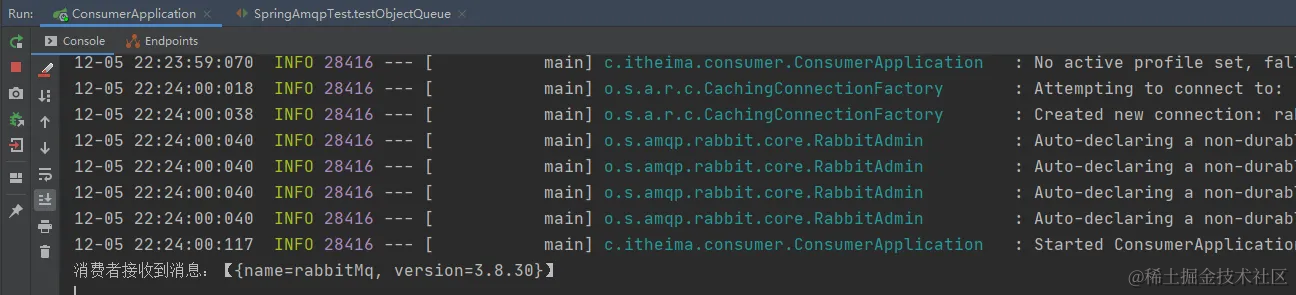
在consumer 中新建一个新的消费者,接受Map 格式的消息。
@RabbitListener(queues = "object.queue")
public void listenObjectMessage(Map<String,Object> msg) throws InterruptedException {
    System.out.println("消费者接收到消息:【" + msg + "】");
}
代码地址:https://gitee.com/duan138/practice-code/tree/master/rabbitmq-java
十一、总结
通过以上配置即可在SpringBoot中初步集成RabbitMQ,并且改变消息转换器设置,使得消息更简洁易读,但是这只是简单的消息发送和接收,不能保证生成端发送的消息消费端一定能接收到,后续我们继续学习消息的可靠性投递等知识。
参考:https://www.bilibili.com/video/BV1mN4y1Z7t9
改变你能改变的,接受你不能改变的,关注公众号:程序员康康,一起成长,共同进步。


 49万+
49万+

 被折叠的 条评论
为什么被折叠?
被折叠的 条评论
为什么被折叠?
 到【灌水乐园】发言


