header.vue
<router-link to="/create" class="collection">发布菜谱</router-link>
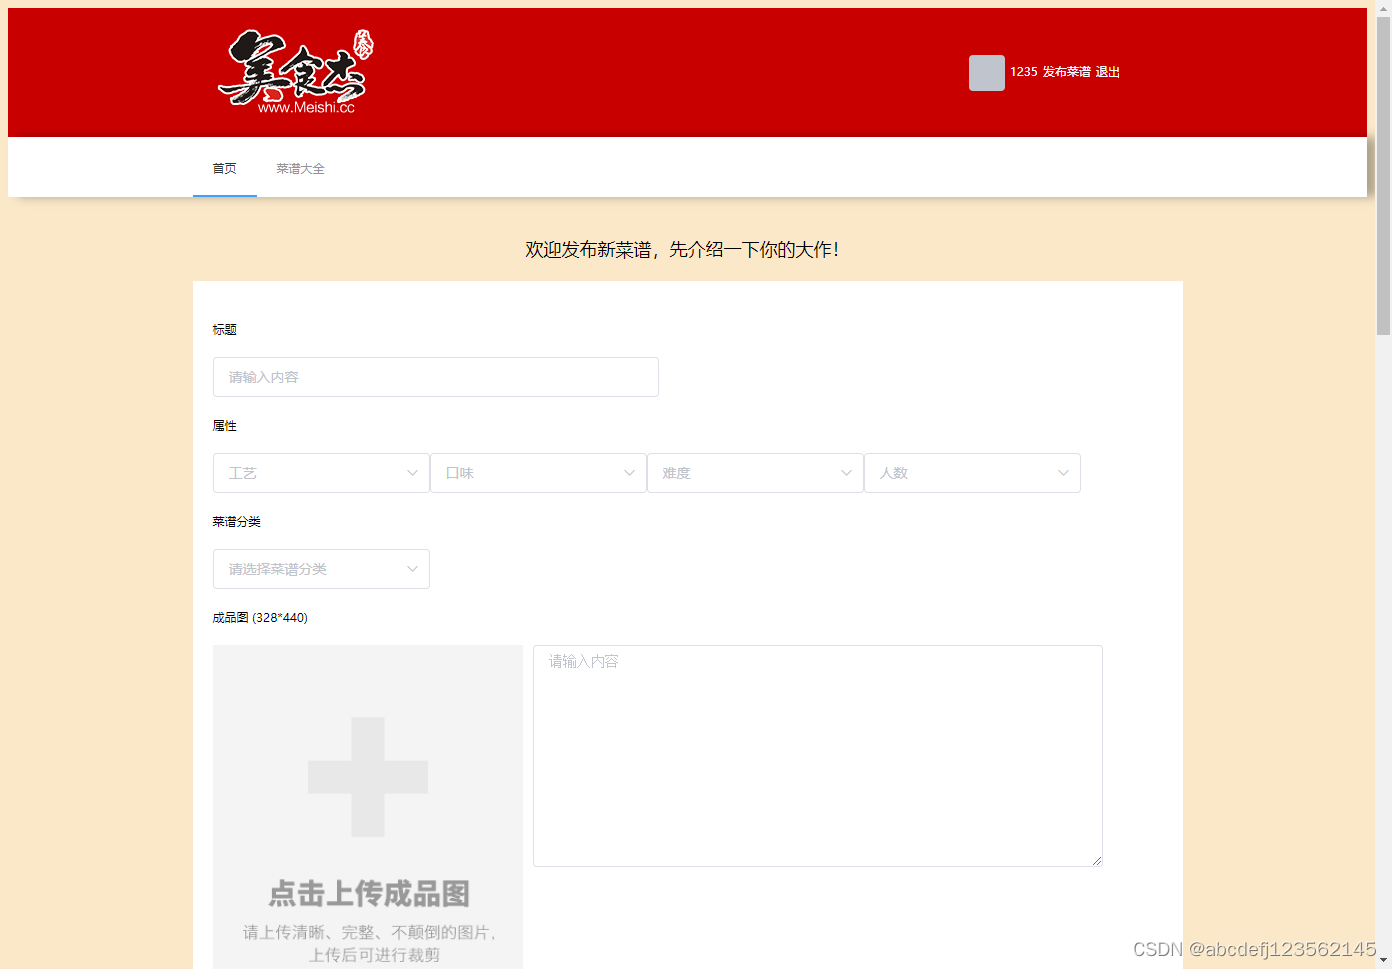
create.vue
<template>
<div class="create">
<h2>欢迎发布新菜谱,先介绍一下你的大作!</h2>
<section class="create-introduce">
<h5>标题</h5>
{{backData.title}}
<el-input class="create-input" placeholder="请输入内容" v-model="backData.title"></el-input>
<h5>属性</h5>
<div>
<el-select
v-for="item in properties"
:key="item.parent_type"
:placeholder="item.parent_name"
v-model="backData.property[item.title]"
>
<el-option
v-for="option in item.list"
:key="option.type"
:label="option.name"
:value="option.type"
>
</el-option>
</el-select>
</div>
<h5>菜谱分类</h5>
<div>
<el-select placeholder="请选择菜谱分类" v-model="backData.classify">
<el-option-group
v-for="group in classifies"
:key="group.parent_type"
:label="group.parent_name">
<el-option
v-for="item in group.list"
:key="item.type"
:label="item.name"
:value="item.type">
</el-option>
</el-option-group>
</el-select>
</div>
<h5>成品图 (328*440)</h5>
<div class="upload-img-box clearfix">
<div class="upload-img">
<upload-img
action="/api/upload?type=product"
:image-url="backData.product_pic_url"
@res-url="(data) => {backData.product_pic_url = data.resImgUrl}"
></upload-img>
</div>
<el-input
class="introduce-text"
type="textarea"
:rows="10"
placeholder="请输入内容"
v-model="backData.product_story"
>
</el-input>
</div>
</section>
<h2>记录所有原材料</h2>
<section class="create-introduce">
<h5>主料</h5>
<!--[ { "name": "", "specs": "" }, { "name": "", "specs": "" }, { "name": "", "specs": "" } ]-->
<Stuff
v-model="backData.raw_material.main_material"
></Stuff>
<h5>辅料</h5>
<Stuff
v-model="backData.raw_material.accessories_material"
></Stuff>
</section>
<h2>开始写步骤了!能否简单易学就看你怎么写了,加油!</h2>
<section class="create-introduce">
<Upload
v-for="(item,index) in backData.steps"
:key="item.customeId"
:n="index+1"
v-model="backData.steps[index]"
@remove="removeStep"
></Upload>
<el-button
class="eaeaea add-step-button"
type="primary"
size="medium"
icon="el-icon-plus"
@click="addStep"
>增加一步</el-button>
<h5>烹饪小技巧</h5>
<el-input
class="introduce-text"
type="textarea"
:rows="8"
placeholder="分享下你做这道菜的过程中的心得和小技巧吧!"
v-model="backData.skill"
>
</el-input>
</section>
<el-button
class="send"
type="primary"
size="medium"
:icon="icon"
@click="send"
>搞定,提交审核</el-button>
</div>
</template>
<script>
import Stuff from './stuff'
import Upload from './step-upload'
import UploadImg from '@/components/upload-img'
import {getProperty, getClassify, publish} from '@/service/api'
const backData = {
title: '',
product_pic_url: '',
product_story: '',
property: {
craft: 0,
flavor: 0,
hard: 0,
pepole: 0
},
raw_material: {
main_material: [{name: '',specs: ''}],
accessories_material: [{name: '',specs: ''}],
},
steps: [{img_url: '',describe: '',}],
classify: '',
skill: '',
}
const raw_material_struct = {
name: '',specs: ''
}
const steps_struct = {img_url: '',describe: '',}
let n = 1;
export default {
name: 'create',
components: {Stuff,Upload,UploadImg},
data(){
return {
properties: [],
classifies: [],
icon: '',
backData: {
title: "",
property: {
craft: "",
flavor: "",
hard: "",
people: "",
},
classify: "",
product_pic_url:
"https://s1.c.meishij.net/n/images/upload_big_img.png?_=1561906961",
product_story: "",
raw_material: {
main_material: [{ name: "", specs: "" }],
accessories_material: [{ name: "", specs: "" }],
},
steps: Array(3)
.fill(1)
.map(() => ({ ...steps_struct, customeId: this.uuid() })),
skill: "",
},
icon: "",
}
}
},
mounted(){
getProperty().then(({data}) => {
this.properties = data;
this.backData.property = data.reduce((o,item) => {
o[item.title] = '';
return o;
},{});
})
getClassify().then(({data}) => {
console.log(data);
this.classifies = data;
})
},
methods:{
uuid(){
n++;
return Date.now() + n;
},
addStep(){
this.backData.steps.push({
...steps_struct,
customeId: this.uuid()
})
},
removeStep(index){
this.backData.steps.splice(index-1, 1);
},
send(){
this.icon = 'el-icon-loading';
let param = this.backData;
param.steps = param.steps.map((item) => {
return {
img_url: item.img_url,
describe: item.describe,
}
})
publish(param).then((data) => {
console.log(data);
this.$router.push({
name: 'space'
})
})
}
}
}
</script>
<style lang="stylus">
.create-introduce
background-color #fff
padding 20px
.add-step-button
margin-left 100px
.create
width 100%
h2
text-align center
margin 20px 0
.send
height: 70px;
width: 220px;
background #ff3232
color #fff
border none
margin 20px auto
display block
h5
margin 20px 0
.create-input input
width 446px
line-height 22px
.upload-img-box
.upload-img
float left
.introduce-text
float left
.el-textarea
width 60%
margin-left 10px
</style>
stuff.vue
<template>
<div class="stuff">
<div class="clearfix">
<div class="raw-item" v-for="(item, index) in value" :key="index">
<el-input
placeholder="请输入内容"
v-model="item.name"
style="width: 200px"
></el-input>
<el-input
placeholder="请输入内容"
v-model="item.specs"
style="width: 100px"
></el-input>
<i class="delete-icon el-icon-close" v-show="value.length!=1" @click="deletes(index)"></i>
</div>
</div>
<el-button class="eaeaea" @click="medium" type="primary" size="medium" icon="el-icon-plus"
>增加一项</el-button
>
</div>
</template>
<script>
export default {
props: {
value: {
type: Array,
default: () => [],
},
},
methods: {
deletes(i){
this.value.splice(i,1)
this.$emit("input",[
...this.value
])
},
medium(){
this.$emit("input",[
...this.value,{ name: "", specs: "" }
])
}
},
};
</script>
<style lang="stylus">
.delete-icon
background-color #ccc
border-radius 50%
color #fff
:hover
background: #ff3232;
color: #fff;
.raw-item
float left
margin-right 65px
margin-bottom 20px
.el-input
margin-right 5px
</style>
step-upload.vue
<template>
<div class="step clearfix">
<div class="step-number">{{ index }}.</div>
<div class="upload-box">
<upload-img
:img-max-width="184"
action="/api/upload?type=product"
:imageUrl="info.img_url?info.img_url:'https://s1.c.meishij.net/n/images/upload_big_img.png?_=1561906961'"
@imageUrl="
(data) => {
info.img_url = data.resImgUrl;
}
"
></upload-img>
</div>
<el-input
class="introduce-text"
type="textarea"
:rows="8"
v-model="info.describe"
placeholder="请输入内容"
>
</el-input>
<i class="delete-icon el-icon-close" v-show="length != 1" @click="icon(index)"></i>
</div>
</template>
<script>
import UploadImg from "@/components/upload-img";
export default {
components: { UploadImg },
imageUrl: "https://s1.c.meishij.net/n/images/upload_step_img.png",
props: {
info: {
type: Object,
default: () => [],
},
index: {
type: Number,
default: 1,
},
length: {
type: Number,
default: 0,
},
},
methods: {
icon(i) {
this.$emit("input", i);
},
},
};
</script>
<style lang="stylus">
.step
margin-bottom 20px
> div
float left
.step-number
height 180px
width 100px
font-size 60px
color #aaa
font-family Arial, Helvetica, sans-serif
font-weight bold
vertical-align top
line-height 180px
.introduce-text
width 60%
margin-left 40px
.upload-box
img
vertical-align top
</style>
upload-img.vue
  <el-upload
    class="avatar-uploader"
    :action="action"
    :show-file-list="false"
    :on-success="handleAvatarSuccess"
    :before-upload="beforeAvatarUpload"
  >
    <img :src="url"  :style="{ width: imgMaxWidth + 'px' }"/>
  </el-upload>
</template>
<script>
export default {
  props: {
    action: String,
    imageUrl: {
      type: String,
    },
    imgMaxWidth:{
      type:  [Number, String],
      default:"210"

    }
  },
  data() {
    return {
      url: this.imageUrl,
    };
  },
  methods: {
    handleAvatarSuccess(res, file) {
      console.log("avatarSuccess",res, file);
       if (res.code === 1) {
        this.$message({
          message: res.mes,
          type: "watning",
        });
        return;
      }


      this.url = URL.createObjectURL(file.raw);
      this.$emit("imageUrl",{
        resImgUrl:this.url
      })
    },
    beforeAvatarUpload(file) {
      console.log(file, "beforeAvatarUpload");
      const isJPG = file.type === "image/jpeg" ;
      const isLt2M = file.size / 1024 / 1024 < 2;

      if (!isJPG) {
        this.$message.error("上传头像图片只能是 JPG 格式!");
      }
      if (!isLt2M) {
        this.$message.error("上传头像图片大小不能超过 2MB!");
      }
      return isJPG && isLt2M;
    },
  },
};
</script>


 160
160

 被折叠的 条评论
为什么被折叠?
被折叠的 条评论
为什么被折叠?
 到【灌水乐园】发言


