


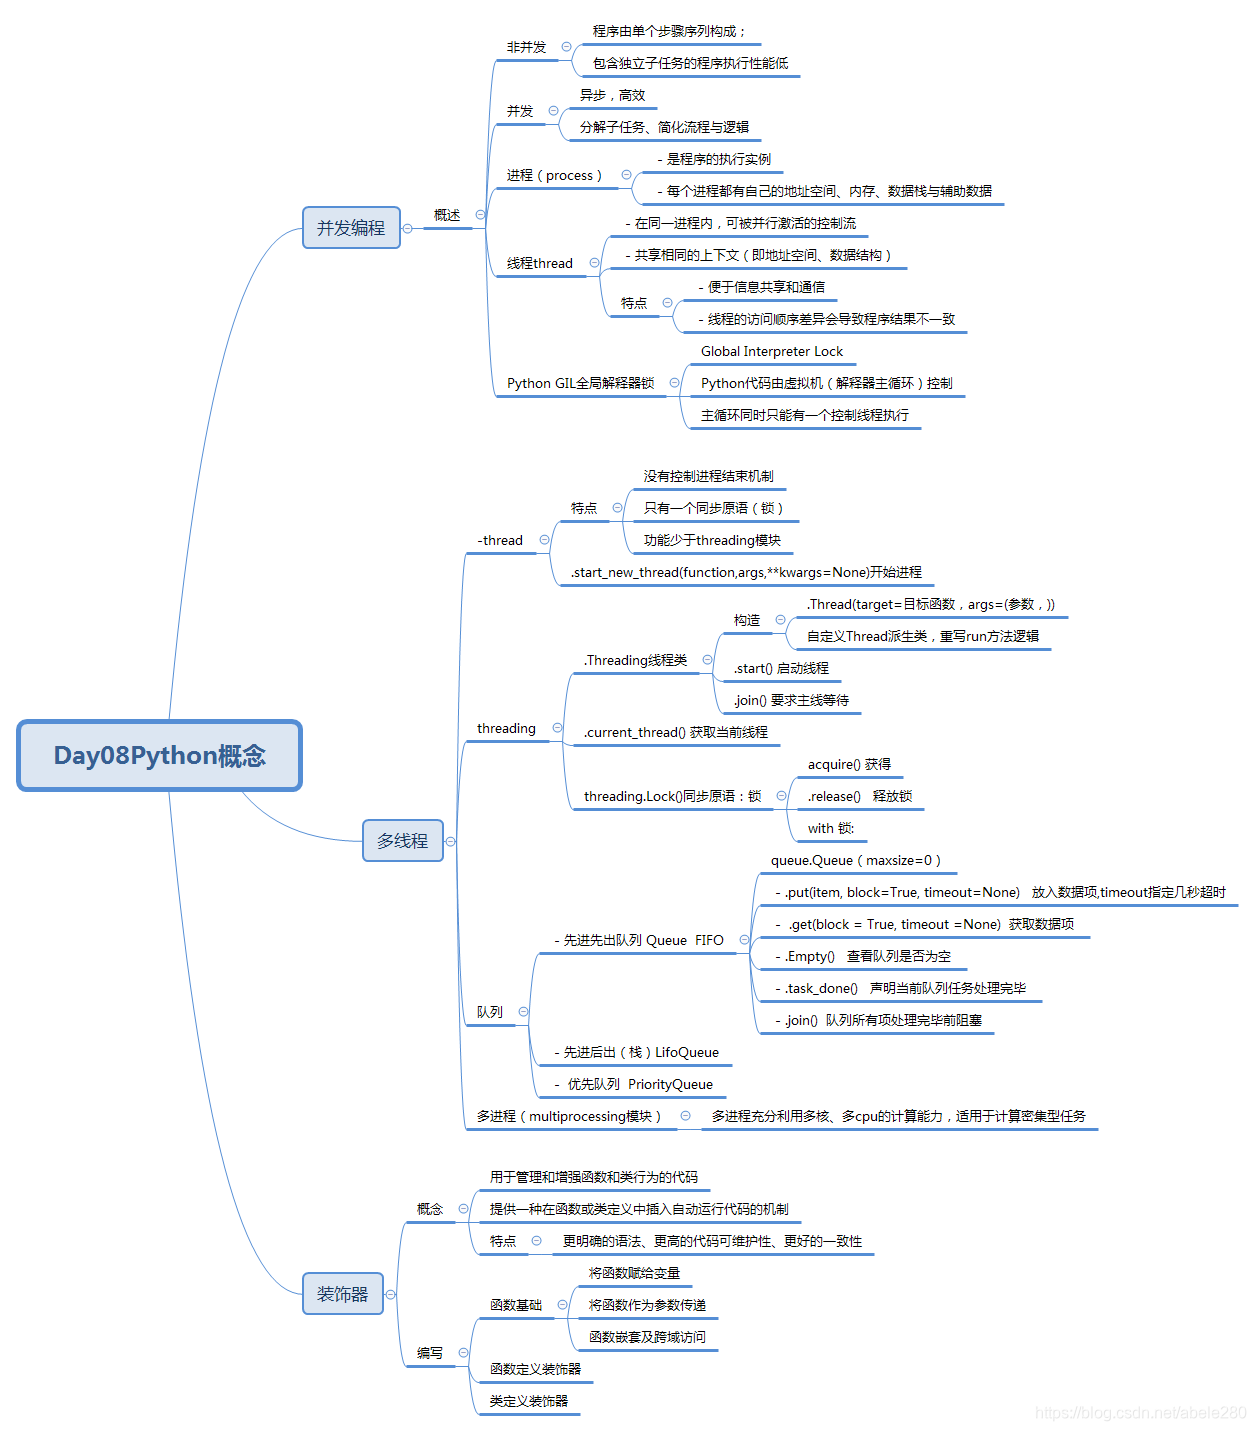
之前学习的程序都是单步骤的,即执行完上一句才开始执行下一句,也称为单任务,单任务程序虽然简单易懂但性能低。多任务是解决这一问题引出的,它能同时让计算机执行多个任务,有着异步与高效的特点。Python中提供了threading、multiprocessing模块来实现多任务。
一、并发编程
1.概述
并发与非并发:
- 非并发编程:程序由单个步骤序列构成;包含独立子任务的程序执行性能低
- 并发编程:异步,高效;分解子任务、简化流程与逻辑
进程概念process:
- 是程序的执行实例
- 每个进程都有自己的地址空间、内存、数据栈与辅助数据
线程概念thread:
- 在同一进程内,可被并行激活的控制流
- 共享相同的上下文(即地址空间、数据结构)
- 特点:
便于信息共享和通信
线程的访问顺序差异会导致程序结果不一致
Python GIL全局解释器锁
- Global Interpreter Lock
- Python代码由虚拟机(解释器主循环)控制
- 主循环同时只能有一个控制线程执行
这样导致Python的多线程只在IO密集型程序上有所作用,在计算密集型上只能用进程(但会消耗更多的资源)或者用底层语言编写
2.多线程(threading模块)
顺序执行一个4秒代码和2秒代码会消耗6秒时间,如下图
import time
def worker(n):
    print('函数执行开始于: {}'.format(time.ctime()))#开始当前时间
    time.sleep(n)
    print(f'函数执行结束于: {time.ctime()}')


def main():
    print(f'【主函数执行开始于: {time.ctime()}】')
    worker(4)               #运行4秒
    worker(2)               #运行2秒
    print(f'【主函数执行结束于: {time.ctime()}】')


if __name__ == '__main__':
    main()
运行结果
【主函数执行开始于: Mon Feb 24 23:43:37 2020】
函数执行开始于: Mon Feb 24 23:43:37 2020
函数执行结束于: Mon Feb 24 23:43:41 2020
函数执行开始于: Mon Feb 24 23:43:41 2020
函数执行结束于: Mon Feb 24 23:43:43 2020
【主函数执行结束于: Mon Feb 24 23:43:43 2020】

Process finished with exit code 0
3.threading模块实现多线程
构造方法1:
.Thread(target = 目标函数,args=(参数,))
其他方法:
- .start() 启动线程
- .join() 要求主线程等待
- .current_thread().name 获取当前线程名称
import time
import _thread
def worker(n):
    print('函数执行开始于: {}'.format(time.ctime()))
    time.sleep(n)
    print(f'函数执行结束于: {time.ctime()}')


def main():
    print(f'【主函数执行开始于: {time.ctime()}】')
    _thread.start_new_thread(worker,(2,))
    _thread.start_new_thread(worker,(4,))
    time.sleep(4)
    #时间间隔,4代表间隔时间,以后面这个为基准,没有这个中间就没有过程
    print(f'【主函数执行结束于: {time.ctime()}】')
运行结果(无 time.sleep(4))
【主函数执行开始于: Tue Feb 25 22:37:37 2020】
【主函数执行结束于: Tue Feb 25 22:37:37 2020】
函数执行开始于: Tue Feb 25 22:37:37 2020函数执行开始于: Tue Feb 25 22:37:37 2020
运行结果,有 time.sleep(4)
【主函数执行开始于: Tue Feb 25 22:43:58 2020】
函数执行开始于: Tue Feb 25 22:43:58 2020
函数执行开始于: Tue Feb 25 22:43:58 2020
函数执行结束于: Tue Feb 25 22:44:00 2020
【主函数执行结束于: Tue Feb 25 22:44:02 2020】
上述代码我们发现主线程不会等待子线程运行结束,我们希望主线程等待子线程需要使用.join()方法
"""
threading.Treading()实现多线程
"""
import time
import threading
def worker(n):
    print('函数执行开始于: {}'.format(time.ctime()))
    time.sleep(n)
    print(f'函数执行结束于: {time.ctime()}')


def main():
    print(f'【主函数执行开始于: {time.ctime()}】')
    #_thread.start_new_thread(worker,(2,))
    #_thread.start_new_thread(worker,(4,))

    threads = []
    t1 = threading.Thread(target=worker, args=(4,))
    threads.append(t1)

    t2 = threading.Thread(target=worker, args=(2,))
    threads.append(t2)

    for t in threads:
        t.start()

    print(f'【主函数执行结束于: {time.ctime()}】')


if __name__ == '__main__':
    main()
运行结果
【主函数执行开始于: Tue Feb 25 22:59:39 2020】
函数执行开始于: Tue Feb 25 22:59:39 2020
函数执行开始于: Tue Feb 25 22:59:39 2020【主函数执行结束于: Tue Feb 25 22:59:39 2020】

函数执行结束于: Tue Feb 25 22:59:41 2020
函数执行结束于: Tue Feb 25 22:59:43 2020
import time
import threading
def worker(n):
    print('函数执行开始于: {}'.format(time.ctime()))
    time.sleep(n)
    print(f'函数执行结束于: {time.ctime()}')


def main():
    print(f'【主函数执行开始于: {time.ctime()}】')
    #_thread.start_new_thread(worker,(2,))
    #_thread.start_new_thread(worker,(4,))

    threads = []
    t1 = threading.Thread(target=worker, args=(4,))
    threads.append(t1)

    t2 = threading.Thread(target=worker, args=(2,))
    threads.append(t2)

    for t in threads:
        t.start()


    for t in threads:
        t.join()         #等待当前子线程完成

    print(f'【主函数执行结束于: {time.ctime()}】')


if __name__ == '__main__':
    main()
运行结果
【主函数执行开始于: Tue Feb 25 23:01:38 2020】
函数执行开始于: Tue Feb 25 23:01:38 2020
函数执行开始于: Tue Feb 25 23:01:38 2020
函数执行结束于: Tue Feb 25 23:01:40 2020
函数执行结束于: Tue Feb 25 23:01:42 2020
【主函数执行结束于: Tue Feb 25 23:01:42 2020】
构造方法2:
自定义Thread派生类,重新run方法逻辑(注意run方法内部将参数元组解包,详见Python基础知识学习(五)——函数)
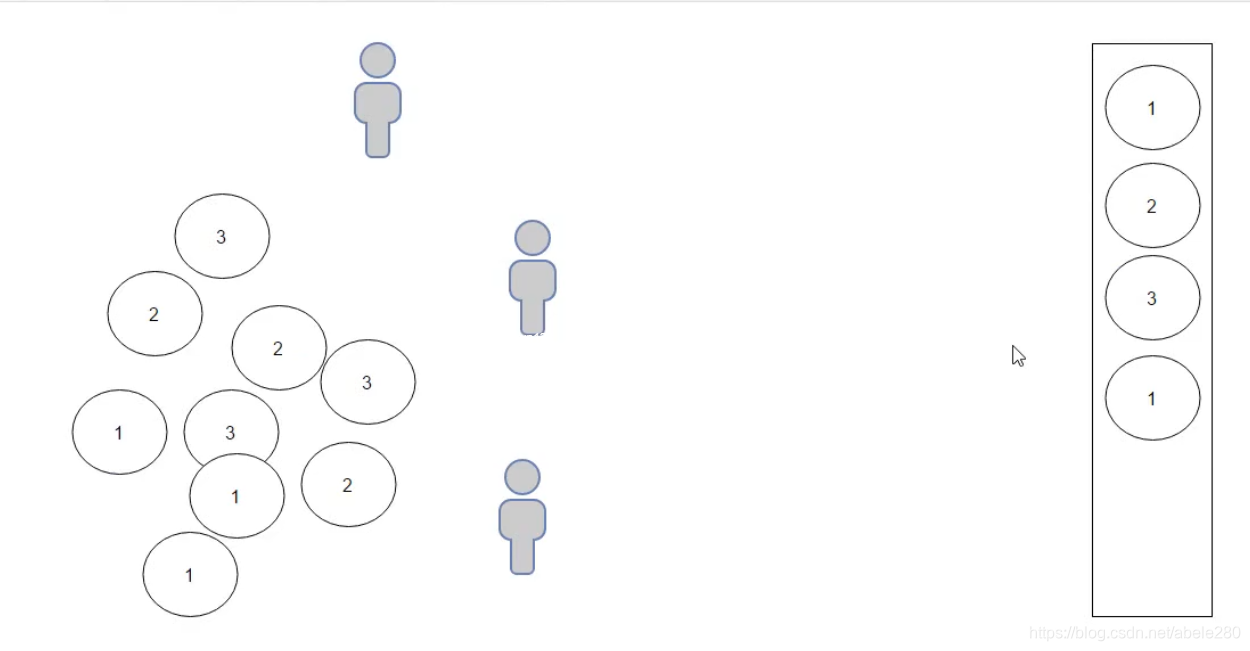
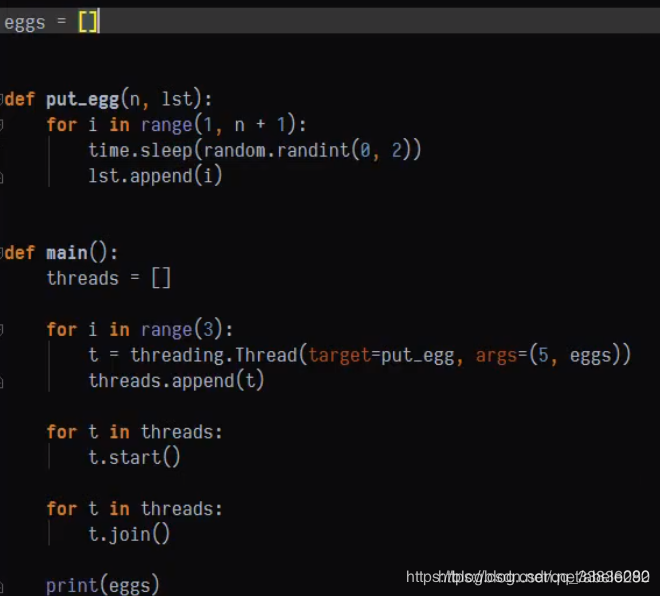
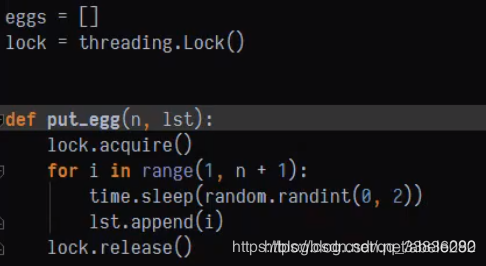
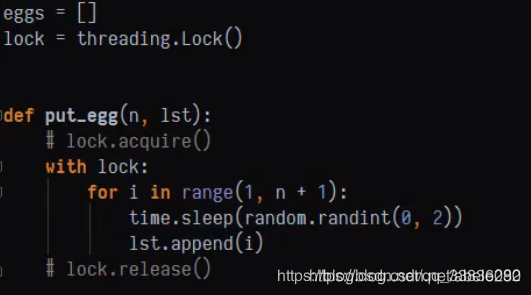
当使用多线程时经常会发生多人同时使用资源而发生错乱的问题,如下图我们想让每个人按顺序放入123鸡蛋,错乱代码如下
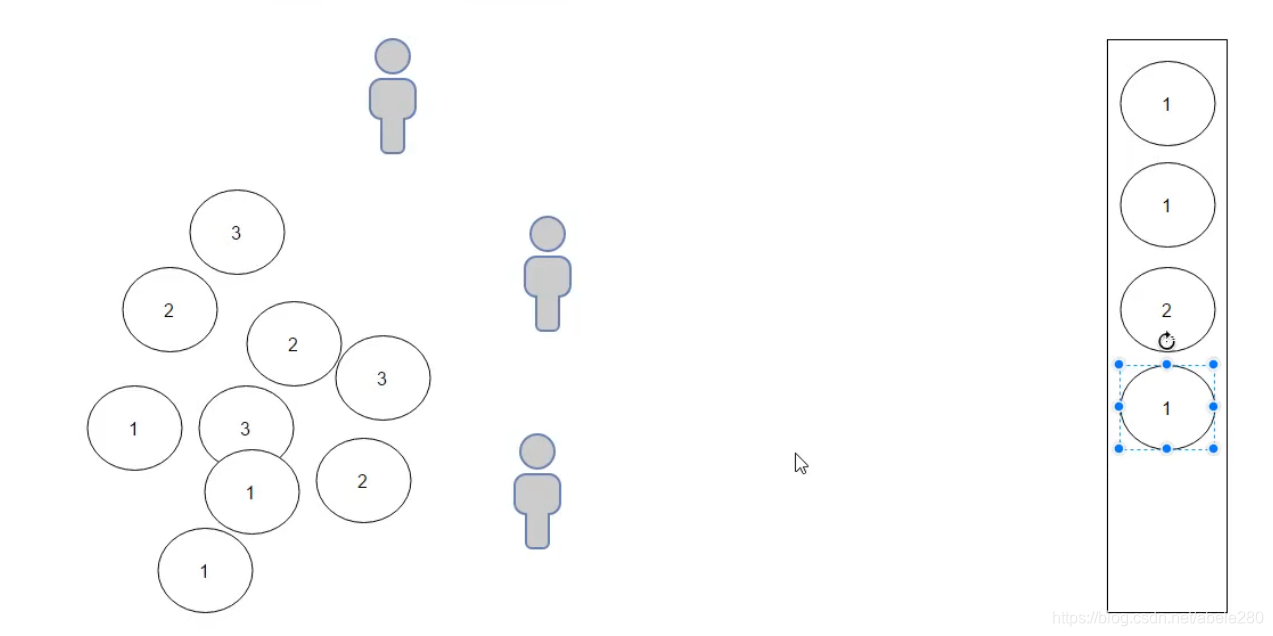
想要解决这一问题最简单的方式是使用同步锁

创建锁:
threading.Lock()
锁方法:
.acquire() 获得锁
.release() 释放锁
锁也支持上下文操作:
with 锁:

使用上下文with的锁
4.队列(queue模块)
队列保证多线程环境下共享操作的顺序
队列分类:
- 先进先出队列 Queue
- 先进后出(栈)LifoQueue
- 优先队列 PriorityQueue
构造队列 - queue.Queue(maxsize=0)
方法
- .put(item, block=True, timeout=None) 放入数据项,timeout指定几秒超时
- .get(block = True, timeout =None) 获取数据项
- .Empty() 查看队列是否为空
- .task_done() 声明当前队列任务处理完毕
- .join() 队列所有项处理完毕前阻塞
import threading
import time
import random
import queue


def producer(date_queue):
    for i in range(5):     #每隔半秒中在队列放5个随机数
        time.sleep(0.5)
        item = random.randint(1,100)
        date_queue.put(item)
        print(f'{threading.current_thread().name}在队列中嵌入数据项:{item}')


def consumer(date_queue):
    while True:
        try:
            item = date_queue.get(timeout=3)   #3秒没有取到数据就异常
            print(f'{threading.current_thread().name}从队列中移除了数据项 {item}')
        except queue.Empty:    #空的异常就跳出程序
           break
        else:
            date_queue.task_done()   #当前处理的项处理完毕了


def main():
    q = queue.Queue()    #q是我们要接收的对象

    threads = []
    p = threading.Thread(target=producer,args=(q,))
    p.start()

    for i in range(2):
        c = threading.Thread(target=consumer,args=(q,))
        threads.append(c)

    for t in threads:  #两个都是开始执行
        t.start()

    for t in threads:  #要让主线等待当先线程完成
        t.join()

    q.join()


if __name__ == '__main__':
    main()
执行结果:
Thread-1在队列中嵌入数据项:47
Thread-2从队列中移除了数据项 47
Thread-1在队列中嵌入数据项:77
Thread-3从队列中移除了数据项 77
Thread-1在队列中嵌入数据项:94
Thread-2从队列中移除了数据项 94
Thread-1在队列中嵌入数据项:91
Thread-3从队列中移除了数据项 91
Thread-1在队列中嵌入数据项:62
Thread-2从队列中移除了数据项 62
5.多进程(multiprocessing模块)
由于Python的全局解释器锁使得多线程优化的结果非常有限,多线程仅仅适用于IO密集型的操作,对计算密集型没有太大效果。而多进程充分利用多核、多cpu的计算能力,适用于计算密集型任务。即IO密集型多考虑多线程,计算密集型多考虑多进程。
构造进程:
multiprocessing.Process(target=目标函数, args=(参数,))
方法:
- .start() 启动线程
- .join() 要求主进程等待
- .current_process() 获取当前进程 进程名称 .name
import multiprocessing
import time

def func(n):
    print(f'{multiprocessing.current_process().name}执行开始于:{time.ctime()}')
    time.sleep(n)
    print(f'{multiprocessing.current_process().name}执行结束于:{time.ctime()}')


def main():
    print(f'主函数运行于:{time.ctime()}')

    processes = []
    p1 = multiprocessing.Process (target=func,args=(4,))
    processes.append(p1)

    p2 = multiprocessing.Process (target=func,args=(2,))
    processes.append(p2)

    for p in processes:
        p.start()

    for p in processes:
        p.join()

    print(f'主函数结束于:{time.ctime()}')

if __name__ == '__main__':
    main()
运行结果
主函数运行于:Thu Feb 27 01:52:33 2020
Process-1执行开始于:Thu Feb 27 01:52:33 2020
Process-2执行开始于:Thu Feb 27 01:52:33 2020
Process-2执行结束于:Thu Feb 27 01:52:35 2020
Process-1执行结束于:Thu Feb 27 01:52:37 2020
主函数结束于:Thu Feb 27 01:52:37 2020
6.进程池:
- concurrent.futures 模块(弃用)——ThreadPoolExecutor 线程池、ProcessPoolExecutor
进程池 - multiprocessing模块:现在进程池已经被添加到进程模块中
- 创建进程池 multiprocessing.Pool()
- 创建线程池 multiprocessing.ThreadPool()
- 阻塞方式运行 .apply(func, args)
- 非阻塞方式运行 apply_async(func, args)
- 关闭进程池 .close() 回收进程池 .join()
#!usr/bin/env python
# -*- coding:utf-8 _*-
"""
@author: 灰灰
@file: test07.py
@time: 2020/02/27
@desc: concurrent.futures 应用
"""
import time
import concurrent.futures

numbers = list(range(1,11))

def count(n):
    for i in range(10000000):
        i +=i
    return i * n

def worker(x):
    result = count(x)
    print(f'数字:{x}的计算结果是:{result}')


#顺序的执行
def sequential_execution():
    start_time = time.clock()
    for i in numbers:
        worker(i)
    print(f'顺序执行花费时间:{time.clock()-start_time}秒')

#线程池执行
def threading_execution():
    start_time = time.clock()
    with concurrent.futures.ThreadPoolExecutor(max_workers=5) as executor:
        for i in numbers:
            executor.submit(worker,i)

    print(f'线性池执行花费时间:{time.clock()-start_time}秒')


#进程池执行
def process_execution():
    start_time = time.clock()

    with concurrent.futures.ThreadPoolExecutor(max_workers=5) as executor:
        for i in numbers:
            executor.submit(worker,i)

    print(f'线性池执行花费时间:{time.clock()-start_time}秒')


if __name__ == '__main__':
    sequential_execution()
    #threading_execution()
    #process_execution()
运行结果分别


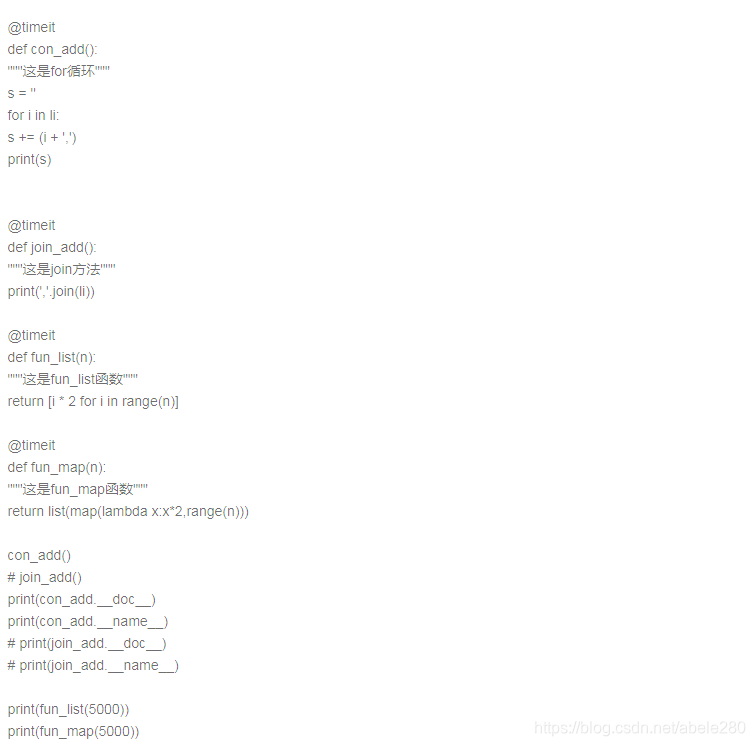
二、装饰器
1.概述
装饰器是用于管理和增强函数和类行为的代码。它提供一种在函数或类定义中插入自动运行代码的机制
优势:更明确的语法、更高的代码可维护性、更好的一致性
2.函数基础
在掌握装饰器之前先复习一下函数基础
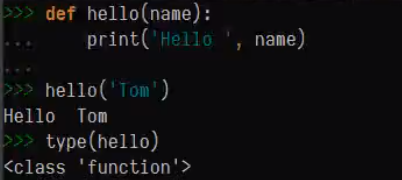
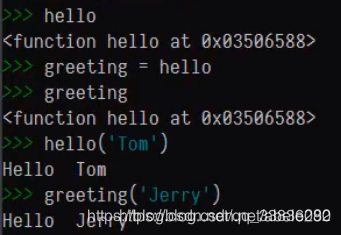
2.1将函数赋给变量
将函数hello赋值给了greeting变量。调用greeting函数也就是在调用hello函数
2.2将函数作为参数传递
将函数作为参数传递给其他函数。
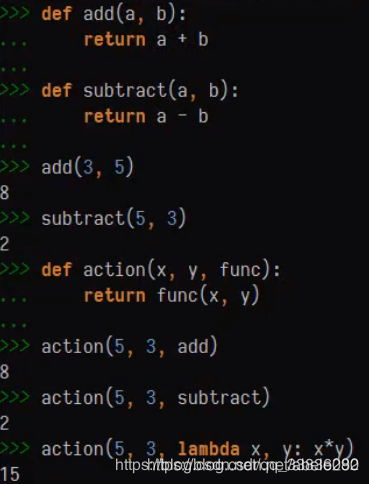
函数嵌套
greeting函数里嵌套hello函数,并返回hello函数,带()的返回会直接调用hello函数(一般不这么用),不带括号的返回需要执行时会返回函数,想要执行内部的函数需要再增加一个括号。
跨域访问
内侧函数会使用自己作用域里定义的变量
若加上nonlocal标识会使用外侧的变量 (其他标识还有global 详见python基础学习(五)函数章节)
3.装饰器
装饰器有两种方式添加
- 函数定义装饰器
- 类定义装饰器
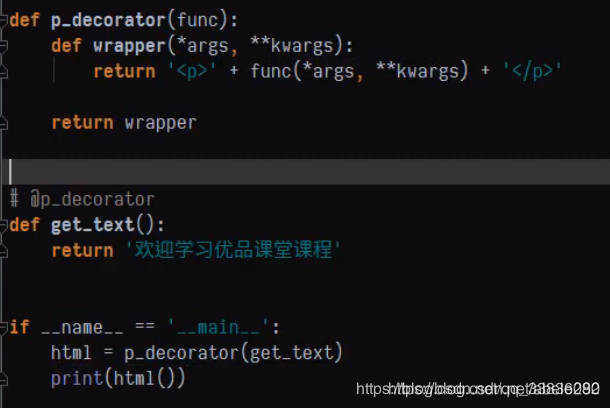
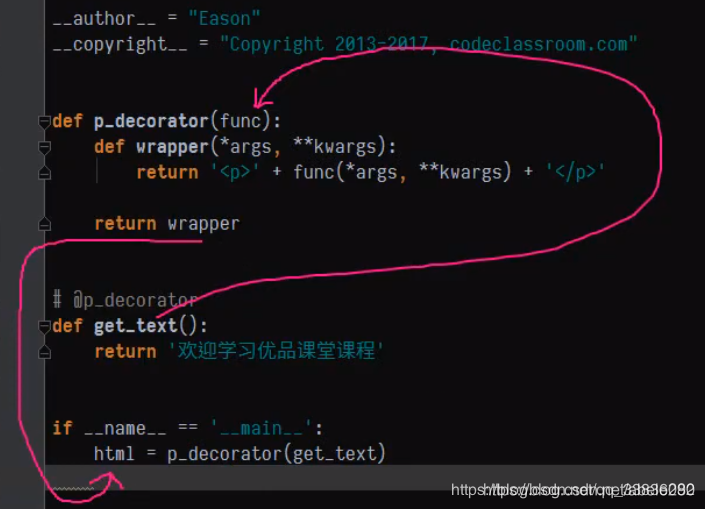
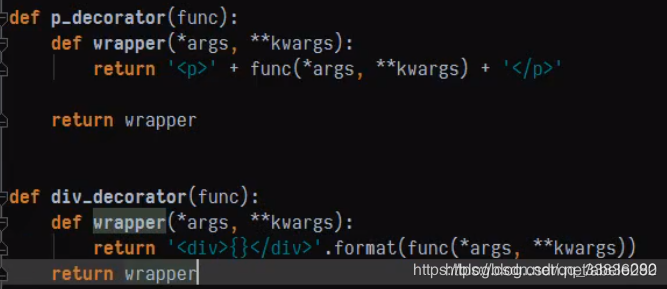
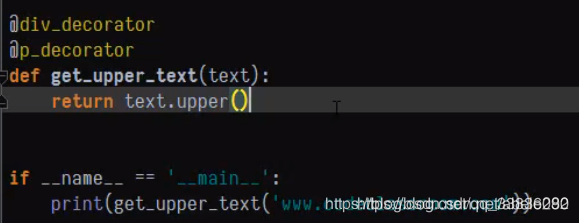
函数定义装饰器
首先定义一个参数为函数的函数,并在其内部定义一个函数,调用参数函数。对参数函数的返回值进行装饰,其次,将我们定义的装饰器以@装饰器名 修饰在函数上
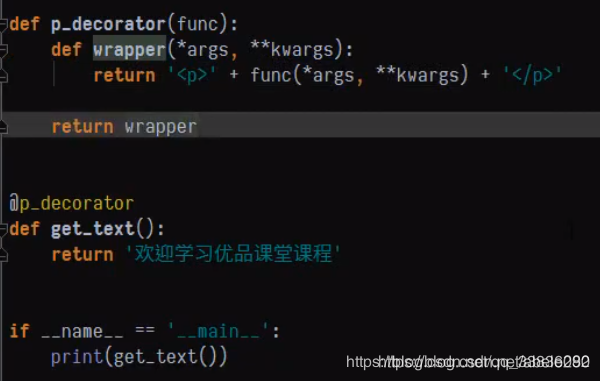
执行结果

装饰器的原理:将调用装饰器的函数作为参数传递给装饰器函数,在执行
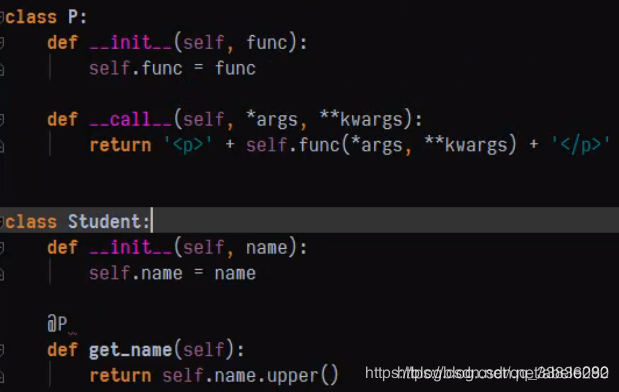
类定义的装饰器:
- 定义__init__()函数初始化类
- 定义__call__()函数作为装饰器
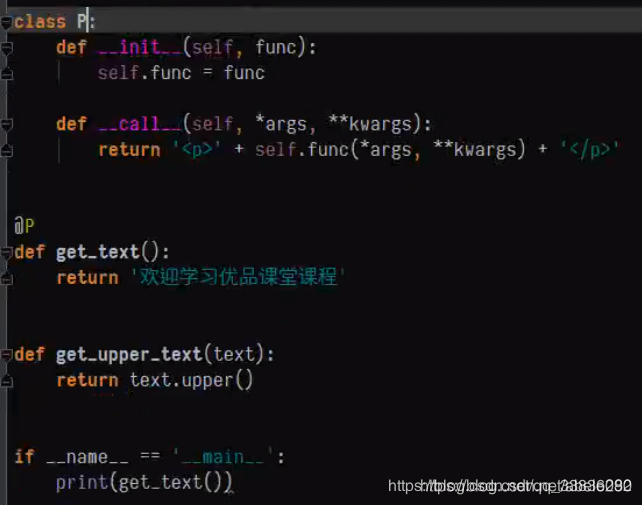
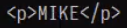
执行结果:

函数定义的装饰器可以用在类中的方法上
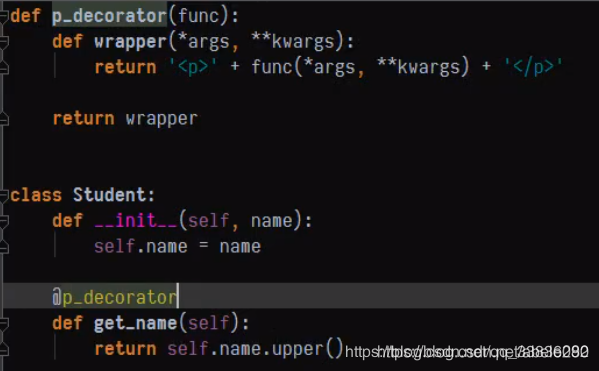
类定义的装饰器用在类定义的方法上会产生问题,这是因为类里面的self会和装饰器的self冲突,想要解决这个冲突需要别的方面的知识,所有我们在使用时最好还是使用用函数定义的装饰器

装饰器的调用顺序——就近原则

功能类似的装饰器我们可以在装饰器外部再嵌套一个接受参数的函数使装饰器更加灵活,注意它的返回结果。
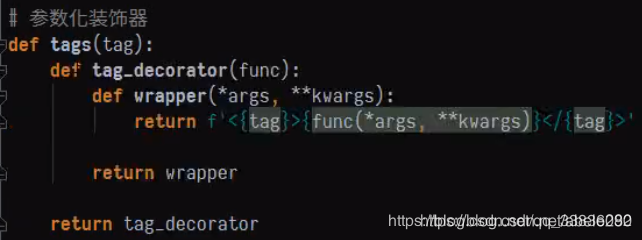
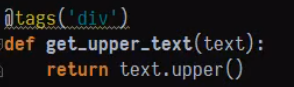
使用再嵌套的装饰器
打印结果

打印结果

三、总结
四、作业


 326
326

 被折叠的 条评论
为什么被折叠?
被折叠的 条评论
为什么被折叠?
 到【灌水乐园】发言


