


本文内容来自 https://blog.csdn.net/UbuntuTouch/article/details/99546568 , 有修正和删减。
在上一篇文章中,我们已经介绍了如何使用REST接口在ES中创建index,文档以及对它们的操作。在今天的文章里,我们来介绍如何利用ES来搜索我们的数据。ES是近实时的搜索。我们还是接着上次的练习“ 开始使用Elasticsearch (1): 如何创建index,添加、删除、更新文档 ”。
在Elasticsearch中的搜索中,有两类搜索:
- queries
- aggregations
它们之间的区别在于: query (查询)用于全文搜索,而 aggregation (聚合)用于对数据进行统计和分析。也可以把二者结合使用,比如我们可以先对文档进行query搜索然后再进行aggregation聚合:
GET blogs/_search
{
  "query": {
    "match": {
      "title": "community"
    }
  },
  "aggregations": {
    "top_authors": {
      "terms": {
        "field": "author"
      }
    }
  }
}
在上面的搜索中,先搜寻title中含有'community'的文档,然后再对数据进行aggregation统计author(作者)的信息。
搜索所有的文档
我们可以使用如下的命令来搜索所有的文档:
GET /_search
这里没有指定任何index,将搜索在该cluster下的所有index。目前默认的返回数据个数是10个,除非我们设定size:
GET /_search?size=20
上面的命令也等同于:
GET /_all/_search
我们也可以这样对多个index进行搜索:
POST /index1,index2,index3/_search
上面的代码表示对index1,index2,index3索引进行搜索。
当然,我们甚至也可以这么写:
POST /index*,-index3/_search
上面的代码表示对所有以index开头的索引来进行搜索,但是排除index3索引。
如果我们只想搜索我们特定的index,比如twitter,我们可以这么做:
GET twitter/_search
GET /twitter/_search
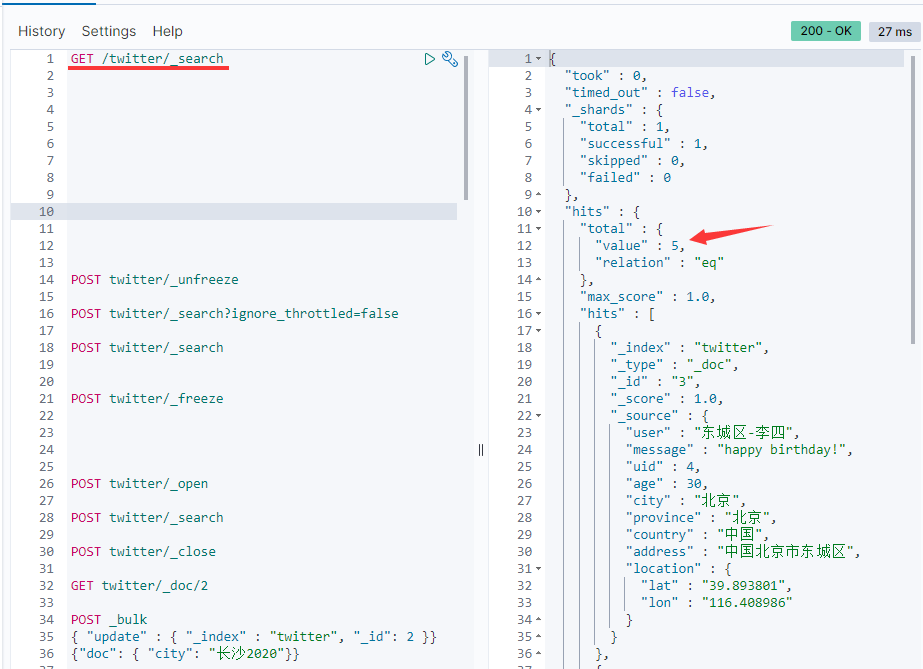
从上面的结果可以看出,在twitter这个index里有5个文档。在上面的 hits 数组里,我们可以看到所有的结果。同时,我们也可以看到一个叫做 _score 的项,它表示搜索结果的相关度。这个值越高,表明搜索匹配的相关度越高。在默认没有sort排序的情况下,搜索结果是按照相关度从大到小进行排列的。
默认情况下分页大小为10,即返回10个数据。可以通过设置size参数得到我们想要的个数。还可以配合from来进行page分页:
GET twitter/_search?size=2&from=2
这样我就可以使用from参数来进行分页的显示。
这里的from是从0开始的序号, 而不是当前页数。
上面的查询类似于DSL查询的如下语句:
GET twitter/_search
{
  "size": 2,
  "from": 2,
  "query": {
    "match_all": {}
  }
}
们可以通过filter_path来控制输出的较少的字段,比如:
GET twitter/_search?filter_path=hits.total
上面执行的结果将直接从hits.total开始进行返回:

source filtering
我们可以通过_source来定义想要返回的字段:
GET twitter/_search
{
  "_source": ["user", "city"],
  "query": {
    "match_all": {}
  }
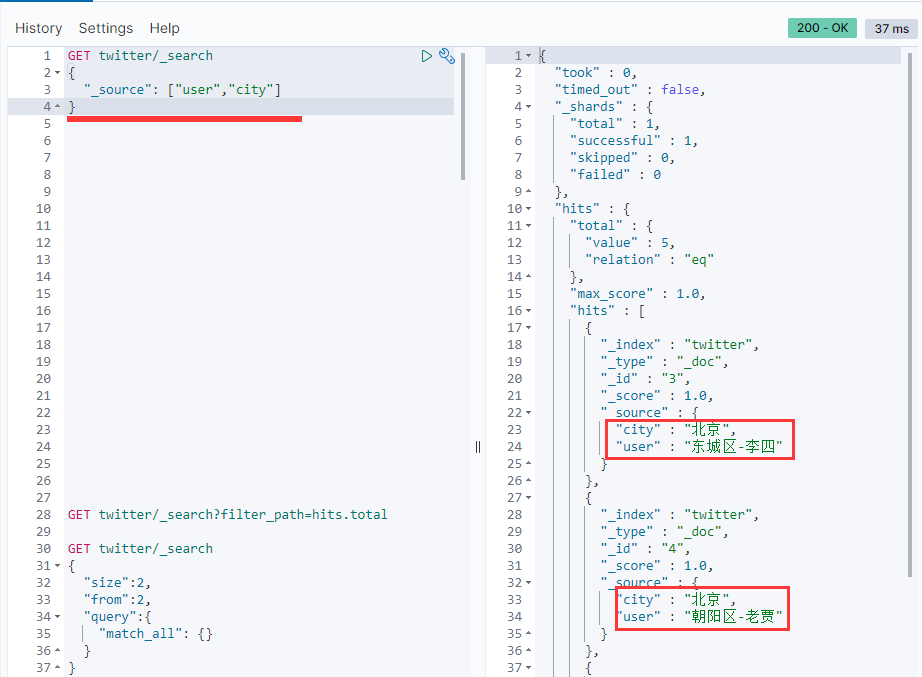
可以看到只有user和city两个字段在_source里返回。如果设置_source为false,则不返回任何的_source信息:
GET twitter/_search
{
  "_source": false
}

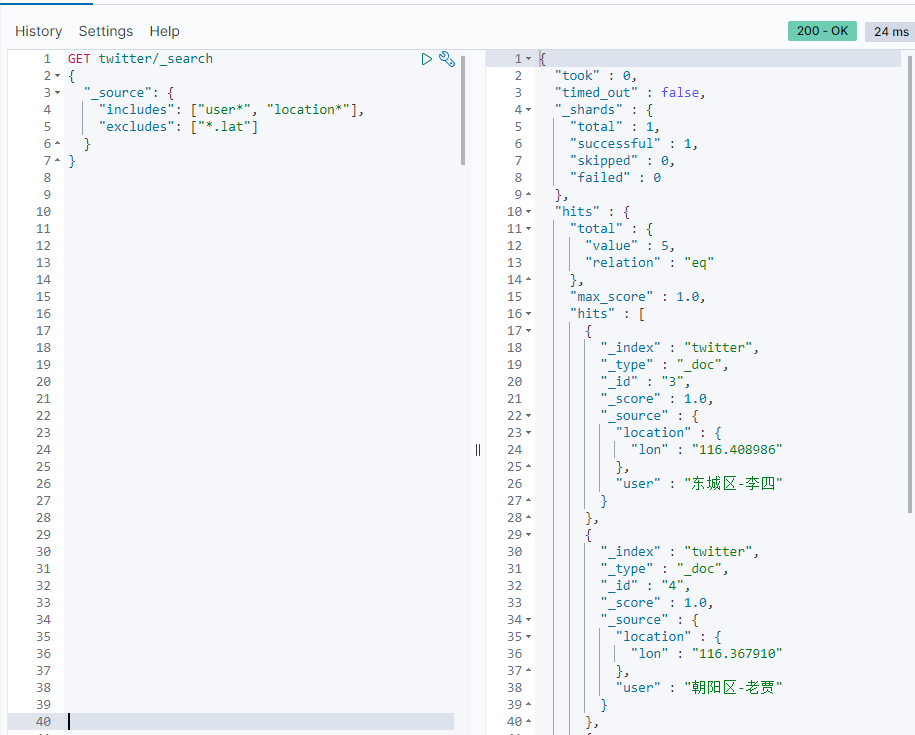
可以看到只有_id及_score等信息返回,其它任何的_source字段都没有被返回。也可以接收通配符形式的控制,比如:
GET twitter/_search
{
  "_source": {
    "includes": ["user*", "location*"],
    "excludes": ["*.lat"]
  }
}
Script fields
有些时候,我们想要的field可能在_source里根本没有,那么我们可以使用script field来生成这些field。允许为每个匹配返回 script evaluation (基于不同的字段),例如:
GET twitter/_search
{
  "query": {
    "match_all": {}
  },
  "script_fields": {
    "years_to_100": {
      "script": {
        "lang": "painless",
        "source": "100 - doc['age'].value"
      }
    },
    "year_of_birth":{
      "script": "2019 - doc['age'].value"
    }
  }
}

这种使用script的方法来生成查询的结果对于大量的文档来说,可能会占用大量资源
Count API
我们经常会查询我们的索引里到底有多少文档,那么我们可以使用_count重点来查询:
GET twitter/_count
如果我们想知道满足条件的文档的数量,我们可以采用如下的格式:
GET twitter/_count
{
  "query": {
    "match": {
      "city": "北京"
    }
  }
}

修改settings
可以通过如下的接口来获得一个index的settings:
GET twitter/_settings
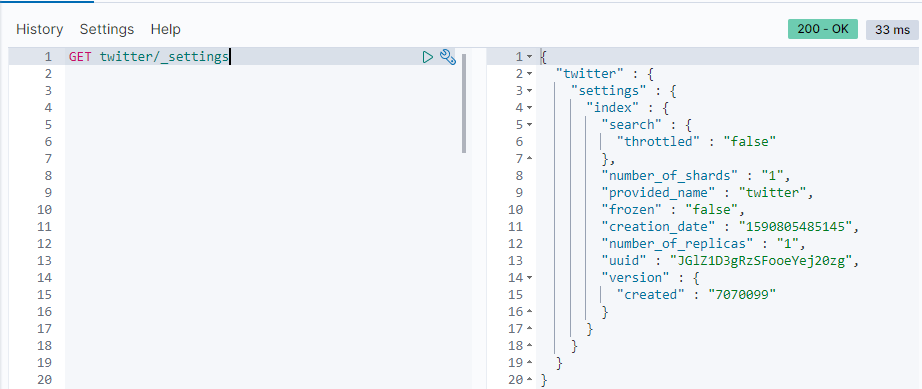
从这里我们可以看到twitter index有多少个shards分片及replicas副本分片。我们也可以通过如下的接口来设置:
PUT twitter
{
  "settings": {
    "number_of_shards": 1,
    "number_of_replicas": 1
  }
}
一旦把number_of_shards定下来了,就不可以修改了,除非把index删除,并重新index它。这是因为每个文档存储到哪一个shard是和number_of_shards这个数值有关的。一旦这个数值发生改变,那么之后寻找那个文档所在的shard就会不准确。
修改index的mapping
Elasticsearch号称是schemaless,在实际的应用中,每一个index都有一个相应的mapping。这个mapping在我们建立第一个文档时已经产生。它是对每个输入的字段进行自动的识别从而判断它们的数据类型。我们可以这么理解schemaless:
- 不需要事先定义一个相应的mapping才可以建立文档。字段类型是动态识别的。这和传统的数据库是不一样的;
- 如果动态加入了新的字段,mapping也可以自动进行调整并识别新加入的字段。
自动识别字段有一个问题,那就是有的字段可能识别并不精确,比如对于我们例子中的位置信息。那么我们需要对这个字段进行修改。
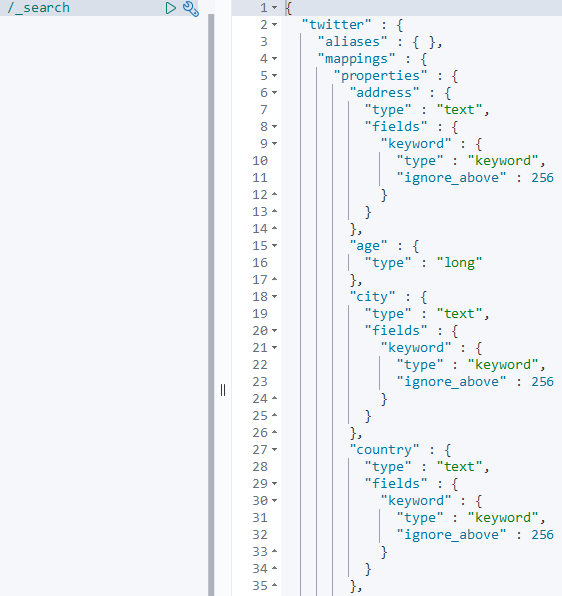
我们可以通过如下的命令来查询目前的index的mapping:
GET twitter/_mapping
显示的数据如下:
{
  "twitter" : {
    "mappings" : {
      "properties" : {
        "address" : {
          "type" : "text",
          "fields" : {
            "keyword" : {
              "type" : "keyword",
              "ignore_above" : 256
            }
          }
        },
        "age" : {
          "type" : "long"
        },
        "city" : {
          "type" : "text",
          "fields" : {
            "keyword" : {
              "type" : "keyword",
              "ignore_above" : 256
            }
          }
        },
        "country" : {
          "type" : "text",
          "fields" : {
            "keyword" : {
              "type" : "keyword",
              "ignore_above" : 256
            }
          }
        },
        "location" : {
          "properties" : {
            "lat" : {
              "type" : "text",
              "fields" : {
                "keyword" : {
                  "type" : "keyword",
                  "ignore_above" : 256
                }
              }
            },
            "lon" : {
              "type" : "text",
              "fields" : {
                "keyword" : {
                  "type" : "keyword",
                  "ignore_above" : 256
                }
              }
            }
          }
        },
        "message" : {
          "type" : "text",
          "fields" : {
            "keyword" : {
              "type" : "keyword",
              "ignore_above" : 256
            }
          }
        },
        "province" : {
          "type" : "text",
          "fields" : {
            "keyword" : {
              "type" : "keyword",
              "ignore_above" : 256
            }
          }
        },
        "uid" : {
          "type" : "long"
        },
        "user" : {
          "type" : "text",
          "fields" : {
            "keyword" : {
              "type" : "keyword",
              "ignore_above" : 256
            }
          }
        }
      }
    }
  }
}
从上面的显示中可以看出来location里的经纬度是一个multi-field的类型。
        "location" : {
          "properties" : {
            "lat" : {
              "type" : "text",
              "fields" : {
                "keyword" : {
                  "type" : "keyword",
                  "ignore_above" : 256
                }
              }
            },
            "lon" : {
              "type" : "text",
              "fields" : {
                "keyword" : {
                  "type" : "keyword",
                  "ignore_above" : 256
                }
              }
            }
          }
        }
这个显然不是我们所要的。正确的类型应该是:geo_point。我们重新修正我们的mapping。
注意: 我们不能为已经建立好的index动态修改mapping。这是因为一旦修改,那么之前建立的索引就变成不能搜索的了。一种办法是reindex从而重新建立索引。如果在之前的mapping加入新的字段,那么我们可以不用重新建立索引。
为了能够正确地创建我们的mapping,我们必须先把之前的twitter索引删除掉,并同时使用settings来创建这个index。具体的步骤如下:
DELETE twitter
PUT twitter
{
  "settings": {
    "number_of_shards": 1,
    "number_of_replicas": 1
  }
}
PUT twitter/_mapping
{
  "properties": {
    "address": {
      "type": "text",
      "fields": {
        "keyword": {
          "type": "keyword",
          "ignore_above": 256
        }
      }
    },
    "age": {
      "type": "long"
    },
    "city": {
      "type": "text",
      "fields": {
        "keyword": {
          "type": "keyword",
          "ignore_above": 256
        }
      }
    },
    "country": {
      "type": "text",
      "fields": {
        "keyword": {
          "type": "keyword",
          "ignore_above": 256
        }
      }
    },
    "location": {
      "type": "geo_point"
    },
    "message": {
      "type": "text",
      "fields": {
        "keyword": {
          "type": "keyword",
          "ignore_above": 256
        }
      }
    },
    "province": {
      "type": "text",
      "fields": {
        "keyword": {
          "type": "keyword",
          "ignore_above": 256
        }
      }
    },
    "uid": {
      "type": "long"
    },
    "user": {
      "type": "text",
      "fields": {
        "keyword": {
          "type": "keyword",
          "ignore_above": 256
        }
      }
    }
  }
}
重新查看我们的mapping:
GET twitter/_mapping
我们可以看到我们已经创建好了新的mapping。我们再次运行之前我们的bulk接口,并把我们所需要的数据导入到twitter索引中。
POST _bulk
{ "index" : { "_index" : "twitter", "_id": 1} }
{"user":"双榆树-张三","message":"今儿天气不错啊,出去转转去","uid":2,"age":20,"city":"北京","province":"北京","country":"中国","address":"中国北京市海淀区","location":{"lat":"39.970718","lon":"116.325747"}}
{ "index" : { "_index" : "twitter", "_id": 2 }}
{"user":"东城区-老刘","message":"出发,下一站云南!","uid":3,"age":30,"city":"北京","province":"北京","country":"中国","address":"中国北京市东城区台基厂三条3号","location":{"lat":"39.904313","lon":"116.412754"}}
{ "index" : { "_index" : "twitter", "_id": 3} }
{"user":"东城区-李四","message":"happy birthday!","uid":4,"age":30,"city":"北京","province":"北京","country":"中国","address":"中国北京市东城区","location":{"lat":"39.893801","lon":"116.408986"}}
{ "index" : { "_index" : "twitter", "_id": 4} }
{"user":"朝阳区-老贾","message":"123,gogogo","uid":5,"age":35,"city":"北京","province":"北京","country":"中国","address":"中国北京市朝阳区建国门","location":{"lat":"39.718256","lon":"116.367910"}}
{ "index" : { "_index" : "twitter", "_id": 5} }
{"user":"朝阳区-老王","message":"Happy BirthDay My Friend!","uid":6,"age":50,"city":"北京","province":"北京","country":"中国","address":"中国北京市朝阳区国贸","location":{"lat":"39.918256","lon":"116.467910"}}
{ "index" : { "_index" : "twitter", "_id": 6} }
{"user":"虹桥-老吴","message":"好友来了都今天我生日,好友来了,什么 birthday happy 就成!","uid":7,"age":90,"city":"上海","province":"上海","country":"中国","address":"中国上海市闵行区","location":{"lat":"31.175927","lon":"121.383328"}}
至此,我们已经完整地建立了我们所需要的索引。在下面,我们开始使用DSL( D omain S pecifc L anaguage)来帮我们进行查询。
查询数据
在这个章节里,我们来展示一下从我们的ES索引中查询我们所想要的数据。
GET twitter/_search
{
  "query": {
    "match": {
      "city": "北京"
    }
  }
}
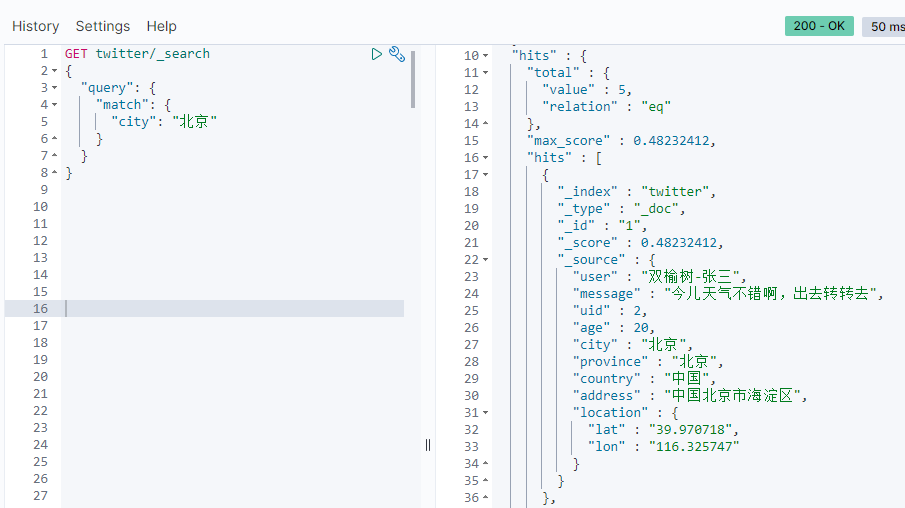
从查询的结果来看,我们可以看到有5个用户是来自北京的,而且查询出来的结果是按照关联(relavance)来进行排序的。
在很多的情况下,我们也可以使用script query来完成:
GET twitter/_search
{
  "query": {
    "script": {
      "script": {
        "source": "doc['city'].contains(params.name)",
        "lang": "painless",
        "params": {
          "name": "北京"
        }
      }
    }
  }
}
上面的script query和上面的查询是一样的结果,但是我们不建议大家使用这种方法。相比较而言,script query的方法比较低效。
上面的搜索也可以这么实现:
GET twitter/_search?q=city:"北京"
如果你想了解更多,你可以更进一步阅读“ Elasticsearch: 使用URI Search ”。
如果我们不需要这个score,我们可以选择filter来完成:
GET twitter/_search
{
  "query": {
    "bool": {
      "filter": {
        "term": {
          "city.keyword": "北京"
        }
      }
    }
  }
}

从返回的结果来看,_score项为0。对于这种搜索,只要yes或no。我们并不关心它们是的相关性。在这里我们使用了city.keyword。对于一些刚接触Elasticsearch的人来说,可能比较陌生。正确的理解是city在我们的mapping中是一个multi-field项。它既是text也是keyword类型。对于一个keyword类型的项来说,这个项里面的所有字符都被当做一个字符串。它们在建立文档时,不需要进行index。keyword字段用于精确搜索,aggregation和排序(sorting)。
所以在我们的filter中,我们是使用了term来完成这个查询。
我们也可以使用如下的办法达到同样的效果:
GET twitter/_search
{
  "query": {
    "constant_score": {
      "filter": {
        "term": {
          "city": {
            "value": "北京"
          }
        }
      }
    }
  }
}
上面的代码在7.7版本中查询不到数据
在我们使用match query时,默认的操作是OR,可以做如下的查询:
GET twitter/_search
{
  "query": {
    "match": {
      "user": {
        "query": "朝阳区-老贾",
        "operator": "or"
      }
    }
  }
}
上面的查询也和如下的查询是一样的:
GET twitter/_search
{
 "query": {
   "match": {
     "user": "朝阳区-老贾"
   }
 }
}
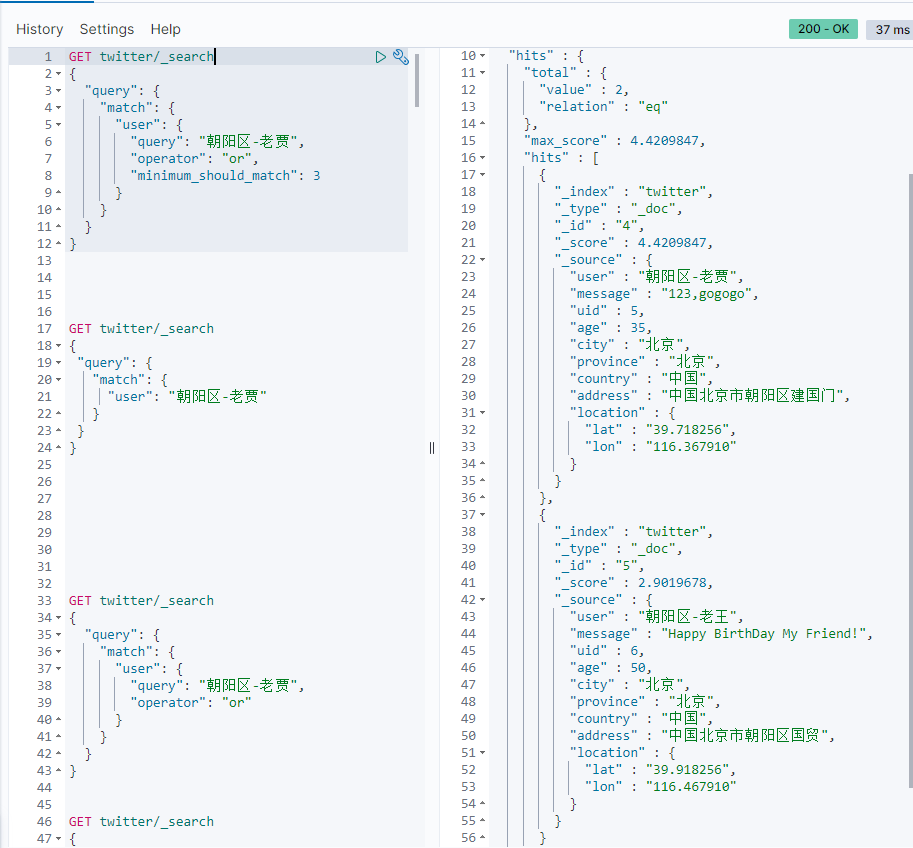
这是因为默认的操作是or操作。上面查询的结果是任何文档匹配:“朝”,“阳”,“区”,“老”及“贾”这5个字中的任何一个将被显示:

我们也可以设置参数minimum_should_match来设置至少匹配的term。比如:
GET twitter/_search
{
  "query": {
    "match": {
      "user": {
        "query": "朝阳区-老贾",
        "operator": "or",
        "minimum_should_match": 3
      }
    }
  }
}
上面显示我们至少要匹配“朝”,“阳”,“区”,“老”及“贾这5个中的3个字才可以。显示结果:
我们也可以改为"and“操作看看:
GET twitter/_search
{
  "query": {
    "match": {
      "user": {
        "query": "朝阳区-老贾",
        "operator": "and"
      }
    }
  }
}
显示的结果是:
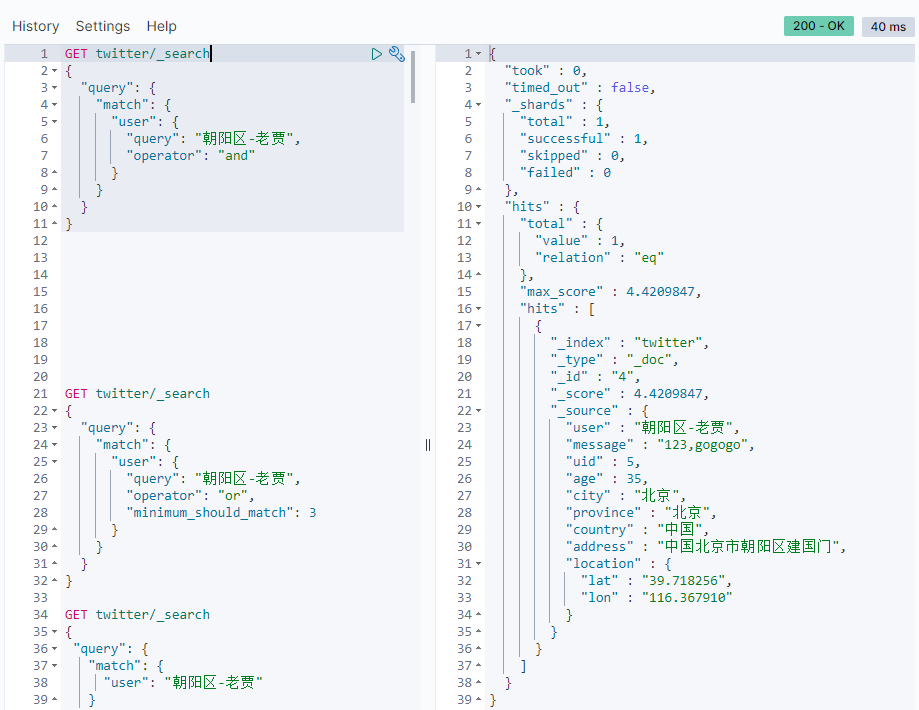
在这种情况下,需要同时匹配索引的5个字才可以。显然我们可以通过使用and来提高搜索的精度。
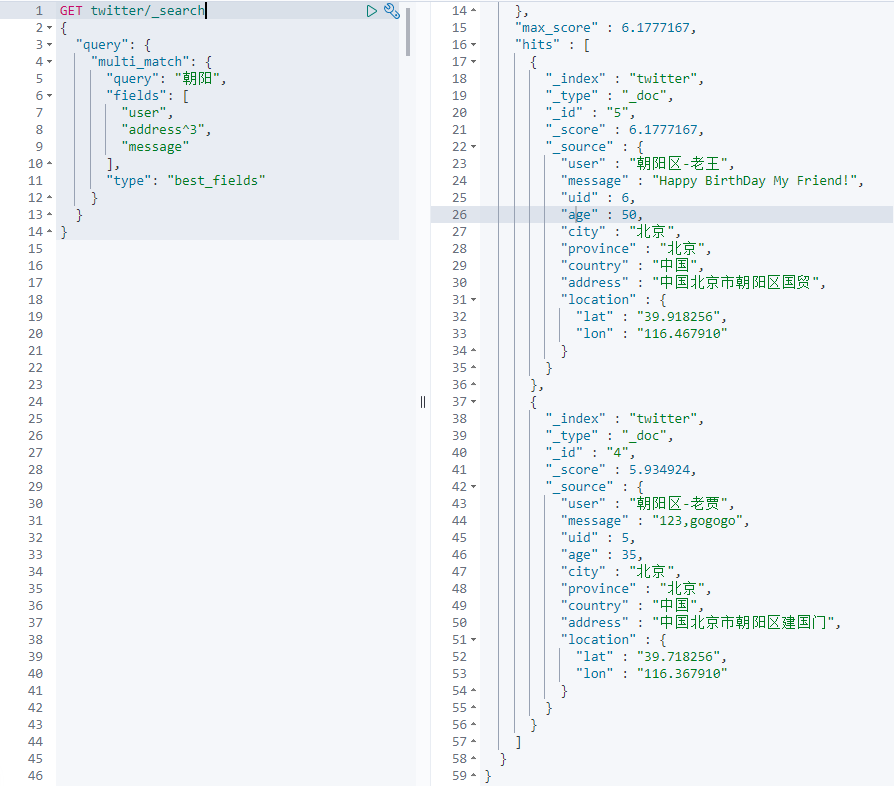
Multi_match
在上面的搜索中,我们特别指明一个专有的field来进行搜索,但是在很多的情况下,我们并不知道是哪一个field含有这个关键词,那么在这种情况下,我们可以使用multi_match来进行搜索:
GET twitter/_search
{
  "query": {
    "multi_match": {
      "query": "朝阳",
      "fields": [
        "user",
        "address^3",
        "message"
      ],
      "type": "best_fields"
    }
  }
}
在上面的代码中,我们同时对三个fields: user,adress及message进行搜索,但是对address含有 “朝阳” 的文档的分数进行3倍的加权。返回的结果:
Prefix query
返回在提供的字段中包含特定前缀的文档。
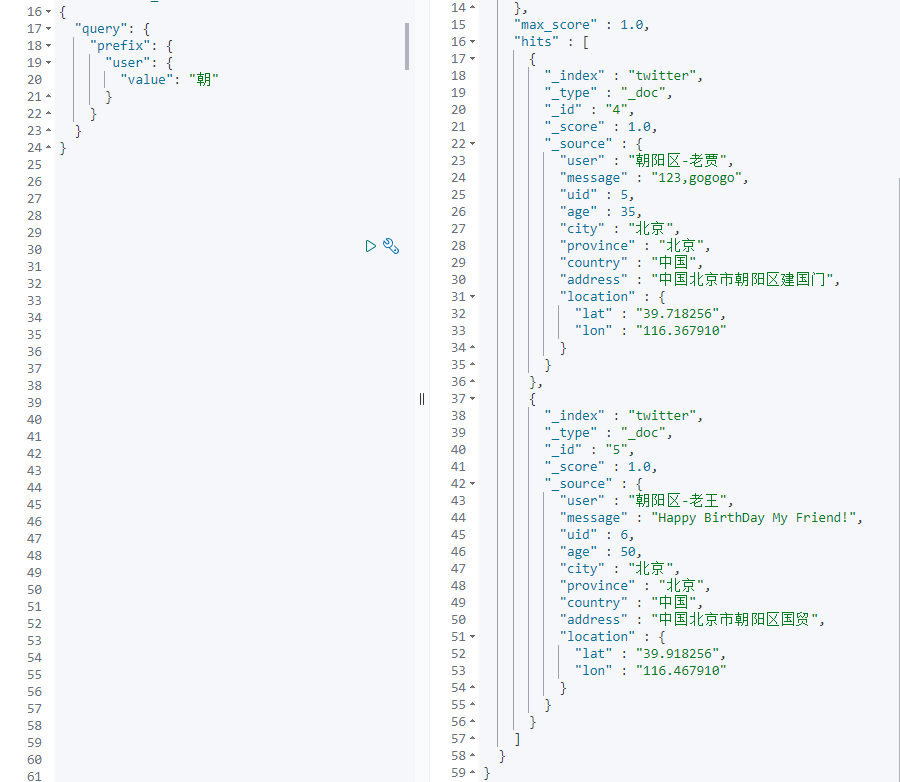
GET twitter/_search
{
  "query": {
    "prefix": {
      "user": {
        "value": "朝"
      }
    }
  }
}
查询user字段里以“朝”为开头的所有文档:
Term query
Term query会在给定字段中进行精确的字词匹配。 因此,您需要提供准确的术语以获取正确的结果。
GET twitter/_search
{
  "query": {
    "term": {
      "user.keyword": {
        "value": "朝阳区-老贾"
      }
    }
  }
}
在这里,我们使用user.keyword来对“朝阳区-老贾”进行精确匹配查询相应的文档:

Terms query
如果我们想对多个terms进行查询,我们可以使用如下的方式来进行查询:
GET twitter/_search
{
  "query": {
    "terms": {
      "user.keyword": [
        "双榆树-张三",
        "东城区-老刘"
      ]
    }
  }
}
上面查询user.keyword里含有“双榆树-张三”或“东城区-老刘”的所有文档:

复合查询(compound query)
什么是复合查询呢?如果说上面的查询是leaf查询的话,那么复合查询可以把很多个leaf查询组合起来从而形成更为复杂的查询。它一般的格式是:
POST _search
{
  "query": {
    "bool" : {
      "must" : {
        "term" : { "user" : "kimchy" }
      },
      "filter": {
        "term" : { "tag" : "tech" }
      },
      "must_not" : {
        "range" : {
          "age" : { "gte" : 10, "lte" : 20 }
        }
      },
      "should" : [
        { "term" : { "tag" : "wow" } },
        { "term" : { "tag" : "elasticsearch" } }
      ],
      "minimum_should_match" : 1,
      "boost" : 1.0
    }
  }
}
从上面我们可以看出,它是由bool下面的 must , must_not , should 及 filter 共同来组成的。针对我们的例子,
GET twitter/_search
{
  "query": {
    "bool": {
      "must": [
        {
          "match": {
            "city": "北京"
          }
        },
        {
          "match": {
            "age": "30"
          }
        }
      ]
    }
  }
}
这个查询的是必须是 city 是 北京 的,并且年龄刚好是30岁的。

如果我们想知道为什么得出来这样的结果,我们可以在搜索的指令中加入 "explain" : true 。
GET twitter/_search
{
  "query": {
    "bool": {
      "must": [
        {
          "match": {
            "city": "北京"
          }
        },
        {
          "match": {
            "age": "30"
          }
        }
      ]
    }
  },
  "explain": true
}
在结果中可以看到一些解释(description):

上面显示结果有2个。同样,我们可以使用must_not把满足某些条件的排除在外:
GET twitter/_search
{
  "query": {
    "bool": {
      "must_not": [
        {
          "match": {
            "city": "北京"
          }
        }
      ]
    }
  }
}
上面的代码是在寻找所有不在北京的文档:

只搜索到一个文档。他来自上海,其余的都北京的。
接下来,我们来尝试一下should。它表述“或”的意思,也就是有就更好,没有就算了。比如:
GET twitter/_search
{
  "query": {
    "bool": {
      "must": [
        {
          "match": {
            "age": "30"
          }
        }
      ],
      "should": [
        {
          "match_phrase": {
            "message": "Happy birthday"
          }
        }
      ]
    }
  }
}
这个搜索的是:age必须是30岁,但如果文档里含有“Hanppy birthday”,相关性会更高,那么搜索得到的结果会排在前面:

在上面的结果中,我们可以看到:同样是年龄30岁的两个文档,第一个文档由于含有“Happy birthday”这个字符串在message里,所以它的结果是排在前面的,相关性更高。我们可以从它的_score中可以看出来。第二个文档里age是30,但是它的message里没有“Happy birthday”字样,但是它的结果还是有显示,只是得分比较低一些。
在使用上面的复合查询时,bool请求通常是must,must_not, should及filter的一个或其中的几个一起组合形成的。我们必须注意的是:
查询类型对hits及_score的影响:
| Clause | 影响 #hits | 影响 _score |
|---|---|---|
| must | Yes | Yes |
| must_not | Yes | No |
| should | No* | Yes |
| filter | Yes | No |
如上面的表格所示,should只有在特殊的情况下才会影响hits。在正常的情况下它不会影响搜索文档的个数。那么在哪些情况下会影响搜索的结果呢?这种情况就是针对只有should的搜索情况,也就是如果你在bool query里,不含有must, must_not及filter的情况下,一个或更多的should必须有一个匹配才会有结果,比如:
GET twitter/_search
{
  "query": {
    "bool": {
      "should": [
        {
          "match": {
            "city": "北京"
          }
        },
        {
          "match": {
            "city": "武汉"
          }
        }
      ]
    }
  }
}
上面的查询结果为:
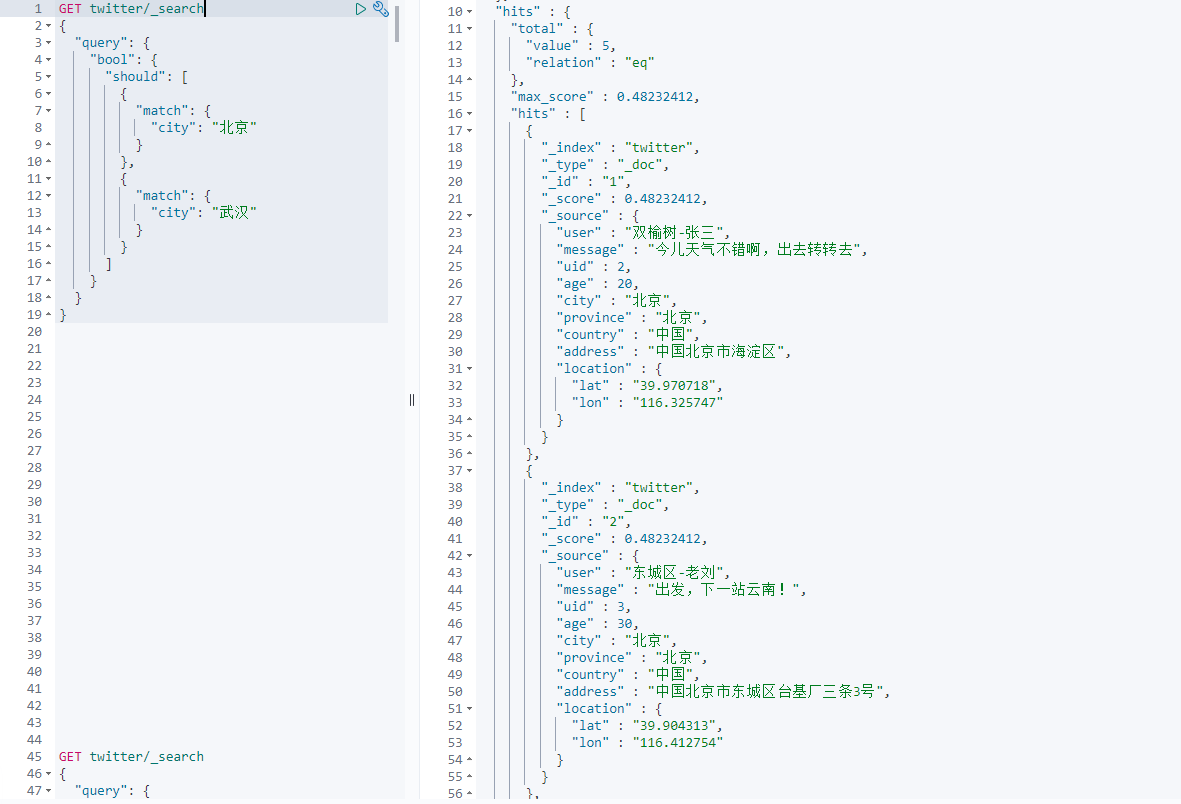
在这种情况下,should是会影响查询的结果的。
位置查询
Elasticsearch最厉害的是位置查询。这在很多的关系数据库里并没有。我们举一个简单的例子:
GET twitter/_search
{
  "query":{
    "bool":{
      "must":{
        "match":{
          "address":"北京"
        }
      }
    }
  },
  "post_filter": {
    "geo_distance": {
      "distance": "3km",
      "location": {
        "lat": 39.920086,
        "lon": 116.454182
      }
    }
  }
}
在这里,我们查找在地址栏里有“北京”,并且在以位置(116.454182, 39.920086)为中心的3公里以内的所有文档。结果如下:

在我们的查询结果中只有一个文档满足要求。
下面,我们找出在5公里以内的所有位置信息,并按照远近大小进行排序:
GET twitter/_search
{
  "query":{
    "bool":{
      "must":{
        "match":{
          "address":"北京"
        }
      }
    }
  },
  "post_filter": {
    "geo_distance": {
      "distance": "5km",
      "location": {
        "lat": 39.920086,
        "lon": 116.454182
      }
    }
  },
  "sort": [
    {
      "_geo_distance": {
        "location": {
          "lat": 39.920086,
          "lon": 116.454182
        },
        "order": "asc"
      }
    }
  ]
}
这里我们使用了 sort 来对搜索的结果进行排序, 按照升序排列。结果如下:
{
  "took" : 1,
  "timed_out" : false,
  "_shards" : {
    "total" : 1,
    "successful" : 1,
    "skipped" : 0,
    "failed" : 0
  },
  "hits" : {
    "total" : {
      "value" : 3,
      "relation" : "eq"
    },
    "max_score" : null,
    "hits" : [
      {
        "_index" : "twitter",
        "_type" : "_doc",
        "_id" : "5",
        "_score" : null,
        "_source" : {
          "user" : "朝阳区-老王",
          "message" : "Happy BirthDay My Friend!",
          "uid" : 6,
          "age" : 50,
          "city" : "北京",
          "province" : "北京",
          "country" : "中国",
          "address" : "中国北京市朝阳区国贸",
          "location" : {
            "lat" : "39.918256",
            "lon" : "116.467910"
          }
        },
        "sort" : [
          1188.2901656104884
        ]
      },
      {
        "_index" : "twitter",
        "_type" : "_doc",
        "_id" : "2",
        "_score" : null,
        "_source" : {
          "user" : "东城区-老刘",
          "message" : "出发,下一站云南!",
          "uid" : 3,
          "age" : 30,
          "city" : "北京",
          "province" : "北京",
          "country" : "中国",
          "address" : "中国北京市东城区台基厂三条3号",
          "location" : {
            "lat" : "39.904313",
            "lon" : "116.412754"
          }
        },
        "sort" : [
          3944.7355972239952
        ]
      },
      {
        "_index" : "twitter",
        "_type" : "_doc",
        "_id" : "3",
        "_score" : null,
        "_source" : {
          "user" : "东城区-李四",
          "message" : "happy birthday!",
          "uid" : 4,
          "age" : 30,
          "city" : "北京",
          "province" : "北京",
          "country" : "中国",
          "address" : "中国北京市东城区",
          "location" : {
            "lat" : "39.893801",
            "lon" : "116.408986"
          }
        },
        "sort" : [
          4837.769064666224
        ]
      }
    ]
  }
}
得到了3个结果。在 sort 里我们可以看到距离是越来越大的。另外我们可以看出来,如果 _score 不是 sort 的field,那么在使用 sor t后,所有的结果的 _score 都变为null。上面查询代码中的"post_filter"也可以写为"filter"(注意结构变化):
GET twitter/_search
{
  "query": {
    "bool": {
      "must": {
        "match": {
          "address": "北京"
        }
      },
      "filter": {
        "geo_distance": {
          "distance": "5km",
          "location": {
            "lat": 39.920086,
            "lon": 116.454182
          }
        }
      }
    }
  },
  "sort": [
    {
      "_geo_distance": {
        "location": "39.920086,116.454182",
        "order": "asc",
        "unit": "km"
      }
    }
  ]
}
范围查询
在 ES 中,我们也可以进行范围查询。我们可以根据设定的范围来对数据进行查询:
GET twitter/_search
{
  "query":{
    "range": {
      "age": {
        "gte": 30,
        "lte": 40
      }
    }
  }
}
上面的代码查询的是年龄介于30到40岁的文档, 结果如下:
{
  "took" : 1,
  "timed_out" : false,
  "_shards" : {
    "total" : 1,
    "successful" : 1,
    "skipped" : 0,
    "failed" : 0
  },
  "hits" : {
    "total" : {
      "value" : 3,
      "relation" : "eq"
    },
    "max_score" : 1.0,
    "hits" : [
      {
        "_index" : "twitter",
        "_type" : "_doc",
        "_id" : "2",
        "_score" : 1.0,
        "_source" : {
          "user" : "东城区-老刘",
          "message" : "出发,下一站云南!",
          "uid" : 3,
          "age" : 30,
          "city" : "北京",
          "province" : "北京",
          "country" : "中国",
          "address" : "中国北京市东城区台基厂三条3号",
          "location" : {
            "lat" : "39.904313",
            "lon" : "116.412754"
          }
        }
      },
      {
        "_index" : "twitter",
        "_type" : "_doc",
        "_id" : "3",
        "_score" : 1.0,
        "_source" : {
          "user" : "东城区-李四",
          "message" : "happy birthday!",
          "uid" : 4,
          "age" : 30,
          "city" : "北京",
          "province" : "北京",
          "country" : "中国",
          "address" : "中国北京市东城区",
          "location" : {
            "lat" : "39.893801",
            "lon" : "116.408986"
          }
        }
      },
      {
        "_index" : "twitter",
        "_type" : "_doc",
        "_id" : "4",
        "_score" : 1.0,
        "_source" : {
          "user" : "朝阳区-老贾",
          "message" : "123,gogogo",
          "uid" : 5,
          "age" : 35,
          "city" : "北京",
          "province" : "北京",
          "country" : "中国",
          "address" : "中国北京市朝阳区建国门",
          "location" : {
            "lat" : "39.718256",
            "lon" : "116.367910"
          }
        }
      }
    ]
  }
}
得到了3个匹配的文档。我们也可以对它们进行排序:
GET twitter/_search
{
  "query":{
    "range": {
      "age": {
        "gte": 30,
        "lte": 40
      }
    }
  },
  "sort":[
    {
      "age":{
        "order":"desc"
      }
      ,"uid":{
        "order":"asc"
      }
    }
    ]
}
上面的查询把结果按年龄age降序, 用户uid升序排列.
Exists 查询
我们可以通过 exists 来查询一个字段是否存在。比如我们再增加一个文档:
PUT twitter/_doc/20
{
  "user" : "王二",
  "message" : "今儿天气不错啊,出去转转去",
  "uid" : 20,
  "age" : 40,
  "province" : "北京",
  "country" : "中国",
  "address" : "中国北京市海淀区",
  "location" : {
    "lat" : "39.970718",
    "lon" : "116.325747"
  }
}
注意, 在这个文档里,不存在 city 这个字段,那么下面的搜索将不会返回上面的这个文档:
GET twitter/_search
{
  "query":{
    "exists":{
      "field":"city"
    }
  }
}
只要文档的 city 字段不为空就会被返回。反之,如果一个文档里city这个字段是空的,那么就不会返回。
如果查询不含 city 这个字段的所有的文档,可以这样查询:
GET twitter/_search
{
  "query":{
    "bool":{
      "must_not": [
        {
          "exists": {
            "field":"city"
          }
        }
      ]
    }
  }
}
假如我们创建另外一个索引 twitter10,我们打入如下的命令:
PUT twitter10/_doc/1
{
  "locale":null
}
数据插入后, 我们看一下twitter10下的所有数据:
GET twitter10/_search
结果为:
{
  "took" : 0,
  "timed_out" : false,
  "_shards" : {
    "total" : 1,
    "successful" : 1,
    "skipped" : 0,
    "failed" : 0
  },
  "hits" : {
    "total" : {
      "value" : 1,
      "relation" : "eq"
    },
    "max_score" : 1.0,
    "hits" : [
      {
        "_index" : "twitter10",
        "_type" : "_doc",
        "_id" : "1",
        "_score" : 1.0,
        "_source" : {
          "locale" : null
        }
      }
    ]
  }
}
数据插入成功.
然后,我们使用如下的命令来进行查询:
GET twitter10/_search
{
  "query":{
    "exists":{
      "field": "locale"
    }
  }
}
查询结果是:
{
  "took" : 0,
  "timed_out" : false,
  "_shards" : {
    "total" : 1,
    "successful" : 1,
    "skipped" : 0,
    "failed" : 0
  },
  "hits" : {
    "total" : {
      "value" : 0,
      "relation" : "eq"
    },
    "max_score" : null,
    "hits" : [ ]
  }
}
没有匹配的数据.
我们再插入一笔数据:
PUT twitter10/_doc/2
{
  "locale":"china"
}
如果你想找到一个 没有值 (missing) 的字段,你可以使用如下的方法:
GET twitter10/_search
{
  "query":{
    "bool":{
      "must_not": [
        {
          "exists": {
            "field": "locale"
          }
        }
      ]
    }
  }
}
执行的结果是:
{
  "took" : 0,
  "timed_out" : false,
  "_shards" : {
    "total" : 1,
    "successful" : 1,
    "skipped" : 0,
    "failed" : 0
  },
  "hits" : {
    "total" : {
      "value" : 1,
      "relation" : "eq"
    },
    "max_score" : 0.0,
    "hits" : [
      {
        "_index" : "twitter10",
        "_type" : "_doc",
        "_id" : "1",
        "_score" : 0.0,
        "_source" : {
          "locale" : null
        }
      }
    ]
  }
}
显然这个就是我们想要的结果。
匹配短语
我们可以通过如下的方法来查找"message"栏位的值是"happy birthday"的文档:
GET twitter/_search
{
  "query":{
    "match": {
      "message": "happy birthday"
    }
  }
}
执行结果:
{
  "took" : 0,
  "timed_out" : false,
  "_shards" : {
    "total" : 1,
    "successful" : 1,
    "skipped" : 0,
    "failed" : 0
  },
  "hits" : {
    "total" : {
      "value" : 3,
      "relation" : "eq"
    },
    "max_score" : 2.4032001,
    "hits" : [
      {
        "_index" : "twitter",
        "_type" : "_doc",
        "_id" : "3",
        "_score" : 2.4032001,
        "_source" : {
          "user" : "东城区-李四",
          "message" : "happy birthday!",
          "uid" : 4,
          "age" : 30,
          "city" : "北京",
          "province" : "北京",
          "country" : "中国",
          "address" : "中国北京市东城区",
          "location" : {
            "lat" : "39.893801",
            "lon" : "116.408986"
          }
        }
      },
      {
        "_index" : "twitter",
        "_type" : "_doc",
        "_id" : "5",
        "_score" : 2.1060429,
        "_source" : {
          "user" : "朝阳区-老王",
          "message" : "Happy BirthDay My Friend!",
          "uid" : 6,
          "age" : 50,
          "city" : "北京",
          "province" : "北京",
          "country" : "中国",
          "address" : "中国北京市朝阳区国贸",
          "location" : {
            "lat" : "39.918256",
            "lon" : "116.467910"
          }
        }
      },
      {
        "_index" : "twitter",
        "_type" : "_doc",
        "_id" : "6",
        "_score" : 1.0587358,
        "_source" : {
          "user" : "虹桥-老吴",
          "message" : "好友来了都今天我生日,好友来了,什么 birthday happy 就成!",
          "uid" : 7,
          "age" : 90,
          "city" : "上海",
          "province" : "上海",
          "country" : "中国",
          "address" : "中国上海市闵行区",
          "location" : {
            "lat" : "31.175927",
            "lon" : "121.383328"
          }
        }
      }
    ]
  }
}
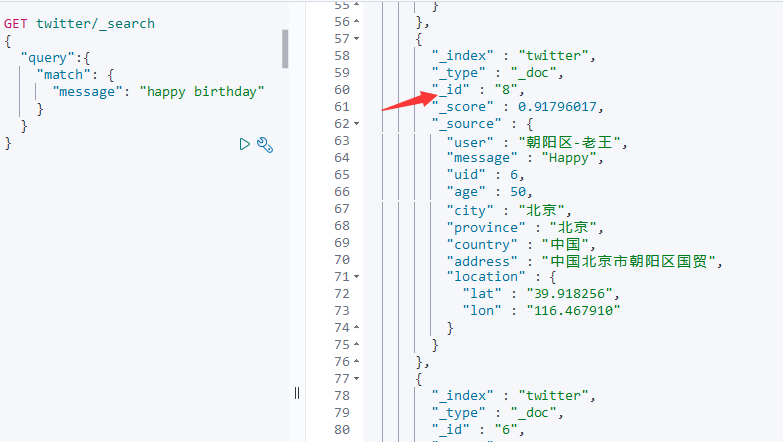
在默认的情况下,这个匹配是“或”的关系,也就是找到文档里含有“happy"或者“birthday”的文档。如果我们新增加一个文档:
PUT twitter/_doc/8
{
  "user": "朝阳区-老王",
  "message": "Happy",
  "uid": 6,
  "age": 50,
  "city": "北京",
  "province": "北京",
  "country": "中国",
  "address": "中国北京市朝阳区国贸",
  "location": {
    "lat": "39.918256",
    "lon": "116.467910"
  }
}
重新进行搜索,可以看到这个新增加的id=8的也会在搜索的结果中,虽然它的message栏位中只含有“Happy"一个单词。
如果我们想得到“与” (and)的关系, 查询同时存在happy和birthday的文档,我们可以采用如下的办法:
GET twitter/_search
{
  "query":{
    "match": {
      "message": {
        "query": "happy birthday",
        "operator": "and"
      }
    }
  }
}
经过这样的修改,我们再也看不见那个id=8的文档了,这是因为我们必须在 message 中同时匹配 “happy” 及 “birthday” 这两个词。
我们还有一种方法,那就是:
GET twitter/_search
{
  "query":{
    "match": {
      "message": {
        "query": "happy birthday",
        "minimum_should_match": 2
      }
    }
  }
}
在这里,我们采用了 “minimum_should_match” 来表明至少有2个是匹配的才可以。
我们可以看到在搜索到的结果中,无论我们搜索的是大小写字母,在搜索的时候,我们都可以匹配到,并且在 message 中,happy birthday 这两个词的先后顺序也不是很重要。比如,我们把 id = 6的文档中是包含了"birthday happy":
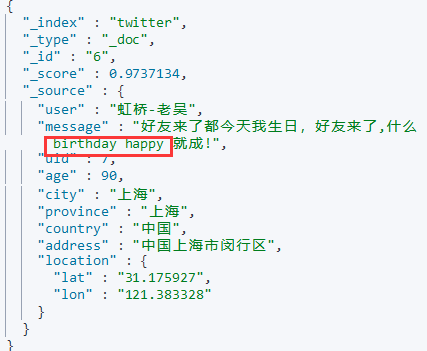
很显然,我们前面的query在match时是不区分先后顺序的。我们下面使用 match_phrase 来看看。
GET twitter/_search
{
  "query":{
    "match_phrase": {
      "message": "Happy birthday"
    }
  },
  "highlight": {
    "fields": {
      "message": {}
    }
  }
}
执行结果:
{
  "took" : 1,
  "timed_out" : false,
  "_shards" : {
    "total" : 1,
    "successful" : 1,
    "skipped" : 0,
    "failed" : 0
  },
  "hits" : {
    "total" : {
      "value" : 2,
      "relation" : "eq"
    },
    "max_score" : 2.3394413,
    "hits" : [
      {
        "_index" : "twitter",
        "_type" : "_doc",
        "_id" : "3",
        "_score" : 2.3394413,
        "_source" : {
          "user" : "东城区-李四",
          "message" : "happy birthday!",
          "uid" : 4,
          "age" : 30,
          "city" : "北京",
          "province" : "北京",
          "country" : "中国",
          "address" : "中国北京市东城区",
          "location" : {
            "lat" : "39.893801",
            "lon" : "116.408986"
          }
        },
        "highlight" : {
          "message" : [
            "<em>happy</em> <em>birthday</em>!"
          ]
        }
      },
      {
        "_index" : "twitter",
        "_type" : "_doc",
        "_id" : "5",
        "_score" : 2.0240107,
        "_source" : {
          "user" : "朝阳区-老王",
          "message" : "Happy BirthDay My Friend!",
          "uid" : 6,
          "age" : 50,
          "city" : "北京",
          "province" : "北京",
          "country" : "中国",
          "address" : "中国北京市朝阳区国贸",
          "location" : {
            "lat" : "39.918256",
            "lon" : "116.467910"
          }
        },
        "highlight" : {
          "message" : [
            "<em>Happy</em> <em>BirthDay</em> My Friend!"
          ]
        }
      }
    ]
  }
}
从上面的结果, 我们可以看到使用了match_phrase就会要求 Happy 必须是在 birthday 的前面。
那我们现在来尝试搜索一下"Happy My":
GET twitter/_search
{
  "query":{
    "match_phrase": {
      "message": "Happy my"
    }
  },
  "highlight": {
    "fields": {
      "message": {}
    }
  }
}
这样子是找不到"完全匹配"的结果的, 那如果允许happy和my之间有一个单词, 我们可以像这样写:
GET twitter/_search
{
  "query":{
    "match_phrase": {
      "message": {
        "query": "Happy my",
        "slop": 1
      }
    }
  },
  "highlight": {
    "fields": {
      "message": {}
    }
  }
}
执行结果:

Named queries
我们可以使用 _name 为一个 filter 或 query 来取一个名字,比如:
GET twitter/_search
{
  "query": {
    "bool": {
      "must": [
        {
          "match": {
            "city": {
              "query": "北京",
              "_name": "城市"
            }
          }
        },
        {
          "match": {
            "country": {
              "query": "中国",
              "_name": "国家"
            }
          }
        }
      ],
      "should": [
        {
          "match": {
            "_id": {
              "query": "1",
              "_name": "ID"
            }
          }
        }
      ]
    }
  }
}
执行结果:
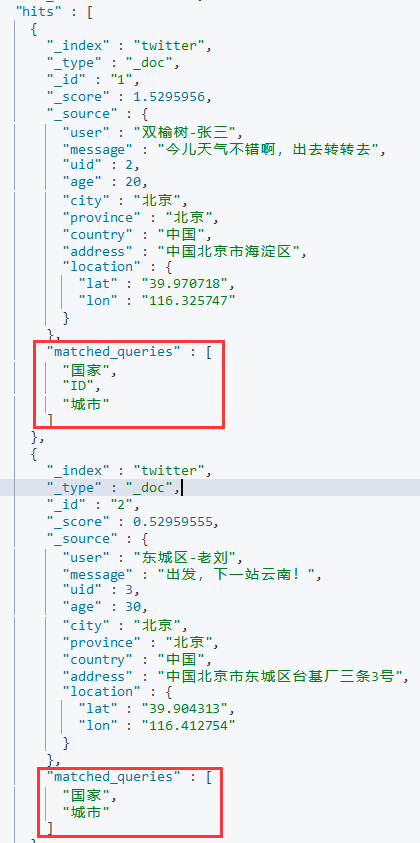
我们从上面的返回结果可以看出来多了一个叫做 matched_queries 的字段。在它的里面罗列了每个匹配了的查询。第一个返回的查询结果是三个都匹配了的,但是第二个来说就只有两项是匹配的。
通配符查询
我们可以使用 wildcard 查询一个字符串里含有的字符:
GET twitter/_search
{
  "query":{
    "wildcard": {
      "city.keyword": {
        "value": "*海"
      }
    }
  }
}
上面的代码查询在 city 这个关键字中含有“海”的文档。执行结果是:
{
  "took" : 4,
  "timed_out" : false,
  "_shards" : {
    "total" : 1,
    "successful" : 1,
    "skipped" : 0,
    "failed" : 0
  },
  "hits" : {
    "total" : {
      "value" : 1,
      "relation" : "eq"
    },
    "max_score" : 1.0,
    "hits" : [
      {
        "_index" : "twitter",
        "_type" : "_doc",
        "_id" : "6",
        "_score" : 1.0,
        "_source" : {
          "user" : "虹桥-老吴",
          "message" : "好友来了都今天我生日,好友来了,什么 birthday happy 就成!",
          "uid" : 7,
          "age" : 90,
          "city" : "上海",
          "province" : "上海",
          "country" : "中国",
          "address" : "中国上海市闵行区",
          "location" : {
            "lat" : "31.175927",
            "lon" : "121.383328"
          }
        }
      }
    ]
  }
}
我们可以看到查到 city 为 “上海” 的文档。
SQL查询
对于很多已经习惯用 RDMS(关系型数据库)的工作人员,他们更喜欢使用 SQL 来进行查询。Elasticsearch 也对 SQL 有支持:
GET /_sql?
{
  "query":"""
  SELECT * FROM twitter
  WHERE age=30
  """
}
注意: 这个查询, 在7.7版本的结果, 与原文7.5版本的结果差别比较大.
通过这个查询,我们可以找到所有年龄等于30的用户。在这个搜索中,我们使用了SQL语句。我们可以很快地把我们的 SQL 知识转化到 Elasticsearch 的使用场景中来。我们可以通过如下的方法得到它对应的 DSL 语句:
GET /_sql/translate
{
    "query":"""
  SELECT * FROM twitter
  WHERE age=30
  """
}
我们的得到的结果是:
{
  "size" : 1000,
  "query" : {
    "term" : {
      "age" : {
        "value" : 30,
        "boost" : 1.0
      }
    }
  },
  "_source" : {
    "includes" : [
      "address",
      "age",
      "city",
      "country",
      "message",
      "province",
      "uid",
      "user"
    ],
    "excludes" : [ ]
  },
  "docvalue_fields" : [
    {
      "field" : "location"
    }
  ],
  "sort" : [
    {
      "_doc" : {
        "order" : "asc"
      }
    }
  ]
}
如果你想了解更多关于Elasticsearch SQL,请参阅另外一篇文章 “ Elasticsearch SQL介绍及实例 ”。
Multi Search API
使用单个 API 请求执行多个搜索。这个 API 的好处是节省 API 的请求个数,把多个请求放到一个 API 请求中来实现。
为了说明问题的方便,我们可以多加一个叫做 twitter1 的 index。它的内容如下:
POST _bulk
{ "create" : { "_index" : "twitter1", "_id": 1} }
{"user":"双榆树-张三","message":"今儿天气不错啊,出去转转去","uid":2,"age":20,"city":"北京","province":"北京","country":"中国","address":"中国北京市海淀区","location":{"lat":"39.970718","lon":"116.325747"}}
{ "index" : { "_index" : "twitter", "_id": 2 }}
{"user":"东城区-老刘","message":"出发,下一站云南!","uid":3,"age":30,"city":"北京","province":"北京","country":"中国","address":"中国北京市东城区台基厂三条3号","location":{"lat":"39.904313","lon":"116.412754"}}
{ "index" : { "_index" : "twitter", "_id": 3} }
{"user":"东城区-李四","message":"happy birthday!","uid":4,"age":30,"city":"北京","province":"北京","country":"中国","address":"中国北京市东城区","location":{"lat":"39.893801","lon":"116.408986"}}
{ "index" : { "_index" : "twitter", "_id": 4} }
{"user":"朝阳区-老贾","message":"123,gogogo","uid":5,"age":35,"city":"北京","province":"北京","country":"中国","address":"中国北京市朝阳区建国门","location":{"lat":"39.718256","lon":"116.367910"}}
{ "index" : { "_index" : "twitter", "_id": 5} }
{"user":"朝阳区-老王","message":"Happy BirthDay My Friend!","uid":6,"age":50,"city":"北京","province":"北京","country":"中国","address":"中国北京市朝阳区国贸","location":{"lat":"39.918256","lon":"116.467910"}}
{ "index" : { "_index" : "twitter", "_id": 6} }
{"user":"虹桥-老吴","message":"好友来了都今天我生日,好友来了,什么 birthday happy 就成!","uid":7,"age":90,"city":"上海","province":"上海","country":"中国","address":"中国上海市闵行区","location":{"lat":"31.175927","lon":"121.383328"}}
这样在我们的 Elasticsearch 中就有两个索引了。我们可以做如下的 _msearch。
GET twitter/_msearch
{"index":"twitter"}
{"query":{"match_all":{}},"from":0,"size":1}
{"index":"twitter"}
{"query":{"bool":{"filter":{"term":{"city.keyword":"北京"}}}}, "size":1}
{"index":"twitter1"}
{"query":{"match_all":{}}}
上面我们通过 _msearch 终点来实现在一个 API 请求中做多个查询,对多个 index 进行同时操作。显示结果为:

多个索引操作
在上面我们引入了另外一个索引 twitter1。在实际的操作中,我们可以通过通配符,或者直接使用多个索引来进行搜索:
GET twitter*/_search
上面的操作是对所有的以 twitter 为开头的索引来进行搜索,显示的结果是在所有的 twitter 及 twitter1 中的文档:

我们还可以像下面这样, 传入多个索引:
GET /twitter,twitter1/_search
但是注意: 多个索引之间不能加空格, 否则会返回其他结果:
GET /twitter, twitter1/_search
执行结果不是我们要的:
Profile API
Profile API 是调试工具。 它添加了有关执行搜索请求中的每个组件的详细信息。 它为用户提供有关搜索的每个步骤的洞察力.
执行请求并可以帮助确定某些请求为何缓慢。
GET twitter/_search
{
  "profile": "true",
  "query": {
    "match": {
      "city": "北京"
    }
  }
}

从上面我们可以看出来,这个搜索是搜索了“北”及“京”,而不是把北京作为一个整体来进行搜索的。我们可以在以后的文档中可以学习使用中文分词器来进行分词搜索。有兴趣的同学可以把上面的搜索修改为 city.keyword 来看看(会全部匹配)。如果你对分词感兴趣的话,请参阅 “ Elastic:菜鸟上手指南 ” 中的分词器部分。
除了上面的通过命令来进行 profile 以外,我们也可以通过 Kibana 的 UI 对我们的搜索进行 profile:
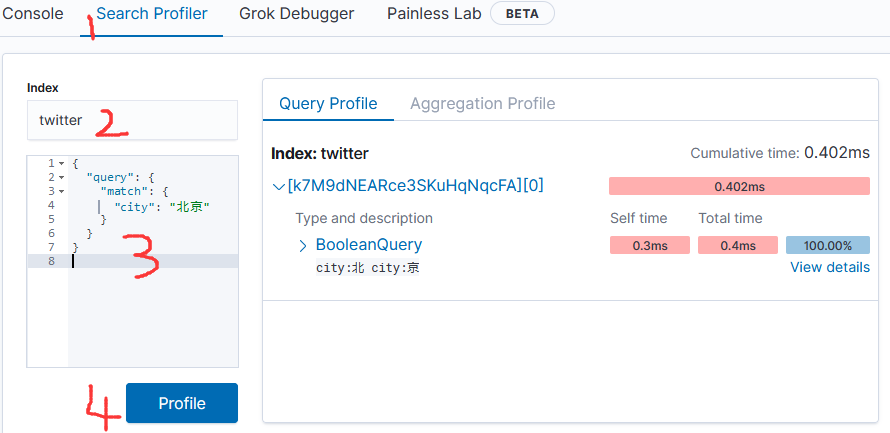
在很多的时候这个可视化的工具更具直观性。
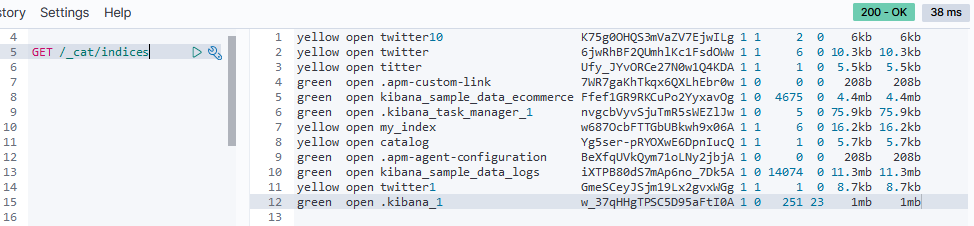
查看所有索引列表
GET /_cat/indices
下一节要学习"聚合 aggregation 及 analyzer".


 被折叠的 条评论
为什么被折叠?
被折叠的 条评论
为什么被折叠?
 到【灌水乐园】发言


