


学习SpringMVC——说说视图解析器
各位前排的,后排的,都不要走,咱趁热打铁,就这一股劲我们今天来说说spring mvc的视图解析器(不要抢,都有位子~~~)
相信大家在昨天那篇如何获取请求参数篇中都已经领略到了spring mvc注解的魅力和套路了。搭上@RequestMapping的便车,我们可以去到我们想去的地方(方法)去,借助@RequestParam、@PathVariable等我们可以得到请求中想要的参数值,最终还能够通过神奇的“return SUCCESS”到达我们的目的地。今天主要就来说说在达到目的地的路上,我们都经历了些什么!
在此之前
我们顺便说说@RequestHeader、请求参数类型为POJO(也就是Java对象类型)的情况以及ModelAndView
1. @RequestHeader
这个无需多说,还是原来的配方,还是一样的套路,只要举个例子,你就都明白了。
在SpringMVCTest中添加测试方法
|
1
2
3
4
5
|
@RequestMapping
(value=
"/testRequestHeader"
)
public
String testRequestHeader(
@RequestHeader
(value=
"Accept-Language"
) String language){
System.out.println(
"testRequestHeader Accept-Languge:"
+ language);
return
SUCCESS;
}
|
我们知道一个请求如get请求或post都有请求头和响应头,这里我们想获取的是请求头中“Accept-Language”的具体信息,所以就用上了@RequestHeader注解来获取。
index.jsp中
|
1
|
<
a
href="springmvc/testRequestHeader">testRequestHeader</
a
><
br
/><
br
/>
|
启动服务器,点击超链接,我们得到了
|
1
|
testRequestHeader Accept-Languge:zh-CN
|
2. 请求参数为POJO
前面两篇,我们看到的请求类型都是一些字符串也就是某一个字段。那么如果现在有一个form表单,说夸张点,表单中有10个字段需要提交,行吧,还用原来的匹配的方式,你要用10个参数来接收,累不累?累!有没有办法?有!我们可以把这些要提交的字段封装在一个对象中,从而请求类型就是一个POJO。
这里我们新建一个类User
|
1
2
3
4
5
6
7
8
9
10
11
12
13
14
15
16
17
18
19
20
21
22
23
24
25
26
27
28
29
30
31
32
33
34
35
36
37
38
39
40
41
42
43
44
45
46
47
48
49
50
51
52
53
54
55
56
57
58
59
60
61
62
63
64
65
66
67
68
69
70
71
72
73
74
75
76
77
78
79
80
81
82
83
84
85
86
87
|
package
com.jackie.springmvc.entities;
public
class
User {
private
Integer id;
private
String username;
private
String password;
private
String email;
private
int
age;
private
Address address;
public
Integer getId() {
return
id;
}
public
void
setId(Integer id) {
this
.id = id;
}
public
String getUsername() {
return
username;
}
public
void
setUsername(String username) {
this
.username = username;
}
public
String getPassword() {
return
password;
}
public
void
setPassword(String password) {
this
.password = password;
}
public
String getEmail() {
return
email;
}
public
void
setEmail(String email) {
this
.email = email;
}
public
int
getAge() {
return
age;
}
public
void
setAge(
int
age) {
this
.age = age;
}
public
Address getAddress() {
return
address;
}
public
void
setAddress(Address address) {
this
.address = address;
}
public
User(String username, String password, String email,
int
age) {
super
();
this
.username = username;
this
.password = password;
this
.email = email;
this
.age = age;
}
public
User(Integer id, String username, String password, String email,
int
age) {
super
();
this
.id = id;
this
.username = username;
this
.password = password;
this
.email = email;
this
.age = age;
}
@Override
public
String toString() {
return
"User [id="
+ id +
", username="
+ username +
", password="
+ password +
", email="
+ email +
", age="
+ age +
"]"
;
}
public
User() {
}
}
|
还有一个Address类
|
1
2
3
4
5
6
7
8
9
10
11
12
13
14
15
16
17
18
19
20
21
22
23
24
25
26
27
28
|
package
com.jackie.springmvc.entities;
public
class
Address {
private
String province;
private
String city;
public
String getProvince() {
return
province;
}
public
void
setProvince(String province) {
this
.province = province;
}
public
String getCity() {
return
city;
}
public
void
setCity(String city) {
this
.city = city;
}
@Override
public
String toString() {
return
"Address [province="
+ province +
", city="
+ city +
"]"
;
}
}
|
同时我们还需要在SpringMVCTest中写一个testPojo的测试方法
|
1
2
3
4
5
|
@RequestMapping
(value=
"/testPojo"
)
public
String testPojo(User user){
System.out.println(
"testPojo: "
+ user);
return
SUCCESS;
}
|
好了,这样,我们就可以在前台jsp页面上构造这样的表单数据了
|
1
2
3
4
5
6
7
8
9
|
<
form
action="springmvc/testPojo" method="post">
username: <
input
type="text" name="username"><
br
>
password: <
input
type="password" name="password"><
br
>
email: <
input
type="text" name="email"><
br
>
age: <
input
type="text" name="age"><
br
>
city: <
input
type="text" name="address.city"><
br
>
province: <
input
type="text" name="address.province"><
br
>
<
input
type="submit" value="submit">
</
form
><
br
/><
br
/>
|
至此,我们启动tomcat服务器,就可以发送一个POJO类型的参数了,并且我们成功了读取了这个请求参数
3. ModelAndView
ModelAndView是什么鬼?其实它是我们经常写在SpringMVCTest里测试方法的返回值类型,在方法体内我们可以通过ModelAndView对象来是像请求域中添加模型数据的,抽象?那就看例子吧~~~
SpringMVCTest中添加方法
|
1
2
3
4
5
6
7
|
@RequestMapping
(value=
"/testModelAndView"
)
public
ModelAndView testModelAndView(){
String viewname = SUCCESS;
ModelAndView modelAndView =
new
ModelAndView(viewname);
modelAndView.addObject(
"time"
,
new
Date());
return
modelAndView;
}
|
index.jsp中还是添加一个超链接
|
1
|
<
a
href="springmvc/testModelAndView">testModelAndView</
a
><
br
/><
br
/>
|
注意我们需要在结果页面中拿到这个放入请求域中的键值对,所以在success.jsp页面中添加
|
1
|
time: ${requestScope.time}<
br
><
br
>
|
最终的效果图是这样的

没错,我们将当前时间信息写进了请求域,并通过视图展示出来。
有了前面的小铺垫,现在我们来唠唠这视图解析器的事儿
视图解析器
这里主要通过调试源代码看看spring mvc的handler是如何利用视图解析器找到并返回实际的物理视图的,别眨眼
1. 如何看源码
说到调试源码,我们就要有源码才行,那么如何看源码,相信这个页面大家已经看腻了吧

没错,这是因为你没有导入源码的jar包,程序没办法给你呈现源代码,还好,这个问题难不倒我们,在第一篇中我们有关于springframework所需要的功能jar包,javadoc以及源码包,那么来导入一波

选中前面提示的spring-context的source jar包,我们就可以一睹这个java文件的庐山真面目了

484很开心~~~
2. 代码调试
为此我们写一个测试方法
|
1
2
3
4
5
|
@RequestMapping
(
"/testViewAndViewResolver"
)
public
String testViewAndViewResolver(){
System.out.println(
"testViewAndViewResolver"
);
return
SUCCESS;
}
|
index.jsp加个链接
|
1
|
<
a
href="springmvc/testViewAndViewResolver">testViewAndViewResolver</
a
><
br
/><
br
/>
|
给testViewAndView方法体一个断点,我们进入调试状态,

程序停在断点处,在调试的上下文中,我们找到DispatcherServlet.doDispaatch方法,以此为入口,来看看视图解析器
(1) 进入DispatcherServlet.doDispaatch
定位到
|
1
|
mv = ha.handle(processedRequest, response, mappedHandler.getHandler());
|

可以看到这里有个mv对象,实际上就是ModelAndView,通过调试我们发现这里的mv中包括了model和view,view的指向就是success,而model这里之所以有值是因为在SpringMVCTest中有一个getUser方法,且加上了@ModelAttribute注解,从而初始化了model。
(2)执行processDispatchResult方法
在doDispatch中继续执行,直到
|
1
|
processDispatchResult(processedRequest, response, mappedHandler, mv, dispatchException);
|
进入该方法进行视图渲染
|
1
2
3
4
5
6
7
8
9
10
11
12
13
14
15
16
17
18
19
20
21
22
23
24
25
26
27
28
29
30
31
32
33
34
35
36
37
38
39
40
|
private
void
processDispatchResult(HttpServletRequest request, HttpServletResponse response,
HandlerExecutionChain mappedHandler, ModelAndView mv, Exception exception)
throws
Exception {
boolean
errorView =
false
;
if
(exception !=
null
) {
if
(exception
instanceof
ModelAndViewDefiningException) {
logger.debug(
"ModelAndViewDefiningException encountered"
, exception);
mv = ((ModelAndViewDefiningException) exception).getModelAndView();
}
else
{
Object handler = (mappedHandler !=
null
? mappedHandler.getHandler() :
null
);
mv = processHandlerException(request, response, handler, exception);
errorView = (mv !=
null
);
}
}
// Did the handler return a view to render?
if
(mv !=
null
&& !mv.wasCleared()) {
render(mv, request, response);
if
(errorView) {
WebUtils.clearErrorRequestAttributes(request);
}
}
else
{
if
(logger.isDebugEnabled()) {
logger.debug(
"Null ModelAndView returned to DispatcherServlet with name '"
+ getServletName() +
"': assuming HandlerAdapter completed request handling"
);
}
}
if
(WebAsyncUtils.getAsyncManager(request).isConcurrentHandlingStarted()) {
// Concurrent handling started during a forward
return
;
}
if
(mappedHandler !=
null
) {
mappedHandler.triggerAfterCompletion(request, response,
null
);
}
}
|
这里我们着重看下render方法,然后得到视图的名字,即运行到view = resolveViewName(mv.getViewName(), mv.getModelInternal(), locale, request);进入到该方法后,我们可以看到整个方法如下:
|
1
2
3
4
5
6
7
8
9
10
11
|
protected
View resolveViewName(String viewName, Map<String, Object> model, Locale locale,
HttpServletRequest request)
throws
Exception {
for
(ViewResolver viewResolver :
this
.viewResolvers) {
View view = viewResolver.resolveViewName(viewName, locale);
if
(view !=
null
) {
return
view;
}
}
return
null
;
}
|
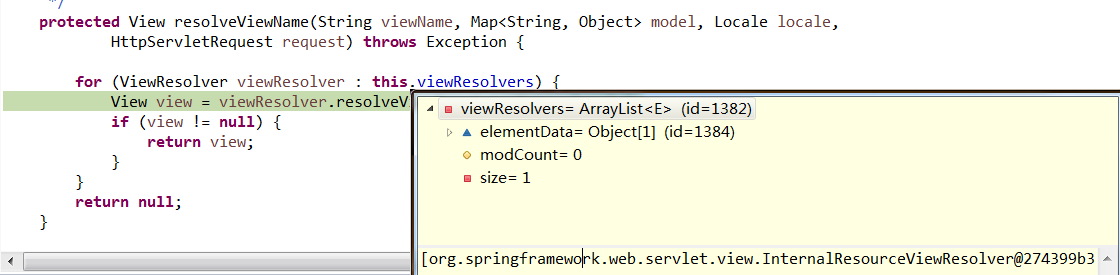
这里用到了视图解析器即this.viewResolvers。而真正的渲染视图在DispatcherServlet的view.render(mv.getModelInternal(), request, response);点击进入这里的render方法,我们选择AbstractView这个抽象类中的该方法
|
1
2
3
4
5
6
7
8
9
10
11
12
13
14
15
16
17
|
/**
* Prepares the view given the specified model, merging it with static
* attributes and a RequestContext attribute, if necessary.
* Delegates to renderMergedOutputModel for the actual rendering.
* @see #renderMergedOutputModel
*/
@Override
public
void
render(Map<String, ?> model, HttpServletRequest request, HttpServletResponse response)
throws
Exception {
if
(logger.isTraceEnabled()) {
logger.trace(
"Rendering view with name '"
+
this
.beanName +
"' with model "
+ model +
" and static attributes "
+
this
.staticAttributes);
}
Map<String, Object> mergedModel = createMergedOutputModel(model, request, response);
prepareResponse(request, response);
renderMergedOutputModel(mergedModel, request, response);
}
|
该方法负责针对具体的Model呈现具体的view,这时候再进入到renderMergedOutputMode的具体实现类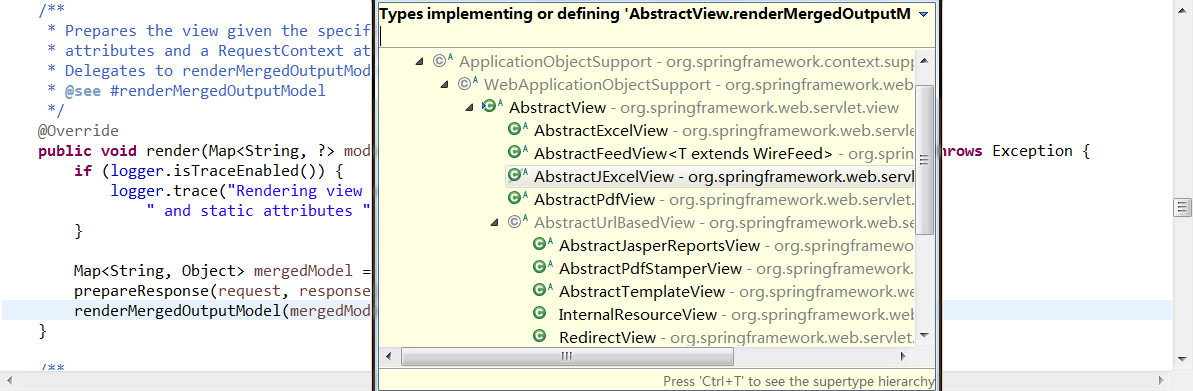
点击后,我们发现对此方法多个类都有实现,那么到底是哪个呢,实际上是InternalResourceView这个类,为什么定位到这个类,笔者是根据之前在springmvc.xml中配置的视图解析器的线索找到的,当时我们配的是InternalResourceViewResolver这个解析器,所以相应的,这里应该是InternalResourceView类,同时通过加断点,更加验证了这一想法~~~
此外在调试DispatcherServlet的resolveViewName方法时,发现,这里的viewResolver正是我们配置的视图解析器InternalResourceViewResolver
同时发现这里返回的view就是/WEB-INF/views/success.jsp
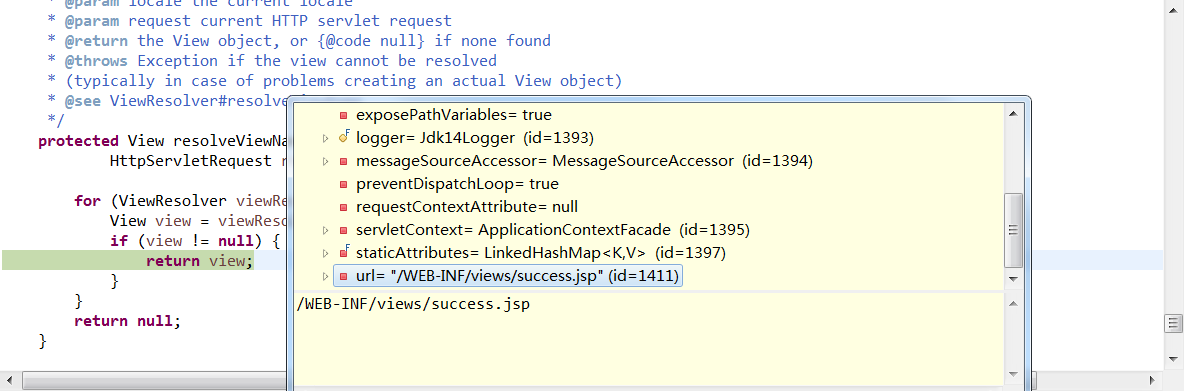
至此,我们就完成了ModelAndView的逻辑路径向这里"/WEB-INF/views/success.jsp"的物理路径的转化,大致了了解了视图解析器的工作机制(感觉还是没有说清楚--!)。
好了,本篇我们主要学习了
- @Request的用法
- 请求参数为POJO的用法
- ModelAndView的用法
- 如何看源代码
- spring mvc如何通过视图解析器得到真正的物理视图页面


 9534
9534


 被折叠的 条评论
为什么被折叠?
被折叠的 条评论
为什么被折叠?
 到【灌水乐园】发言


