


版本
我用的是SpringBoot 2.7.3+Knife4j3.0.3
添加依赖
当然最新Knife4j
       <dependency>
            <groupId>com.github.xiaoymin</groupId>
            <artifactId>knife4j-spring-boot-starter</artifactId>
            <version>3.0.3</version>
        </dependency>
除此之外还需要SpringMvc的依赖
添加配置类
Knife4jConfig:
package com.example.springjpaquery.config;

import com.github.xiaoymin.knife4j.spring.annotations.EnableKnife4j;
import org.springframework.context.annotation.Bean;
import org.springframework.context.annotation.Configuration;
import springfox.documentation.builders.ApiInfoBuilder;
import springfox.documentation.builders.PathSelectors;
import springfox.documentation.builders.RequestHandlerSelectors;
import springfox.documentation.oas.annotations.EnableOpenApi;
import springfox.documentation.service.Contact;
import springfox.documentation.spi.DocumentationType;
import springfox.documentation.spring.web.plugins.Docket;
import springfox.documentation.swagger2.annotations.EnableSwagger2;

/**
 * Knife4j配置类
 */
@Configuration
@EnableOpenApi
// @EnableKnife4j
// @EnableSwagger2
public class Knife4jConfig {
    @Bean
    public Docket docket() {
        Docket docket = new Docket(DocumentationType.OAS_30)
                .apiInfo(new ApiInfoBuilder()
                        .title("Aip在线文档")
                        .description("我的描述")
                        // .termsOfServiceUrl("http://www.xx.com/")
                        .contact(new Contact("knife", "https://blog.csdn.net/abst122", "xx@qq.com"))
                        .version("1.0")
                        .build())
                // 分组名称
                .groupName("all")
                .select()
                // 这里指定Controller扫描包路径
                .apis(RequestHandlerSelectors.basePackage("com.example.springjpaquery"))
                .paths(PathSelectors.any())
                .build();

        return docket;
    }
}
添加controller
IndexController:
package com.example.springjpaquery.controller;


import io.swagger.annotations.Api;
import io.swagger.annotations.ApiImplicitParam;
import io.swagger.annotations.ApiImplicitParams;
import io.swagger.annotations.ApiOperation;
import org.springframework.http.ResponseEntity;
import org.springframework.web.bind.annotation.GetMapping;
import org.springframework.web.bind.annotation.RequestParam;
import org.springframework.web.bind.annotation.RestController;

/**
 * 首页模块
 */
@Api(tags = {"首页模块"})
@RestController
public class IndexController {

    @ApiImplicitParams({
            @ApiImplicitParam(paramType = "query", dataType = "string", name = "name", value = "姓名")
    })
    @ApiOperation(value = "", notes = "", httpMethod = "GET")
    @GetMapping("/sayHi")
    public ResponseEntity<String> sayHi(@RequestParam(value = "name")String name){
        return ResponseEntity.ok("Hi:"+name);
    }
}
启动测试
如果报错
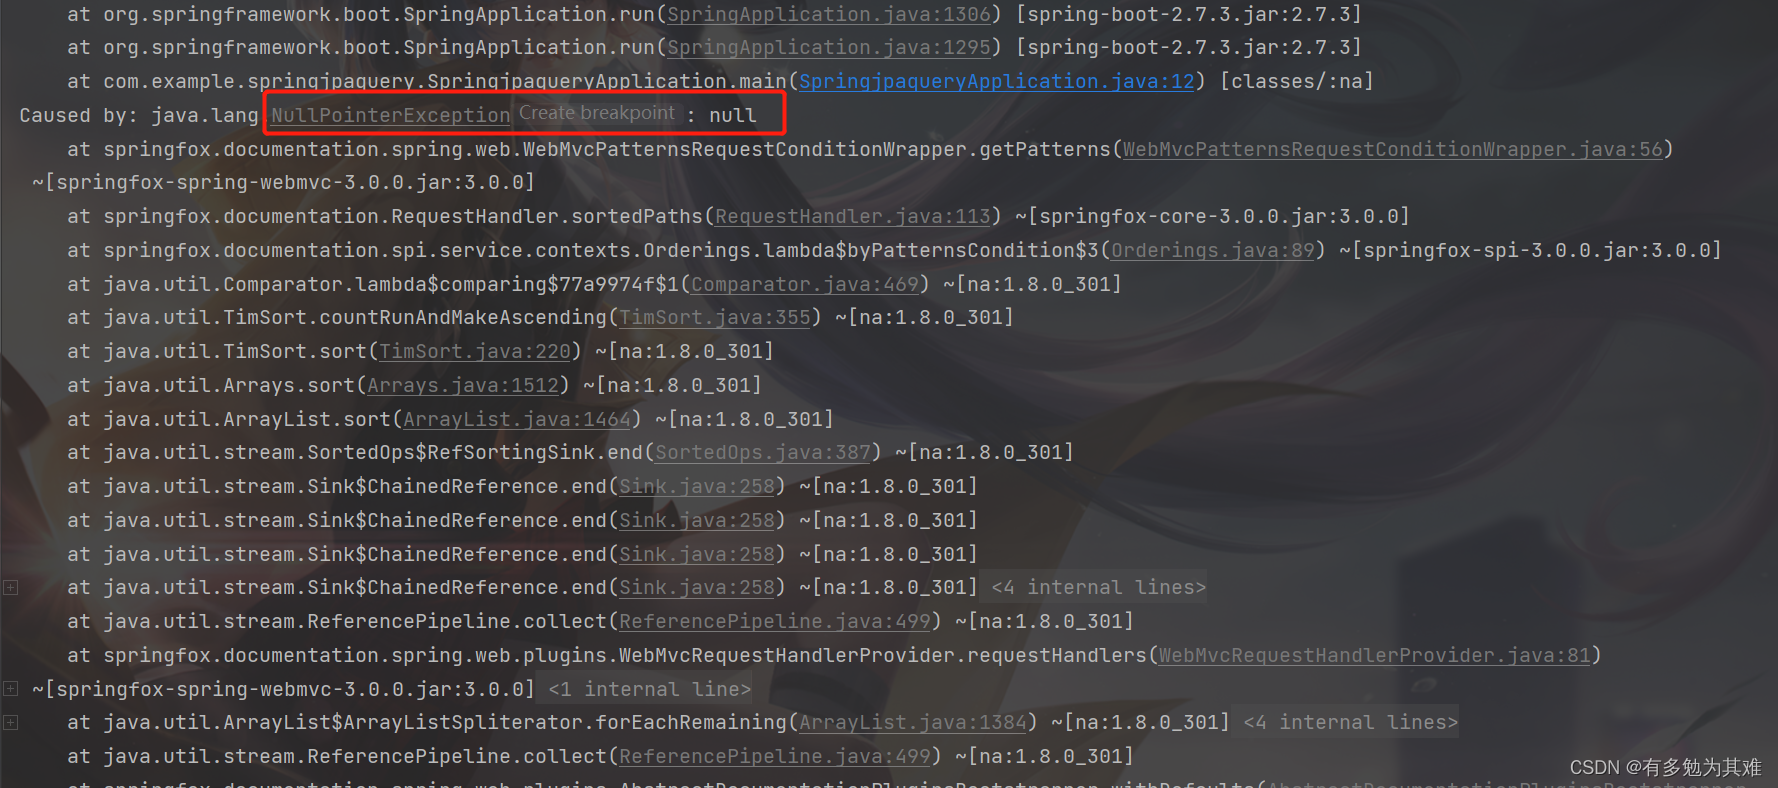
空指针异常,百度一下,有两个解决方案,忘记从哪里看的了,感谢!
- 降低springboot的版本一般降到
2.5.7即可,其他版本没试过 - 在主程序启动类中加上 @EnableWebMvc
既然使用MVC就要对静态资源进行放行
其实可以不用加@EnableWebMvc,springboot已经帮我们做了
@Configuration
public class SpringMvcSupport extends WebMvcConfigurationSupport {
    //设置静态资源访问过滤,当前类需要设置为配置类,并被扫描加载
    @Override
    public void addResourceHandlers(ResourceHandlerRegistry registry) {
    //当访问/pages/????时候,从/pages目录下查找内容
        registry.addResourceHandler("/**").addResourceLocations("classpath:/static/");
        registry.addResourceHandler("doc.html").addResourceLocations("classpath:/META-INF/resources/");
        registry.addResourceHandler("/webjars/**").addResourceLocations("classpath:/META-INF/resources/webjars/");
        super.addResourceHandlers(registry);
    }
}
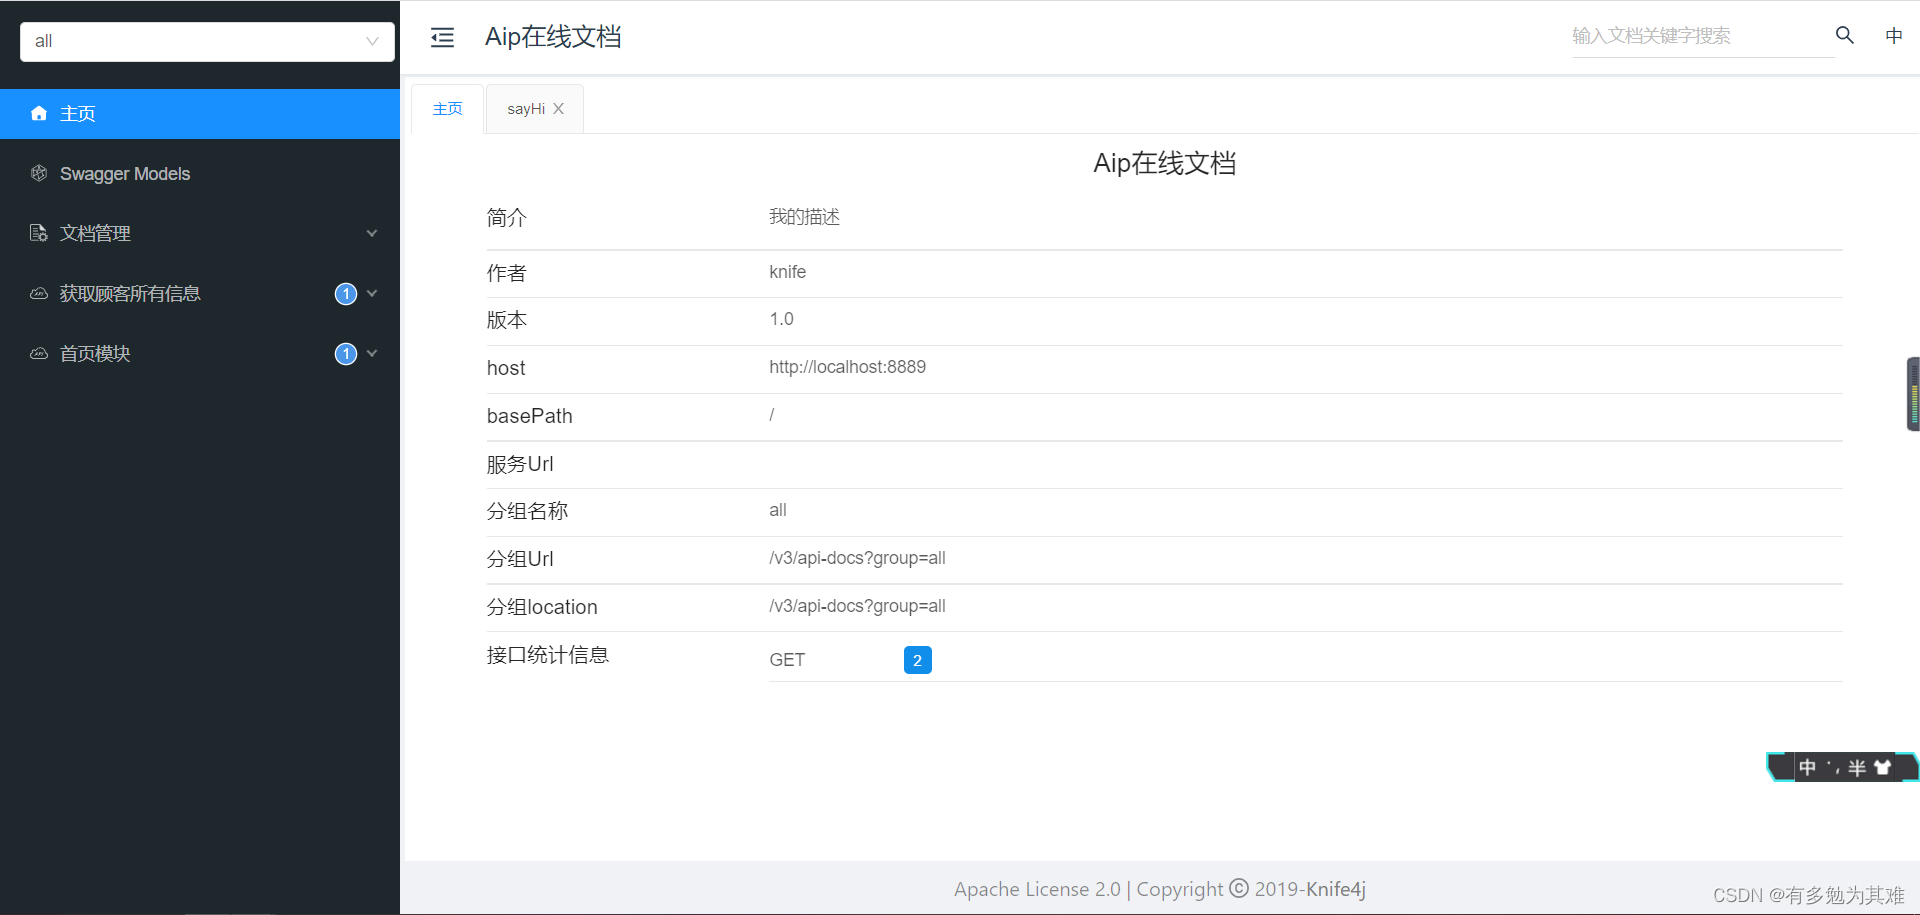
访问
http://localhost:8889/doc.html
yml配置
knife4j:
  # 是否开启加强模式 true开启  false关闭
  enable: true
  setting:
    # 是否开启调试功能  true开启  false关闭
    enableDebug: true
  basic:
    # 是否开启认证功能  true开启  false关闭
    enable: true
    username: test
    password: 123456
knife4j:
  # 开启增强配置
  enable: true
  # 开启生产环境屏蔽
  production: true


 1万+
1万+


 被折叠的 条评论
为什么被折叠?
被折叠的 条评论
为什么被折叠?
 到【灌水乐园】发言


