


1 React 新的前端思维方式
npm i create-react-app -g
create-react-app first_react_app
npm start

//执行eject则会弹出原本的scripts配置,不可逆
react的理念
UI = render(data)2 设计高质量的React组件
当 prop 的值不是字符串类型时,在 JSX 中必须用花括号 {} 包住,
所以 style 的值有两层花括号,外层花括号代表是 JSX 的语法,内层的花括号代表这是一个对象常量。
可以使用 babel-react-optimize 在发布时去除开发中的propTypes。
直接使用this.state = xxx 而不是使用setState,可能会导致渲染异常。
在constructor里初始化state,替代了过去的getInitialState。
render函数并不做实际渲染动作,只是返回一个JSX描述的结构,最终由React操作渲染。
如果不需要渲染可以让render return null || false 。
不要在render里执行setState。
componentWillMount进行setState无效,和componentDidMount对称。随着组件render前调用。
componentWillMount可以在服务端被调用。
componentDidMount 并不是紧随着组件render后调用。而是当所有子组件都render后才会一起进行componentDidMount。
产生真实dom。
装载生命周期:
constructor -> getInitialState(deprecated) -> getDefaultProps -> componentWillMount -> render -> componentDidMount
更新生命周期:
componentWillReceiveProps -> shouldComponentUpdate(只有为true才会往下执行) -> componentWillUpdate -> render -> componentDidUpdate
只要父组件的render被调用,render函数里的子组件就会进行更新,不管父组件传给子组件的props有没有改变,都会触发componentWillReceiveProps。
而子组件内部的setState不会触发componentWillReceiveProps。
当对子组件传入function时,可能会触发子组件无谓的刷新?
componentWillReceiveProps可以做两次props的比较,拒绝无谓的刷新,算一点小优化。
render决定渲染什么,shouldComponentUpdate决定渲不渲染,默认为true。可以通过手动比较nextProps,nextState和this.props与this.state的值来决定是否渲染。
由于setState不是立即state值,在shouldComponentUpdate里取得可能不是this.setState()后的state值。
componentDidUpdate的作用在于一些原生的绑定事件在dom更新后在这里可以重新进行绑定。
如果在组件内自建了原生DOM,可能需要在componentWillUnmount里进行手动销毁防止内存泄漏。
3 从Flux到Redux
Flux
action是纯粹的数据对象,type定义action类型,由type触发相应的action构造函数。
Store也是对象,存储对应状态,接收Dispatcher派发的动作,根据动作来决定是否要更新应用状态。
不应该修改通过Store得到的数据,也就是Immutable的由来。
当一个动作被派发,Dispatcher就是简单地把所有注册的回调函数全部调用了一遍,至于这个动作是不是对方关心的,Flux 的Dispatcher不关心,要求每个回调函数去鉴别。
Flux的架构下,应用的状态被放在了store中,React组件中只是扮演View的作用,被动根据Store的状态来渲染,只是Store 的一个映射,不会主动变化数据,而是通过触发action来改变store,数据处理的工作不在view里。
正常组件里,操作可能是触发了setState,而Flux中只是派发了一个动作,这个动作会发送给所有Store对象,根据type改变Store对象,再而改变view本身。
这里的Store,不是一个数据的概念,而是一个大对象的概念,大对象里的某些Store,存储了数据。
缺点:1.Store之间依赖 2.难以进行服务端渲染(因为Dispatcher和Store都是全局唯一的一个) 3. Sotre混杂了逻辑和状态
Redux
1.唯一数据源:
不像Flux,redux的数据源只存在一个唯一的store上。
2.保持状态只读:
不能直接去修改状态。要修改store的状态,必须通过派发一个action对象来完成,这点和Flux一致。
UI=redner(data)
3.数据改变只能通过纯函数完成
这里的纯函数也就是reducer,redux的red也就是reducer。(reducer+flux)。
reducer(state,action)
第一个参数state为当前的状态,
第二个参数action是接收到的action对象,
reducer做的就是根据action和state返回一个新的对象,
reducer是一个纯函数,无副作用的,不能修改action和state。
reducer只负责计算状态,不负责存储状态。
redux中每个action构造函数都返回一个action对象。
而flux中action不返回什么,
而是把构造的动作函数立即通过调用dispatcher的dispatch函数派发出去。
redux中相比flux没有Dispatcher,而是在store上有一个dispatch函数。
flux中的state是由Store管理的,而redux中state是由reducer管理的,
reducer只关心如何更新state。
不能(应该)直接修改reducer里的state,而是通过返回新的state的复制的方式来修改,
因为reducer是纯函数且不应该产生副作用。
Store.getState()获取store存储的所有状态。Store.subscribe()通过subscribe监听store的变化,变化则触发里面的方法。Store.dispatch()派发action。
容器组件与傻瓜组件
傻瓜组件只负责渲染,没有state,只有传递下来不让他改变的props数据。
容器组件负责傻瓜组件需要的渲染数据的处理。
export出去的也是容器组件。
function Counter({caption, onIncrement, onDecrement, value}){
    return (
      <div>
        <button style={buttonStyle} onClick={onIncrement}>+</button>
        <button style={buttonStyle} onClick={onDecrement}>-</button>
        <span>{caption} count: {value}</span>
      </div>
    );
}
constructor(props, context) {
super(props, context);
}
//等效
constructor() {
super(...arguments);
}
可以通过context实现Provider
import { PropTypes, Component } from 'react';
class Provider extends Component {
  getChildContext() {
    return {
      store: this.props.store
    };
  }
  render() {
    return this.props.children;
  }
}
Provider.propTypes = {
  store: PropTypes.object.isRequired
}
Provider.childContextTypes = {
  store: PropTypes.object
};
export default Provider;
react-redux
connect接受两个参数mapStateToProps,mapDispatchToprops。
connect可部分替代容器组件的功能,如果props不是特别复杂,可以直接用
connect替代容器组件。
mapStateToProps将需要的state转化为props传递给组件,
mapDispatchToprops将dispatch转化为props传递给组件。
4 模块化React和Redux应用
开始一个新的应用,应先考虑3件事:
- 代码文件的组织结构
- 确定模块的边界
- Store的状态树设计
文件的组织结构
沿袭过去的MVC思想,按角色组织
- reducer目录包含所有Redux和reducer,
- actions目录包含所有action构造函数,
- components目录包含所有的傻瓜组件,
- containers目录包含所有的容器组件。
缺点是当项目大了以后不好扩展而且需要在不同目录间切换。
redux应用适合按功能组织,也就是将一个组件相关的redux文件都放在一起。
模块接口
在最理想的情况下,我们应该通过增加代码就能增加系统的功能,而不是通过对现有代码的修改来增加功能。
低耦合:不同功能模块之间的依赖关系应该简单而且清晰。
高内聚性:一个模块应该把自己的功能封装好,不让外界太依赖内部的结构,这样不会因为内部的变化而影响外部模块的功能。
状态树的设计
几个原则:
- 一个模块控制一个状态节点
- 避免冗余数据
- 树形结构扁平
使用symbol替代actiontype里的字符串?
actionTypes里的名字必须保证唯一性。
export const toggleTodo = (id) => ({
  type: TOGGLE_TODO,
  id: id
});
使用combineReducers合并reducer。
不要把ref带入redux中。
const mapDispatchToProps = (dispatch) => {
  return {
    onToggleTodo: (id) => {
      dispatch(toggleTodo(id));
    },
    onRemoveTodo: (id) => {
      dispatch(removeTodo(id));
    }
  };
};

//使用Store的bindActionCreators
const mapDispatchToProps = (dispatch) => bindActionCreators({
    onToggleTodo: toggleTodo,
    onRemoveTodo: removeTodo
  }, dispatch);


//更简化?
//让其只是prop到action的映射?
const mapDispatchToProps = {
  onToggleTodo: toggleTodo,
  onRemoveTodo: removeTodo
};
state 与 redux 里props的界限?
是否所有状态都需要传入store中,如每次input变化的值?
要使用chrome React Perf插件,需要在Store加入这段代码:
import Perf from 'react-addons-perf'

const win = window;
win.Perf = Perf
开发环境可以使用redux-immutable-state-invariant提醒防止误改state。
在Store加入这段代码:
const middlewares = [];
if (process.env.NODE_ENV !== 'production') {
  middlewares.push(require('redux-immutable-state-invariant')());
}
const storeEnhancers = compose(
  applyMiddleware(...middlewares),
  (win && win.devToolsExtension) ? win.devToolsExtension() : (f) => f,
);

export default createStore(reducer, {}, storeEnhancers);
//export default createStore(reducer, initialState, storeEnhancers);
就可以使用redux-immutable-state-invariant和redux devtools了。
Store Enhancer可能有多个,用于将createStore函数产生的store具有更强的功能。
使用compose将多个storeEnhancers组合在一起。
使用applyMiddleware将多个中间件组合在一起。
5 React 组件的性能优化
我们应该忘记忽略很小的性能优化,可以说97%的情况下,过早的优化是万恶之源,而我们应该关心对性能影响最关键的那另外3%的代码。使用shouldComponentUpdate手动比较值得变化绝对是否返回true进行渲染。
react产生的shouldComponentUpdatehe 和react-redux产生的shouldComponentUpdate是不一样的。
但他们都是浅层比较("shallow compare")。
当面对props是对象(函数也是对象)的时候,会比较不出来。
//bad
<Foo style={{color:"red"}}/}>

//good
const fooStyle = {color:"red"};
<Foo style={fooStyle}/}>
也就是尽量少用匿名函数/对象的方式,而是用一个变量代替。
const mapDispatchToProps = (dispatch, ownProps) => {
  const {id} = ownProps;
  return {
    onToggle: () => dispatch(toggleTodo(id)),
    onRemove: () => dispatch(removeTodo(id))
  }
};
在redux里做掉,至于action是在父组件还是在本组件内都是可以的。
key是为提升比较算法性能,所以key应该保持稳定性,用会变化的数组的index是不对的,尽量保持其稳定,最好是props传递过来的值。如果一定要用数组的index,应该保证数组是不变的或者只是push变化的数组。
除了从渲染角度,还可以从数据获取的角度来优化性能。
reselect:
只要相关状态没有改变,那就直接用上一次的缓存结果。
先比较第一层,如果相等就不会继续往下比较。
同样是浅比较,但是因为我们要求reducer每次返回的是新对象,所以也可以比较到。
const selectVisibleTodos = (todos, filter) => {
  switch (filter) {
    case FilterTypes.ALL:
      return todos;
    case FilterTypes.COMPLETED:
      return todos.filter(item => item.completed);
    case FilterTypes.UNCOMPLETED:
      return todos.filter(item => !item.completed);
    default:
      throw new Error('unsupported filter');
  }
}

const mapStateToProps = (state) => {
  return {
    todos: selectVisibleTodos(state.todos, state.filter)
  };
}

//使用reselect
const getFilter = (state) => state.filter;
const getTodos = (state) => state.todos;
export const selectVisibleTodos = createSelector(
  [getFilter, getTodos],
  (filter, todos) => {
    switch (filter) {
      case FilterTypes.ALL:
        return todos;
      case FilterTypes.COMPLETED:
        return todos.filter(item => item.completed);
      case FilterTypes.UNCOMPLETED:
        return todos.filter(item => !item.completed);
      default:
        throw new Error('unsupported filter');
    }
  }
);
const mapStateToProps = (state) => {
  return {
    todos: selectVisibleTodos(state)
  };
}
状态书的设计应该尽量范式化(Normalized),
所谓范式化就是遵照关系型数据库的设计原则,减少冗余数据。
用数据库表设计的思路来看就是,范式化是多分表,然后多关联查,少冗余数据。而反范式化就是一表多数据,少关联查。
因为使用了reselect(等),推荐范式化
6 React高阶组件
重复是优秀系统设计的大敌高阶组件可以类比高阶函数。
一个高阶组件就是一个函数,这个函数接受一个组件作为输入,然后返回一个新的组件作为结果,新的组件拥有输入组件所不具有的功能。
react里高阶组件是一个组件类(class)而不是一个组件实例,也可以是一个无状态组件的函数。
一般用代理方式比继承方式多。
使用的思路:
例如可以用于提取复用的shouldComponentUpdate,减少重复代码。
mixins的新实现?
不修改原本组件的代码。
代理方式
返回的新组件类直接继承自React.Component类。
新组件扮演的角色是传入参数组件的一个“代理”,在新组件的render函数中,把被包裹组件渲染出来,除了高阶组件让自己要做的工作,其余功能全都转手给了被包裹的组件。
如果高阶组件不涉及到除render之外的生命周期函数,也可以是无状态纯函数。
可以实现
操纵props
const addNewProps = (WrappedComponent, newProps) => {
  return class WrappingComponent extends React.Component {
    render() {
      return <WrappedComponent {...this.props} {...newProps} />
    }
  }
}
访问ref
const refsHOC = (WrappedComponent) => {
  return class HOCComponent extends React.Component {
    constructor() {
      super(...arguments);

      this.linkRef = this.linkRef.bind(this);
    }

    linkRef(wrappedInstance) {
      this._root = wrappedInstance;
    }

    render() {
      const props = {...this.props, ref: this.linkRef};
      return <WrappedComponent {...props}/>;
    }
  };
};
抽取状态
简易版connect
const doNothing = () => ({});

function connect(mapStateToProps=doNothing, mapDispatchToProps=doNothing) {

  function getDisplayName(WrappedComponent) {
    return WrappedComponent.displayName ||
      WrappedComponent.name ||
      'Component';
  }

  return function(WrappedComponent) {
    class HOCComponent extends React.Component {
      constructor() {
        super(...arguments);

        this.onChange = this.onChange.bind(this);

        this.store = {};
      }

      /*
      //TODO: make a workable shouldComponentUpdate
      shouldComponentUpdate(nextProps, nextState) {
        for (const propType in nextProps) {
          if (nextProps.hasOwnProperty(propType)) {
            if (nextProps[propType] === this.props[propType]) {
              return true;
            }
          }
        }

        for (const propType in this.props) {
          if (this.props.hasOwnProperty(propType)) {
            if (nextProps[propType] === this.props[propType]) {
              return true;
            }
          }
        }

        return false;
      }
      */

      componentDidMount() {
        this.context.store.subscribe(this.onChange);
      }

      componentWillUnmount() {
        this.context.store.unsubscribe(this.onChange);
      }

      onChange() {
        this.setState({});
      }

      render() {
        const store = this.context.store;
        const newProps = {
          ...this.props,
          ...mapStateToProps(store.getState(), this.props),
          ...mapDispatchToProps(store.dispatch, this.props)
        }

        return <WrappedComponent {...newProps} />;
      }
    };

    //借助context的一种provider实现
    HOCComponent.contextTypes = {
      store: React.PropTypes.object
    }

    HOCComponent.displayName = `Connect(${getDisplayName(WrappedComponent)})`;

    return HOCComponent;
  };
}
防止高阶组件失去名字不好debug
  function getDisplayName(WrappedComponent) {
    return WrappedComponent.displayName ||
      WrappedComponent.name ||
      'Component';
  }
  HOCComponent.displayName = `Connect(${getDisplayName(WrappedComponent)})`;
包装组件
//。。。
const styleHOC = (WrappedComponent, style) => {
  return class HOCComponent extends React.Component {
    render() {
      return (
        <div style={style}>
          <WrappedComponent {...this.props}/>
        </div>
      );
    }
  };
};
继承方式
采用继承关系关联作为参数的组件和返回的组件。
代理方式下是不同的组件,每个组件都经历完整的生命周期.
继承方式共同使用一个。
function removeUserProp(WrappedComponent) {
  return class NewComponent extends WrappedComponent {
    render() {
      //不推荐的用法
      const {user, ...otherProps} = this.props;
      this.props = otherProps;
      return super.render();
    }
  };
}

/*
function removeUserProp(WrappedComponent) {
  return class NewComponent extends WrappedComponent {
    render() {
      const elements = super.render();
      const {user, ...otherProps} = this.props;

      console.log('##', elements);

      return React.cloneElement(elements, otherProps, elements.props.children);
    }
  };
}
*/
操纵props
一般不这么用
一定要用页不推荐上面修改props的方法
const modifyPropsHOC = (WrappedComponent) => {
  return class NewComponent extends WrappedComponent {
    render() {
      const elements = super.render();

      const newStyle = {
        color: (elements && elements.type === 'div') ? 'red' : 'green'
      }
      const newProps = {...this.props, style: newStyle};

      return React.cloneElement(elements, newProps, elements.props.children);
    }
  };
};
操作生命周期
一般这么用
校验登录
const onlyForLoggedinHOC = (WrappedComponent) => {
  return class NewComponent extends WrappedComponent {
    render() {
      if (this.props.loggedIn) {
        return super.render();
      } else {
        return null;
      }
    }
  }
}
重写shouldCompoentUpdate
useCache???
const cacheHOC = (WrappedComponent) => {
  return class NewComponent extends WrappedComponent {
    shouldComponentUpdate(nextProps, nextState) {
      return !nextProps.useCache;
    }
  }
}
以函数为子组件 (现在叫做 render props)
高阶组件并不是唯一可用于提高React组件代码重用的方法。
高阶组件的缺点在于对元组件的props有固化的要求。
在‘以函数为子组件’的模式下,他是一个真正的组件,要求必须有子组件,而且子组件必须是一个函数。
这种模式的缺点在于比较难优化,实际实现中在react-motion中大量使用并没有发现明显的性能问题。如果对性能有硬(强迫症)性需求,可以考虑少使用匿名函数,在shouldComponentUpdate里加入对children的比较。
登录信息可以这样:
class AddUserProp extends React.Component {
  render() {
    const user = loggedinUser;
    return this.props.children(user)
  }
}
大概是这样用的
<AddUserProp>
{(user) => <div>{user}</div>}
</AddUserProp>
用这种模式实现一个倒计时
class CountDown extends React.Component {

  constructor() {
    super(...arguments);

    this.state = {count: this.props.startCount};
  }

  shouldComponentUpdate(nextProps, nextState) {
    return nextState.count !== this.state.count;
  }

  componentDidMount() {
    this.intervalHandle = setInterval(() => {
      const newCount = this.state.count - 1;
      if (newCount >= 0) {
        this.setState({count: newCount});
      } else {
        window.clearInterval(this.intervalHandle);
        this.intervalHandle = null;
      }
    }, 1000);
  }

  componentWillUnmount() {
    if (this.intervalHandle) {
      window.clearInterval(this.intervalHandle);
      this.intervalHandle = null;
    }
  }

  render() {
    return this.props.children(this.state.count);
  }
}

CountDown.propTypes = {
  children: React.PropTypes.func.isRequired,
  startCount: React.PropTypes.number.isRequired
}
大概是这么用的
<CountDown startCount={10}>
{
  (count) => <div>{ count > 0 ? count : '新年快乐'}</div>
}
</CountDown>
7 Redux和服务器通信
解决跨域访问api的一个方式是通过代理(proxy)。
跨域访问api的限制是针对浏览器的行为,服务器对于任何域名下的api访问不受限制。
可以通过webpack的proxy实现简易的代理功能?
一般在componentDidMount里进行ajax请求。
 componentDidMount() {
    const apiUrl = `/data/cityinfo/${cityCode}.html`;
    fetch(apiUrl).then((response) => {
      if (response.status !== 200) {
        throw new Error('Fail to get response with status ' + response.status);
      }

      response.json()//要先解
      .then((responseJson) => {
        this.setState({weather: responseJson.weatherinfo});
      }).catch((error) => {
        this.setState({weather: null});
      });
    }).catch((error) => {
      this.setState({weather: null});
    });
  }
thunk表示辅助调用另一个子程序的子程序。
const f = (x) =>{
  renturn x() + 5;
}

const g = () =>{
  renturn 3 + 4;
}

f(g)//结果是 (3+4)+5 = 12
redux-thunk 的工作是检查对象是不是函数,如果不是函数就放行,完成普通action对象的生命周期,如果发现action对象是函数,就执行这个函数,并把Store的dispatch函数和getState函数作为参数传递到函数中去,处理过程到此为主,不会让这个异步action对象继续往前派发到reducer函数。
异步action并不是纯函数
export const fetchWeather = (cityCode) => {
  return (dispatch) => {
    const apiUrl = `/data/cityinfo/${cityCode}.html`;

    dispatch(fetchWeatherStarted())

    return fetch(apiUrl).then((response) => {
      if (response.status !== 200) {
        throw new Error('Fail to get response with status ' + response.status);
      }

      response.json().then((responseJson) => {
        dispatch(fetchWeatherSuccess(responseJson.weatherinfo));
      }).catch((error) => {
        dispatch(fetchWeatherFailure(error));
      });
    }).catch((error) => {
      dispatch(fetchWeatherFailure(error));
    })
  };
}
取消上一次的ajax请求:
- 禁止dom操作
- 在过去的xhr中有abort()方法。
而原生的fetch是没有的,但是一般使用的fetch其实是在xhr基础上封装的,可以在fetch上暴露出abort方法。 - 在thunk中加入某种计数变量
export const fetchWeather = (cityCode) => {
  return (dispatch) => {
    const apiUrl = `/data/cityinfo/${cityCode}.html`;

    const seqId = ++ nextSeqId;

    const dispatchIfValid = (action) => {
      if (seqId === nextSeqId) {
        return dispatch(action);
      }
    }

    dispatchIfValid(fetchWeatherStarted())

    fetch(apiUrl).then((response) => {
      if (response.status !== 200) {
        throw new Error('Fail to get response with status ' + response.status);
      }

      response.json().then((responseJson) => {
        dispatchIfValid(fetchWeatherSuccess(responseJson.weatherinfo));
      }).catch((error) => {
        dispatchIfValid(fetchWeatherFailure(error));
      });
    }).catch((error) => {
      dispatchIfValid(fetchWeatherFailure(error));
    })
  };
}
8 单元测试
如果程序的结构是足够简单的,单元测试并不是必须的。
单元测试框架一般用:
Mocha + Chai
或
Jest
辅助工具一般用:
Enzyme(测试react组件)
sinon.js(模拟各种请求,特别是网络)
redux-mock-store(mock reduxt store)
测试一般的action
export const addTodo = (text) => ({
  type: ADD_TODO,
  completed: false,
  id: nextTodoId ++,
  text: text
});

//test
describe('todos/actions', () => {
  describe('addTodo', () => {
    const addTodo = actions.addTodo

    it('should create an action to add todo', () => {
      const text = 'first todo';
      const action = addTodo(text);

      expect(action.text).toBe(text);
      expect(action.completed).toBe(false);
      expect(action.type).toBe(actionTypes.ADD_TODO);
    });

    it('should have different id for different actions', () => {
      const text = 'first todo';
      const action1 = addTodo(text);
      const action2 = addTodo(text);

      expect(action1.id !== action2.id).toBe(true);
    });
  });
});
使用mock store测试异步action
import thunk from 'redux-thunk';
import {stub} from 'sinon';
import configureStore from 'redux-mock-store';

import * as actions from '../../src/weather/actions.js';
import * as actionTypes from '../../src/weather/actionTypes.js';

const middlewares = [thunk];
const createMockStore = configureStore(middlewares);


describe('weather/actions', () => {
  describe('fetchWeather', () => {
    let stubbedFetch;
    const store = createMockStore();

    beforeEach(() => {
      stubbedFetch = stub(global, 'fetch');//fake fetch
    });

    afterEach(() => {
      stubbedFetch.restore();
    });

    it('should dispatch fetchWeatherSuccess action type on fetch success', () => {
      const mockResponse= Promise.resolve({
        status: 200,
        json: () => Promise.resolve({
          weatherinfo: {}
        })
      });// fake response
      stubbedFetch.returns(mockResponse);

      return store.dispatch(actions.fetchWeather(1)).then(() => {
        const dispatchedActions = store.getActions();//redux-mock-store 的api
        expect(dispatchedActions.length).toBe(2);
        expect(dispatchedActions[0].type).toBe(actionTypes.FETCH_STARTED);
        expect(dispatchedActions[1].type).toBe(actionTypes.FETCH_SUCCESS);
      });
    });

  });
});
测试reducer
export default (state = {status: Status.LOADING}, action) => {
  switch(action.type) {
    case FETCH_STARTED: {
      return {status: Status.LOADING};
    }
    case FETCH_SUCCESS: {
      return {...state, status: Status.SUCCESS, ...action.result};
    }
    case FETCH_FAILURE: {
      return {status: Status.FAILURE};
    }
    default: {
      return state;
    }
  }
}

//test
describe('weather/reducer', () => {
  it('should return loading status', () => {
    const action = actions.fetchWeatherStarted();

    const newState = reducer({}, action);

    expect(newState.status).toBe(Status.LOADING);
  });
});
使用Enzyme的
shallow方法测试无状态React组件
const Filters = () => {
  return (
    <p className="filters">
      <Link filter={FilterTypes.ALL}> {FilterTypes.ALL} </Link>
      <Link filter={FilterTypes.COMPLETED}> {FilterTypes.COMPLETED} </Link>
      <Link filter={FilterTypes.UNCOMPLETED}> {FilterTypes.UNCOMPLETED} </Link>
    </p>
  );
};

//test
describe('filters', () => {
  it('should render three link', () => {
    const wrapper = shallow(<Filters />);

    expect(wrapper.contains(<Link filter={FilterTypes.ALL}> {FilterTypes.ALL} </Link>)).toBe(true);
    expect(wrapper.contains(<Link filter={FilterTypes.COMPLETED}> {FilterTypes.COMPLETED} </Link>)).toBe(true);
    expect(wrapper.contains(<Link filter={FilterTypes.UNCOMPLETED}> {FilterTypes.UNCOMPLETED} </Link>)).toBe(true);
  });
});
测试被连接(connnect)的react组件
const TodoList = ({todos, onClickTodo}) => {
  return (
    <ul className="todo-list">
    {
      todos.map((item) => (
        <TodoItem
          key={item.id}
          id={item.id}
          text={item.text}
          completed={item.completed}
        />
        ))
    }
    </ul>
  );
};

const mapStateToProps = (state) => {
  return {
    todos: selectVisibleTodos(state)
  };
}

export default connect(mapStateToProps)(TodoList);

//test
import {mount} from 'enzyme';
describe('todos', () => {
  it('should add new todo-item on addTodo action', () => {
    const store = createStore(
      combineReducers({
        todos: todosReducer,
        filter: filterReducer
      }), {
        todos: [],
        filter: FilterTypes.ALL
      });//创造的临时Store
    const subject = (
      <Provider store={store}>
        <TodoList />
      </Provider>
    );
    const wrapper = mount(subject);//加入react context

    store.dispatch(actions.addTodo('write more test'));

    expect(wrapper.find('.text').text()).toEqual('write more test');
  });
});
这里的provide需要这样构建是因为TodoItem也是connect到store的组件。
9 扩展Redux
如果用express中间件类比redux的中间件,那么
如果把redux和express都看作一个对请求的处理框架,
redux中的action对象对应与express中的客户端请求,
所有的中间件就组成处理请求的'管道'。
在redux中,中间件处理的是action对象,而派发action对象的就是store上的dispatch函数,在action对象进入reducer之前,会经历中间件的管道。
一个空的中间件
function doNothingMiddleware({dispatch,getState}){
  return function(next){
    return function(action){
      return next(action);//下一个中间件继续处理
    }
  }
}

//也可以这么写
let doNothingMiddleware = ({dispatch,getState}) => next => action => next(action)
redux-thunk源码
function createThunkMiddleware(extraArgument){
  return ({dispatch,getState}) => next =>action=>{
    if(typeof action === 'function'){
      return action(dispatch,getState,extraArgument);
    }
    return next(action);
  }
}
const thunk = createThunkMiddleware();
export default thunk;
单个Enhancer
const configureStore = applyMiddleware(thunkMiddleware)(createStore);
const store = configureStore(reducer,initialState);
有多个Enhancer的情况
const middlewares = [thunkMiddleware];

const storeEnhancers = compose(
  applyMiddleware(...middlewares),
  (win && win.devToolsExtension) ? win.devToolsExtension() : (f) => f,
);

export default createStore(reducer, {}, storeEnhancers);
替换thunk,利用promise处理异步action
一个简易的promise中间件
function isPromise(obj) {
  return obj && typeof obj.then === 'function';
}

/*
export default function promiseMiddleware({dispatch}) {
  return next => action => {
    return isPromise(action) ? action.then(dispatch) : next(action);
  }
}
*/

export default function promiseMiddleware({dispatch}) {
  return function(next) {
    return function(action) {
      return isPromise(action) ? action.then(dispatch) : next(action);
    }
  }
}
改进的promise中间件
function isPromise(obj) {
  return obj && typeof obj.then === 'function';
}

export default function promiseMiddleware({dispatch}) {
  return (next) => (action) => {
    const {types, promise, ...rest} = action;
    if (!isPromise(promise) || !(action.types && action.types.length === 3)) {
      return next(action);
    }

    const [PENDING, DONE, FAIL] = types;

    dispatch({...rest, type: PENDING});
    return action.promise.then(
      (result) => dispatch({...rest, result, type: DONE}),
      (error) => dispatch({...rest, error, type: FAIL})
    );
  };
}
promise中间件用的话就这样用,可以省去几个样板action
export const fetchWeather = (cityCode) => {
  const apiUrl = `/data/cityinfo/${cityCode}.html`;

  return {
    promise: fetch(apiUrl).then(response => {
      if (response.status !== 200) {
        throw new Error('Fail to get response with status ' + response.status);
      }

      return response.json().then(responseJson => responseJson.weatherinfo);
    }),
    types: [FETCH_STARTED, FETCH_SUCCESS, FETCH_FAILURE]
  };
}
applyMiddleware函数可以接受任意个参数的中间件,每个通过dispatch函数派发的动作组件按照在applyMiddleware中的先后顺序传递给各个中间件。
一个中间件如果产生新的action对象,正确的方式是使用dispatch函数派发,而不是使用next函数。
中间件可以用来增强Redux Store的dispatch方法。
Store Enhancer可以用来增强Redux Store。
一个空的Store Enhancer
const doNothingEnhancer = (createStore) =>(reducer,preloadedState,enhancer)=>{
  const store = createStore(reducer,preloadedState,enhancer);
  return store;
}
一个store对象包含:
- dispatch
- subscribe
- getState
- replaceReducer
对dispatch调用的日志
const logEnhancer = (createStore) =>(reducer,preloadedState,enhancer)=>{
  const store = createStore(reducer,preloadedState,enhancer);

  const originalDispatch = store.dispatch;
  store.dispatch = (action) =>{
    console.log('dispatch action:',action);
    originalDispatch(action);
  }

  return store;
}
不清除过去store新界面创建该页面(临时?)store的enhancer
const RESET_ACTION_TYPE = '@@RESET';

const resetReducerCreator = (reducer, resetState) => (state, action) => {
  if (action.type === RESET_ACTION_TYPE) {
    return resetState;
  } else {
    return reducer(state, action);
  }
};

const reset = (createStore) => (reducer, preloadedState, enhancer) => {
  const store = createStore(reducer, preloadedState, enhancer);

  const reset = (resetReducer, resetState) => {
    const newReducer = resetReducerCreator(resetReducer, resetState);
    store.replaceReducer(newReducer);
    store.dispatch({type: RESET_ACTION_TYPE, state: resetState});
  };

  return {
    ...store,
    reset
  };
};

export default reset;

//大概是这么用的
  it('reset', () => {
    it('should reset state and reducer', () => {
      const newReducer = (state, action) =>({newPayload: action.payload});
      const newState = {newPayload: 'new'};

      store.reset(newReducer, newState);
      expect(store.getState()).toEqual(newState);

      store.dispatch({type: 'any', payload: 'changed'});
      expect(store.getState()).toEqual({newPayload: 'changed'});
    });
  });
10 动画
css3方式的缺点是时间和速度曲线不合理,过程可能是一闪而逝的,捕捉不到中间状态。优点是性能好。
js方式的缺点是性能差,优点是灵活度高。
60帧 = 60fps(Frame Per Second)
1000ms/60 = 16ms
模拟requestAnimationFrame实现
var lastTimeStamp = new Date().getTime();
function raf(fn) {
  var currTimeStamp = new Date().getTime();
  var delay  = Math.max(0, 16 - (currTimeStamp - lastTimeStamp));
  var handle = setTimeout(function(){
    fn(currTimeStamp);
  }, delay);
  lastTimeStamp = currTimeStamp;
  return handle;
}

var left = 0;
var animatedElement = document.getElementById("sample");
var startTimestamp = new Date().getTime();
function render(timestamp) {
  left += (timestamp - startTimestamp) / 16;
  animatedElement.style.left = left + 'px';
  if (left < 400) {
    raf(render);
  }
}

raf(render);
ReactCssTransitionGroup
ReactCssTransitionGroup是通过css实现的。
一般用在组件的装载和卸载动画中。
transitionName,
enter代表‘装载’开始时的状态,
leave代表‘卸载’开始时的状态,
active代表动画结束时的状态。
假设transitionName为sanmple,那么相关类名就是:
sample-enter
sample-enter-active
sample-leave
sample-leave-active
sample-appear
sample-appear-active
transitionEnterTimeout‘装载’动画持续时间,
transitionLeaveTImeout‘卸载’动画持续时间,
transitionAppearTImeout初次‘装载’动画持续时间,
他们的持续时间应该与css里的transition-duration保持一致,
这种重复设置是ReactCssTransitionGroup的一个缺点。
只有在该组件已经加载(真实渲染?)了,该ReactCssTransitionGroup动画才有效。
在初次加载时如果也需要动画可以手动将transitionAppear={true},大多数情况下是不需要的。
React-Motion
友好的API比性能更重要
React-Motion是通过js的方式来控制动画的。
相比ReactCssTransitionGroup不需要css,ReactCssTransitionGroup包裹子元素集合,React-Motion包裹return的根节点,用的是‘以函数为子组件’的模式。
willEnter对应装载,willLeave对应卸载,defaultStyles对应appear。
11 多页面应用
路由
React-Router按照Route在代码中的先后顺序决定匹配的顺序。
(这本书用的是3.x)
当react-router和react-redux同存时
const createElement = (Component, props) => {
  return (
    <Provider store={store}>
      <Component {...props} />
    </Provider>
  );
};
//App
const App = ({children}) => {
return (
<div>
<TopMenu />
<div>{children}</div>
</div>
);
};
//Routes
const Routes = () => (
<Router history={history} createElement={createElement}>
<Route path="/" component={App}>
<IndexRoute component={Home} />
<Route path="home" component={Home} />
<Route path="about" component={About} />
<Route path="*" component={NotFound} />
</Route>
</Router>
);IndexRoute是默认路由。
这里createElement每次都会调用,如果觉得有性能问题,也在Routes里去掉createElement然后这样用。
ReactDOM.render(
  <Routes />,
  document.getElementById('root')
);

//改为
ReactDOM.render(
  <Provider store={store} >
    <Routes />,
  </Provider>
  document.getElementById('root')
);
如果希望将url的变化也统一到redux里,需要加入react-router-redux,
但是他的使用实际上是违背唯一数据源的。
//routes
import {Router, Route, IndexRoute, browserHistory} from 'react-router';
import {syncHistoryWithStore} from 'react-router-redux';

const history = syncHistoryWithStore(browserHistory, store);

//store
import {routerReducer} from 'react-router-redux';

const reducer = combineReducers({
  routing: routerReducer
});
现在当url变化时,会向store派发action。
代码分片
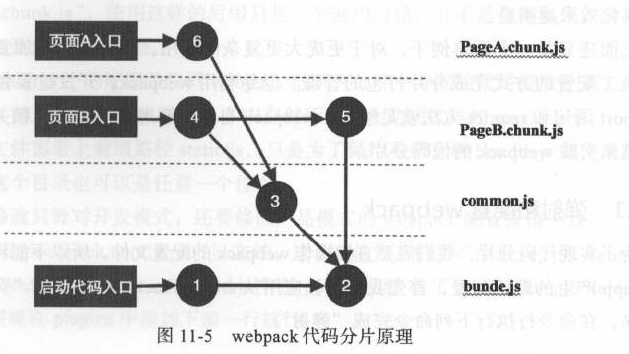
利用webpack。
使用CommonsChunkPlugin,配置output的chunkFilename用于分片各页面组件间的公共组件。
chunkFilename: 'dist/js/[name].[chunkhash:8].chunk.js'

new webpack.optimize.CommonsChunkPlugin('common', 'dist/js/common.[chunkhash:8].js')
开发环境可以不用[chunkhash]。
使用require.ensure和react-router的getComponent异步加载组件。也可以尝试使用新的import(),写法略有差异。
const getHomePage = (nextState, callback) => {
  require.ensure([], function(require) {
    callback(null, require('./pages/Home.js').default);
  }, 'home');
};

//routes
const Routes = () => (
  <Router history={history} createElement={createElement}>
    <Route path="/" component={App}>
      <IndexRoute getComponent={getHomePage} />
      <Route path="home" getComponent={getHomePage} />
      <Route path="counter" getComponent={getCounterPage} />
      <Route path="about" getComponent={getAboutPage} />
      <Route path="*" getComponent={getNotFoundPage} />
    </Route>
  </Router>
);
需要注意的是因为webpack打包过程是对代码静态扫描的过程,所以这里不能对getHomePage这种样板代码进行方法提取。
require里参数不能是变量。
因为代码分片后,redux的reducer和state有中断,所以需要一个store enhancer来弥补这个问题,替换当前store上的state和reducer。
const getCounterPage = (nextState, callback) => {
  require.ensure([], function(require) {
    const {page, reducer, stateKey, initialState} = require('./pages/CounterPage.js');

    const state = store.getState();
    store.reset(combineReducers({
      ...store._reducers,
      counter: reducer//将新的recuer合入
    }), {
      ...state,
      [stateKey]: initialState //state的处理
    });

    callback(null, page);
  }, 'counter');
};
这章整体讲的略为粗略,也可能是涉及的东西比较复杂。如果想更好的掌握需要自己去扩展更多的知识。
12 同构(isomorphic)
服务器端渲染 vs 浏览器端渲染
一般一个浏览器(前端)渲染需要3个部分:
- 应用架构,如backbone,react。
- 模板库。
- 服务端的api支持。
前端渲染的主要问题在于首屏渲染。
TTFP(Time To First Paint):从网页HTTP请求发出,到用户可以看到第一个有意义的内容渲染出来的时间差。
TTI(Time To Interactive):从网页HTTP请求发出,到用户可以对网页内容进行交互的时间。
前端渲染没有任何缓存(首屏渲染)的情况下,需要等待3个HTTP请求
- 向服务器获取HTML
- 获取js文件
- 访问api服务获取数据
PWA(Progressive Web App)利用Manifest和Service Worker可以进一步优化,该书没有讲述,可以另外进行探索。
服务端渲染的优点:
- 在html请求时就可以返回有内容的html,所以首次渲染TTFP相比前端渲染会短一些。
- 更利于搜索引擎(SEO)优化.
- 大多数情况下服务器上(api)获取数据的速度更快。
服务端渲染的缺点:
- 可能会产生过大的html,导致首屏一样不快
- 服务器压力更大
- 主流的react,vue框架对服务端渲染支持并不太好
构建渲染动态内容服务器
react的热加载除了webpack-dev-middleware和webpack-hot-middleware,还需要一个babel装载器react-hot-loader。
同构的简单思路就是,原本前端渲染是始终返回html挂载文件本身,现在是server始终render模板文件,但同时又加载前端运行的文件。
react 同构
react的render在客户端时,最终产出的是dom元素。
而在服务器端,最终产出的是字符串,
因为返回给浏览器的就是html字符串,所以服务端渲染不需要指定容器元素。
renderToString函数返回结果就是一个html字符串。
为了避免不必要的dom操作,服务端渲染react组件时会计算所生成html的校验和,并存放在根节点的属性 data-react-checksum中。
只有检验不过时,前端渲染才会覆盖掉服务端渲染产生的html。
所以实现同构很重要的一条,就是一定要保证前后端渲染的结果一致。
脱水(Dehydrate)和注水(Rehydrate)
服务端渲染产生了html,但是在交给浏览器的网页中不光要有html,还需要有“脱水数据”,也就是在服务器渲染过程中给react组件的输入数据,这样,当浏览器端渲染时,可以直接根据“脱水数据”来渲染react组件,这个过程叫做“注水”。
使用脱水数据可以避免没必要的api请求,保证了两端渲染的结果一致,这样不会产生网页内容的闪动。
使用脱水数据需要注意防止跨站脚本攻击(XSS)。
脱水数据一般来自redux 的store。
脱水数据不能过大,如果过大就会影响性能,让服务端渲染失去意义。
在服务器端使用redux必须对每个请求都创造一个新的store,这是和浏览器渲染的最大区别。
有时候需要在前端和后端中都请求某一个接口。
后端渲染不存在所谓分片(懒加载),全都是直接导入。
可能需要额外的特殊处理字符串的方法,防止脱水数据中的不安全字符。
function safeJSONstringify(obj) {
  return JSON.stringify(obj).replace(/<\/script/g, '<\\/script').replace(/<!--/g, '<\\!--');
}
前后端渲染都需要用react-router的match函数了现在。
完
react的同构与vue的同构
都有一个服务端渲染的方法
vue是vue-server-renderer提供的,
react是react-dom/server提供的。
vue需要客户端和服务端各打一次包,react只需要一次。
vue还需要在webpack里加入'vue-server-renderer/client-plugin'和'vue-server-renderer/server-plugin',而react只需要'webpack-manifest-plugin'.
这里很大可能是vue的该插件做了其他整合和优化。
react对redux的处理比较复杂,特别是对懒加载和ssr,而vue也应该是整合过了比较简单。
整体而言两者各有异同,可能vue本身并没有比react更适合ssr,但是奈何有个尤雨溪做掉了很多脏活。。。。


 113
113


 被折叠的 条评论
为什么被折叠?
被折叠的 条评论
为什么被折叠?
 到【灌水乐园】发言


