


基于传统的session机制,主要存在下面三个问题

- 开发繁琐
- 安全性和客户体验差
- 有些前段技术不支持cookie,如小程序。
基于token的方式(令牌)
1.参数或请求头中添加token
2.token可以进行定制(jwt)

SpringSecurityOAuth封装了服务提供商大部分的操作;而SpringSocial则是封装了客户端和服务提供商交互的流程

协议中没有规定token怎么生成和存储,这个需要我们自己去实现。
本篇主要实现下面几个要点
- 实现标准的Oauth2协议中服务提供商(Provider)的各种功能
- 重构前面的三种登录方式,使其支持token的方式
- 高级特性,支持jwt和sso单点登录
实现标准Oauth服务提供商
标准认证服务商
package com.rui.tiger.auth.app;

import org.springframework.context.annotation.Configuration;
import org.springframework.security.oauth2.config.annotation.web.configuration.EnableAuthorizationServer;

/**
 * 服务提供商-认证服务器
 * @author CaiRui
 * @date 2019-03-18 09:12
 */
@Configuration
@EnableAuthorizationServer
public class TigerAuthorizationServerConfig {

}
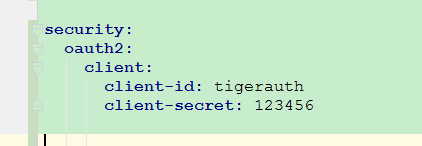
自定义clientId和clientSecret,这样不用系统每次给你自动分配
项目启动会增加几个认证控制器如下

ok下面我们来测试下是否可以,官方文档地址
Oauth官网 https://tools.ietf.org/html/rfc6749#section-4 授权码模式文档
由于spring oath2实现的是标准的oat2协议,所以参数什么的一般可以参考官网文档,如上链接
出现以下报错信息

security5+ 认证默认为表单了也就是http.formLogin() 所以我们要进行改造
package com.rui.tiger.auth.app;

import org.springframework.beans.factory.annotation.Autowired;
import org.springframework.context.annotation.Configuration;
import org.springframework.security.config.annotation.web.builders.HttpSecurity;
import org.springframework.security.config.annotation.web.configuration.WebSecurityConfigurerAdapter;
import org.springframework.security.core.userdetails.UserDetailsService;

/**
 * @author CaiRui
 * @date 2019-04-09 12:12
 */
@Configuration
public class AppSecurityConfig extends WebSecurityConfigurerAdapter {


	@Autowired
	private UserDetailsService userDetailsService;
	@Override
	protected void configure(HttpSecurity http) throws Exception {
		//security5+ 认证默认为表单了也就是http.formLogin()
		http.httpBasic();
	}
}
再次访问出现如下错误:

断点调试报错如下:org.springframework.security.oauth2.provider.endpoint.DefaultRedirectResolver#resolveRedirect

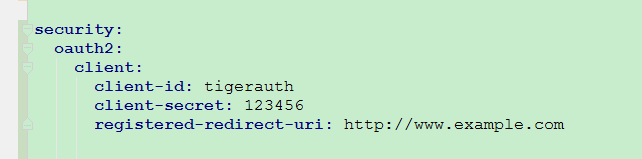
我们要配置授权码回调域如下
ok再次请求终于调到了我们的同意授权界面

同意授权后返回授权码:http://www.example.com/?code=f1c9V7

拿到这个授权码以后我们就可以请求token了 官方文档如下:
请求地址:org.springframework.security.oauth2.provider.endpoint.TokenEndpoint#postAccessToken ,用postman来发送请求

头部放app账户和密码


发送请求返回响应如下:

{
"access_token": "f61345b1-cfda-4599-ae9e-3215ad682bfc",
"token_type": "bearer",
"refresh_token": "f4b16714-c704-4f58-9659-815c2bd1c324",
"expires_in": 43199,
"scope": "all"
}
下面我们再来测试其它几种授权模式
密码模式
http://localhost:8060/oauth/token 参数和授权码不同 这种模式适用于公司内相互信任的应用之间,可以直接提供用户名密码

资源服务器
添加标准资源服务器实现
package com.rui.tiger.auth.app;

import org.springframework.context.annotation.Configuration;
import org.springframework.security.oauth2.config.annotation.web.configuration.EnableResourceServer;

/**
 * @author CaiRui
 * @date 2019-04-17 08:38
 */
@Configuration
@EnableResourceServer
public class TigerResourceServerConfig {


}
访问用户信息 http://localhost:8060/user/me 报以下错误
{
"error": "unauthorized",
"error_description": "Full authentication is required to access this resource"
}
重启服务器,密码模式获取token 返回如下
{
"access_token": "039ed20d-1f41-4914-bab2-c75ab53d0e73",
"token_type": "bearer",
"refresh_token": "3137ab8c-3668-43ff-90b7-d3e57be49f37",
"expires_in": 43199,
"scope": "all"
}
访问 http://localhost:8060/user/me 随带token

或者直接在请求参数中添加token
http://localhost:8060/user/me?access_token=039ed20d-1f41-4914-bab2-c75ab53d0e73
ok 到此基本的认证和资源服务器测试开发完成,下一章我们进行简单的源码分析


 210
210


 被折叠的 条评论
为什么被折叠?
被折叠的 条评论
为什么被折叠?
 到【灌水乐园】发言


