


快速搭建DMHS DM之间双向同步
DM技术交流QQ群:940124259
1. 场景介绍
在已有的项目基础上,甲方欲延伸项目的投入,例如设计一套同城双中心、异地灾备的方案,结合关键RTO与RPO考究,可能大家会联想到达梦数据库自带数据守护集群(类似Oracle ADG)、抑或异构数据实时同步软件( (Heterogeneous database Synchronization for DM ,简称DMHS)。
从严格意义上区别,数据守护集群属于整库物理数据复制(基于redo日志发送到备库,重演日志,至于日志发送时机和备库重演日志响应方式,根据实际的归档类型决定,分为实时归档与即时归档),DMHS属于逻辑数据复制(基于redo日志事务提交,源端进一连串的操作【捕获、解析、转换、投递消息】,目标端拼装适合目标数据库的SQL执行)。
本篇博客主要介绍通过DMHS实时数据同步软件实现同构数据库双向同步(自家产品:DM8,其他数据库同理操作),分享本人快捷搭建DMHS双向同步的方法,这也是本人经过大量的实战,摸索出不易出错的操作方式,为大家普及一下,让大家少走点弯路。全程截图,记录都比较详细,不懂的朋友可以加QQ群,咨询我们。
先揭秘:利用HS代理预先部署在每台将搭建DMHS数据同步的节点主机上,最好使用root启动代理服务,以便后期正常地远程部署数据同步服务模块,附加功能是实时监控服务器硬件资源。
双向同步优点:支持AB机房双活,两个中心都可以同时对外提供服务(一个实例修改数据,将数据同步到另一个实例,以实现数据融合)。缺点:维护复杂,易出错。
有关数据对比、数据修复,到时单独开一篇文章讲解。
2. RPO与RTO概念
RTO和RPO指的是:灾难发生时数据中心坏了,业务重新起来的时延和数据丢失率。
在灾难恢复方面,目前业界公认有三个目标值得努力。
- 恢复时间,企业能忍受多长时间没有IT,处于停业状态;
- 网络多长时间能够恢复;
- 业务层面的恢复。
整个恢复过程中,最关键的衡量指标有两个:一个是RTO,另一个是RPO。
RTO(Recovery Time Objective)
它是指灾难发生后,从IT系统宕机导致业务停摆时间点开始,到IT系统恢复至可以支持各部门运作、恢复运营之时,此两点之间的时间段称为RTO。
RPO(Recovery Point Objective)
它是指从系统和应用数据而言,要实现能够恢复至可以支持各部门业务运作,系统及生产数据应恢复到怎样的更新程度(业务及数据能恢复到的程度)。
例如:这种更新程度可以是上一周的备份数据,也可以是上一次交易的实时数据。
3. 双向同步原理

在这个双向同步方案中,需对2个数据库实例分别部署一套DMHS软件,每个DMHS实例包含日志捕获模块(CPT)和数据入库模块(EXEC),以及数据传输模块(NET)。 可以简单理解成交叉式的日志解析和数据传递入库(你发送我接收,我发送你接收)。
但值得我们注意的地方是避免同一事务死循环,即同一个事务在AB两个数据库实例中重复执行。因此,我们应该特殊处理这类情况,对入库端接收的增量数据进行判断,对于未执行过的事务, 执行模块将增量数据入库, 而对于已经执行过的事务,执行模块将此增量数据丢弃。至于增量数据的判断,通过什么样的方式进行打标签,大家不必深究,点到为止。
4. 搭建过程

4.1 准备AB测试库
数据库软件安装省略(请参考本人的其他博客)
以dmdba用户登录,分别在A、B主机上初始化数据库
./dminit path=/dmdata db_name=DMDB instance_name=DB1
分别在A、B主机上使用root用户注册数据库实例服务
/opt/dmdbms/script/root/dm_service_installer.sh -t dmserver -dm_ini /dmdata/DMDB/dm.ini -p DMDB
启动A、B主机中的数据库实例
/opt/dmdbms/bin/DmServiceDMDB start
4.2 开启归档和逻辑日志
开启归档和逻辑日志是数据同步的前提。
A/B主机上数据库实例都要执行。
-- 配置归档
alter database mount;
alter database add archivelog 'type=local, dest=/dmdata/DMDB/arch, file_size=256, space_limit=10240';
alter database  archivelog;
alter database open;

-- 逻辑日志
alter system set 'rlog_append_logic'=1 both;

-- 关闭快速提交(默认是关闭的,默认值为0)
alter system set 'fast_commit' = 0 both;

-- 检查归档日志和逻辑日志是否开启
select
sf_get_para_value(2, 'rlog_append_logic') logiclog,
sf_get_para_value(2, 'fast_commit') fstcmt        ,
arch_mode
from v$database;


4.3 初始化DMHS相关DDL触发器和表
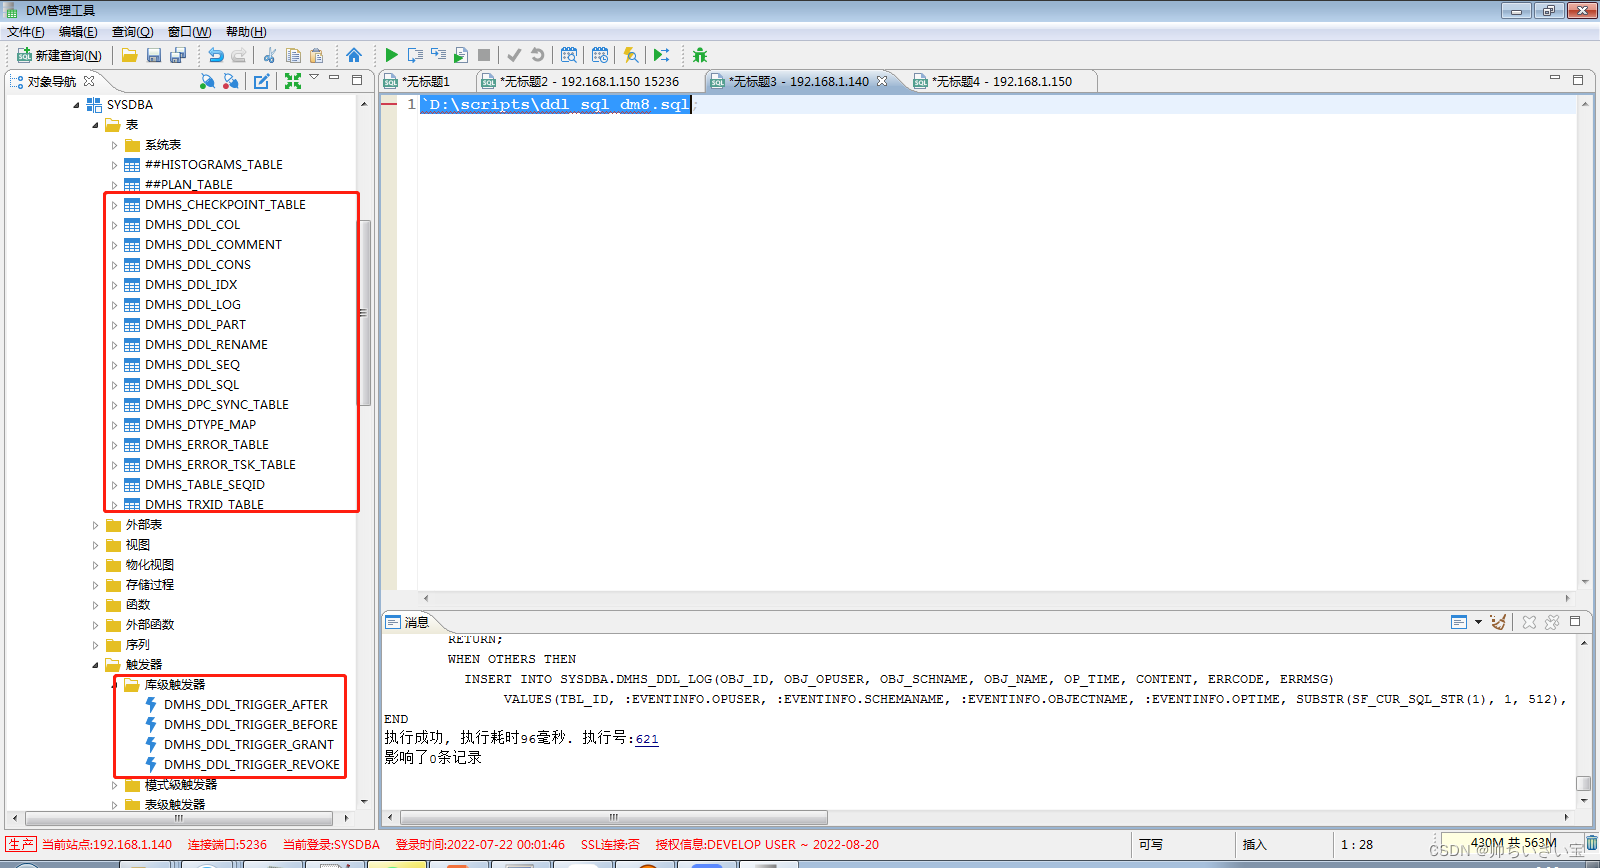
分别登录A、B数据库实例,执行初始化脚本。
`
/opt/dmhs/script/ddl_sql_dm8.sql取自于DMHS安装目录
4.4 安装unixODBC程序
关于更详细的unixODBC学习,请前往本人博客搜索学习。
-- AB两台主机都要安装unixODBC。
export LANG=en_US.UTF8
./configure --enable-drivers=no --with-iconv-char-enc=GB18030 --enable-gui=no --enable-iconv=yes
make && make install

-- DM8 ODBC驱动链接配置
[root@DCP140 ~]# cat /usr/local/etc/odbcinst.ini
[DM8 ODBC DRIVER]
Description = ODBC DRIVER FOR DM8
DRIVER = /opt/dmdbms/bin/libdodbc.so
threading = 0

 -- DSN数据源配置(可省略,非必需)
[root@DCP140 ~]# cat /usr/local/etc/odbc.ini
[dm8]
Desription = DM ODBC DSND
Driver = DM8 ODBC DRIVER
SERVER = 127.0.0.1
UID = SYSDBA
PWD = SYSDBA
TCP_PORT = 5236
[root@DCP140 ~]#
4.5 安装DMHS软件
直接使用root安装,最终安装程序会自动把安装目录树的属主改为dmdba。
其实安装过程很简单,填上软件安装的目标路径,环境变量指定。这里DMHS使用的是免费测试版KEY。
特别注意:
- A主机:选择3自定义安装组件,选中 DMHS Server、DMHS Agent、DMHS Web Manager组件,其实当时安装时本人多选一个DMHS Web Manager,但不影响整体,只要晓得每个组件的用途就行,占不了多大的空间。
- B主机:选择3自定义安装组件,选中DMHS Server、DMHS Agent、DMHS Web Manager、Build In Database组件,Build In Database内置数据库专门拿来存放HSEM元数据库信息,HSEM平台主要用于DMHS数据同步链路维护、监控、远程部署。
- status server: 192.168.1.150 status_port:15236 直接填写B主机HSEM元数据库的。
- HSEM Web部署在B机,连接本机上刚DMHS安装时自动初始化的DM7版的内置数据库DAMENG,默认端口号:15236。
-- A:192.168.1.140 主机
[root@DCP140 ~]# chmod +x dmhs_V4.2.90_dm8_rev110412_rh6_64_veri_20220620_sp2.bin
[root@DCP140 ~]# ./dmhs_V4.2.90_dm8_rev110412_rh6_64_veri_20220620_sp2.bin -i
Extract install files..........

1.English(English)
2.Simplified Chinese(简体中文)
Select the language to install[2.Simplified Chinese(简体中文)]:1
/tmp/DMHSInstall/install.log
1.Welcome to free trial DMHS
2.Enter the license key file
Verify the license key file[1.Welcome to free trial DMHS]:
1.Lite Edition
2.Full Edition (Web Service)
3.Custom Edition
Install type[1.Lite Edition]:3
1.DMHS Server
2.DMHS Agent
3.DMHS Web Manager
4.Build In Database
5.ODBC
6.DMHS Configuration Assitant
7.Manual
Input the number of component you want to install,seperated by ',' :1,2,3
1.DMHS Server
2.DMHS Agent
3.DMHS Web Manager
Space required:502 MB
Destination Folder:[/opt/dmhs]
1.Unify Deploy
2.Now init
Init Dmhs[1.Unify Deploy]:
Installing...
default start ...    default finished.
server start ...    server finished.
hs_agent start ...    hs_agent finished.
webmanager start ...    webmanager finished.
postinstall start ...    postinstall finished.
Creating shortcuts...
The installation was successful
DMHS Agent config
name[HsAgent]:
server_ip[192.168.1.140](192.168.1.140):
lsn_port[5456](1000-65535):
status_interval[3](1-60):
status_server[]:192.168.168.1.150
Input error, please re-enter!
status_server[192.168.168.1.150]:192.168.1.150
status_port[15236](1000-65535):
status_user[SYSDBA]:
status_pwd[SYSDBA]:
Service script configuration
Dependent library path
tip:This configuration item is for users to confiure the source or destination database path and the ODBC dependent library path.Multiple paths are separated by ":"(for example:/opt/dmdbms/bin:/usr/local/lib).This configuration item whill added to the variable value of NEED_LIB_PATH in the service script.
Please configure the dependent library path:/usr/local/lib:/opt/dmdbms/dmdbms/bin
Guard Service
1.Automatic
2.Demand
Start type:[2.Demand]
Installing agent Service
web Service
1.Automatic
2.Demand
Start type:[2.Demand]
Installing web Service
DMHSV4.0Install Finish
For more information,see the install log file:
/opt/dmhs/log/install.log
[root@DCP140 ~]#
-- A:192.168.1.150 主机
[root@DCP150 ~]# chmod +x dmhs_V4.2.90_dm8_rev110412_rh6_64_veri_20220620_sp2.bin
[root@DCP150 ~]# ./dmhs_V4.2.90_dm8_rev110412_rh6_64_veri_20220620_sp2.bin -i
Extract install files..........

1.English(English)
2.Simplified Chinese(简体中文)
Select the language to install[2.Simplified Chinese(简体中文)]:1
/tmp/DMHSInstall/install.log
1.Welcome to free trial DMHS
2.Enter the license key file
Verify the license key file[1.Welcome to free trial DMHS]:
1.Lite Edition
2.Full Edition (Web Service)
3.Custom Edition
Install type[1.Lite Edition]:3
1.DMHS Server
2.DMHS Agent
3.DMHS Web Manager
4.Build In Database
5.ODBC
6.DMHS Configuration Assitant
7.Manual
Input the number of component you want to install,seperated by ',' :1,2,3,4
1.DMHS Server
2.DMHS Agent
3.DMHS Web Manager
4.Build In Database
Space required:719 MB
Destination Folder:[/opt/dmhs]
1.Unify Deploy
2.Now init
Init Dmhs[1.Unify Deploy]:
Installing...
default start ...    default finished.
server start ...    server finished.
hs_agent start ...    hs_agent finished.
webmanager start ...    webmanager finished.
db start ...    db finished.
doc start ...    doc finished.
postinstall start ...    postinstall finished.
Creating shortcuts...
The installation was successful
DMHS Agent config
name[HsAgent]:
server_ip[192.168.1.150](192.168.1.150):
lsn_port[5456](1000-65535):
status_interval[3](1-60):
status_server[192.168.1.150]:
status_port[15236]:
status_user[SYSDBA]:
status_pwd[SYSDBA]:
Service script configuration
Dependent library path
tip:This configuration item is for users to confiure the source or destination database path and the ODBC dependent library path.Multiple paths are separated by ":"(for example:/opt/dmdbms/bin:/usr/local/lib).This configuration item whill added to the variable value of NEED_LIB_PATH in the service script.
Please configure the dependent library path:/usr/local/lib:/opt/dmbms/bin
Built-in database Service
1.Automatic
2.Demand
Start type:[2.Demand]
Installing Built-in Database Service
Init inner database
Guard Service
1.Automatic
2.Demand
Start type:[2.Demand]
Installing agent Service
web Service
1.Automatic
2.Demand
Start type:[2.Demand]
Installing web Service
DMHSV4.0Install Finish
For more information,see the install log file:
/opt/dmhs/log/install.log

[root@DCP150 ~]#
4.6 启动B机HSDB内置元数据库
附加说明:为了优化下数据库,可以在启动前修改参数文件dm.ini ( BUFFER=500 , SORT_BUF_SIZE=10)`
# /opt/dmhs/db/bin
[root@DCP150 bin]# ./DmServiceHSDB start
Starting DmServiceHSDB:                                    [ OK ]

[root@DCP150 bin]# ps -ef|grep dms
dmdba      93305       1  0 22:45 pts/0    00:00:04 /opt/dmdbms/bin/dmserver /dmdata/DMDB/dm.ini -noconsole
root      115246       1  0 23:31 pts/0    00:00:00 /opt/dmhs/db/bin/dmserver /opt/dmhs/db/data/DAMENG/dm.ini -noconsole
root      115317   92124  0 23:32 pts/0    00:00:00 grep dms
[root@DCP150 bin]#
4.7 配置HS远程部署代理
-- A机:/opt/dmhs/hs_agent
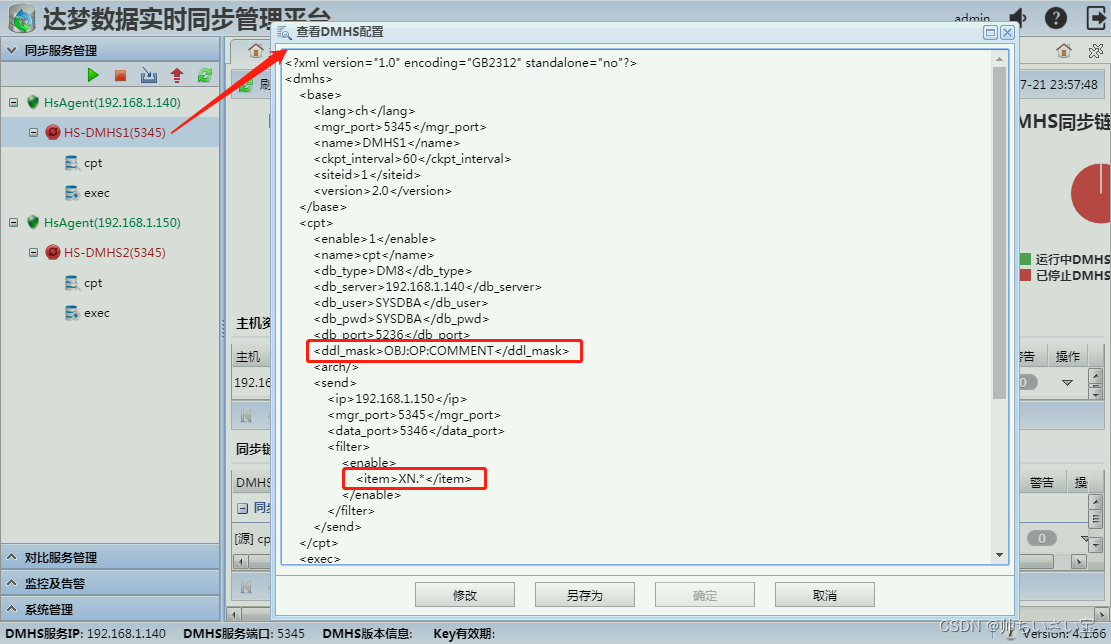
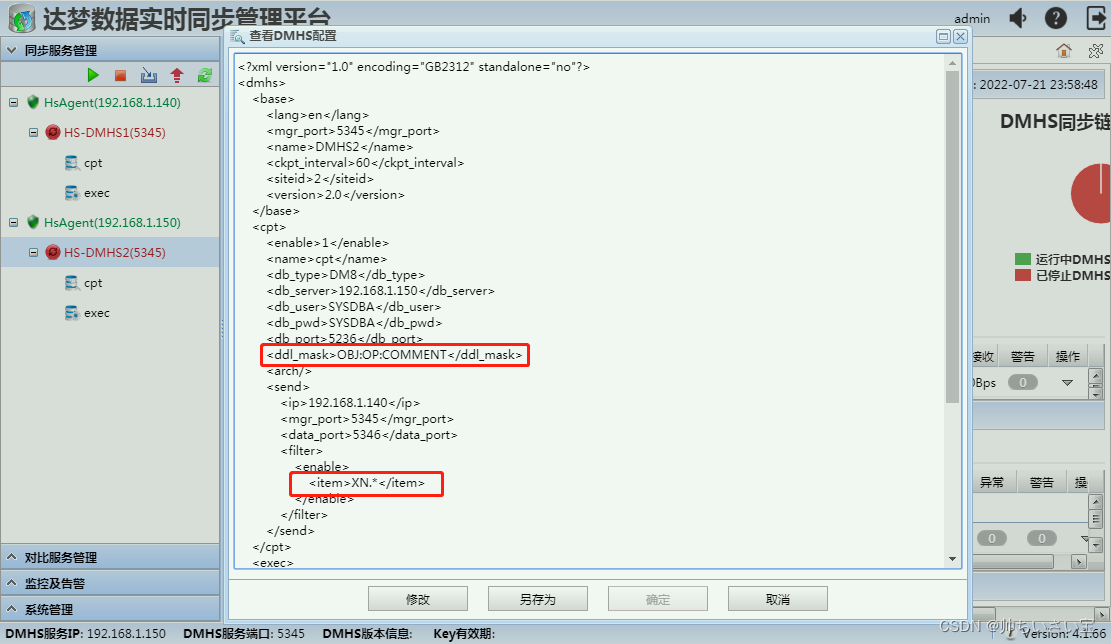
[root@DCP140 hs_agent]# cat dmhs_agent.xml
<?xml version="1.0" encoding="GB2312"?>
<hs_agent>
<lsn_port>5456</lsn_port>
<name>HsAgent</name>
<server_ip>192.168.1.140</server_ip>
<status_interval>3</status_interval>
<status_server>192.168.1.150</status_server>
<status_port>15236</status_port>
<status_user>SYSDBA</status_user>
<status_pwd>SYSDBA</status_pwd>
<dmhs_support>1</dmhs_support>
<veri_support>1</veri_support>
<lang>en</lang>
</hs_agent>
[root@DCP140 hs_agent]#
-- B机:/opt/dmhs/hs_agent
[root@DCP150 hs_agent]# cat dmhs_agent.xml
<?xml version="1.0" encoding="GB2312"?>
<hs_agent>
<lsn_port>5456</lsn_port>
<name>HsAgent</name>
<server_ip>192.168.1.150</server_ip>
<status_interval>3</status_interval>
<status_server>192.168.1.150</status_server>
<status_port>15236</status_port>
<status_user>SYSDBA</status_user>
<status_pwd>SYSDBA</status_pwd>
<dmhs_support>1</dmhs_support>
<veri_support>1</veri_support>
<lang>en</lang>
</hs_agent>
[root@DCP150 hs_agent]#
-- 启动HSAgent
[root@DCP140 hs_agent]# ./DmhsAgentServiceHsAgent start
Starting DmhsAgentServiceHsAgent: [ OK ]
[root@DCP140 hs_agent]# ss -lnp|grep dmhs_agent
tcp LISTEN 0 128 0.0.0.0:5456 0.0.0.0:* users:(("dmhs_agent",pid=113748,fd=7))
[root@DCP140 hs_agent]#
[root@DCP150 hs_agent]# ./DmhsAgentServiceHsAgent start
Starting DmhsAgentServiceHsAgent: [ OK ]
[root@DCP150 hs_agent]# ss -lnp|grep dmhs_agent
tcp LISTEN 0 128 0.0.0.0:5456 0.0.0.0:* users:(("dmhs_agent",pid=115383,fd=7))
[root@DCP150 hs_agent]#
4.8 配置HSEM Web数据源
在B机192.168.1.150上,配置web数据源,连接到HSEM元数据库。
# 启动tomcat web
[root@DCP150 dmhs]# cd web
[root@DCP150 web]# ls
bin  BUILDING.txt  conf  CONTRIBUTING.md  icon  lib  LICENSE  logs  NOTICE  README.md  RELEASE-NOTES  RUNNING.txt  temp  webapps  work
[root@DCP150 web]# cd bin
[root@DCP150 bin]# ./startup.sh
Using CATALINA_BASE:   /opt/dmhs/web
Using CATALINA_HOME:   /opt/dmhs/web
Using CATALINA_TMPDIR: /opt/dmhs/web/temp
Using JRE_HOME:        /usr
Using CLASSPATH:       /opt/dmhs/web/bin/bootstrap.jar:/opt/dmhs/web/bin/tomcat-juli.jar
Tomcat started.
[root@DCP150 bin]# ps -e|grep java
 115465 pts/0    00:00:32 java
[root@DCP150 bin]# ps -ef|grep java
root      115465       1 99 23:39 pts/0    00:00:43 /usr/bin/java -Djava.util.logging.config.file=/opt/dmhs/web/conf/logging.properties -Djava.util.logging.manager=org.apache.juli.ClassLoaderLogManager -Djdk.tls.ephemeralDHKeySize=2048 -Dignore.endorsed.dirs= -classpath /opt/dmhs/web/bin/bootstrap.jar:/opt/dmhs/web/bin/tomcat-juli.jar -Dcatalina.base=/opt/dmhs/web -Dcatalina.home=/opt/dmhs/web -Djava.io.tmpdir=/opt/dmhs/web/temp org.apache.catalina.startup.Bootstrap start
root      115541   92124  0 23:39 pts/0    00:00:00 grep java
[root@DCP150 bin]# cd ../webapps/manager/WEB-INF/
classes/ config/  deploy/  lib/
[root@DCP150 bin]# cd ../webapps/manager/WEB-INF/config/
[root@DCP150 config]# ls
connectPool.xml
[root@DCP150 config]# vi connectPool.xml
[root@DCP150 config]# cat connectPool.xml
<?xml version="1.0" encoding="UTF-8"?>
<ConnectPool>
        <Dbtype>dm7</Dbtype>
        <Server>127.0.0.1</Server>
        <Port>15236</Port>
        <User>SYSDBA</User>
        <Password>SYSDBA</Password>
        <InitPoolSize>20</InitPoolSize>
        <CorePoolSize>20</CorePoolSize>
        <MaxPoolSize>50</MaxPoolSize>
        <KeepAliveTime>60</KeepAliveTime>
        <DbDriver></DbDriver>
        <DbTestStatement>select 1</DbTestStatement>
        <SSLDir></SSLDir>
        <SSLPassword></SSLPassword>
</ConnectPool>
[root@DCP150 config]#
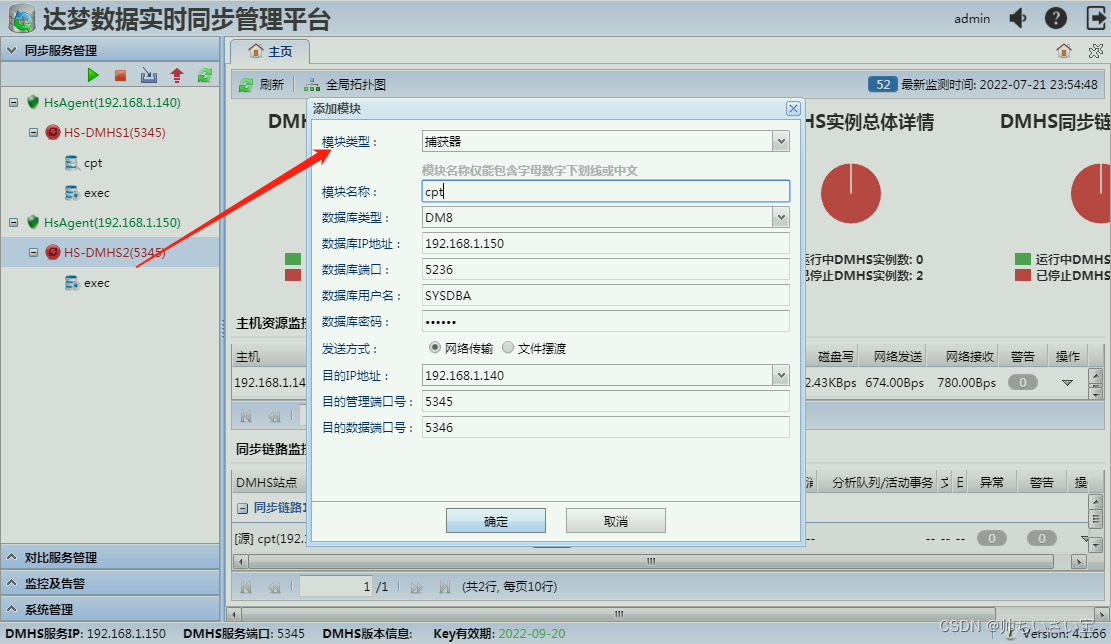
4.9 HSEM平台添加DMHS实例服务
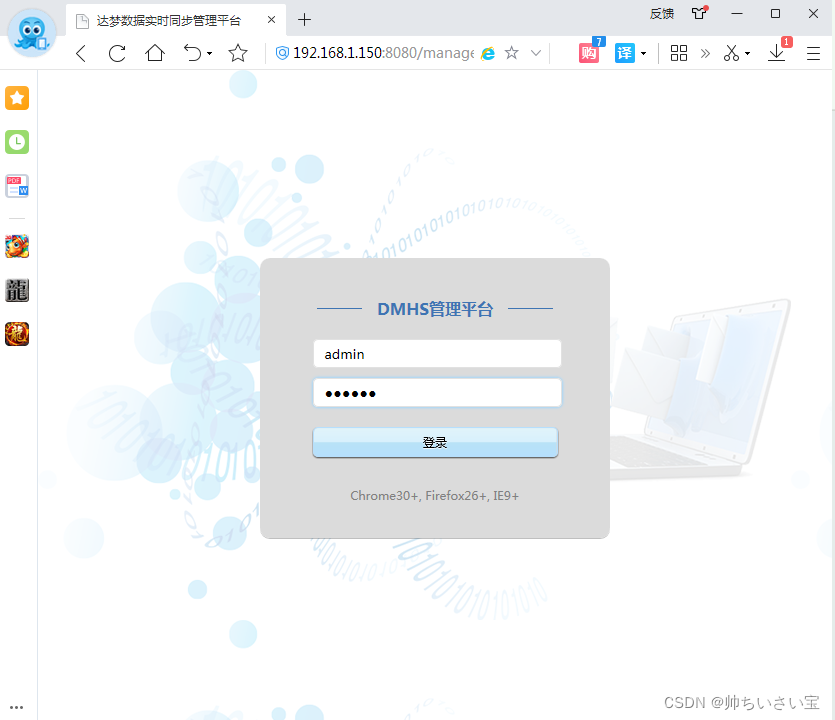
登录HSEM Web平台,账号:admin 密码:888888
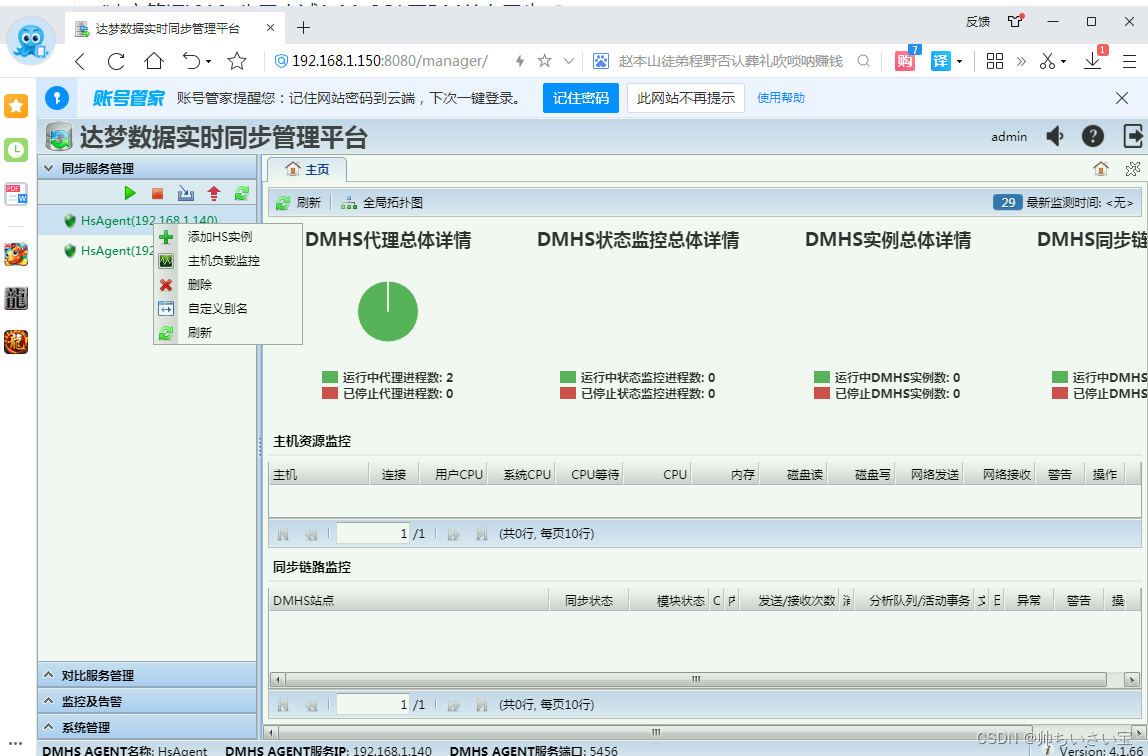
为A、B数据库实例注册DMHS实例服务


4.10 源端库与目标库建测试的同步模式数据
A/B主机数据库上创建模式(相当于MySQL逻辑库、Oracle PDB)
create schema XN authorization SYSDBA;

4.11 解决动态库依赖
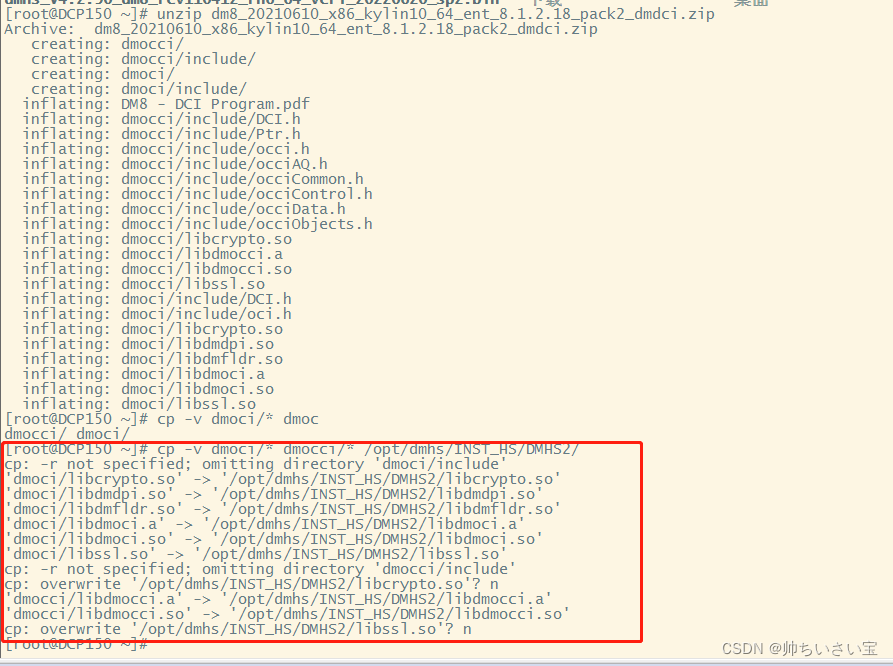
检查DMHS核心的入库模块和分析模块的动态库依赖是否完整,如果缺失,及时修正,否则影响后续数据同步的操作。(AB两台主机都要检查)
一定要到HSEM平台自动注册实例添加的目录下,一般是以站点名称命名。
比如:A主机 DMHS1 相应路径:/opt/dmhs/INST_HS/DMHS1

解决DCI依赖方法
[root@DCP140 ~]# unzip dm8_20210610_x86_kylin10_64_ent_8.1.2.18_pack2_dmdci.zip
Archive:  dm8_20210610_x86_kylin10_64_ent_8.1.2.18_pack2_dmdci.zip
   creating: dmocci/
   creating: dmocci/include/
   creating: dmoci/
   creating: dmoci/include/
  inflating: DM8 - DCI Program.pdf
  inflating: dmocci/include/DCI.h
  inflating: dmocci/include/Ptr.h
  inflating: dmocci/include/occi.h
  inflating: dmocci/include/occiAQ.h
  inflating: dmocci/include/occiCommon.h
  inflating: dmocci/include/occiControl.h
  inflating: dmocci/include/occiData.h
  inflating: dmocci/include/occiObjects.h
  inflating: dmocci/libcrypto.so
  inflating: dmocci/libdmocci.a
  inflating: dmocci/libdmocci.so
  inflating: dmocci/libssl.so
  inflating: dmoci/include/DCI.h
  inflating: dmoci/include/oci.h
  inflating: dmoci/libcrypto.so
  inflating: dmoci/libdmdpi.so
  inflating: dmoci/libdmfldr.so
  inflating: dmoci/libdmoci.a
  inflating: dmoci/libdmoci.so
  inflating: dmoci/libssl.so
[root@DCP140 ~]# ls
 anaconda-ks.cfg                                            dmocci                  下载   模板
 dm8_20210610_x86_kylin10_64_ent_8.1.2.18_pack2_dmdci.zip   dmoci                   公共   视频
 dm8_20210818_x86_rh6_64_ent_8.4.2.18_pack14.iso            initial-setup-ks.cfg    图片   音乐
'DM8 - DCI Program.pdf'                                     unixODBC-2.3.9          文档
 dmhs_V4.2.90_dm8_rev110412_rh6_64_veri_20220620_sp2.bin    unixODBC-2.3.9.tar.gz   桌面
[root@DCP140 ~]# cp -v dmocci/* dmoci/* /opt/dmhs/INST_HS/DMHS1/
cp: -r not specified; omitting directory 'dmocci/include'
'dmocci/libcrypto.so' -> '/opt/dmhs/INST_HS/DMHS1/libcrypto.so'
'dmocci/libdmocci.a' -> '/opt/dmhs/INST_HS/DMHS1/libdmocci.a'
'dmocci/libdmocci.so' -> '/opt/dmhs/INST_HS/DMHS1/libdmocci.so'
'dmocci/libssl.so' -> '/opt/dmhs/INST_HS/DMHS1/libssl.so'
cp: -r not specified; omitting directory 'dmoci/include'
cp: overwrite '/opt/dmhs/INST_HS/DMHS1/libcrypto.so'? n
'dmoci/libdmdpi.so' -> '/opt/dmhs/INST_HS/DMHS1/libdmdpi.so'
'dmoci/libdmfldr.so' -> '/opt/dmhs/INST_HS/DMHS1/libdmfldr.so'
'dmoci/libdmoci.a' -> '/opt/dmhs/INST_HS/DMHS1/libdmoci.a'
'dmoci/libdmoci.so' -> '/opt/dmhs/INST_HS/DMHS1/libdmoci.so'
cp: overwrite '/opt/dmhs/INST_HS/DMHS1/libssl.so'? n
[root@DCP140 ~]#
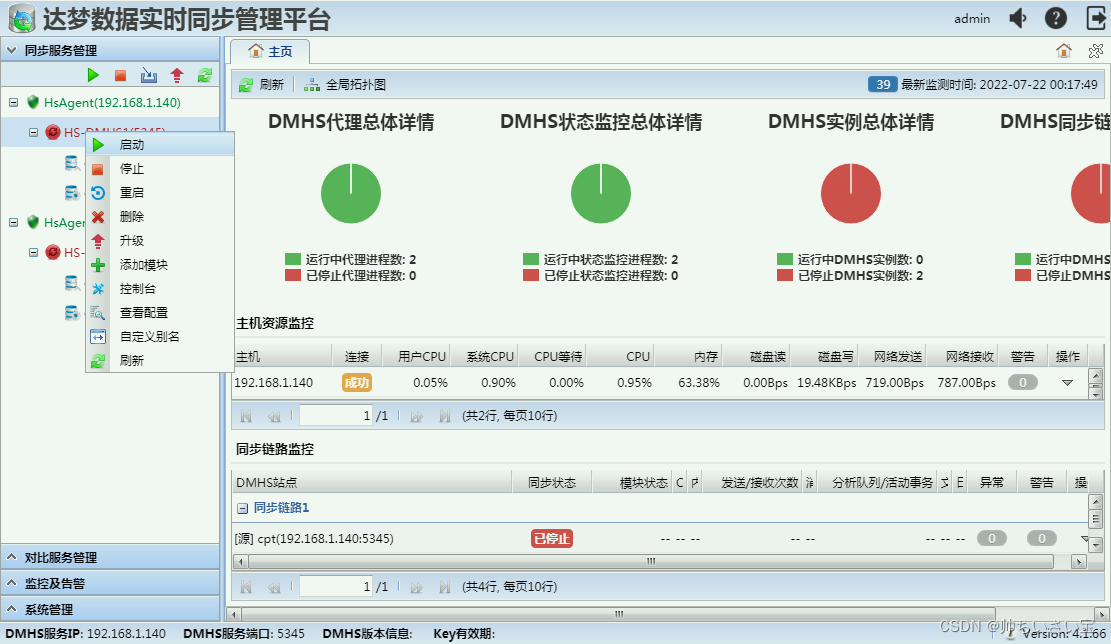
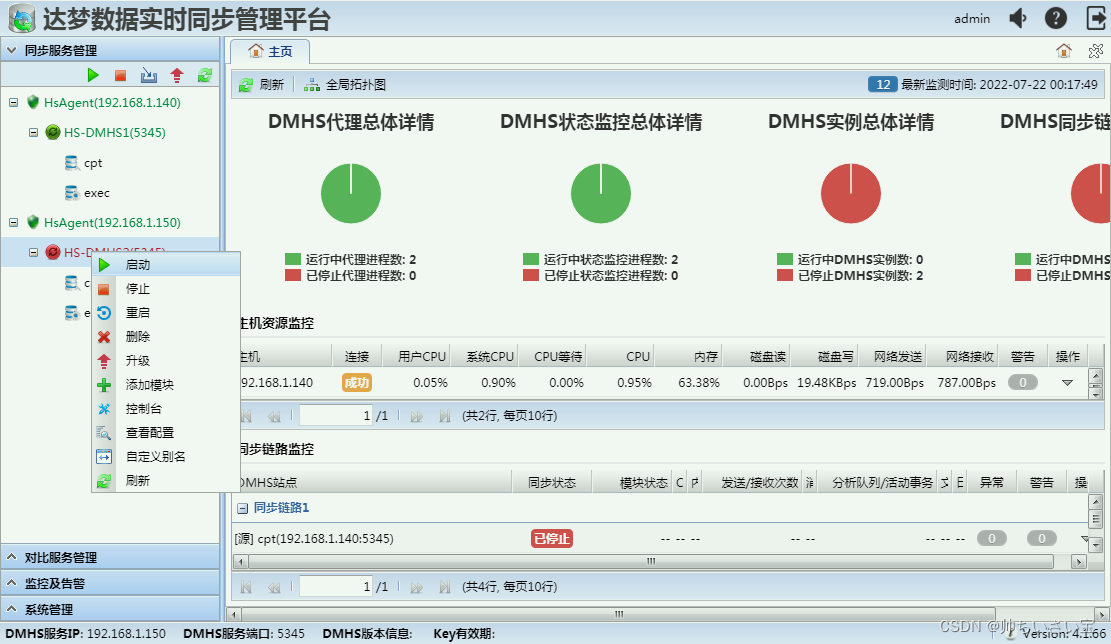
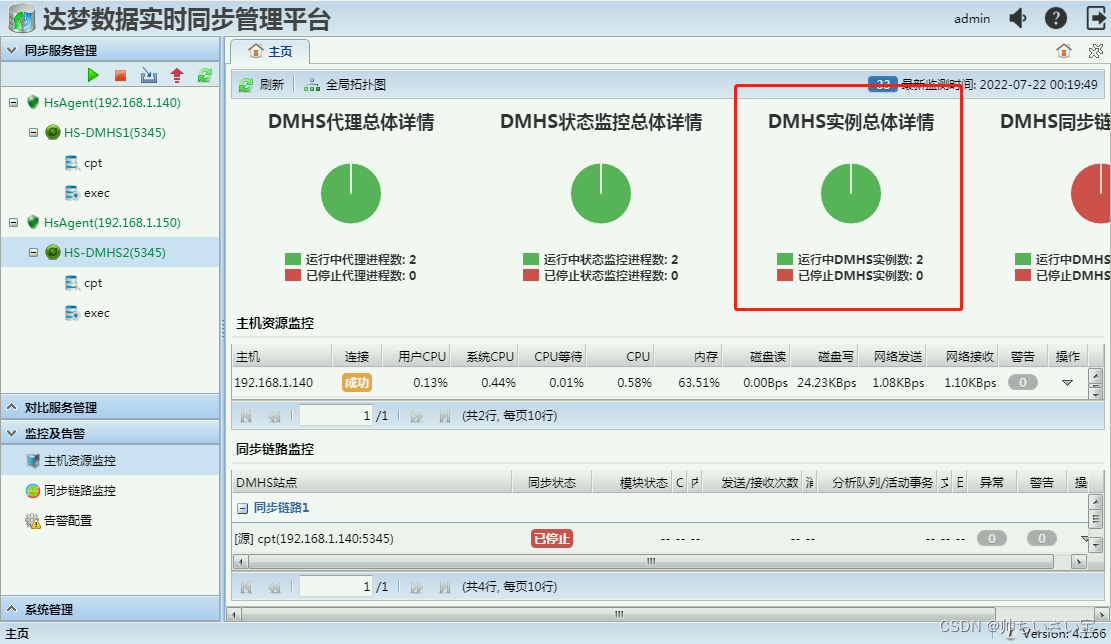
4.12 分别拉起DMHS1和DMHS2实例
通过DMHS HSEM Web管理平台,手工远程拉起DMHS实例服务。


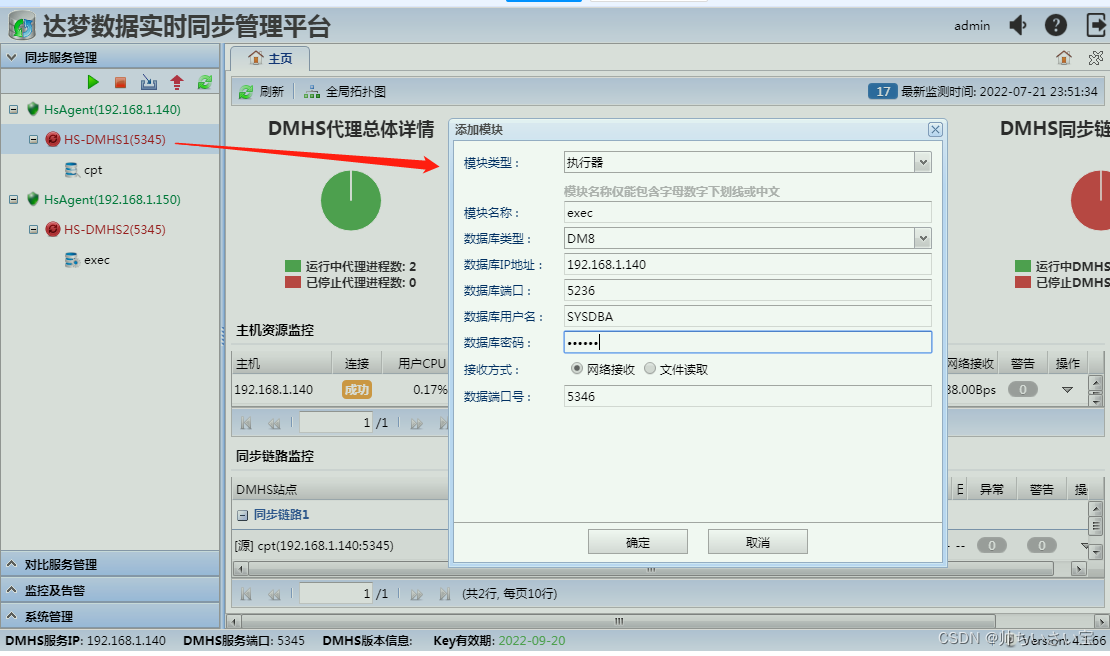
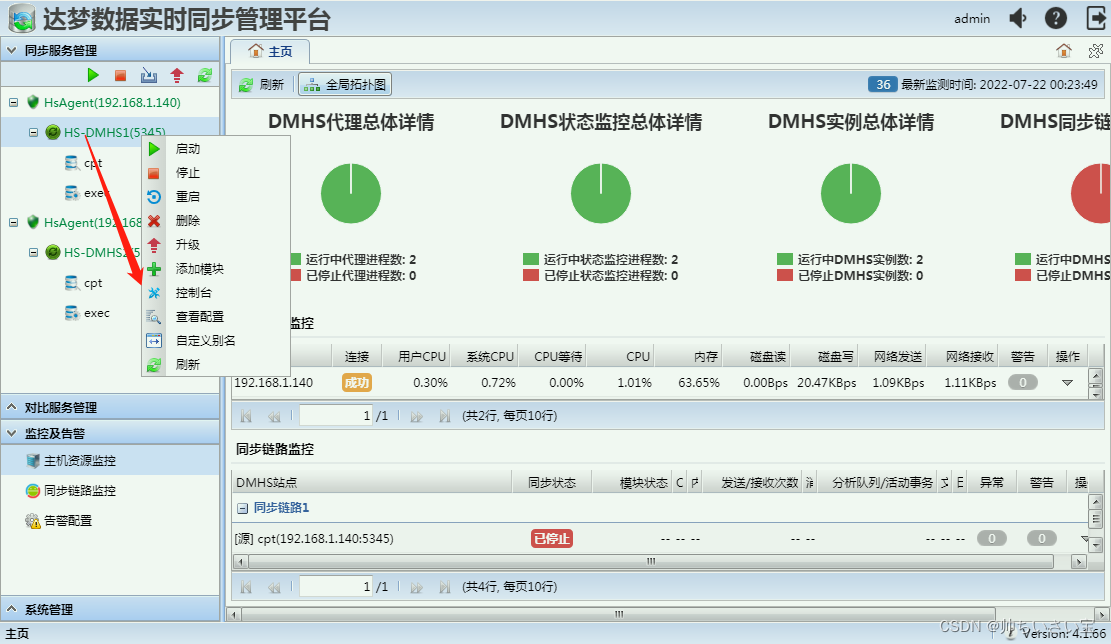
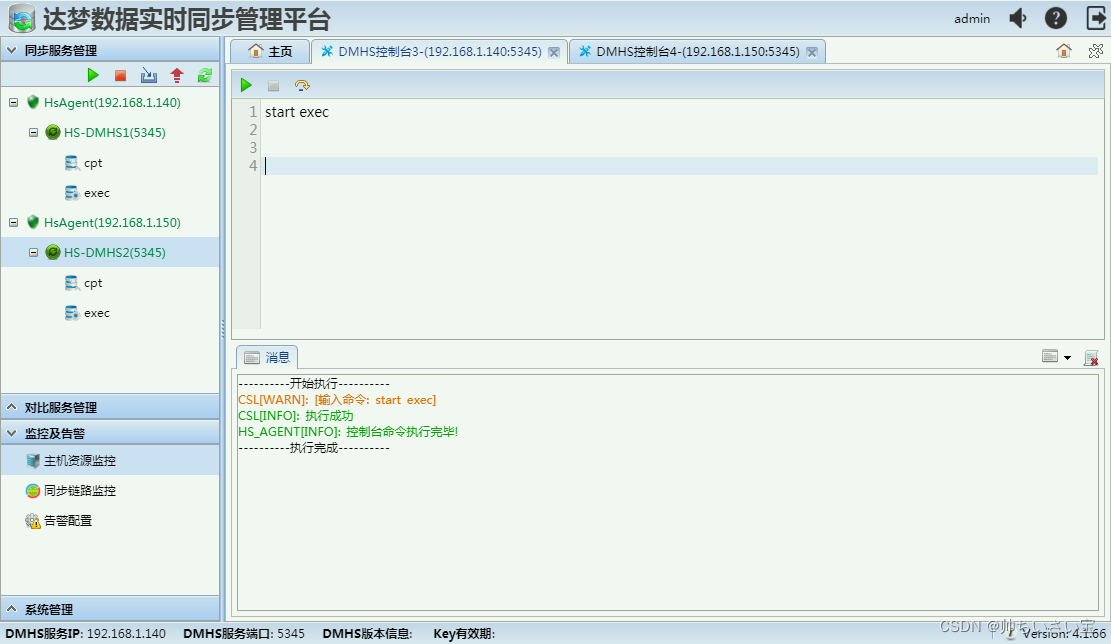
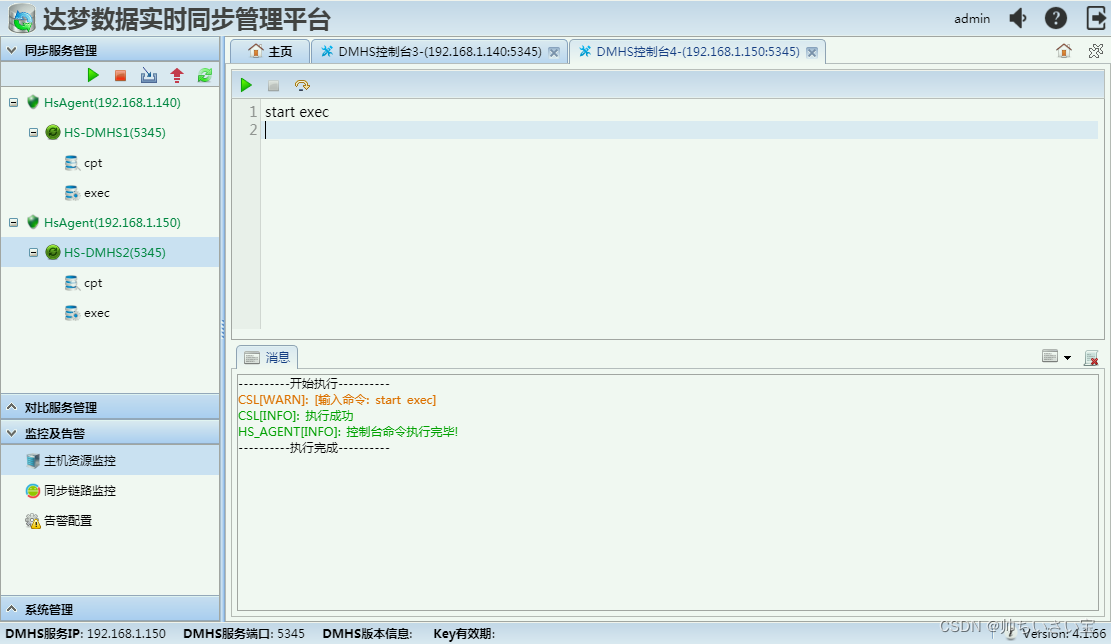
4.13 先分别启动两端库的入库模块

4.14 初始化离线字典
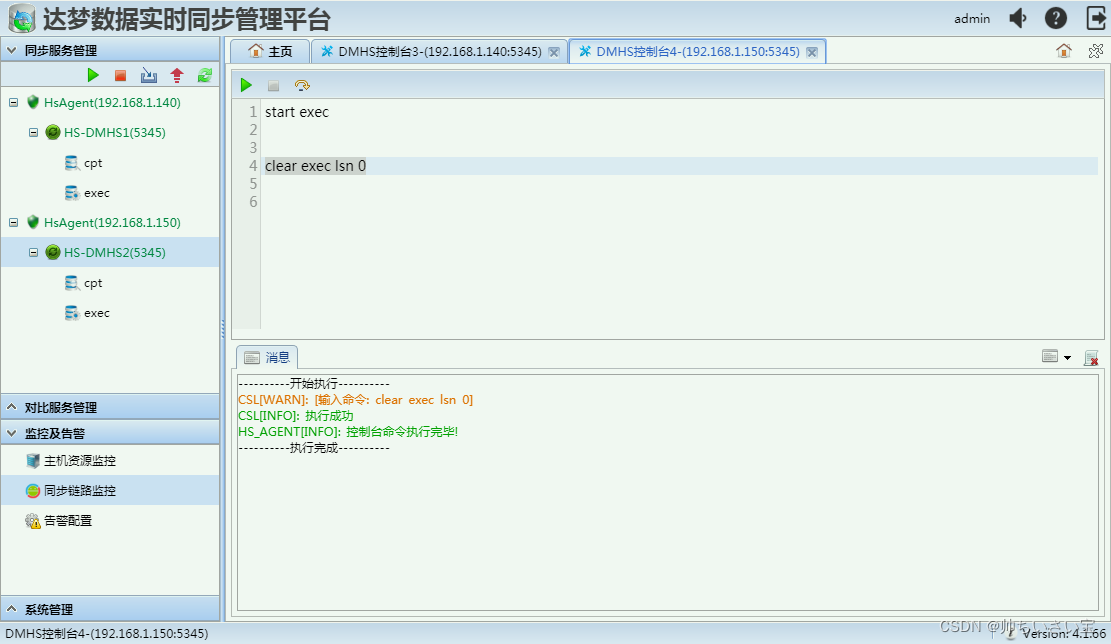
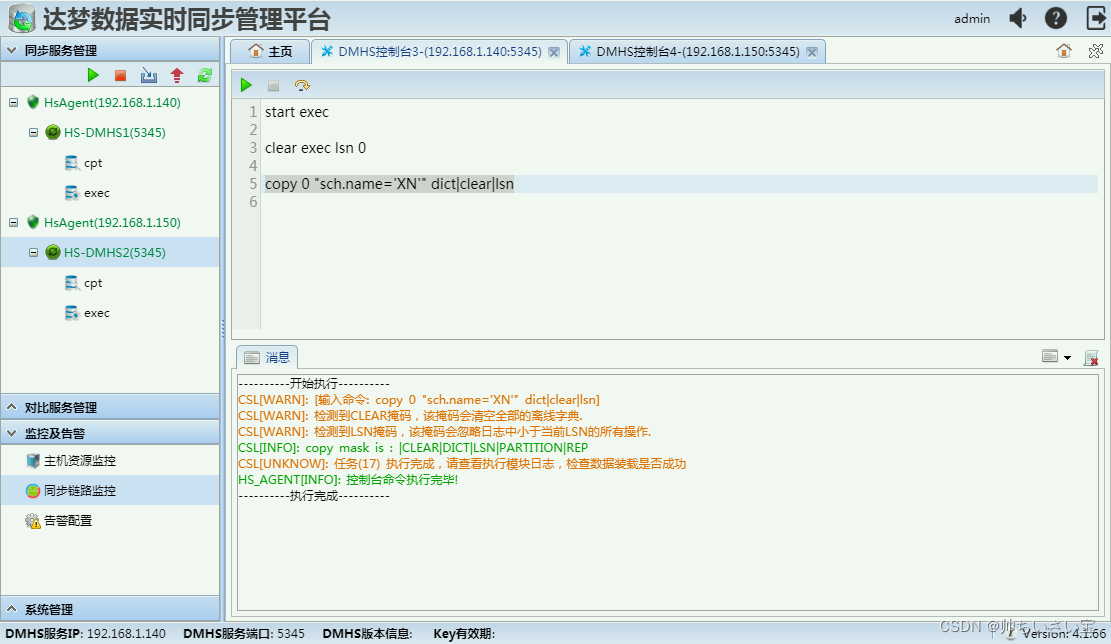
离线字典是DMHS的灵魂,这个操作一定要记住做。
1.DMHS1实例
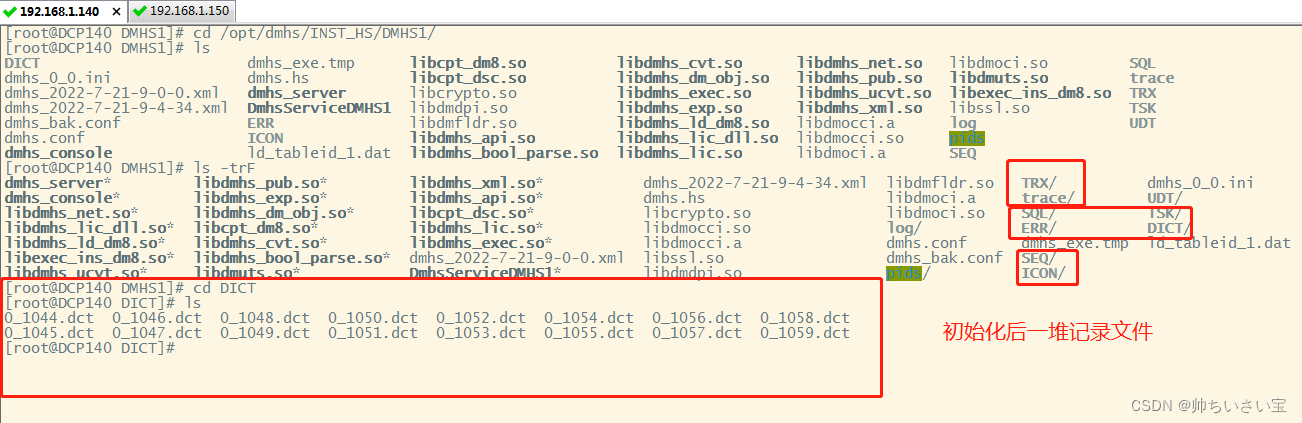
2.DMHS2实例


4.15 开启增量数据同步
两端都要执行,切记,这是双向同步。
1.DMHS1实例
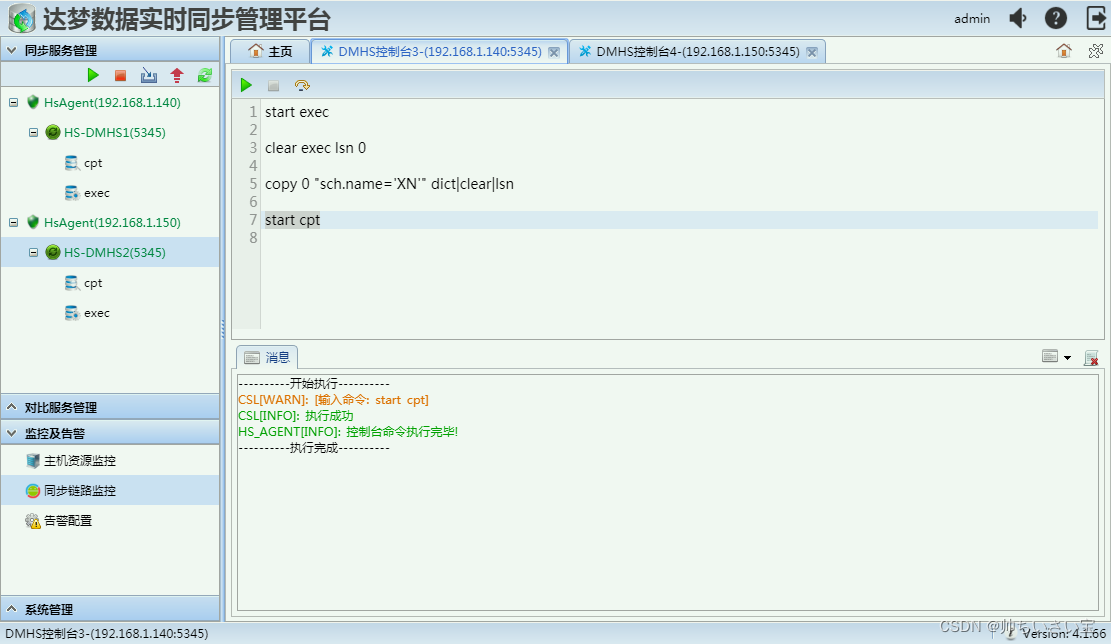
2.DMHS2实例
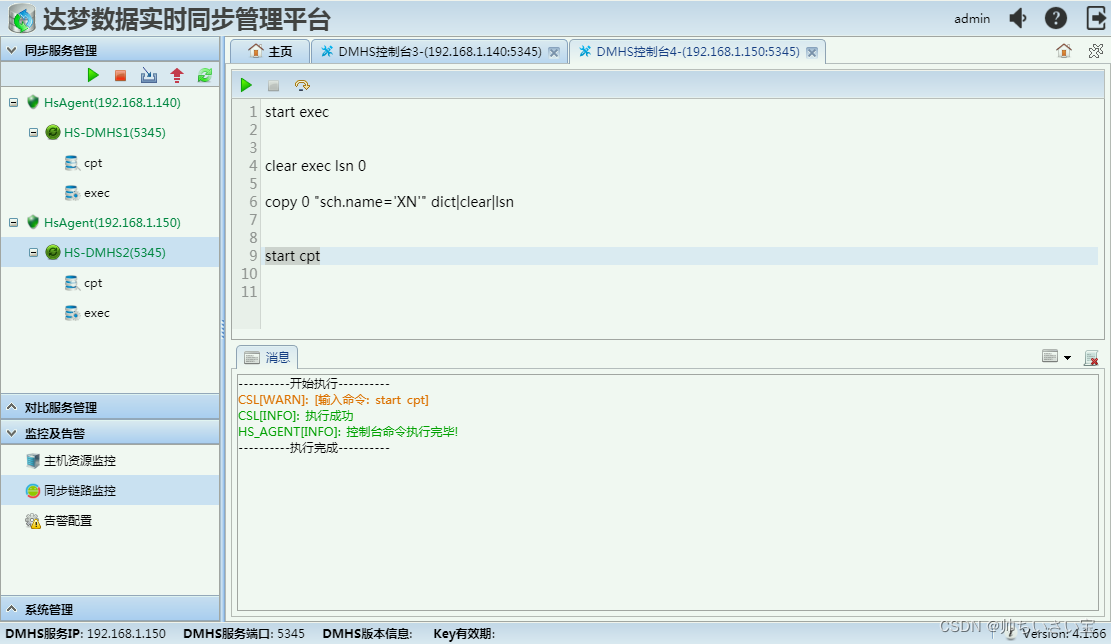
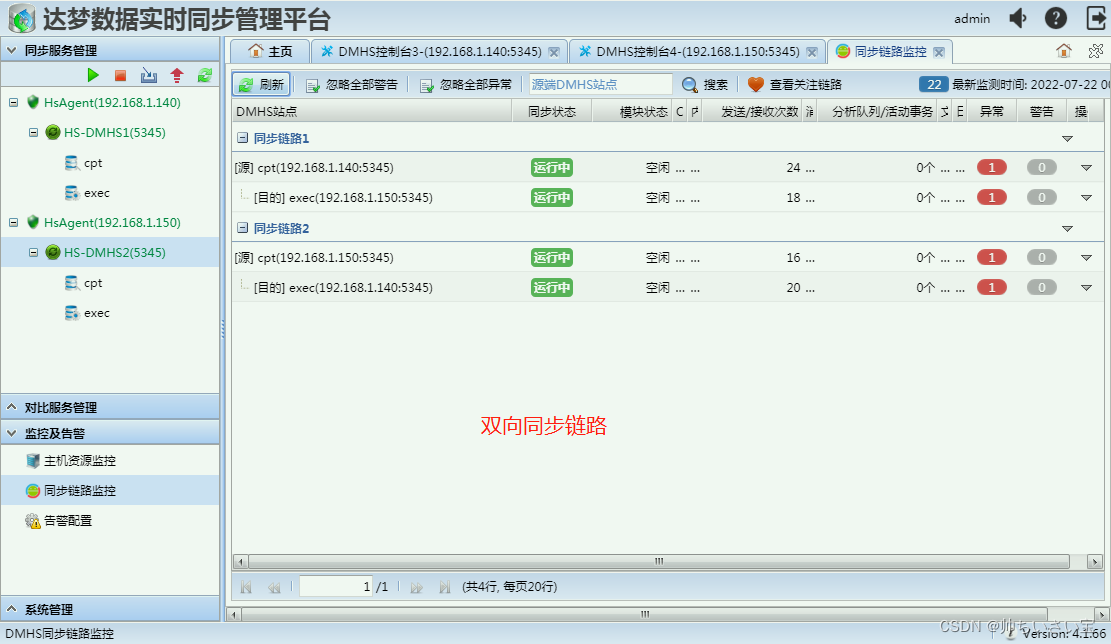
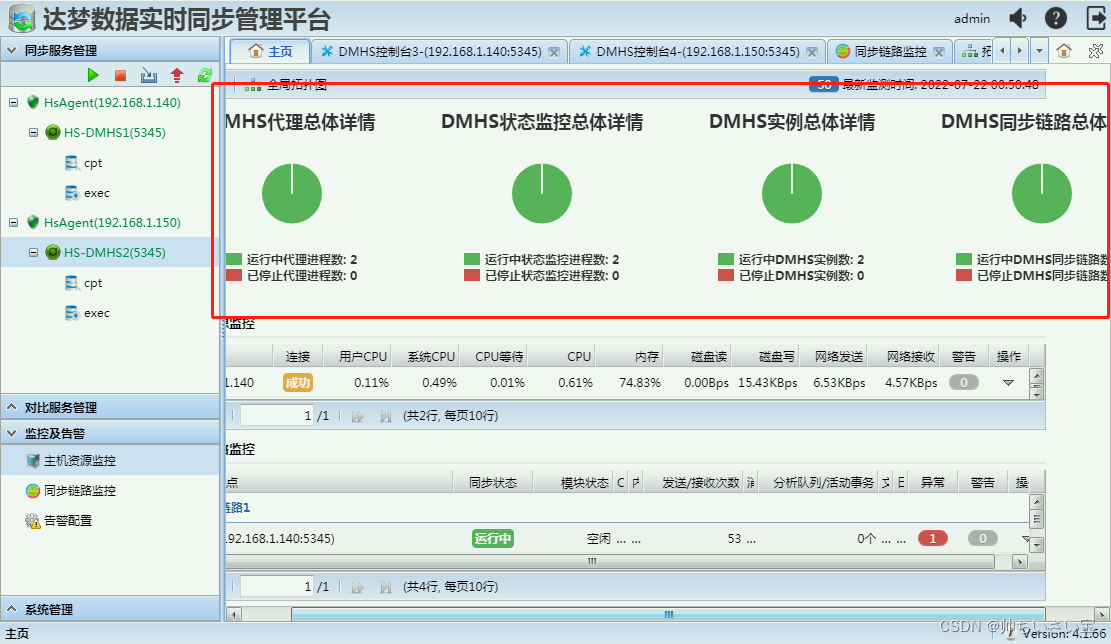
查看同步链路状态
4.16 测试DDL和DML数据同步
本人测试DDL同步和DML是比较齐全的,测试内容都是在日常数据库涉及到的操作:分区表、注释、视图、增删改。
A:192.168.1.140
4.16.1 数据同步(A–>B)
-- 建分区表
create table XN.fstest
(
   c1 int  primary key not null,
   c2 varchar(50) not null,
   c3 date not null
) partition by range(c3) interval(numtoyminterval(2, 'MONTH'))
(
  partition p1 values less than ('2022-02-01')
);

-- 添加注释
comment on table  XN.fstest is '帅小宝测试间隔分区表';
comment on column XN.fstest.c3 is '帅小宝测试分区表列C3'

-- 建视图
create view XN.v_fstest as select c2, c3 from XN.fstest;
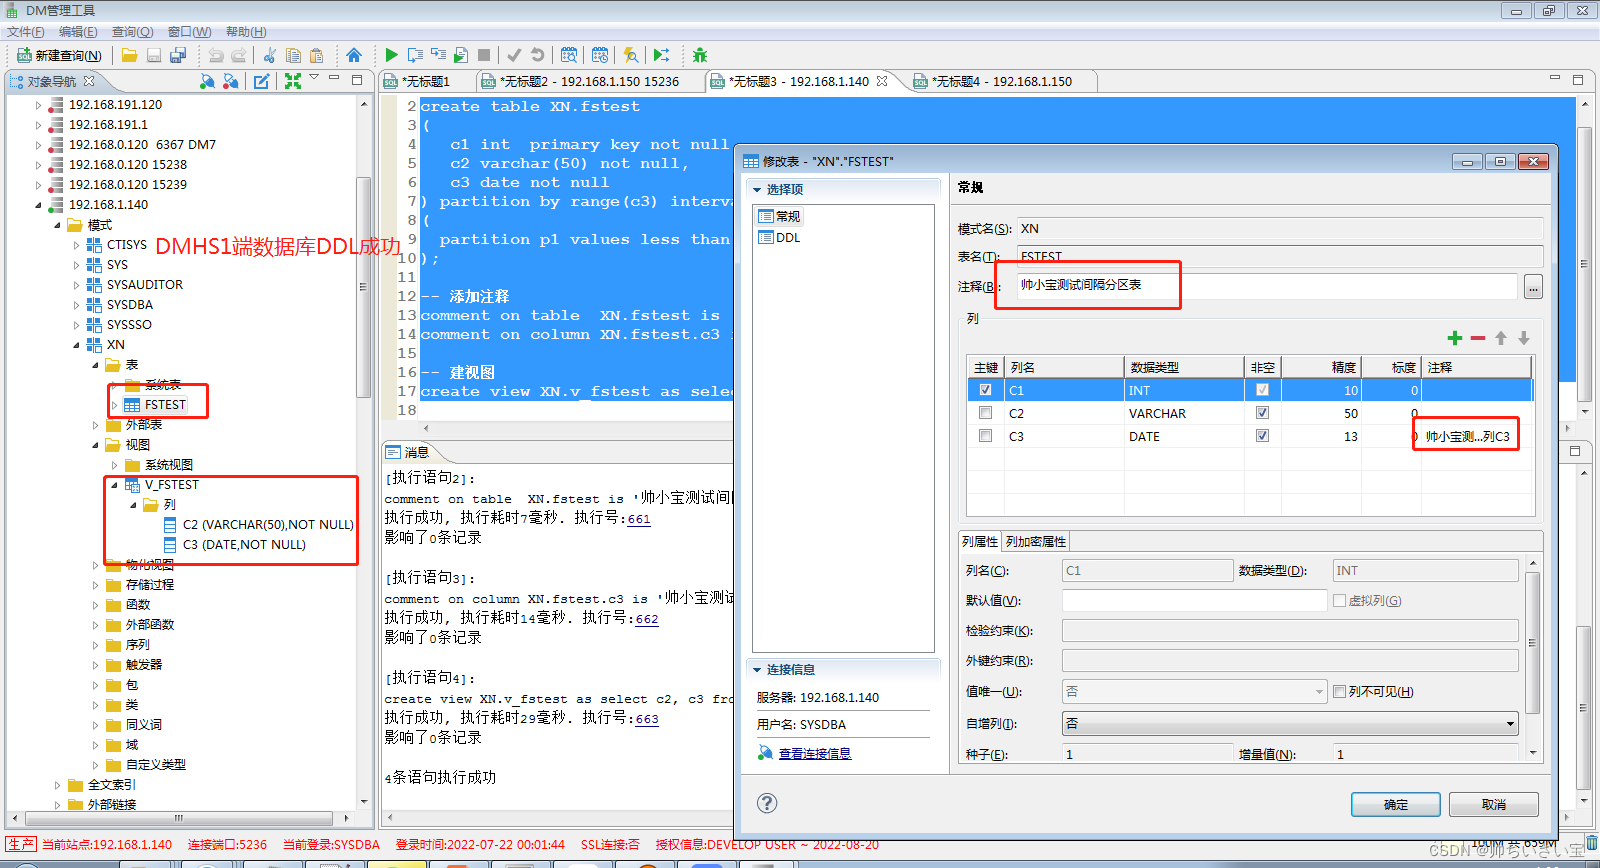
检查DMHS2端数据库DDL同步情况

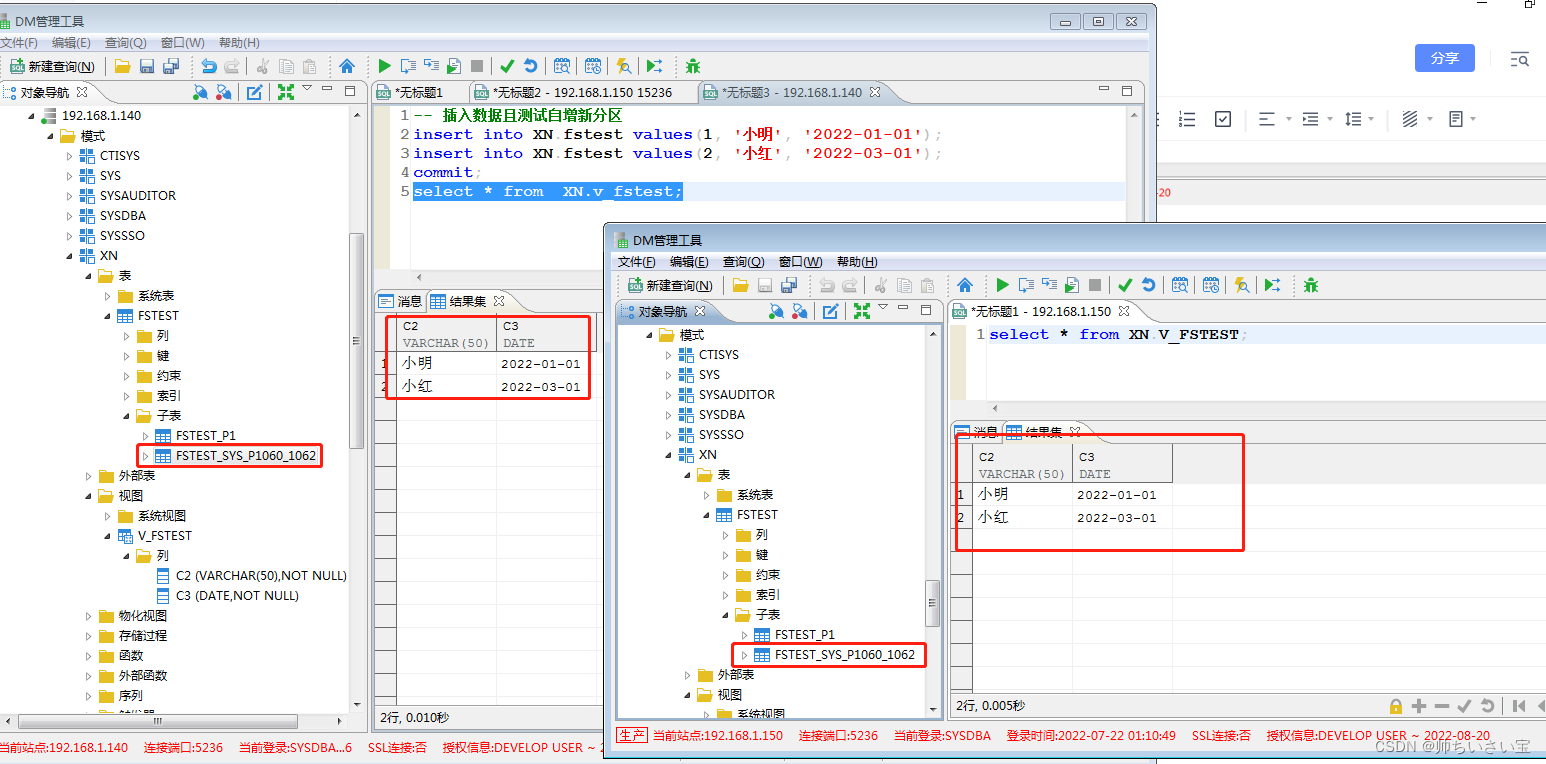
-- 插入数据且测试自增新分区
insert into XN.fstest values(1, '小明', '2022-01-01');
insert into XN.fstest values(2, '小红', '2022-03-01');
commit;
select * from  XN.v_fstest;
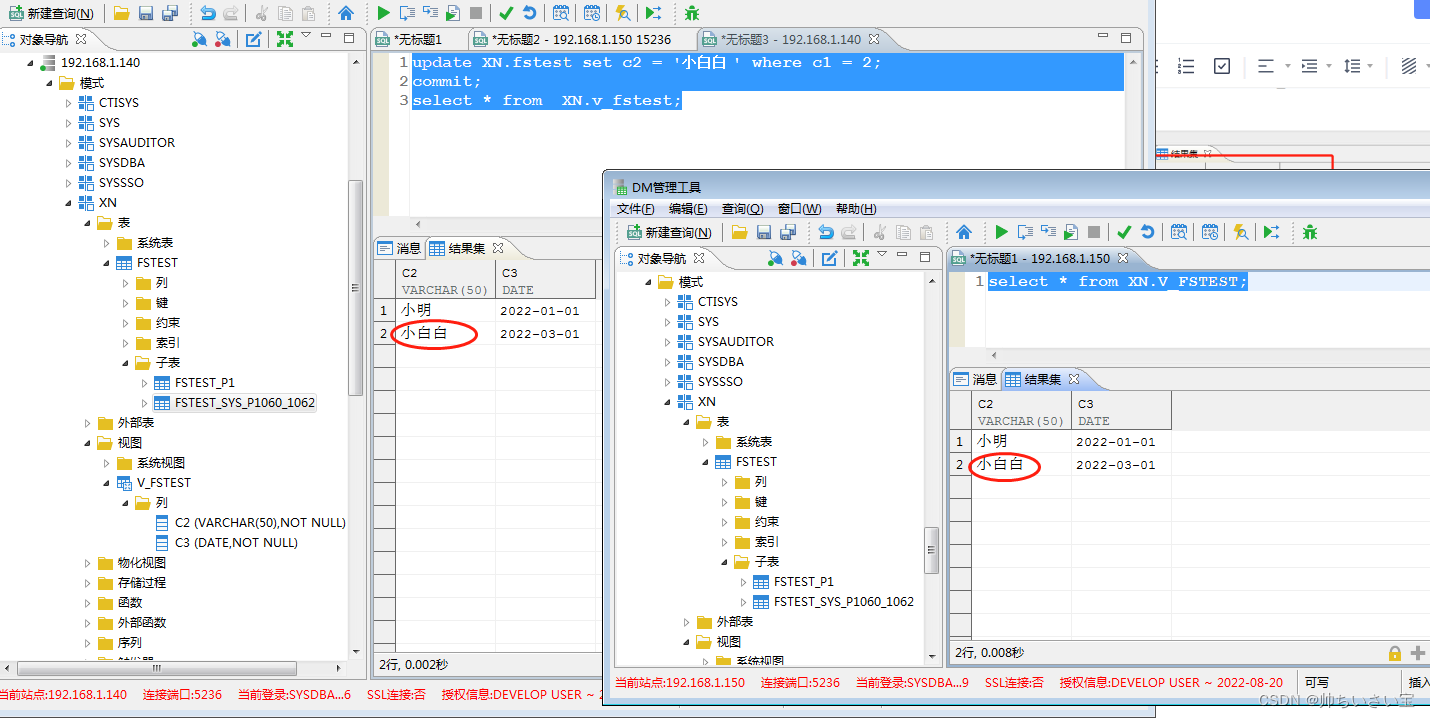
-- 修改数据
update XN.fstest set c2 = '小白白 ' where c1 = 2;
commit;
select * from  XN.v_fstest;
-- 删除数据
delete from XN.fstest where c1 = 1;
commit;
select * from  XN.v_fstest;

-- 复制表
create table XN.fstest_copy as select c2, c3 from XN.fstest;
select * from XN.fstest_copy;

4.16.2 数据同步(B->A)
B:192.168.1.150
-- 删除表
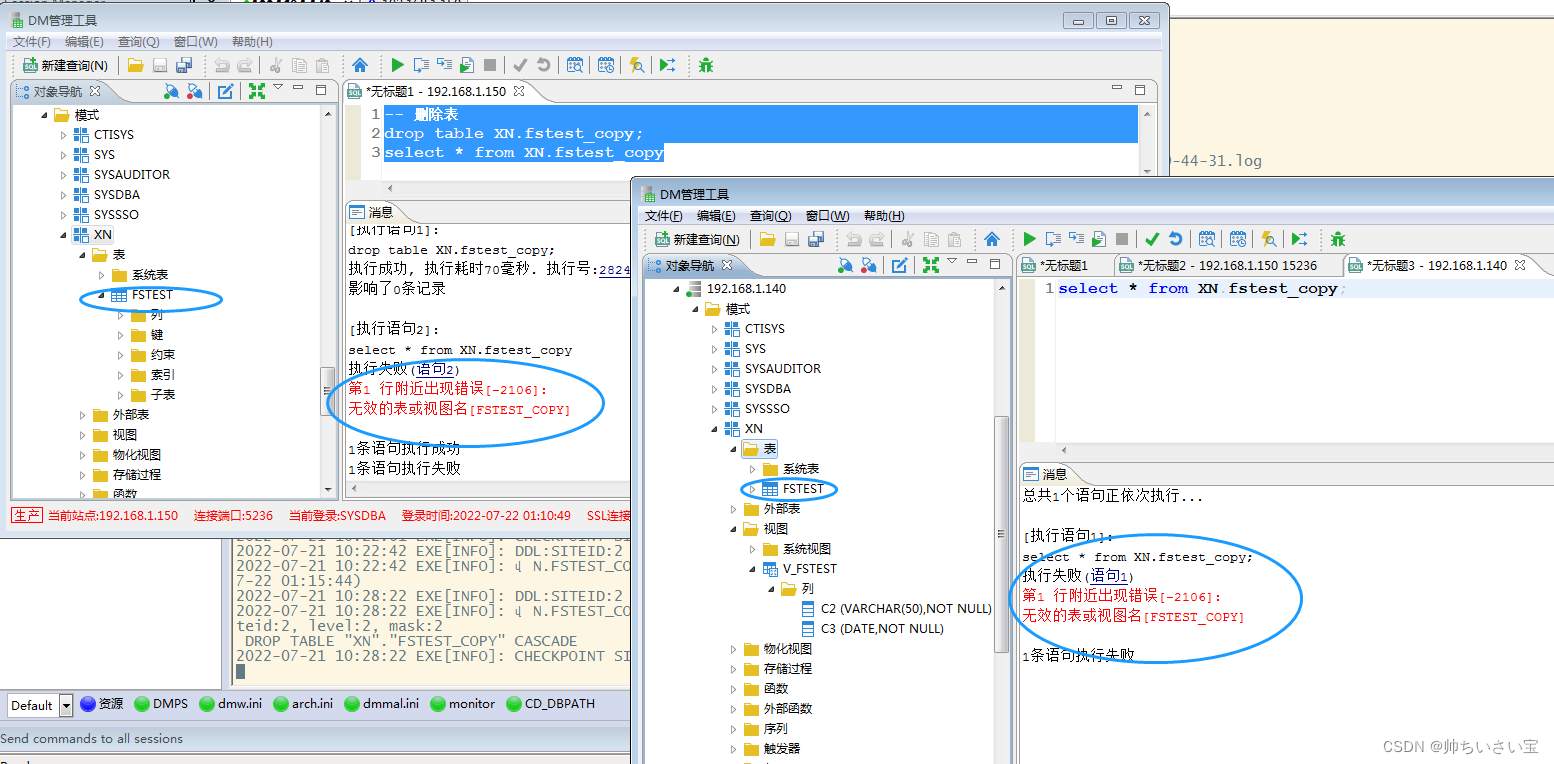
drop table XN.fstest_copy;
select * from XN.fstest_copy;
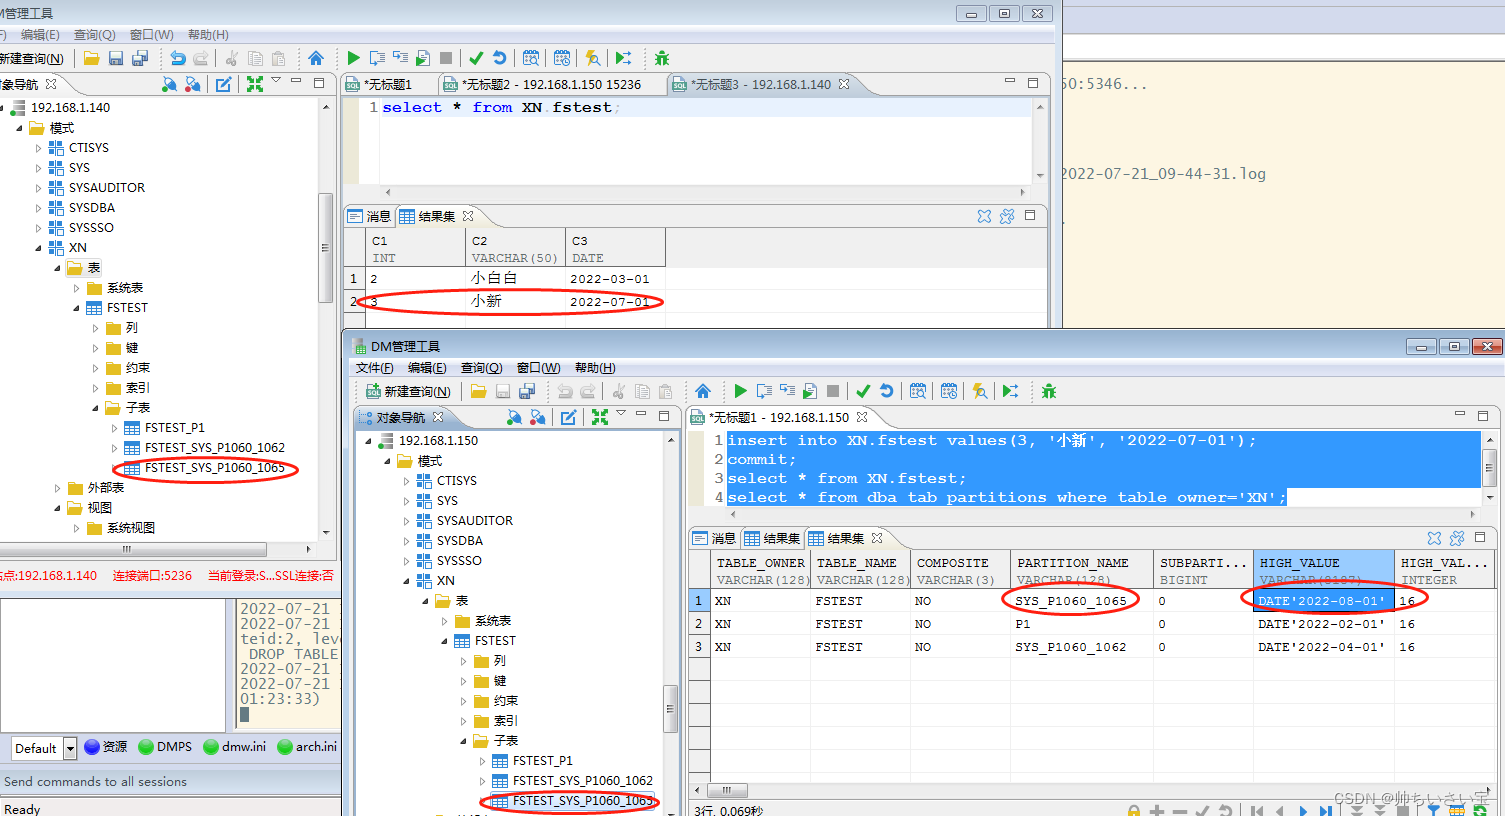
-- 插入数据并自动增加新分区
insert into XN.fstest values(3, '小新', '2022-07-01');
commit;
select * from XN.fstest;
select * from dba_tab_partitions where table_owner='XN';
-- 删除表和视图
drop table XN.fstest_copy;
drop view XN.v_fstest;
select * from XN.stest;
select * from XN.v_fstest;

至此,数据的双向同步测试完毕。如果想掌握更高级的功能,又或者有不解之处,请加入 本人QQ群,技术交流。
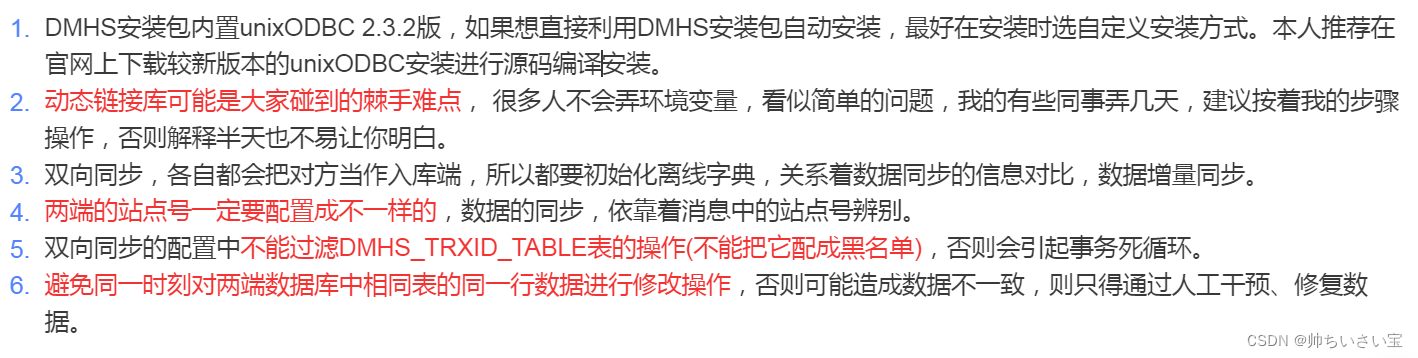
5. 注意事项


 1035
1035


 被折叠的 条评论
为什么被折叠?
被折叠的 条评论
为什么被折叠?
 到【灌水乐园】发言


