


By 何明桂(http://blog.csdn.net/hmg25)转载请注明出处
之前在网上看到有篇文章:Launcher之Dock细节篇http://news.wangmeng.cn/detailNews/2716-the-article-details-launcher-dock它实现了一个仿Mac的dock。感觉蛮有意思的,所以就照着仿制了一个。
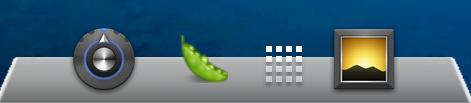
可以动态的添加快捷方式,默认包含AllApp按钮,图标居中显示。

DockBar上的图标可以相互交换位置,并且将图标拖拽出去。
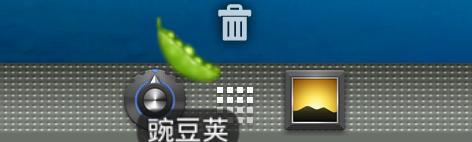
拖拽释放后:
文章后边附带的源码是基于android2.2自带的launcher2稍作修改而成,使用eclipse调试。
一、首先要在Launcher的setupViews函数里面初始化自己的layout(需增加3个地方)
[java]
view plain
copy
- 1.
- dockbar=(DockBar)dragLayer.findViewById(R.id.dockbar);
- dockbar.setLauncher(this);
- dockbar.setDragController(dragController);
- 2.
- dragController.setDragScoller(workspace);
- dragController.setDragListener(deleteZone);
- dragController.setDockDragListener(dockbar);//hmg25addfordock
- setDockDragListener为自定义函数,添加在DragController的startDrag中,具体见源码
- if(mDockListener!=null){
- mDockListener.onDragStart(source,dragInfo,dragAction);
- }
- 3.
- //Theorderhereisbottomtotop.
- dragController.addDropTarget(workspace);
- dragController.addDropTarget(dockbar);//hmg25addfordock
- dragController.addDropTarget(deleteZone);
二、在layout-port的launcher.xml中增加
[xhtml]
view plain
copy
- <!--hmgaddfordock{-->
- <com.android.launcher2.DockBar
- android:id="@+id/dockbar"
- android:layout_width="fill_parent"
- android:layout_height="@dimen/button_bar_height"
- android:layout_gravity="bottom|center_horizontal"
- android:background="@drawable/dock_bg"
- launcher:direction="horizontal">
- <HorizontalScrollViewandroid:id="@+id/dock_scroll_view"
- android:scrollbars="none"
- android:fadingEdge="none"
- android:saveEnabled="false"
- android:layout_width="fill_parent"
- android:layout_height="fill_parent">
- <LinearLayoutandroid:orientation="horizontal"
- android:id="@+id/dock_item_holder"
- android:saveEnabled="false"
- android:layout_width="fill_parent"
- android:layout_height="fill_parent">
- <com.android.launcher2.HandleView//默认将allapp按钮添加进去
- android:id="@+id/all_apps_button"
- android:layout_centerHorizontal="true"
- android:src="@drawable/all_apps_button"
- launcher:direction="horizontal"
- android:layout_width="fill_parent"
- android:layout_height="fill_parent"
- android:focusable="true"
- android:clickable="true"
- />
- </LinearLayout>
- </HorizontalScrollView>
- </com.android.launcher2.DockBar>
- <!--hmgaddfordock}-->
三、创建自定义的类:
[java]
view plain
copy
- publicclassDockBarextendsLinearLayoutimplementsDropTarget,DragSource,
- DragController.DragListener,View.OnLongClickListener{
- @Override
- publicbooleanacceptDrop(DragSourcesource,intx,inty,intxOffset,intyOffset,DragViewdragView,ObjectdragInfo){
- //接受什么类型的图标
- Log.i("hmg","DockBar->acceptDrop");
- finalItemInfoitem=(ItemInfo)dragInfo;
- if(item.itemType==LauncherSettings.Favorites.ITEM_TYPE_APPWIDGET
- ||item.itemType==LauncherSettings.Favorites.ITEM_TYPE_LIVE_FOLDER
- ||item.itemType==LauncherSettings.Favorites.ITEM_TYPE_USER_FOLDER
- ||item.itemType==LauncherSettings.Favorites.ITEM_TYPE_WIDGET_PHOTO_FRAME
- ||item.itemType==LauncherSettings.Favorites.ITEM_TYPE_WIDGET_SEARCH
- ||item.itemType==LauncherSettings.Favorites.ITEM_TYPE_WIDGET_CLOCK){
- returnfalse;
- }
- returntrue;
- }
- //拖拽释放时响应下边函数
- @Override
- publicvoidonDrop(DragSourcesource,intx,inty,intxOffset,
- intyOffset,DragViewdragView,ObjectdragInfo){
- intposition=0;
- position=getLocation(x);//根据释放时的坐标,获取插入位置
- addItemAt((ItemInfo)dragInfo,position);
- }
- /*
- *传入x坐标,判断新图标的位置,此处仅判断竖屏
- */
- publicintgetLocation(intx){
- for(inti=0;i<mItemHolder.getChildCount();i++){
- Viewiv=mItemHolder.getChildAt(i);
- int[]position=newint[2];
- //获取坐标,如果要适应横屏可以稍作修改,比较Y值
- iv.getLocationOnScreen(position);
- //判断释放时新增的图标在原图标的之前还是之后
- if(x<=(position[0]+(iv.getWidth()/2))){
- returni;
- }
- }
- returnmItemHolder.getChildCount();
- }
- privatevoidaddItemAt(ItemInfoitemInfo,intposition)
- {
- Viewview=null;
- switch(itemInfo.itemType){
- caseLauncherSettings.Favorites.ITEM_TYPE_APPLICATION:
- caseLauncherSettings.Favorites.ITEM_TYPE_SHORTCUT:
- ShortcutInfoshortcutInfo;
- //拖拽图标来自于applist
- if(itemInfo.container==NO_ID&&itemInfoinstanceofApplicationInfo)
- {
- //与来自桌面的图标包含信息不一样,具体看源码
- shortcutInfo=newShortcutInfo((ApplicationInfo)itemInfo);
- }
- else
- shortcutInfo=(ShortcutInfo)itemInfo;//拖拽图标来自桌面
- //调用Launcher中的CreateDockShortcut生成一个imageView
- view=mLauncher.CreateDockShortcut(shortcutInfo);
- view.setOnLongClickListener(this);
- break;
- caseLauncherSettings.Favorites.ITEM_TYPE_USER_FOLDER:
- break;
- default:
- thrownewIllegalStateException("Unknownitemtype:"
- +itemInfo.itemType);
- }
- mItemHolder.addView(view,position);
- }
- 之所以将新建view用Launcher.CreateDockShortcut是想直接使用Launcher中的单击事件。
- ViewCreateDockShortcut(ShortcutInfoshortcutInfo)
- {
- Contextcontext=getApplicationContext();
- ImageViewimageView=newImageView(context);
- imageView.setImageBitmap(shortcutInfo.mIcon);
- imageView.setOnClickListener(this);
- imageView.setFocusable(true);
- imageView.setTag(shortcutInfo);
- imageView.setMinimumWidth(100);
- returnimageView;
- }
- 在dock上长按,拖拽交换位置或者拖拽出去
- @Override
- publicbooleanonLongClick(Viewv){
- //TODOAuto-generatedmethodstub
- if(mLauncher.isAllAppsVisible())
- mLauncher.closeAllApps(false);
- mSelectedView=v;
- //开始拖拽
- mDragController.startDrag(v,this,v.getTag(),
- DragController.DRAG_ACTION_MOVE);
- removeSelectedItem();
- returntrue;
- }
- privatevoidremoveSelectedItem()
- {
- if(mSelectedView==null)
- return;
- mItemHolder.removeView(mSelectedView);
- }
代码修改了不少地方,具体看代码,修改的地方我都标注啦 ~~欢迎大家指教,相互交流~~


 8万+
8万+

 被折叠的 条评论
为什么被折叠?
被折叠的 条评论
为什么被折叠?
 到【灌水乐园】发言


