


操作环境RHEL7.9 RedHat官方离线镜像yum源
16G内存 16核心CPU(逻辑核)
VMware虚拟机
补充:如果没有离线yum源,https://centos.pkgs.org/7/ 也可以下载离线rpm包
varnish包上传
-
下载地址 https://varnish-cache.org/downloads/varnish-6.2.2.tgz
-
创建用户varnish
useradd varnish -
将
varnish-6.2.2.tgz包上传到/home/varnish目录
开始安装
-
创建文件夹
mkdir -p /data/varnish/{etc,log} -
修改文件夹权限
chown varnish:varnish /home/varnish/* chown varnish:varnish /data/varnish/* chown varnish:varnish /data/varnish -
安装依赖环境
yum -y install gcc
yum -y install autoconf
yum -y install automake
yum -y install jemalloc-devel
jemalloc-devel没有这个包,需要下载离线包
访问https://centos.pkgs.org/7/centos-sclo-rh-x86_64/rh-varnish5-jemalloc-devel-3.6.0-13.el7.x86_64.rpm.html

安装的时候会报错,依赖也找不到,因此需要在网页上一并下载三个依赖

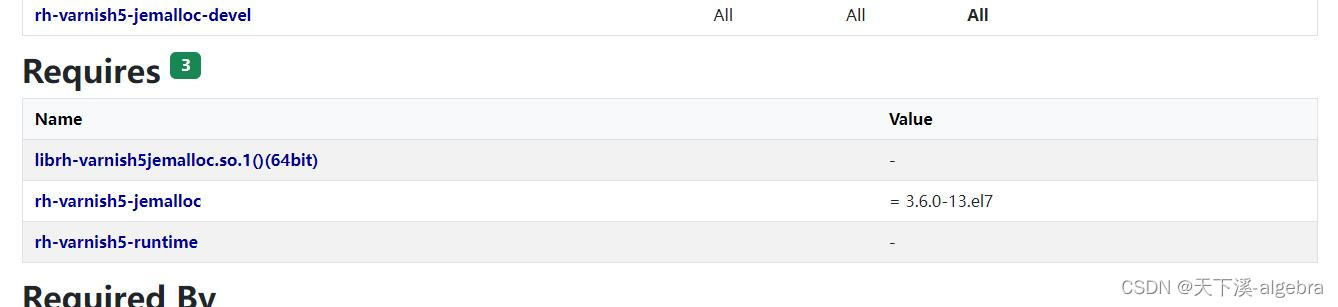
librh-varnish5jemalloc.so.1()(64bit)
实际来源于rh-varnish5-jemalloc-3.6.0-13.el7.x86_64.rpm,安装rh-varnish5-jemalloc即可
rh-varnish5-jemalloc-3.6.0-13.el7.x86_64.rpm
rh-varnish5-runtime-3.1-4.el7.x86_64.rpm
rh-varnish5-runtime也有依赖policycoreutils-python scl-utils
policycoreutils-python-2.5-34.el7.x86_64.rpm
policycoreutils-python
scl-utils-20130529-19.el7.x86_64.rpm
scl-utils
安装时发现rpm -ivh policycoreutils-python-2.5-34.el7.x86_64.rpm失败,用yum -y install policycoreutils-python可以正常安装
因此最终的安装流程
yum -y install policycoreutils-python
rpm -ivh scl-utils-20130529-19.el7.x86_64.rpm
rpm -ivh rh-varnish5-runtime-3.1-4.el7.x86_64.rpm
rpm -ivh rh-varnish5-jemalloc-3.6.0-13.el7.x86_64.rpm
rpm -ivh rh-varnish5-jemalloc-devel-3.6.0-13.el7.x86_64.rpm
继续进行yum安装
yum -y install libedit-devel
yum -y install libtool
yum -y install ncurses-devel
yum -y install pcre-devel
yum -y install pkgconfig
yum -y install python-docutils
yum -y install python-sphinx
yum -y install python3
至此环境准备完成
-
编译安装varnish
su - varnish
tar -zxvf varnish-6.2.2.tgz
cd varnish-6.2.2/
./configure --prefix=/data/varnish
make && make install
ll /data/varnish/
可以看到已经安装完毕了
[varnish@localhost varnish-6.2.2]$ ll /data/varnish/ total 0 drwxrwxr-x. 2 varnish varnish 136 Nov 11 17:00 bin drwxr-xr-x. 2 varnish varnish 6 Nov 11 15:23 etc drwxrwxr-x. 3 varnish varnish 21 Nov 11 17:00 include drwxrwxr-x. 4 varnish varnish 142 Nov 11 17:00 lib drwxr-xr-x. 2 varnish varnish 6 Nov 11 15:23 log drwxrwxr-x. 2 varnish varnish 22 Nov 11 17:00 sbin drwxrwxr-x. 6 varnish varnish 58 Nov 11 17:00 share drwxr-xr-x. 3 varnish varnish 21 Nov 11 17:00 var -
找到Varnish服务所使用的配置文件,拷贝一份
cp /data/varnish/share/doc/varnish/example.vcl /data/varnish/etc/example1.vcl -
配置环境变量,需要先exit到root用户下
exit
# 进入root用户下操作
echo 'export PATH=$PATH:/data/varnish/sbin:/data/varnish/bin' >> /etc/profile
source /etc/profile
echo $PATH
已经可以看到varnish的版本号了
[root@localhost varnish]# echo $PATH /usr/local/sbin:/usr/local/bin:/usr/sbin:/usr/bin:/root/bin:/data/varnish/sbin:/data/varnish/bin [root@localhost varnish]# varnishd -V varnishd (varnish-6.2.2 revision 3ed1506895ecaddb91f658bee11742f0b0b982b5) Copyright (c) 2006 Verdens Gang AS Copyright (c) 2006-2019 Varnish Software AS -
查看并修改配置信息
 su - varnish
cd /data/varnish/etc/
mv example1.vcl default.vcl
vim default.vcl
可以看到文件信息如下
#
# This is an example VCL file for Varnish.
#
# It does not do anything by default, delegating control to the
# builtin VCL. The builtin VCL is called when there is no explicit
# return statement.
#
# See the VCL chapters in the Users Guide at https://www.varnish-cache.org/docs/
# and https://www.varnish-cache.org/trac/wiki/VCLExamples for more examples.

# Marker to tell the VCL compiler that this VCL has been adapted to the
# new 4.0 format.
vcl 4.0;

# Default backend definition. Set this to point to your content server.
backend default {
    .host = "127.0.0.1";
    .port = "8080";
}

sub vcl_recv {
    # Happens before we check if we have this in cache already.
    #
    # Typically you clean up the request here, removing cookies you don't need,
    # rewriting the request, etc.
}

sub vcl_backend_response {
    # Happens after we have read the response headers from the backend.
    #
    # Here you clean the response headers, removing silly Set-Cookie headers
    # and other mistakes your backend does.
}

sub vcl_deliver {
    # Happens when we have all the pieces we need, and are about to send the
    # response to the client.
    #
    # You can do accounting or modifying the final object here.
}
站点配置
安装已经完成了。如果只是对单网站的话,只需要配置backend default就可以了,但是实际项目中是多机器多上下文的,因此后道任务是做多服务器集群。
  # Default backend definition. Set this to point to your content server.
  backend default {
      .host = "127.0.0.1";
      .port = "8080";
  }
目前找到的资料有
https://blog.csdn.net/qq_41880412/article/details/104402784
Linux-varnish多台后端服务器
https://varnish-cache.org/docs/trunk/users-guide/vcl-separate.html
官方varnish文档 Separate VCL files
https://info.varnish-software.com/blog/one-vcl-per-domain
官方varnish文档 HOWTO: USE ONE VCL PER DOMAIN
https://blog.csdn.net/keda8997110/article/details/8777153
varnish配置详解
https://www.phodal.com/blog/nginx-varinsh-multiples-site-settings/
Varnish Nginx 多站点配置
https://www.linode.com/docs/guides/use-varnish-and-nginx-to-serve-wordpress-over-ssl-and-http-on-debian-8/
Use Varnish & NGINX to Serve WordPress over SSL & HTTP on Debian 8
https://cloud.tencent.com/developer/article/1200310
Varnish Cache入门
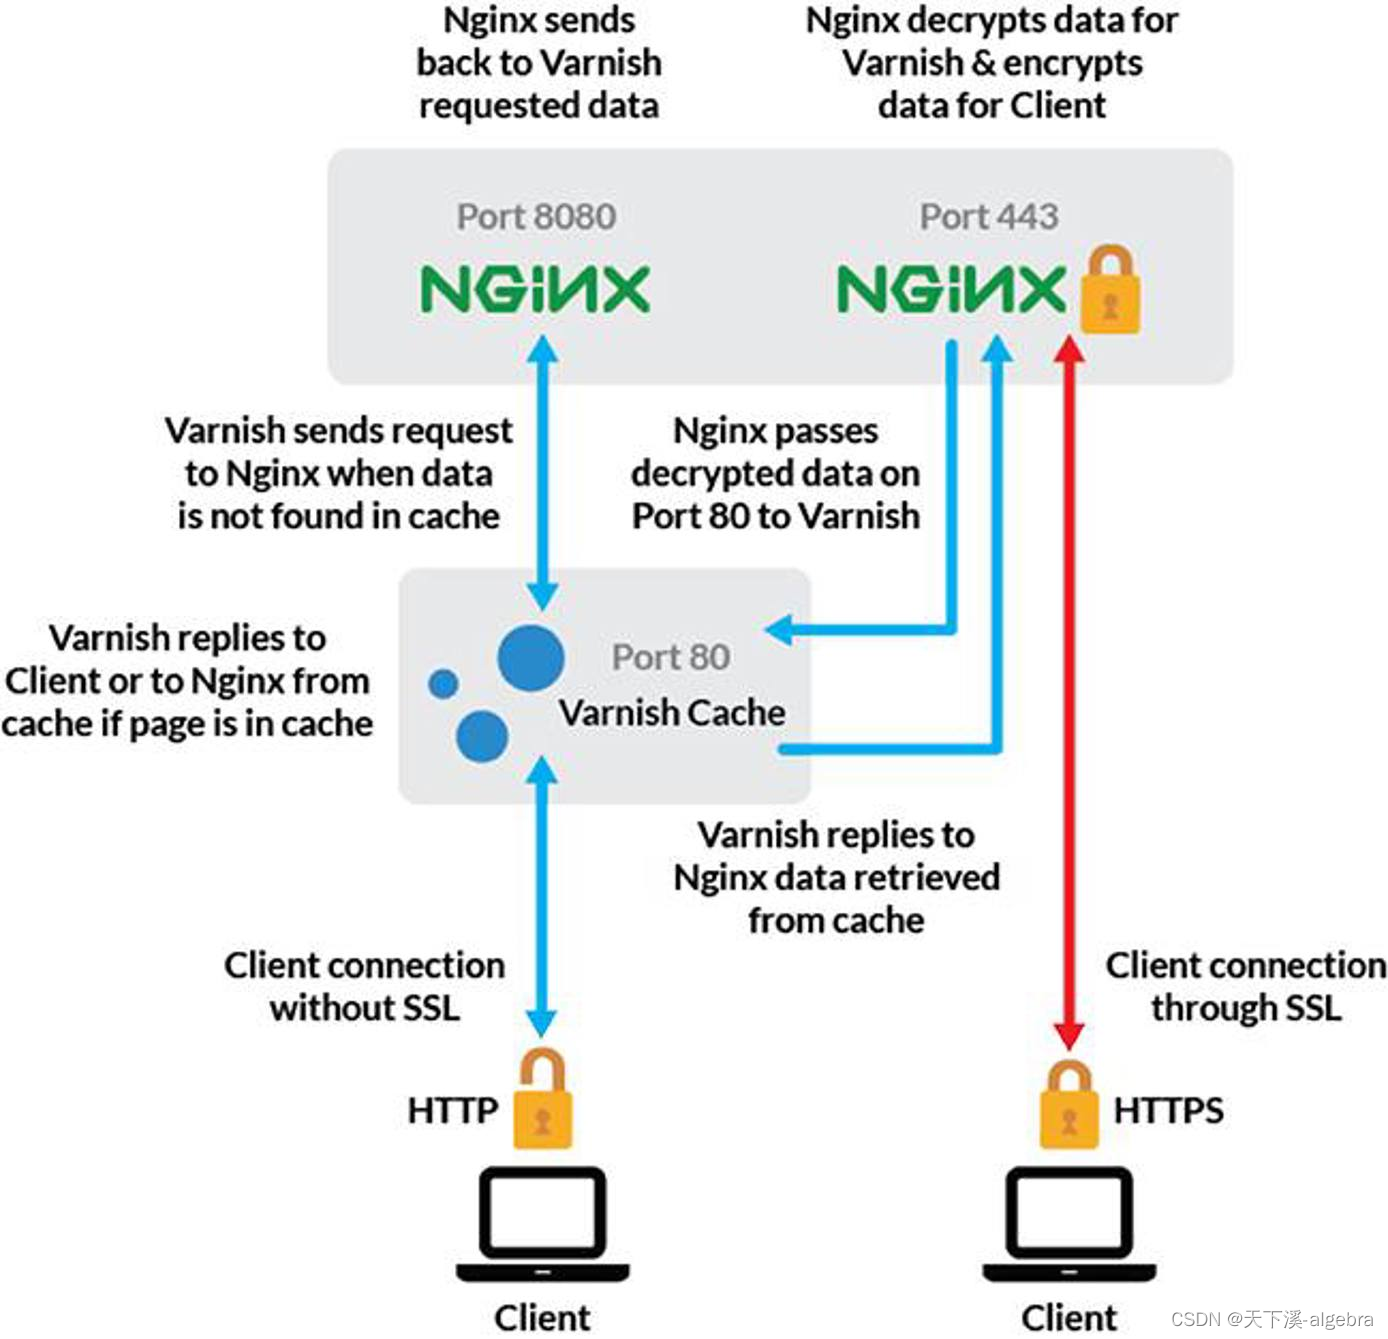
经过查看以上的资料,varnish多站点的方式是通过if else轮询的方式,时间复杂度为n;nginx多站点是通过哈希的方式,时间复杂度为1。因此使用Varnish+Nginx的配置方式较为合理。
注意Varnish本身不支持https,当然也不支持http2(http2必须是https协议),因此要使用varnish+http2要使用nginx+varnish+nginx的结构。或者干脆就不通过varnish实现http2。
附上default.vcl
#
# This is an example VCL file for Varnish.
#
# It does not do anything by default, delegating control to the
# builtin VCL. The builtin VCL is called when there is no explicit
# return statement.
#
# See the VCL chapters in the Users Guide at https://www.varnish-cache.org/docs/
# and https://www.varnish-cache.org/trac/wiki/VCLExamples for more examples.

# Marker to tell the VCL compiler that this VCL has been adapted to the
# new 4.0 format.
vcl 4.0;
import directors;
import std;
# Default backend definition. Set this to point to your content server.
probe backend_healthcheck {
    .url="/"; #访问后端服务器根路径
    .interval = 5s;   #请求时间间隔
    .timeout = 1s;   #请求超时时间
    .window = 5;    #指定轮询次数5次
    .threshold = 3;   #如果出现3次失败则表示后端服务器宕机
}
# Default backend definition. Set this to point to your content server.
backend web1 {
    .host = "192.168.3.190";
    .port = "80";
    .probe = backend_healthcheck;
}

backend web2 {
    .host = "192.168.3.191";
    .port = "80";
    .probe = backend_healthcheck;
}

sub vcl_init {
    new web_cluster = directors.round_robin();
    web_cluster.add_backend(web1);
    web_cluster.add_backend(web2);
}
#acl purgers { #定义访问控制列表
#        "127.0.0.1";
#        "localhost";
#        "192.168.171.0/24";
#        !"192.168.171.132";
#}
sub vcl_recv {
    # Happens before we check if we have this in cache already.
    #
    # Typically you clean up the request here, removing cookies you don't need,
    # rewriting the request, etc.
    set req.backend_hint = web_cluster.backend();
}

#sub vcl_backend_response {
    # Happens after we have read the response headers from the backend.
    #
    # Here you clean the response headers, removing silly Set-Cookie headers
    # and other mistakes your backend does.
#}

#sub vcl_deliver {
    # Happens when we have all the pieces we need, and are about to send the
    # response to the client.
    #
    # You can do accounting or modifying the final object here.
#}
站点启动
目前未能解决在varnish用户启动的问题,使用root用户启动
/data/varnish/sbin/varnishd -f /data/varnish/etc/default.vcl -s malloc,12G -a 0.0.0.0:80


 370
370


 被折叠的 条评论
为什么被折叠?
被折叠的 条评论
为什么被折叠?
 到【灌水乐园】发言


