


在使用 Red Hat 的 Kickstart 和 Debian 的 Preseed 来自动化 Linux 安装之后,我需要类似的东西来自动化 Windows 部署。
目标
防止在安装过程中显示 Windows 安装程序中的所有用户界面页面并使其完全自动化。
在我们开始之前
我们可以使用应答文件自动安装 Windows。
该过程分为三个步骤:
- 下载 Windows 服务器 ISO 文件
- 创建应答文件
autounattend.xml - 将应答文件添加
autounattend.xml到 ISO 文件中
配置
下载 Windows Server ISO
导航到https://www.microsoft.com/en-us/evalcenter/evaluate-windows-server-2016并下载 Windows Server 2016 评估 ISO。
在撰写本文时,我没有使用 Windows Server 2019 的经验,因此使用的是我熟悉的 Windows Server 2016。
创建 autounattend.xml
我使用 Windows 系统映像管理器创建了无人值守的 Windows 安装程序应答文件。
我还使用了 Windows 安装程序参考,该参考描述了可以在 Windows Server 2016 中设置的所有无人参与设置。以下链接供参考。
https://docs.microsoft.com/en-us/windows-hardware/customize/desktop/unattend/components-b-unattend
这是一个基于反复试验的漫长过程。
你可以autounattend.xml 在这里查看我的。
将 autounattend.xml 添加到 ISO
我最终使用第三方工具来实现这一点。这是我所做的。
使用我们之前下载的 Windows Server ISO 文件创建 KVM 来宾。
# virt-install \
--name windows2016 \
--ram 6144 \
--vcpus 2 \
--disk path=/var/lib/libvirt/images/windows2016.qcow2,size=40 \
--os-type windows \
--os-variant generic \
--network network=default \
--cdrom Windows_Server_2016_Datacenter_EVAL_en-us_14393_refresh.ISO \
--sound none \
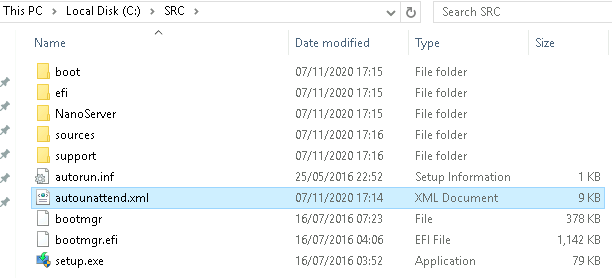
--virt-type kvm登录到 Windows 服务器并创建两个目录:
C:\SRC\
C:\OUTPUT\
使用安装的Windows Server ISO为DVD和所有文件复制到C:\SRC\包括autounattend.xml。
下载并安装 ImgBurn。
使用 ImgBurn 从目录创建 ISO 文件。导航到“高级 > 可启动磁盘”并勾选“使映像可启动”框。
将“来源”设置为C:\SRC\. 将“目的地”设置为C:\OUTPUT\win2k16_autounattend.iso。
使用boot\etfsboot.comDVD 中的文件作为“启动映像”。
设置 Windows Server 2016 时,将“要加载的扇区”设置为 8。
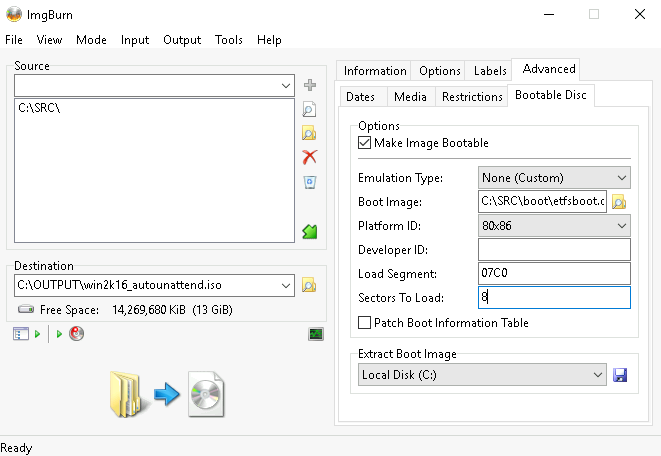
构建图像。在可能出现的所有提示上单击是。
将生成 ISO 文件并另存为C:\OUTPUT\win2k16_autounattend.iso. 现在使用此 ISO 文件部署无人值守的 Windows 服务器。


 2万+
2万+


 被折叠的 条评论
为什么被折叠?
被折叠的 条评论
为什么被折叠?
 到【灌水乐园】发言


