


我们经常在电子商务网站上使用HTML5 Range 输入类型元素作为范围选择器。在这篇文章中,我将分享几个简单的 JavaScript 示例,展示如何从输入类型 Range 中提取或读取值并提交这些值。

我没有使用任何程序代码或API 来提交数据;此处的示例主要关注如何从 Range 滑块(元素)中提取值,在 <label> 中显示值并使用这些值更新浏览器 URL,仅使用 JavaScript。
该示例使用两个不同的属性,即oninput(HTML5 元素)和onchange来调用 JavaScript 方法以从 Range 滑块中读取或提取值。
HTML5 输入类型范围
<input type= 'range' />
浏览器支持:Chrome 39.0 - Yes | FireFox 34.0 - Yes | Internet Explorer 10 - Yes | Safari - Yes
注意:示例不验证From和To Range 滑块。它只是读取范围值。
<div>
    <p>
        <label>Price From:</label>
        <input type="range" id="fromPrice" value="50" min="0" max="500"
            oninput="document.getElementById('fPrice').innerHTML = this.value" />
        <label id="fPrice"></label>
    </p>
    <p>
        <label>Price To:</label>
        <input type="range" id="toPrice" value="450" min="0" max="500"
            oninput="document.getElementById('tPrice').innerHTML = this.value" />
        <label id="tPrice"></label>
    </p>
    <p><input type="submit" value="submit" onclick="ti()" /></p>
</div>
在上面的标记中,我使用oninput属性来更新带有 Range 值的标签。注意: JavaScript 函数ti()在这篇博文的末尾。
HTML5“oninput”事件属性的语法
oninput='someFunction()'当您输入一个值时, oninput事件属性会调用一个 JavaScript 函数,在我们的例子中是 Range 滑块。当用户移动滑块时,该属性会立即使用范围值更新标签。
<!DOCTYPE html>
<html>
<head>
<title>HTML5 oninput Attribute Example</title>
<style>
	* {font: 20px Calibri;}
    h3 {font-weight: bold;}
</style>
</head>
<body>
	<h3>Drag the sliders to see the values. The range is between 0 and 500</h3>

    <p>
      <label style="padding-right:20px;">Price From:</label>
      <input type="range" id="fromPrice" value="50" min="0" max="500"
             oninput="document.getElementById('fPrice').innerHTML = this.value" />
      <label id="fPrice" style="padding-left:20px;"></label>
  </p>
  <p>
    <label style="padding-right:20px;">Price To:</label>
    <input type="range" id="toPrice" value="450" min="0" max="500"
           oninput="document.getElementById('tPrice').innerHTML = this.value" />
    <label id="tPrice" style="padding-left:20px;"></label>
  </p>
</body>
</html>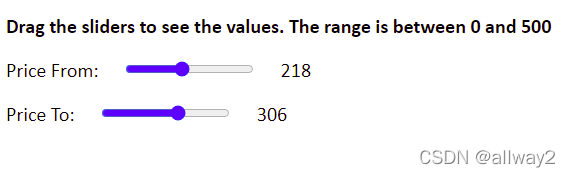
onchange 事件属性的语法
onchange='someFunction()'onchange事件属性与oninput事件属性不同。一旦用户拖动并停止滑块(在特定位置),onchange 就会更新标签。
<!DOCTYPE html>
<html>
<head>
<title>HTML5 onchange Attribute Example</title>
<style>
	* {font: 20px Calibri;}
    h3 {font-weight: bold;}
</style>
</head>
<body>
	<h3>HTML5 onchange attribute example</h3>
    <p>
    	Drag the sliders and stop to see its values.
    </p>

    <p>
      <label style="padding-right:20px;">Price From:</label>
      <input type="range" id="Range1" value="50" min="0" max="500"
             onchange="document.getElementById('Label1').innerHTML = this.value" />
      <label id="Label1" style="padding-left:20px;"></label>
  </p>
  <p>
    <label style="padding-right:20px;">Price To:</label>
    <input type="range" id="Range2" value="450" min="0" max="500"
           onchange="document.getElementById('Label2').innerHTML = this.value" />
    <label id="Label2" style="padding-left:20px;"></label>
  </p>
</body>
</html>
您可能还喜欢: 什么是 HTML5 <aside> 标签以及如何在您的网站中使用它
这是您在单击提交按钮后使用 JavaScript 读取标签中值的方法(我们使用 Range 滑块进行了更新)。一旦我们有了 Range 滑块值,我们就可以使用window.location.replace()方法更新浏览器 URL。
<script>
    function ti() {
        var fP = document.getElementById('fPrice').innerHTML;
        var tP = document.getElementById('tPrice').innerHTML;

        if (fP != '' && tP != '')
            window.location.replace(window.location.href + '?min_Price=' + fP + '&max_Price=' + tP);
    }
</script>
谢谢阅读。


 335
335


 被折叠的 条评论
为什么被折叠?
被折叠的 条评论
为什么被折叠?
 到【灌水乐园】发言


