


Spring Boot 建立在 Spring 之上,包含了 Spring 的所有特性。并且由于其快速的生产就绪环境使开发人员能够直接专注于逻辑而不是为配置和设置而苦苦挣扎,如今它正成为开发人员的最爱。Spring Boot 是一个基于微服务的框架,在其中制作可用于生产的应用程序只需要很少的时间。以下是 Spring Boot 的一些特性:
- 它允许避免在 spring 中存在的 XML 的繁重配置
- 它提供易于维护和创建 REST 端点
- 它包括嵌入式 Tomcat 服务器
- 部署非常简单,war和jar文件可以轻松部署在tomcat服务器中
更多信息请参考这篇文章:Spring Boot 简介。在本文中,我们将讨论如何使用JpaRepository来管理 Spring Boot 应用程序中的数据。
JpaRepository
JpaRepository 是 Repository 的JPA(Java Persistence API)特定扩展。它包含CrudRepository 和 PagingAndSortingRepository的完整 API 。因此它包含用于基本 CRUD 操作的 API 以及用于分页和排序的 API。
句法:
public interface JpaRepository<T,ID>
extends PagingAndSortingRepository<T,ID>, QueryByExampleExecutor<T>
在哪里:
- T:存储库管理的域类型(通常是实体/模型类名)
- ID:存储库管理的实体的 ID 类型(通常是在 Entity/Model 类中创建的 @Id 的包装类)
插图:
public interface DepartmentRepository extends JpaRepository<Department, Long> {}方法
下面给出了 JpaRepository 中可用的一些最重要的方法
方法 1:saveAll():保存所有给定的实体。
句法:
<S extends T> List<S> saveAll(Iterable<S> entities)参数:实体,注意它们不能为空,也不能包含空。
返回类型:保存的实体;永远不会为空。返回的 Iterable 将与作为参数传递的 Iterable 具有相同的大小。
抛出异常:如果给定实体或其实体之一为空,则抛出IllegalArgumentException 。
方法 2:getById():返回对具有给定标识符的实体的引用。根据 JPA 持久性提供程序的实现方式,这很可能总是返回一个实例并在首次访问时抛出 EntityNotFoundException。他们中的一些人会立即拒绝无效的标识符。
句法:
T getById(ID id)参数: id - 不能为空。
返回类型:对具有给定标识符的实体的引用。
方法 3:flush():刷新对数据库的所有未决更改。
句法:
void flush()方法 4:saveAndFlush():保存实体并立即刷新更改。
句法:
<S extends T> S saveAndFlush(S entity)参数:要保存的实体。不得为空。
返回类型:保存的实体
方法 5:deleteAllInBatch():批量删除给定的实体,这意味着它将创建一个查询。这种操作会使 JPA 的一级缓存和数据库不同步。考虑在调用此方法之前刷新 EntityManager。
句法:
void deleteAllInBatch(Iterable<T> entities)参数:要删除的实体,不能为空。
实现:让我们考虑一个使用 JpaRepository 管理部门实体的 Spring Boot 应用程序。数据保存在 H2 数据库中。我们使用 RESTful 控制器。
第一步:使用 IntelliJ IDEA创建 Spring Boot 项目并创建 Spring Boot 项目。
第二步:添加以下依赖
- 春季网络
- H2 数据库
- 龙目岛
- 春季数据 JPA
示例:这是pom.xml文件的完整代码。
- XML
<?xml version="1.0" encoding="UTF-8"?>
<project xmlns="http://maven.apache.org/POM/4.0.0" xmlns:xsi="http://www.w3.org/2001/XMLSchema-instance"
xsi:schemaLocation="http://maven.apache.org/POM/4.0.0 https://maven.apache.org/xsd/maven-4.0.0.xsd">
<modelVersion>4.0.0</modelVersion>
<parent>
<groupId>org.springframework.boot</groupId>
<artifactId>spring-boot-starter-parent</artifactId>
<version>2.5.5</version>
<relativePath/> <!-- lookup parent from repository -->
</parent>
<groupId>com.amiya</groupId>
<artifactId>Spring-Boot-Demo-Project</artifactId>
<version>1.0.0-SNAPSHOT</version>
<name>Spring-Boot-Demo-Project</name>
<description>Demo project for Spring Boot</description>
<properties>
<java.version>11</java.version>
</properties>
<dependencies>
<dependency>
<groupId>org.springframework.boot</groupId>
<artifactId>spring-boot-starter-web</artifactId>
</dependency>
<dependency>
<groupId>com.h2database</groupId>
<artifactId>h2</artifactId>
<scope>runtime</scope>
</dependency>
<dependency>
<groupId>org.springframework.boot</groupId>
<artifactId>spring-boot-devtools</artifactId>
<scope>runtime</scope>
<optional>true</optional>
</dependency>
<dependency>
<groupId>org.springframework.boot</groupId>
<artifactId>spring-boot-starter-data-jpa</artifactId>
</dependency>
<dependency>
<groupId>org.springframework.boot</groupId>
<artifactId>spring-boot-starter-test</artifactId>
<scope>test</scope>
</dependency>
<dependency>
<groupId>org.projectlombok</groupId>
<artifactId>lombok</artifactId>
<optional>true</optional>
</dependency>
</dependencies>
<build>
<plugins>
<plugin>
<groupId>org.springframework.boot</groupId>
<artifactId>spring-boot-maven-plugin</artifactId>
<configuration>
<excludes>
<exclude>
<groupId>org.projectlombok</groupId>
<artifactId>lombok</artifactId>
</exclude>
</excludes>
</configuration>
</plugin>
</plugins>
</build>
</project>
|
第 3 步:创建如下所示的 4 个包,并在这些包中创建一些类和接口,如下图所示
- 实体
- 存储库
- 服务
- 控制器
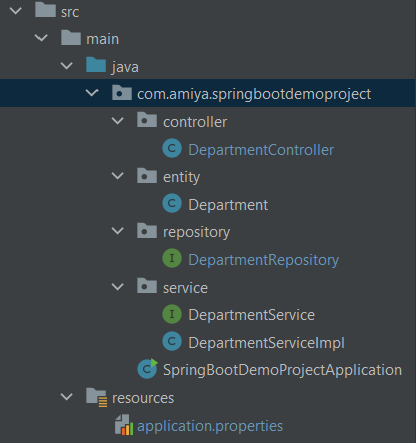
注意:
- 绿色圆形图标“I”按钮是界面
- 蓝色圆形图标“C”按钮是类
第 4 步:在实体包内
在 Department.java 文件中 创建一个简单的POJO 类。
- 爪哇
// Java Program to Demonstrate Department File
// Importing package module to this code fragment
package com.amiya.springbootdemoproject.entity;
import lombok.AllArgsConstructor;
import lombok.Builder;
import lombok.Data;
import lombok.NoArgsConstructor;
// Importing required classes
import javax.persistence.Entity;
import javax.persistence.GeneratedValue;
import javax.persistence.GenerationType;
import javax.persistence.Id;
@Entity
@Data
@NoArgsConstructor
@AllArgsConstructor
@Builder
// Class
public class Department {
@Id
@GeneratedValue(strategy = GenerationType.AUTO)
private Long departmentId;
private String departmentName;
private String departmentAddress;
private String departmentCode;
}
|
第 5 步:在存储库包中
创建一个简单的接口并将接口命名为 DepartmentRepository。正如我们上面讨论 的那样,这个接口将扩展JpaRepository 。

例子:
- 爪哇
// Java Program to Illustrate DepartmentRepository File
// Importing package module to code fragment
package com.amiya.springbootdemoproject.repository;
import com.amiya.springbootdemoproject.entity.Department;
import org.springframework.data.jpa.repository.JpaRepository;
import org.springframework.stereotype.Repository;
// Annotation
@Repository
// Interface
public interface DepartmentRepository
extends JpaRepository<Department, Long> {
}
|
第 6 步:在服务包内
在包中创建一个名为 DepartmentService 的接口和一个名为DepartmentServiceImpl的类。
示例 1-A:
- 爪哇
// Java Program to Demonstrate DepartmentService File
// Importing required package to code fragment
package com.amiya.springbootdemoproject.service;
import com.amiya.springbootdemoproject.entity.Department;
// Importing required classes
import java.util.List;
// Interface
public interface DepartmentService {
// Save operation
Department saveDepartment(Department department);
// Read operation
List<Department> fetchDepartmentList();
// Update operation
Department updateDepartment(Department department,
Long departmentId);
// Delete operation
void deleteDepartmentById(Long departmentId);
}
|
示例 1-B:
- 爪哇
// Java Program to Illustrate DepartmentServiceImpl File
// Importing package module to code fragment
package com.amiya.springbootdemoproject.service;
import com.amiya.springbootdemoproject.entity.Department;
import com.amiya.springbootdemoproject.repository.DepartmentRepository;
// Importing required classes
import java.util.List;
import java.util.Objects;
import org.springframework.beans.factory.annotation.Autowired;
import org.springframework.stereotype.Service;
// Annotation
@Service
// Class
public class DepartmentServiceImpl
implements DepartmentService {
@Autowired
private DepartmentRepository departmentRepository;
// Save operation
@Override
public Department saveDepartment(Department department)
{
return departmentRepository.save(department);
}
// Read operation
@Override public List<Department> fetchDepartmentList()
{
return (List<Department>)
departmentRepository.findAll();
}
// Update operation
@Override
public Department
updateDepartment(Department department,
Long departmentId)
{
Department depDB
= departmentRepository.findById(departmentId)
.get();
if (Objects.nonNull(department.getDepartmentName())
&& !"".equalsIgnoreCase(
department.getDepartmentName())) {
depDB.setDepartmentName(
department.getDepartmentName());
}
if (Objects.nonNull(
department.getDepartmentAddress())
&& !"".equalsIgnoreCase(
department.getDepartmentAddress())) {
depDB.setDepartmentAddress(
department.getDepartmentAddress());
}
if (Objects.nonNull(department.getDepartmentCode())
&& !"".equalsIgnoreCase(
department.getDepartmentCode())) {
depDB.setDepartmentCode(
department.getDepartmentCode());
}
return departmentRepository.save(depDB);
}
// Delete operation
@Override
public void deleteDepartmentById(Long departmentId)
{
departmentRepository.deleteById(departmentId);
}
}
|
第 7 步:在控制器包内
在包中创建一个名为DepartmentController的类。
- 爪哇
// Java Program to Demonstrate DepartmentController File
// Importing package module to code fragment
package com.amiya.springbootdemoproject.controller;
import com.amiya.springbootdemoproject.entity.Department;
import com.amiya.springbootdemoproject.service.DepartmentService;
import java.util.List;
// Importing required classes
import javax.validation.Valid;
import org.springframework.beans.factory.annotation.Autowired;
import org.springframework.web.bind.annotation.*;
// Annotation
@RestController
// Class
public class DepartmentController {
@Autowired private DepartmentService departmentService;
// Save operation
@PostMapping("/departments")
public Department saveDepartment(
@Valid @RequestBody Department department)
{
return departmentService.saveDepartment(department);
}
// Read operation
@GetMapping("/departments")
public List<Department> fetchDepartmentList()
{
return departmentService.fetchDepartmentList();
}
// Update operation
@PutMapping("/departments/{id}")
public Department
updateDepartment(@RequestBody Department department,
@PathVariable("id") Long departmentId)
{
return departmentService.updateDepartment(
department, departmentId);
}
// Delete operation
@DeleteMapping("/departments/{id}")
public String deleteDepartmentById(@PathVariable("id")
Long departmentId)
{
departmentService.deleteDepartmentById(
departmentId);
return "Deleted Successfully";
}
}
|
第 8 步:下面是 application.properties 文件的代码
server.port = 8082

# H2 Database
spring.h2.console.enabled=true
spring.datasource.url=jdbc:h2:mem:dcbapp
spring.datasource.driverClassName=org.h2.Driver
spring.datasource.username=sa
spring.datasource.password=password
spring.jpa.database-platform=org.hibernate.dialect.H2Dialect
现在运行您的应用程序,让我们在 Postman 中测试端点并参考我们的 H2 数据库。
在 Postman 中测试端点
端点 1: POST – http://localhost:8082/departments/

端点 2: GET - http://localhost:8082/departments/

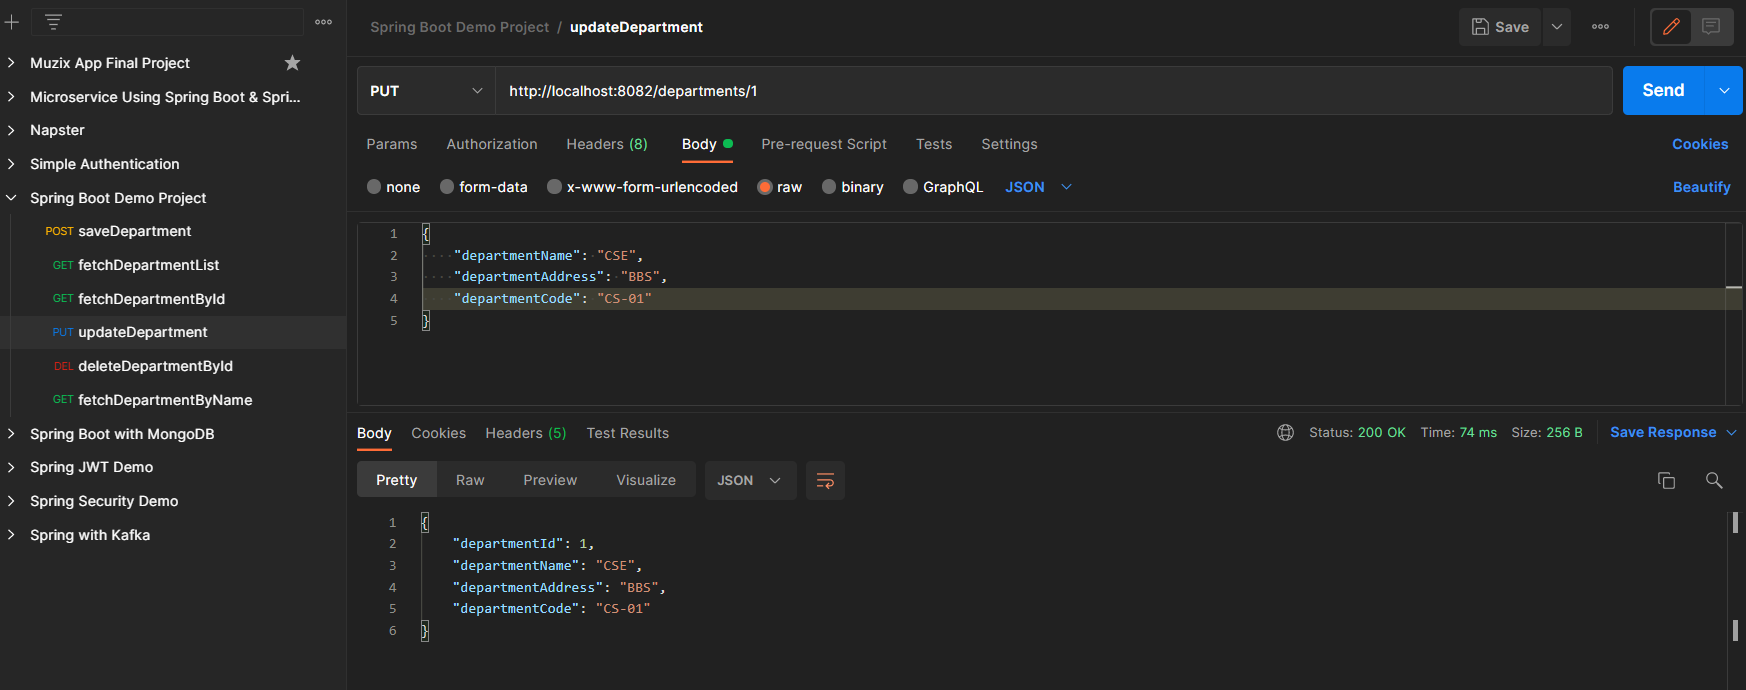
端点 3: PUT - http://localhost:8082/departments/1
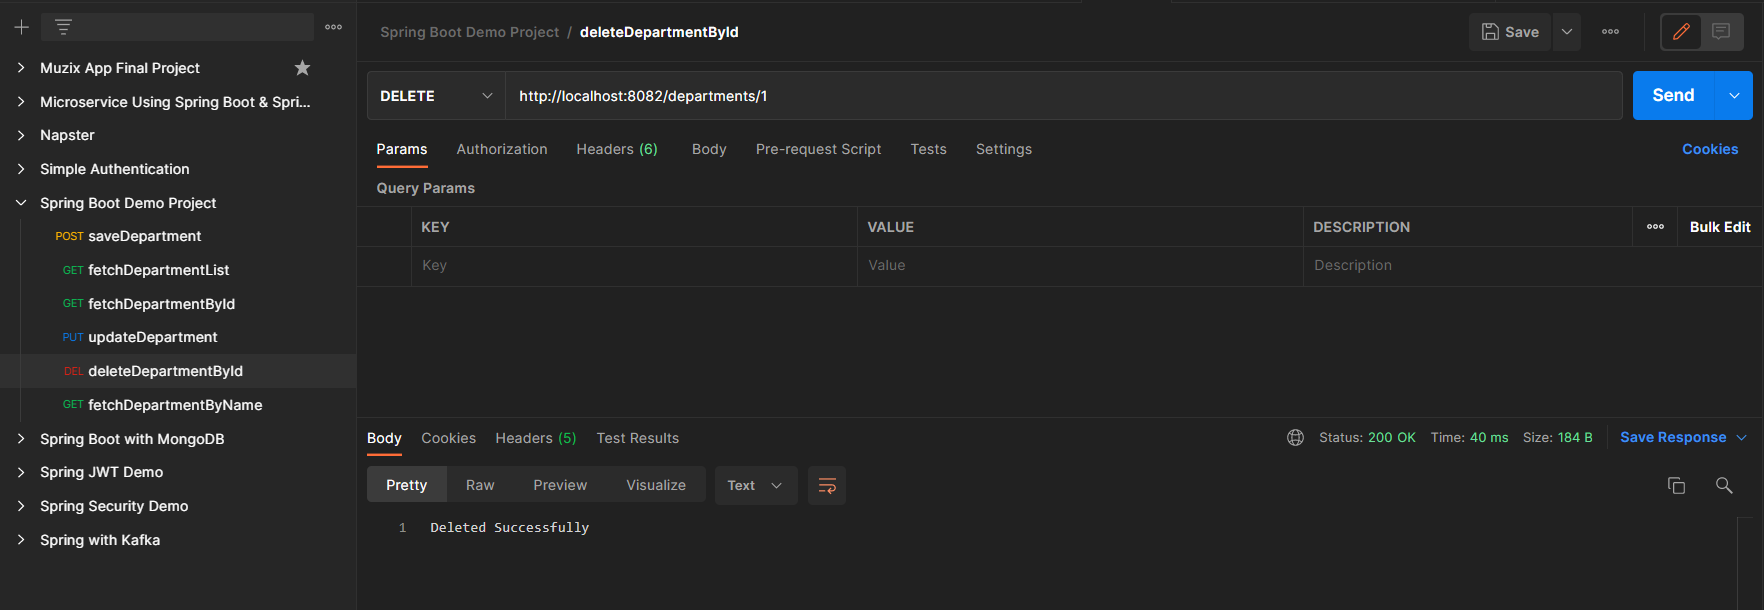
端点 4:删除 - http://localhost:8082/departments/1
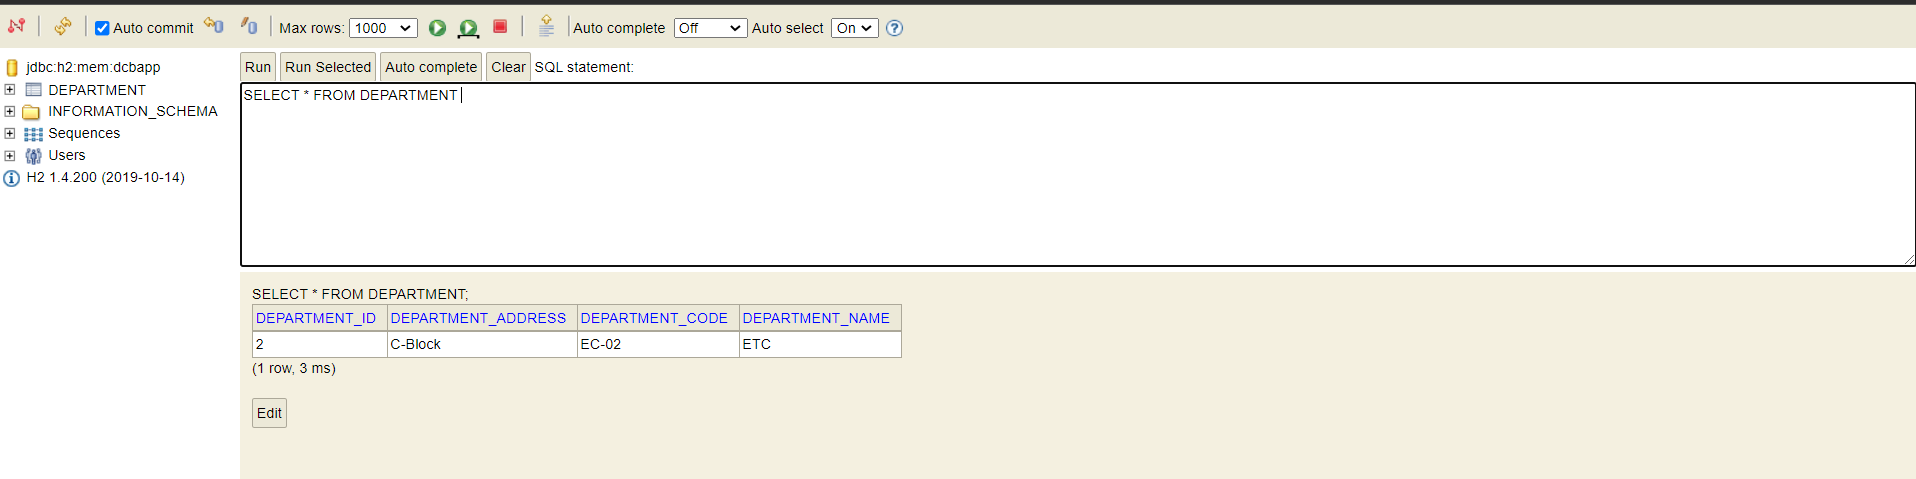
H2 数据库 如下:


 302
302


 被折叠的 条评论
为什么被折叠?
被折叠的 条评论
为什么被折叠?
 到【灌水乐园】发言


