


CRUD Application with PHP, PDO, and MySQL
在本教程中,我们将使用 PHP、PDO 和 MySQL 创建一个完整的创建、读取、更新和删除应用程序。我们将完全从头开始创建应用程序,不需要额外的框架。
CRUD 应用程序通常与数据库结合使用,与表中的记录进行交互。我们将在我们的应用程序中使用 MySQL 作为我们的数据库管理系统。
我们将创建一个包含联系人表的数据库,我们将能够在我们的 CRUD 应用程序中操作这些联系人,联系人表将包含姓名、电子邮件、电话号码等。
Basic 和 Advanced 包包括附加功能和源代码的下载链接。
1. 入门
在开始编写 CRUD 应用程序之前,我们需要安装我们的 Web 服务器并设置我们的应用程序。
1.1。您将在本教程中学到什么
- 创建 MySQL 记录— 将新记录插入联系人表。
- 读取 MySQL 记录— 读取 MySQL 记录并将它们显示在 HTML 表中。
- 更新 MySQL 记录— 更新联系人表中的现有 MySQL 记录。
- 删除 MySQL 记录— 确认并从联系人表中删除记录。
- GET 和 POST 请求——从 HTML 表单和 URL 参数向我们的应用程序发送数据。
- 准备好的语句——使用准备好的语句保护我们的 SQL 语句。
1.2. 要求
- Web 服务器— 我建议您在本地计算机系统上下载并安装XAMPP,此服务器包包括 MySQL、PHP、phpMyAdmin 和 PDO 扩展。
- PHP — 我建议您使用最新版本的PHP,但旧版本应该可以正常工作(如果您安装了XAMPP ,请跳过)。
- PDO 扩展——如果你使用XAMPP,应该默认启用,但如果不是,你需要启用/安装它。
1.3. 文件结构和设置
导航到C:\xampp\htdocs ( XAMPP ) 并创建以下目录和文件。
文件结构
\-- phpcrud
|-- index.php
|-- create.php
|-- read.php
|-- update.php
|-- delete.php
|-- functions.php
|-- style.css
每个文件将包含什么:
- index.php — 我们的 CRUD 应用程序的主页。
- create.php — 使用 HTML 表单创建新记录并使用 POST 请求将数据发送到服务器。
- read.php — 显示我们数据库表中的记录并使用分页导航。
- update.php — 使用 HTML 表单更新现有记录,并使用 POST 请求将数据发送到服务器。
- delete.php — 按 ID 确认和删除记录(获取 ID 的 GET 请求)。
- functions.php — 基本模板函数和 MySQL 连接函数(因此我们不必在每个文件中重复代码)。
- style.css——我们应用的样式表,这将改变我们应用的外观。
2. 创建数据库和设置表
我们将使用 MySQL 数据库来存储联系人并使用 PHP 检索它们。如果您使用 XAMPP,请按照以下说明进行操作。
- 导航到http://localhost/phpmyadmin/
- 单击顶部的数据库
- 在Create database下输入phpcrud并选择utf8_general_ci作为排序规则
- 单击创建
- 选择新创建的数据库
- 单击SQL选项卡并执行以下 SQL:
CREATE TABLE IF NOT EXISTS `contacts` (
`id` int(11) NOT NULL AUTO_INCREMENT,
`name` varchar(255) NOT NULL,
`email` varchar(255) NOT NULL,
`phone` varchar(255) NOT NULL,
`title` varchar(255) NOT NULL,
`created` datetime NOT NULL DEFAULT CURRENT_TIMESTAMP,
PRIMARY KEY (`id`)
) ;
INSERT INTO `contacts` (`id`, `name`, `email`, `phone`, `title`, `created`) VALUES
(1, 'John Doe', 'johndoe@example.com', '2026550143', 'Lawyer', '2019-05-08 17:32:00'),
(2, 'David Deacon', 'daviddeacon@example.com', '2025550121', 'Employee', '2019-05-08 17:28:44'),
(3, 'Sam White', 'samwhite@example.com', '2004550121', 'Employee', '2019-05-08 17:29:27'),
(4, 'Colin Chaplin', 'colinchaplin@example.com', '2022550178', 'Supervisor', '2019-05-08 17:29:27'),
(5, 'Ricky Waltz', 'rickywaltz@example.com', '7862342390', '', '2019-05-09 19:16:00'),
(6, 'Arnold Hall', 'arnoldhall@example.com', '5089573579', 'Manager', '2019-05-09 19:17:00'),
(7, 'Toni Adams', 'alvah1981@example.com', '2603668738', '', '2019-05-09 19:19:00'),
(8, 'Donald Perry', 'donald1983@example.com', '7019007916', 'Employee', '2019-05-09 19:20:00'),
(9, 'Joe McKinney', 'nadia.doole0@example.com', '6153353674', 'Employee', '2019-05-09 19:20:00'),
(10, 'Angela Horst', 'angela1977@example.com', '3094234980', 'Assistant', '2019-05-09 19:21:00'),
(11, 'James Jameson', 'james1965@example.com', '4002349823', 'Assistant', '2019-05-09 19:32:00'),
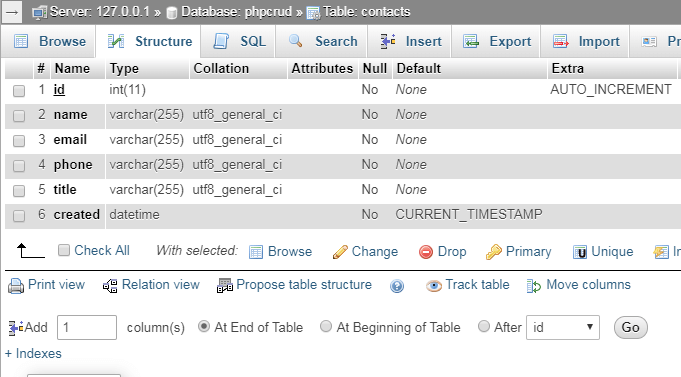
(12, 'Daniel Deacon', 'danieldeacon@example.com', '5003423549', 'Manager', '2019-05-09 19:33:00');上面的 SQL 将创建表:contacts,我们将在我们的应用程序中使用此表,包含在 SQL 中的是示例数据,此数据将用于测试目的,以确保一切正常,您可以删除稍后再说。
在contacts表中有6列(id、name、email、phone、title、created),title列基本上就是每个联系人的角色,你可以把这个改成你想要的任何东西,示例数据将使用工作角色举个例子。
在phpMyAdmin中,数据库应如下所示:
3. 创建样式表 (CSS3)
样式表将改变我们应用程序的外观,编辑style.css文件并添加以下代码:
* {
  	box-sizing: border-box;
  	font-family: -apple-system, BlinkMacSystemFont, "segoe ui", roboto, oxygen, ubuntu, cantarell, "fira sans", "droid sans", "helvetica neue", Arial, sans-serif;
  	font-size: 16px;
  	-webkit-font-smoothing: antialiased;
  	-moz-osx-font-smoothing: grayscale;
}
body {
  	background-color: #FFFFFF;
  	margin: 0;
}
.navtop {
  	background-color: #3f69a8;
  	height: 60px;
  	width: 100%;
  	border: 0;
}
.navtop div {
  	display: flex;
  	margin: 0 auto;
  	width: 1000px;
  	height: 100%;
}
.navtop div h1, .navtop div a {
  	display: inline-flex;
  	align-items: center;
}
.navtop div h1 {
  	flex: 1;
  	font-size: 24px;
  	padding: 0;
  	margin: 0;
  	color: #ecf0f6;
  	font-weight: normal;
}
.navtop div a {
  	padding: 0 20px;
  	text-decoration: none;
  	color: #c5d2e5;
  	font-weight: bold;
}
.navtop div a i {
  	padding: 2px 8px 0 0;
}
.navtop div a:hover {
  	color: #ecf0f6;
}
.content {
  	width: 1000px;
  	margin: 0 auto;
}
.content h2 {
  	margin: 0;
  	padding: 25px 0;
  	font-size: 22px;
  	border-bottom: 1px solid #ebebeb;
  	color: #666666;
}
.read .create-contact {
  	display: inline-block;
  	text-decoration: none;
  	background-color: #38b673;
  	font-weight: bold;
  	font-size: 14px;
  	color: #FFFFFF;
  	padding: 10px 15px;
  	margin: 15px 0;
}
.read .create-contact:hover {
  	background-color: #32a367;
}
.read .pagination {
  	display: flex;
  	justify-content: flex-end;
}
.read .pagination a {
  	display: inline-block;
  	text-decoration: none;
  	background-color: #a5a7a9;
  	font-weight: bold;
  	color: #FFFFFF;
  	padding: 5px 10px;
  	margin: 15px 0 15px 5px;
}
.read .pagination a:hover {
  	background-color: #999b9d;
}
.read table {
  	width: 100%;
  	padding-top: 30px;
  	border-collapse: collapse;
}
.read table thead {
  	background-color: #ebeef1;
  	border-bottom: 1px solid #d3dae0;
}
.read table thead td {
  	padding: 10px;
  	font-weight: bold;
  	color: #767779;
  	font-size: 14px;
}
.read table tbody tr {
  	border-bottom: 1px solid #d3dae0;
}
.read table tbody tr:nth-child(even) {
  	background-color: #fbfcfc;
}
.read table tbody tr:hover {
  	background-color: #376ab7;
}
.read table tbody tr:hover td {
  	color: #FFFFFF;
}
.read table tbody tr:hover td:nth-child(1) {
  	color: #FFFFFF;
}
.read table tbody tr td {
  	padding: 10px;
}
.read table tbody tr td:nth-child(1) {
  	color: #a5a7a9;
}
.read table tbody tr td.actions {
  	padding: 8px;
  	text-align: right;
}
.read table tbody tr td.actions .edit, .read table tbody tr td.actions .trash {
  	display: inline-flex;
  	text-align: right;
  	text-decoration: none;
  	color: #FFFFFF;
  	padding: 10px 12px;
}
.read table tbody tr td.actions .trash {
  	background-color: #b73737;
}
.read table tbody tr td.actions .trash:hover {
  	background-color: #a33131;
}
.read table tbody tr td.actions .edit {
  	background-color: #37afb7;
}
.read table tbody tr td.actions .edit:hover {
  	background-color: #319ca3;
}
.update form {
  	padding: 15px 0;
  	display: flex;
  	flex-flow: wrap;
}
.update form label {
  	display: inline-flex;
  	width: 400px;
  	padding: 10px 0;
  	margin-right: 25px;
}
.update form input {
  	padding: 10px;
  	width: 400px;
  	margin-right: 25px;
  	margin-bottom: 15px;
  	border: 1px solid #cccccc;
}
.update form input[type="submit"] {
  	display: block;
  	background-color: #38b673;
  	border: 0;
  	font-weight: bold;
  	font-size: 14px;
  	color: #FFFFFF;
  	cursor: pointer;
  	width: 200px;
	margin-top: 15px;
}
.update form input[type="submit"]:hover {
  	background-color: #32a367;
}
.delete .yesno {
  	display: flex;
}
.delete .yesno a {
  	display: inline-block;
  	text-decoration: none;
  	background-color: #38b673;
  	font-weight: bold;
  	color: #FFFFFF;
  	padding: 10px 15px;
  	margin: 15px 10px 15px 0;
}
.delete .yesno a:hover {
  	background-color: #32a367;
}
随意更改样式,这是我为使 CRUD 应用程序更具吸引力而汇总的内容。
4. 创建 CRUD 应用程序
我们终于可以开始使用 PHP 编写 CRUD 应用程序了。在我们开始之前,请确保您按照前面的步骤操作并准备好 MySQL 数据库。
4.1。创建函数
该文件将包含我们可以在所有 PHP 文件中执行的函数,这样我们就不必在每个 PHP 文件中编写相同的代码,代码越短越好,对吧?我们将创建 3 个函数,1 个函数将连接到数据库,另外 2 个函数将是页眉和页脚的模板,它们将出现在我们创建的每个页面上,并将包含 HTML 布局。
编辑functions.php文件并添加以下代码:
<?php
function pdo_connect_mysql() {
    $DATABASE_HOST = 'localhost';
    $DATABASE_USER = 'root';
    $DATABASE_PASS = '';
    $DATABASE_NAME = 'phpcrud';
    try {
    	return new PDO('mysql:host=' . $DATABASE_HOST . ';dbname=' . $DATABASE_NAME . ';charset=utf8', $DATABASE_USER, $DATABASE_PASS);
    } catch (PDOException $exception) {
    	// If there is an error with the connection, stop the script and display the error.
    	exit('Failed to connect to database!');
    }
}
function template_header($title) {
echo <<<EOT
<!DOCTYPE html>
<html>
	<head>
		<meta charset="utf-8">
		<title>$title</title>
		<link href="style.css" rel="stylesheet" type="text/css">
		<link rel="stylesheet" href="https://use.fontawesome.com/releases/v5.7.1/css/all.css">
	</head>
	<body>
    <nav class="navtop">
    	<div>
    		<h1>Website Title</h1>
            <a href="index.php"><i class="fas fa-home"></i>Home</a>
    		<a href="read.php"><i class="fas fa-address-book"></i>Contacts</a>
    	</div>
    </nav>
EOT;
}
function template_footer() {
echo <<<EOT
    </body>
</html>
EOT;
}
?>
确保将 MySQL 连接详细信息更改为您的详细信息,我们使用 PDO 连接到 MySQL,PDO 将使我们更容易与我们的 MySQL 数据库交互。
4.2. 创建主页
当您导航到http://localhost/phpcrud/时,它将提供index.php文件,该页面将是我们的主页。
编辑index.php文件并添加以下代码:
<?php
include 'functions.php';
// Your PHP code here.

// Home Page template below.
?>

<?=template_header('Home')?>

<div class="content">
	<h2>Home</h2>
	<p>Welcome to the home page!</p>
</div>

<?=template_footer()?>这将创建一个基本主页,我们可以使用此页面导航到其他页面。如您所见,我们包含了functions.php文件并执行了我们创建的模板函数,请记住这些函数会将页眉和页脚代码添加到我们的主页。
现在,如果我们导航到http://localhost/phpcrud/,我们将看到以下内容:
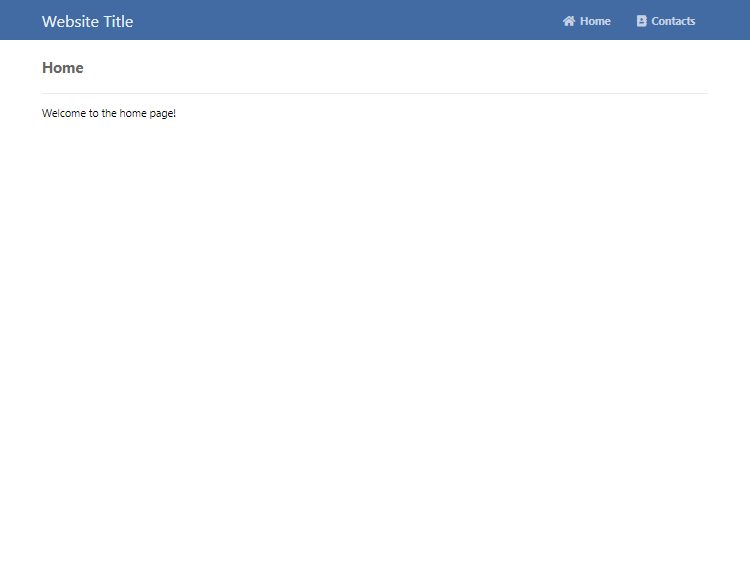
主页基本上就是这样,您可以随意添加自己的内容,这个页面只是为了让我们可以导航到其他页面。
4.3. 创建阅读页面
此页面将从我们的联系人表中填充 HTML 表中的记录。
编辑read.php文件并添加以下代码:
<?php
include 'functions.php';
// Connect to MySQL database
$pdo = pdo_connect_mysql();
// Get the page via GET request (URL param: page), if non exists default the page to 1
$page = isset($_GET['page']) && is_numeric($_GET['page']) ? (int)$_GET['page'] : 1;
// Number of records to show on each page
$records_per_page = 5;
我们再次包含函数文件,但这次我们通过执行函数连接到我们的 MySQL 数据库:pdo_connect_mysql,如果连接成功我们可以使用$pdo执行查询的变量。
我们还创建了另外 2 个变量,即$页变量将确定用户当前所在的页面,$records_per_page将用于限制每页显示的记录数,例如,如果我们将记录数限制为 5 并且我们的联系人表中有 10 条记录,那么将只有 2 页和每页上的 5 条记录,用户将能够在页面之间导航。
将以下代码添加到read.php文件中:
// Prepare the SQL statement and get records from our contacts table, LIMIT will determine the page
$stmt = $pdo->prepare('SELECT * FROM contacts ORDER BY id LIMIT :current_page, :record_per_page');
$stmt->bindValue(':current_page', ($page-1)*$records_per_page, PDO::PARAM_INT);
$stmt->bindValue(':record_per_page', $records_per_page, PDO::PARAM_INT);
$stmt->execute();
// Fetch the records so we can display them in our template.
$contacts = $stmt->fetchAll(PDO::FETCH_ASSOC);上面的代码将从联系人表中选择记录,这将由用户所在的当前页面决定,记录将按id列排序,如果我们愿意,我们可以轻松更改按列排序,例如,如果我们将其更改为已创建,那么它将按创建日期对记录进行排序。
我们还为上述查询使用了准备好的语句,这将确保我们的查询是安全的(转义用户输入数据)。
将以下代码添加到read.php文件中:
// Get the total number of contacts, this is so we can determine whether there should be a next and previous button
$num_contacts = $pdo->query('SELECT COUNT(*) FROM contacts')->fetchColumn();
?>上面的SQL查询会得到contacts表的总记录数,这里我们不需要使用prepared statement,因为查询不包含用户输入变量。
将以下代码添加到read.php文件中:
<?=template_header('Read')?>

<div class="content read">
	<h2>Read Contacts</h2>
	<a href="create.php" class="create-contact">Create Contact</a>
	<table>
        <thead>
            <tr>
                <td>#</td>
                <td>Name</td>
                <td>Email</td>
                <td>Phone</td>
                <td>Title</td>
                <td>Created</td>
                <td></td>
            </tr>
        </thead>
        <tbody>
            <?php foreach ($contacts as $contact): ?>
            <tr>
                <td><?=$contact['id']?></td>
                <td><?=$contact['name']?></td>
                <td><?=$contact['email']?></td>
                <td><?=$contact['phone']?></td>
                <td><?=$contact['title']?></td>
                <td><?=$contact['created']?></td>
                <td class="actions">
                    <a href="update.php?id=<?=$contact['id']?>" class="edit"><i class="fas fa-pen fa-xs"></i></a>
                    <a href="delete.php?id=<?=$contact['id']?>" class="trash"><i class="fas fa-trash fa-xs"></i></a>
                </td>
            </tr>
            <?php endforeach; ?>
        </tbody>
    </table>
	<div class="pagination">
		<?php if ($page > 1): ?>
		<a href="read.php?page=<?=$page-1?>"><i class="fas fa-angle-double-left fa-sm"></i></a>
		<?php endif; ?>
		<?php if ($page*$records_per_page < $num_contacts): ?>
		<a href="read.php?page=<?=$page+1?>"><i class="fas fa-angle-double-right fa-sm"></i></a>
		<?php endif; ?>
	</div>
</div>

<?=template_footer()?>
这是阅读页面的模板,代码迭代联系人并将它们添加到 HTML 表格中,当我们导航到阅读页面时,我们将能够以表格格式读取记录。
添加了分页,因此我们可以在阅读页面(第 1 页、第 2 页等)上的页面之间导航。
对于我们使用Font Awesome的图标,请确保它包含在标题模板功能中,否则图标将不会出现。
现在,如果我们导航到http://localhost/phpcrud/read.php,我们将看到以下内容:
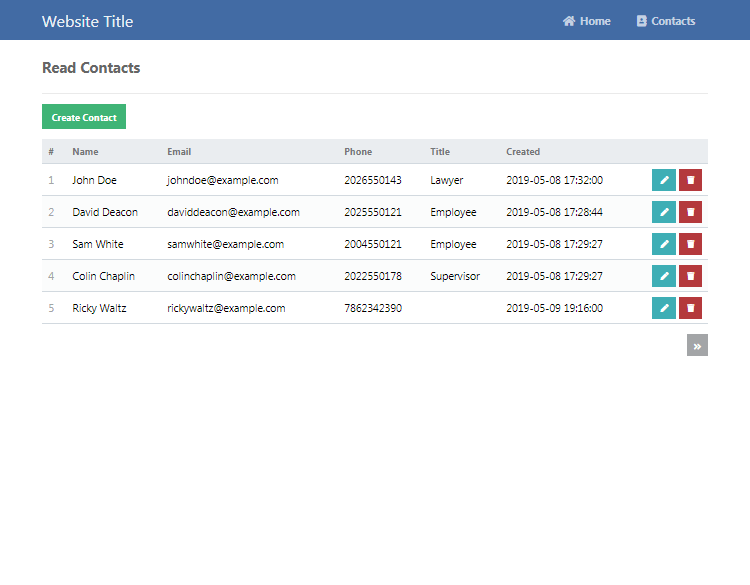
所以现在我们知道如何显示 MySQL 数据库中的记录了,注意表格中出现的按钮(创建、编辑和删除)将不起作用,那是因为我们还没有创建这些页面。
您也可以单击标题栏中的联系人链接,这将导航到阅读页面。
4.4. 创建创建页面
创建页面将用于创建新记录并将它们插入到我们的联系人表中。
编辑create.php文件并添加:
<?php
include 'functions.php';
$pdo = pdo_connect_mysql();
$msg = '';
// Check if POST data is not empty
if (!empty($_POST)) {
    // Post data not empty insert a new record
    // Set-up the variables that are going to be inserted, we must check if the POST variables exist if not we can default them to blank
    $id = isset($_POST['id']) && !empty($_POST['id']) && $_POST['id'] != 'auto' ? $_POST['id'] : NULL;
    // Check if POST variable "name" exists, if not default the value to blank, basically the same for all variables
    $name = isset($_POST['name']) ? $_POST['name'] : '';
    $email = isset($_POST['email']) ? $_POST['email'] : '';
    $phone = isset($_POST['phone']) ? $_POST['phone'] : '';
    $title = isset($_POST['title']) ? $_POST['title'] : '';
    $created = isset($_POST['created']) ? $_POST['created'] : date('Y-m-d H:i:s');
    // Insert new record into the contacts table
    $stmt = $pdo->prepare('INSERT INTO contacts VALUES (?, ?, ?, ?, ?, ?)');
    $stmt->execute([$id, $name, $email, $phone, $title, $created]);
    // Output message
    $msg = 'Created Successfully!';
}
?>上面的代码会检查POST数组(表单数据)是否不为空,如果不是,则基本上意味着用户已经填写了表单并单击了提交按钮,这将在我们的联系人表中插入一条新记录。
之后添加:
<?=template_header('Create')?>
<div class="content update">
<h2>Create Contact</h2>
<form action="create.php" method="post">
<label for="id">ID</label>
<label for="name">Name</label>
<input type="text" name="id" placeholder="26" value="auto" id="id">
<input type="text" name="name" placeholder="John Doe" id="name">
<label for="email">Email</label>
<label for="phone">Phone</label>
<input type="text" name="email" placeholder="johndoe@example.com" id="email">
<input type="text" name="phone" placeholder="2025550143" id="phone">
<label for="title">Title</label>
<label for="created">Created</label>
<input type="text" name="title" placeholder="Employee" id="title">
<input type="datetime-local" name="created" value="<?=date('Y-m-d\TH:i')?>" id="created">
<input type="submit" value="Create">
</form>
<?php if ($msg): ?>
<p><?=$msg?></p>
<?php endif; ?>
</div>
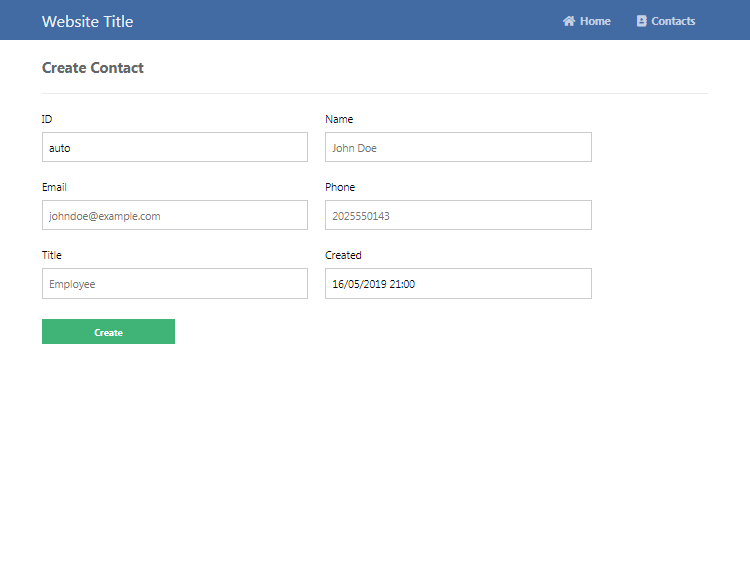
<?=template_footer()?>这是我们创建页面的模板,如您所见,我们创建了一个表单并相应地命名了每个输入字段,输入字段的名称是我们在 PHP 代码中获取 POST 变量的方式,例如,如果我们将输入字段命名为“zip_code”,我们可以使用$_POST['zip_code']在 PHP 中(假设表单的方法设置为post)。
现在,如果我们导航到http://localhost/phpcrud/create.php或单击阅读页面上的Create按钮,我们将看到以下内容:
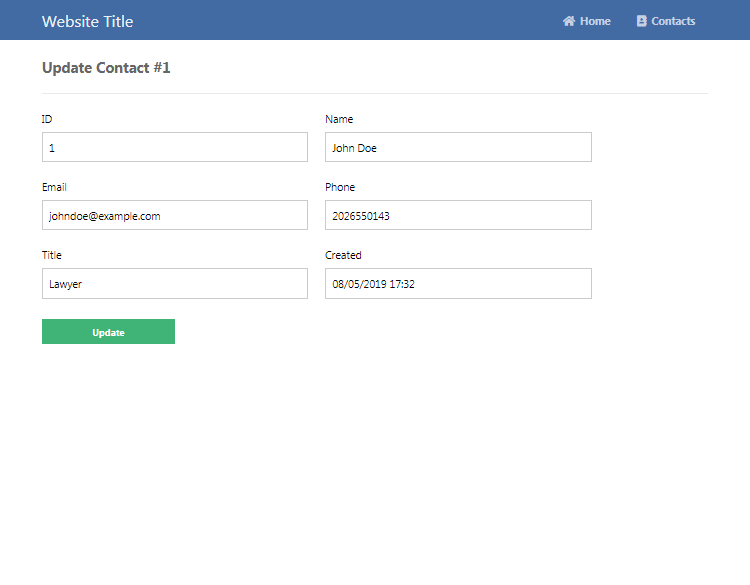
4.5. 创建更新页面
更新页面将用于更新我们的联系人表中的记录,此页面类似于创建页面,但我们将更新现有记录,而不是插入新记录。我们将能够通过 GET 请求获取记录 ID。
编辑update.php文件并添加:
<?php
include 'functions.php';
$pdo = pdo_connect_mysql();
$msg = '';
// Check if the contact id exists, for example update.php?id=1 will get the contact with the id of 1
if (isset($_GET['id'])) {
    if (!empty($_POST)) {
        // This part is similar to the create.php, but instead we update a record and not insert
        $id = isset($_POST['id']) ? $_POST['id'] : NULL;
        $name = isset($_POST['name']) ? $_POST['name'] : '';
        $email = isset($_POST['email']) ? $_POST['email'] : '';
        $phone = isset($_POST['phone']) ? $_POST['phone'] : '';
        $title = isset($_POST['title']) ? $_POST['title'] : '';
        $created = isset($_POST['created']) ? $_POST['created'] : date('Y-m-d H:i:s');
        // Update the record
        $stmt = $pdo->prepare('UPDATE contacts SET id = ?, name = ?, email = ?, phone = ?, title = ?, created = ? WHERE id = ?');
        $stmt->execute([$id, $name, $email, $phone, $title, $created, $_GET['id']]);
        $msg = 'Updated Successfully!';
    }
    // Get the contact from the contacts table
    $stmt = $pdo->prepare('SELECT * FROM contacts WHERE id = ?');
    $stmt->execute([$_GET['id']]);
    $contact = $stmt->fetch(PDO::FETCH_ASSOC);
    if (!$contact) {
        exit('Contact doesn\'t exist with that ID!');
    }
} else {
    exit('No ID specified!');
}
?>上面的代码会检查联系人ID,ID会是URL中的一个参数,例如http://localhost/phpcrud/update.php?id=1会得到ID为1的联系人,然后我们可以使用 GET 方法处理请求并执行 MySQL 查询,该查询将通过 ID 获取联系人。
之后添加:
<?=template_header('Read')?>

<div class="content update">
	<h2>Update Contact #<?=$contact['id']?></h2>
    <form action="update.php?id=<?=$contact['id']?>" method="post">
        <label for="id">ID</label>
        <label for="name">Name</label>
        <input type="text" name="id" placeholder="1" value="<?=$contact['id']?>" id="id">
        <input type="text" name="name" placeholder="John Doe" value="<?=$contact['name']?>" id="name">
        <label for="email">Email</label>
        <label for="phone">Phone</label>
        <input type="text" name="email" placeholder="johndoe@example.com" value="<?=$contact['email']?>" id="email">
        <input type="text" name="phone" placeholder="2025550143" value="<?=$contact['phone']?>" id="phone">
        <label for="title">Title</label>
        <label for="created">Created</label>
        <input type="text" name="title" placeholder="Employee" value="<?=$contact['title']?>" id="title">
        <input type="datetime-local" name="created" value="<?=date('Y-m-d\TH:i', strtotime($contact['created']))?>" id="created">
        <input type="submit" value="Update">
    </form>
    <?php if ($msg): ?>
    <p><?=$msg?></p>
    <?php endif; ?>
</div>

<?=template_footer()?>
这是更新页面的模板,输入值已经用联系人列指定,我们之前创建的 MySQL 查询将获取这些值。
在阅读页面(联系人)上,我们应该能够单击记录旁边的更新图标并对其进行更新,我们应该会看到如下内容:
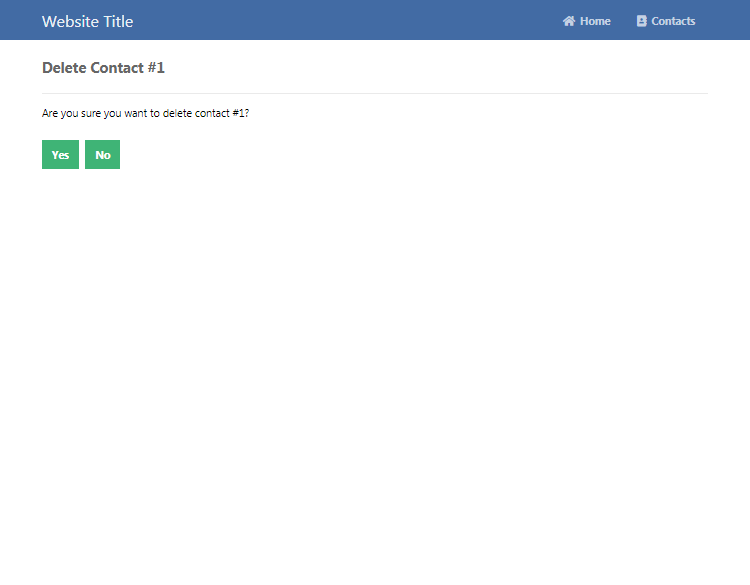
4.6. 创建删除页面
删除页面将用于从联系人表中删除记录。在用户可以删除记录之前,他们需要确认它,这将防止意外删除。
编辑delete.php文件并添加:
<?php
include 'functions.php';
$pdo = pdo_connect_mysql();
$msg = '';
// Check that the contact ID exists
if (isset($_GET['id'])) {
    // Select the record that is going to be deleted
    $stmt = $pdo->prepare('SELECT * FROM contacts WHERE id = ?');
    $stmt->execute([$_GET['id']]);
    $contact = $stmt->fetch(PDO::FETCH_ASSOC);
    if (!$contact) {
        exit('Contact doesn\'t exist with that ID!');
    }
    // Make sure the user confirms beore deletion
    if (isset($_GET['confirm'])) {
        if ($_GET['confirm'] == 'yes') {
            // User clicked the "Yes" button, delete record
            $stmt = $pdo->prepare('DELETE FROM contacts WHERE id = ?');
            $stmt->execute([$_GET['id']]);
            $msg = 'You have deleted the contact!';
        } else {
            // User clicked the "No" button, redirect them back to the read page
            header('Location: read.php');
            exit;
        }
    }
} else {
    exit('No ID specified!');
}
?>
要删除记录,代码将检查 GET 请求变量“ id ”是否存在,如果存在则检查记录是否存在于联系人表中并确认用户是否要删除联系人,一个简单的 GET 请求将确定用户单击了哪个按钮(是或否)。
之后添加:
<?=template_header('Delete')?>

<div class="content delete">
	<h2>Delete Contact #<?=$contact['id']?></h2>
    <?php if ($msg): ?>
    <p><?=$msg?></p>
    <?php else: ?>
	<p>Are you sure you want to delete contact #<?=$contact['id']?>?</p>
    <div class="yesno">
        <a href="delete.php?id=<?=$contact['id']?>&confirm=yes">Yes</a>
        <a href="delete.php?id=<?=$contact['id']?>&confirm=no">No</a>
    </div>
    <?php endif; ?>
</div>

<?=template_footer()?>上面的代码是删除页面的模板,这包括是和否按钮(删除确认)和输出消息。Yes和No按钮将创建一个新的 GET 请求,以确认用户的选择。
在阅读页面(联系人)上,单击其中一条记录上的删除按钮,您应该会看到类似以下内容:
结论
恭喜!您已经使用 PHP 和 MySQL 成功创建了一个 CRUD 应用程序,下一步是什么?考虑将您自己的列添加到联系人表和代码中。
如果您喜欢本教程,请不要忘记使用下面的社交链接进行分享,并查看我们网站上的更多教程。
享受编码!


 1057
1057

 被折叠的 条评论
为什么被折叠?
被折叠的 条评论
为什么被折叠?
 到【灌水乐园】发言


