


在本教程中,我将指导您如何编写代码,以使用具有基于表单的身份验证的Spring安全API来保护Spring Boot应用程序中的网页。用户详细信息存储在MySQL数据库中,并使用春季JDBC连接到数据库。我们将从本教程中的 ProductManager 项目开始,向现有的弹簧启动项目添加登录和注销功能。
1. 创建用户表和虚拟凭据
凭据应存储在数据库中,因此让我们创建一个名为 users 的新表,其中包含以下列:

密码列的类型为 varchar(64),因为密码是使用 BCrypt 哈希算法编码的。为方便起见,您可以执行以下MySQL语句来创建此表:并执行以下SQL INSERT语句以创建两个用户:第一个用户namhm具有角色USER,密码是代码java。第二个用户管理员具有角色 ADMIN 与密码是尼姆达。两个用户都已启用。您可以看到密码以BCrypt格式编码。您可以编写一个简单的程序来生成密码,如本教程中所述。
|
1
2
3
4
5
6
7
8
|
CREATE TABLE `users` (
`user_id` int(11) NOT NULL AUTO_INCREMENT,
`username` varchar(45) NOT NULL,
`password` varchar(64) NOT NULL,
`role` varchar(45) NOT NULL,
`enabled` tinyint(4) DEFAULT NULL,
PRIMARY KEY (`user_id`)
);
|
|
1
2
3
4
5
6
7
8
9
|
INSERT INTO `users` (`username`,`password`,`role`,`enabled`)
VALUES ('namhm',
'$2a$10$XptfskLsT1l/bRTLRiiCgejHqOpgXFreUnNUa35gJdCr2v2QbVFzu',
'ROLE_USER', 1);
INSERT INTO `users` (`username`,`password`,`role`,`enabled`)
VALUES ('admin',
'$2a$10$zxvEq8XzYEYtNjbkRsJEbukHeRx3XS6MDXHMu8cNuNsRfZJWwswDy',
'ROLE_ADMIN', 1);
|
2. 配置数据源属性
接下来,在应用程序属性文件中指定数据库连接信息,如下所示:根据您的MySQL数据库更新URL,用户名和密码。
|
1
2
3
|
spring.datasource.url=jdbc:mysql://localhost:3306/testdb
spring.datasource.username=root
spring.datasource.password=password
|
3. 声明弹簧安全性和 MySQL JDBC 驱动程序的依赖关系
要将Spring安全API用于项目,请在pom.xml文件中声明以下依赖项:并且要将JDBC与弹簧启动和MySQL一起使用:请注意,依赖项版本已由弹簧启动初学者父项目定义。
|
1
2
3
4
|
<dependency>
<groupId>org.springframework.boot</groupId>
<artifactId>spring-boot-starter-security</artifactId>
</dependency>
|
|
1
2
3
4
5
6
7
8
9
|
<dependency>
<groupId>org.springframework.boot</groupId>
<artifactId>spring-boot-starter-jdbc</artifactId>
</dependency>
<dependency>
<groupId>mysql</groupId>
<artifactId>mysql-connector-java</artifactId>
<scope>runtime</scope>
</dependency>
|
4. 配置 JDBC 身份验证详细信息
要将 Spring 安全性与基于表单的身份验证和 JDBC 结合使用,请按如下方式创建 WebSecurityConfig 类:此安全配置类必须使用@EnableWebSecurity注释进行批注,并且是 Web 安全配置器适配器的子类。数据源对象的实例将由Spring框架创建并注入:它将从应用程序属性文件中读取数据库连接信息。要使用JDBC配置身份验证,请编写以下方法:如您所见,我们需要指定密码编码器(建议使用BCrypt),数据源和两个SQL语句:第一个根据用户名选择用户,第二个选择用户的角色。请注意,Spring安全性要求列名必须是用户名,密码,启用和角色。为了配置基于表单的身份验证,我们重写了 configure(HttpSecurity) 方法,如下所示:在这里,我们指定所有请求都必须进行身份验证,这意味着用户必须登录才能使用该应用程序。使用Spring安全性提供的默认登录表单。要显示已登录用户的用户名,请在Thymeleaf模板文件中编写以下代码:并添加注销按钮:如您所见,Spring Security将处理应用程序的登录和注销。我们不必编写重复的代码,只需指定一些配置即可。
|
1
2
3
4
5
6
7
8
9
10
11
12
13
14
15
16
17
18
19
20
21
22
23
24
25
26
27
28
29
30
31
32
33
34
35
36
37
|
package net.codejava;
import javax.sql.DataSource;
import org.springframework.beans.factory.annotation.Autowired;
import org.springframework.context.annotation.Configuration;
import org.springframework.security.config.annotation.authentication.builders.*;
import org.springframework.security.config.annotation.web.builders.HttpSecurity;
import org.springframework.security.config.annotation.web.configuration.*;
import org.springframework.security.crypto.bcrypt.BCryptPasswordEncoder;
@Configuration
@EnableWebSecurity
public class WebSecurityConfig extends WebSecurityConfigurerAdapter {
@Autowired
private DataSource dataSource;
@Autowired
public void configAuthentication(AuthenticationManagerBuilder auth) throws Exception {
auth.jdbcAuthentication().passwordEncoder(new BCryptPasswordEncoder())
.dataSource(dataSource)
.usersByUsernameQuery("select username, password, enabled from users where username=?")
.authoritiesByUsernameQuery("select username, role from users where username=?")
;
}
@Override
protected void configure(HttpSecurity http) throws Exception {
http.authorizeRequests()
.anyRequest().authenticated()
.and()
.formLogin().permitAll()
.and()
.logout().permitAll();
}
}
|
|
1
2
|
@Autowired
private DataSource dataSource;
|
|
1
2
3
4
5
6
7
8
|
@Autowired
public void configAuthentication(AuthenticationManagerBuilder auth) throws Exception {
auth.jdbcAuthentication().passwordEncoder(new BCryptPasswordEncoder())
.dataSource(dataSource)
.usersByUsernameQuery("select username, password, enabled from users where username=?")
.authoritiesByUsernameQuery("select username, role from users where username=?")
;
}
|
|
1
2
3
4
5
6
7
8
9
|
@Override
protected void configure(HttpSecurity http) throws Exception {
http.authorizeRequests()
.anyRequest().authenticated()
.and()
.formLogin().permitAll()
.and()
.logout().permitAll();
}
|
|
1
|
<h3 th:inline="text">Welcome [[${#httpServletRequest.remoteUser}]]</h3>
|
|
1
2
3
|
<form th:action="@{/logout}" method="post">
<input type="submit" value="Logout" />
</form>
|
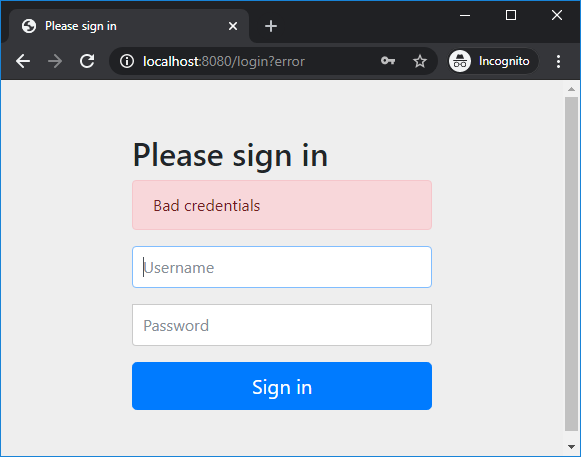
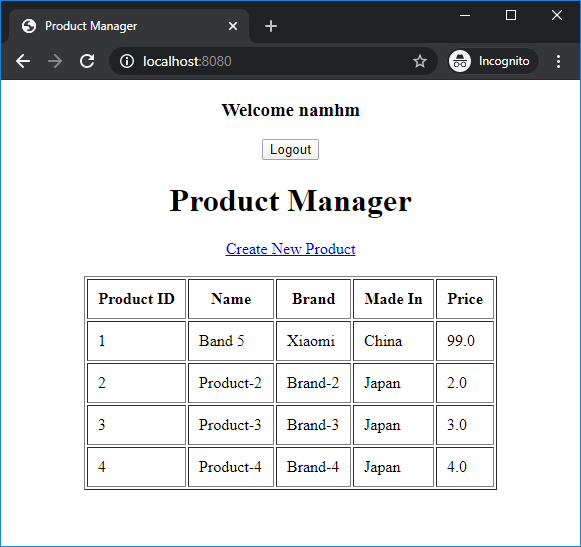
5. 测试登录和注销
启动Spring Boot应用程序并访问 http://localhost:8080 在Web浏览器中,您将看到Spring安全提供的默认登录页面出现:尝试使用用户名namhm和密码代码123登录,您应该看到此错误:现在输入正确的用户名namhm和密码代码java,您将看到主页如下:并注意欢迎消息后跟用户名。用户现在已通过身份验证以使用该应用程序。单击“注销”按钮,您将看到:这意味着我们已成功实现登录并注销到我们的Spring Boot应用程序。有关基于角色的基本授权,请观看以下视频:


结论:
到目前为止,您已经学会了使用基于表单的身份验证和数据库内凭据来保护Spring Boot应用程序。您会看到 Spring 安全性使实现登录和注销功能变得非常容易,并且非常方便。为方便起见,您可以下载下面的示例项目。
| 正在上传…重新上传取消产品经理JDBC作者.zip | [示例弹簧启动安全项目] | 76 千字节 |


 758
758


 被折叠的 条评论
为什么被折叠?
被折叠的 条评论
为什么被折叠?
 到【灌水乐园】发言


