


本篇内容基于《hadoop权威指南(第三版)》内容。我在实现书中源代码的时候会出现一些错误(我在windows平台下测试),这里做了一些改进,同时我也想在书中内容的基础上了解更多AVRO的信息,所以写这个笔记对自已学习的内容有一个记录,方便以后使用。(本文所有代码见https://github.com/alphg/avro_study)
1、JAVA序列化
建议大家先阅读http://www.cnblogs.com/xiohao/p/4234184.html 了解基本的java序列化的方法和序列化的作用
2、Hadoop Writable接口
2.1、Intwritable 测试
hadoop序列化格式是writable,我们以Intwritable为例来对期进行简单了解。
common.java 定义一些简单的序列化公共函数
package com.java.study.serial;

import org.apache.commons.io.output.ByteArrayOutputStream;
import org.apache.hadoop.io.Writable;

import java.io.*;


/**
 * Created by 410s on 2016/10/14.
 */
public class Common {
    //序列化到内存
    public static byte[] serialize_byte(Writable writable) throws IOException {
        ByteArrayOutputStream out=new ByteArrayOutputStream();
        DataOutputStream dataout=new DataOutputStream(out);
        writable.write(dataout);
        dataout.close();
        return out.toByteArray();
    }
    //从内存中反序列化
    public static void deserialize(Writable writable,byte[] bytes) throws IOException {
        ByteArrayInputStream in=new ByteArrayInputStream(bytes);
        DataInputStream dataIn=new DataInputStream(in);
        writable.readFields(dataIn);
        dataIn.close();
    }
    //序列化到文件 将文件存到D:\\a.txt中
    public static void serialize_file(Writable writable) throws IOException {
        FileOutputStream out=new FileOutputStream("D:\\a.txt");
        DataOutputStream dataout=new DataOutputStream(out);
        writable.write(dataout);
        dataout.close();
        out.close();
    }
    //从文件中进行反序列化
    public static void deserialize_file(Writable writable) throws IOException {
        FileInputStream in=new FileInputStream("D:\\a.txt");
        DataInputStream dataIn=new DataInputStream(in);
        writable.readFields(dataIn);
        dataIn.close();
        in.close();
    }
}
WritableTest.java
import com.java.study.serial.Common;
import com.java.study.serial.PersonWritable;
import org.apache.hadoop.io.*;
import org.testng.annotations.Test;

import java.io.IOException;
import java.util.Date;
import java.util.EnumSet;
import java.util.Iterator;

/**
 * Created by 410s on 2016/10/14.
 * intwritable 测试
 */
public class WritableTest {
    public static void main(String[] args) throws IOException {
        IntWritable writable=new IntWritable(163);
        Common.serialize_file(writable);
    }
    @Test
    public void test_IntWritable_file() throws IOException {
        //声名一个Intwritable对象,并将其值设置为163
        IntWritable writable=new IntWritable(163);
        //将其序列化输出到文件当中
        Common.serialize_file(writable);
        //构造一个新的对像
        IntWritable writable2=new IntWritable();
        //反序列化
        Common.deserialize_file(writable2);
        //输出writable2中的值,看其是否与我们序列化的值相同
        System.out.println(writable2.get());
    }
 }
运行测试文件我们可以看到输出的值是163,与我们序列化的值相同。
2.2 定制writable
在我们编写Mapreduce程序时,常常需要定制writable,实现我们自已的序列化类。
PersonWritable.java
package com.java.study.serial;

import org.apache.hadoop.io.*;

import java.io.DataInput;
import java.io.DataOutput;
import java.io.IOException;

/**
 * Created by 410s on 2016/10/14.
 */
public class PersonWritable implements WritableComparable<PersonWritable> {
    private Text userName=new Text();
    private IntWritable age=new IntWritable();
    private DoubleWritable account=new DoubleWritable();
    private BooleanWritable status=new BooleanWritable();
    private LongWritable createTime=new LongWritable();
    private MapWritable configs=new MapWritable();

    public PersonWritable() {
    }
    public PersonWritable(Text userName, IntWritable age, DoubleWritable account, BooleanWritable status, LongWritable createTime, MapWritable configs) {
        this.userName = userName;
        this.age = age;
        this.account = account;
        this.status = status;
        this.createTime = createTime;

        this.configs = configs;
    }

    public int compareTo(PersonWritable o) {
        return 0;
    }

    public void write(DataOutput out) throws IOException {
        userName.write(out);
        age.write(out);
        account.write(out);
        status.write(out);
        createTime.write(out);
        configs.write(out);
    }

    public void readFields(DataInput in) throws IOException {
        this.userName.readFields(in);
        this.age.readFields(in);
        this.account.readFields(in);
        this.status.readFields(in);
        this.createTime.readFields(in);
        this.configs.readFields(in);
    }

    @Override
    public String toString() {
          String str=this.userName.toString()+"\n"
                +this.getAge().get()+"\n"
                +this.getAccount().get()+"\n"
                +this.getCreateTime().get()+"\n";
        Set<Map.Entry<Writable,Writable>> keys=this.configs.entrySet();
        Iterator<Map.Entry<Writable, Writable>> it=keys.iterator();
        while(it.hasNext()){
            Map.Entry<Writable,Writable> tmp=it.next();
            str+="{"+tmp.getKey()+":"+tmp.getValue()+"}";
        }
        return str;
       }

    public Text getUserName() {
        return userName;
    }

    public void setUserName(Text userName) {
        this.userName = userName;
    }

    public IntWritable getAge() {
        return age;
    }

    public void setAge(IntWritable age) {
        this.age = age;
    }

    public DoubleWritable getAccount() {
        return account;
    }

    public void setAccount(DoubleWritable account) {
        this.account = account;
    }

    public BooleanWritable getStatus() {
        return status;
    }

    public void setStatus(BooleanWritable status) {
        this.status = status;
    }

    public LongWritable getCreateTime() {
        return createTime;
    }

    public void setCreateTime(LongWritable createTime) {
        this.createTime = createTime;
    }

    public MapWritable getConfigs() {
        return configs;
    }

    public void setConfigs(MapWritable configs) {
        this.configs = configs;
    }
}
在WritableTest.java中添加如下测试函数
     @Test
    public void test_PersonWritable_file() throws IOException {
        PersonWritable person=new PersonWritable();
        person.setUserName(new Text("administrator"));
        person.setAge(new IntWritable(20));
        person.setAccount(new DoubleWritable(100.23));
        person.setStatus(new BooleanWritable(true));
        person.setCreateTime(new LongWritable(new Date().getTime()));
        MapWritable configs=new MapWritable();
        configs.put(new Text("index_style"),new IntWritable(1));
        configs.put(new Text("hompage"),new Text("index.html"));
        person.setConfigs(configs);
        Common.serialize_file(person);
        PersonWritable person2=new PersonWritable();
        Common.deserialize_file(person2);
        System.out.println(person2.toString());
    }
结果我们看到我们成功输出了对象person中的值。
2、简单AVRO实例
修改pom.xml添加以下代码
    <dependency>
        <groupId>org.apache.hadoop</groupId>
        <artifactId>hadoop-common</artifactId>
        <version>2.7.3</version>
    </dependency>
StringPair.avsc内容
{
"type":"record",
"name":"StringPair",
"doc":"A pair of strings.",
"fields":[
    {"name":"left","type":"string"},
    {"name":"right","type":"string"}
]
}
JAVA代码
public void test_1(){
        Schema.Parser parser=new Schema.Parser();
        try {
            File f=new File("D:\\Workspace\\java\\hbase\\src\\main\\resources\\StringPair.avsc");//StringPair.avsc文件的绝对路径
            InputStream in=new FileInputStream(f);
            Schema schema= parser.parse(in);
            GenericRecord datum= new GenericData.Record(schema);
            datum.put("left","L");
            datum.put("right","R");
            ByteArrayOutputStream out = new ByteArrayOutputStream();
            DatumWriter<GenericRecord> writer =
                    new GenericDatumWriter<GenericRecord>(schema);
            Encoder encoder = EncoderFactory.get().binaryEncoder(out, null);
            writer.write(datum, encoder);
            encoder.flush();
            byte[] bytes=out.toByteArray();
            System.out.println(new String(bytes));
            out.close();
        } catch (Exception e) {
            e.printStackTrace();
        }
    }
执行结果
可以看到控台输出 L R
3、avro-rpc-quickstart
本文参考AVRO文档中推荐的 avro-rpc-quickstart,原文网址
https://github.com/phunt/avro-rpc-quickstart
排除其中所有的英文介绍不谈,运行这个实例的方法很简单
安装配置MAVEN
安装配置MAVEN的方法大家可以参考下面网址
http://www.cnblogs.com/quanyongan/archive/2013/04/17/3025971.html(推荐大家使用第二种方法,进行下图中所示的两步就可以,关于ECLIPSE部分可以不操作。)
运行测试代码
按照下图所示下载整个工程的的ZIP压缩文件
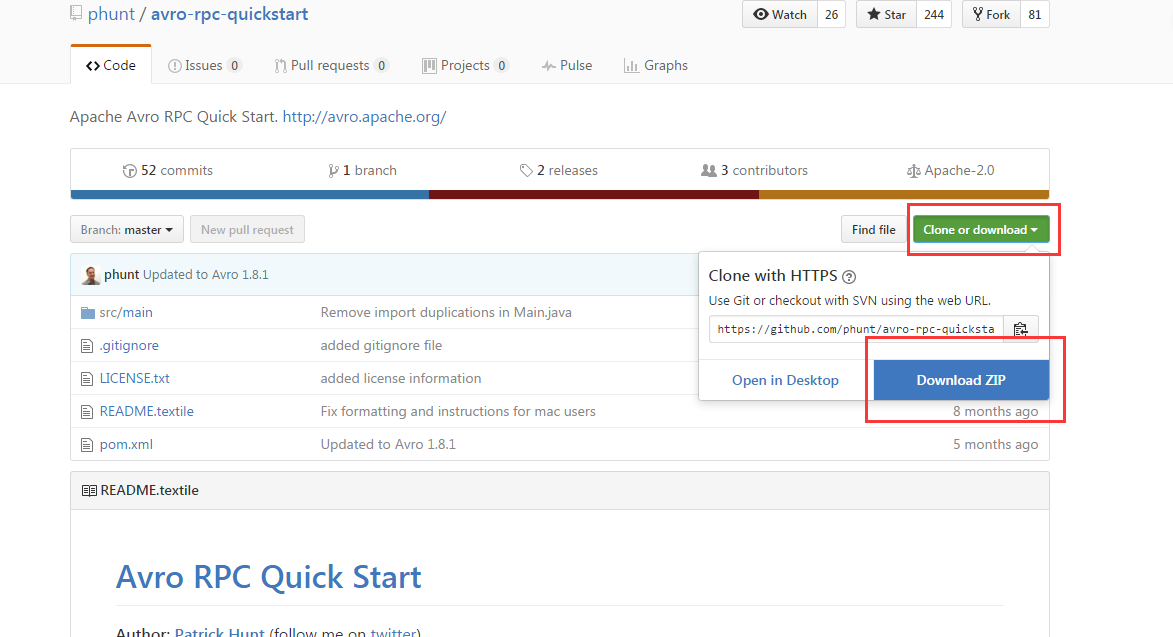
解压上述ZIP文件,打开命令提示符(CMD),切换当前目录至文件解压后的位置。
cd C:\Users\410s\Desktop\avro-rpc-quickstart-master
mvn compile
mvn -e exec:java -Dexec.mainClass=example.Main -Dexec.args="avro_user pat Hello_World"
如果没有出错的话大家应该可以看到下面结果

收集
http://blog.csdn.net/xxd851116/article/details/25197373 解决Maven报Plugin execution not covered by lifecycle configuration


 289
289

 被折叠的 条评论
为什么被折叠?
被折叠的 条评论
为什么被折叠?
 到【灌水乐园】发言


