


1.基础架构
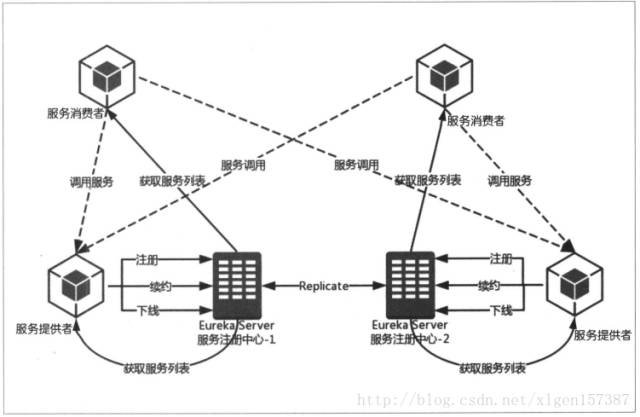
eueka按逻辑上可以划分为3个模块,eureka-server,service-provider,service-consumer
eureka-server:服务端,提供服务注册和发现
eureka-client-service-provider:服务端,服务提供者,通过http rest告知服务端注册,更新,取消服务
eureka-client-service-consumer:客户端,服务消费者,通过http rest从服务端获取需要服务的地址列表,然后配合一些负载均衡策略(ribbon)来调用服务端服务。
值得注意的一点,不同于其他服务注册与发现(zookeeper需要单独以中间件的形式部署集群server),以上3个角色都是逻辑角色,甚至可以在相同的jvm进程上
2.构建服务中心
2.1搭建服务注册中心
①新建Spring Boot工程,在pom.xml 中新增如下依赖
<parent>
     <groupId>org.springframework.boot</groupId>
     <artifactId>spring-boot-starter-parent</artifactId>
     <version>1.5.2.RELEASE</version>
     <relativePath/> <!-- lookup parent from repository -->
  </parent>
<dependencies>
    <dependency>
        <groupId>org.springframework.cloud</groupId>
        <artifactId>spring-cloud-starter-eureka-server</artifactId>
    </dependency>
  </dependencies>
<dependencyManagement>
      <dependencies>
          <dependency>
              <groupId>org.springframework.cloud</groupId>
              <artifactId>spring-cloud-dependencies</artifactId>
              <version>Dalston.RC1</version>
              <type>pom</type>
              <scope>import</scope>
          </dependency>
      </dependencies>
  </dependencyManagement>
②通过@EnableEurekaServer注解启动一个服务注册中心
例如:
@EnableEurekaServer
@SpringBootApplication
public class EurekaServerApplication {

    public static void main(String[] args) {
        SpringApplication.run(EurekaServerApplication.class, args);
    }
}
③添加application.yml配置(属性文件配置也行)
server:
  port: 8761
eureka:
  instance:
    hostname: localhost
  client:
    register-with-eureka: false
    fetch-registry: false
    serviceUrl:
      defaultZone: http://${eureka.instance.hostname}:${server.port}/eureka/
注意:在该默认配置下,注册中心也会将自己作为客户端尝试注册自己,因此要禁用客户端注册行为
eureka.client.register-with-eureka=false
eureka.client.fetch-registry=false
④启动应用,并访问http://localhost:8761/,可以看到如下图所示的Eureka信息面板,其中Instances currently registered with Eureka栏为空,说明该注册中心还没有注册服务。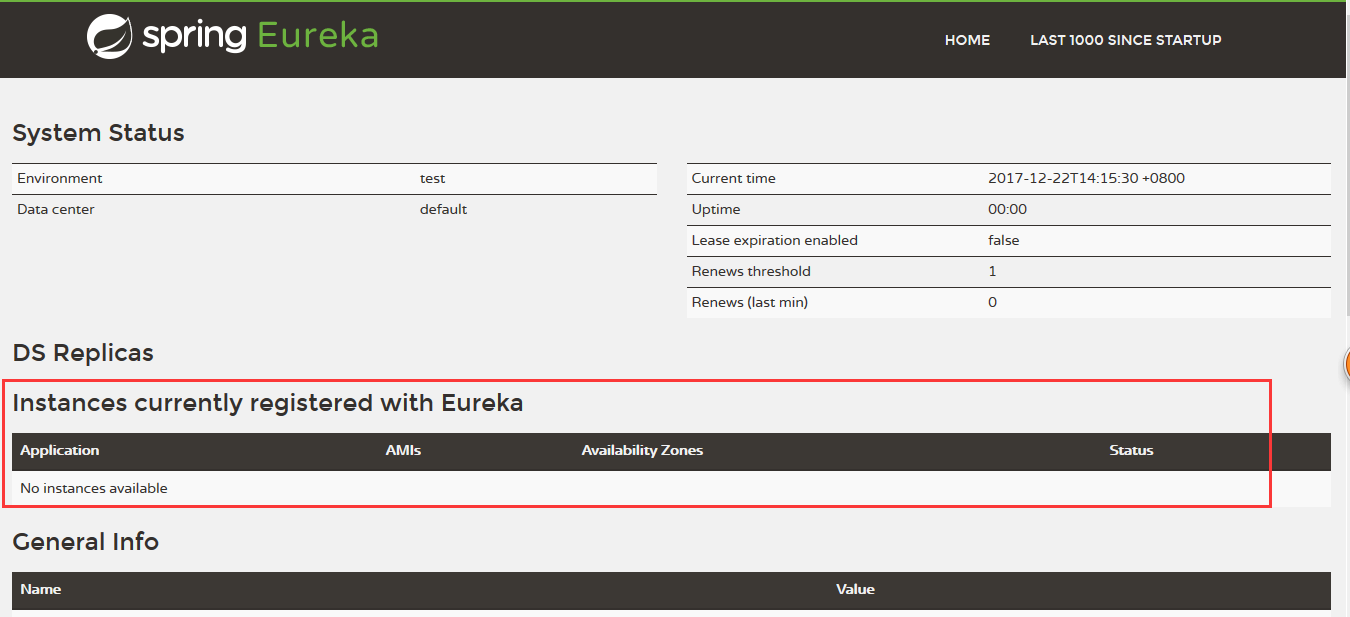
2.2 高可用注册中心(集群)
在Eureka的服务治理设计中,所有的节点既是服务提供方,也是服务消费方,服务注册中心也不例外,Eurekad的高可用实际就是将自己作为服务向其他服务注册中心注册自己,这样形成一组互相注册的服务注册中心,以实现服务清单的互相同步,达到高可用的效果
例如:构建一个双节点的注册中心集群
application1.yml配置如下:
server:
  port: 8761
eureka:
  instance:
    hostname: 10.22.0.130
  client:
    register-with-eureka: false
    fetch-registry: false
    serviceUrl:
      defaultZone: http://10.22.0.131:8762/eureka/
application2.yml配置如下:
server:
  port: 8762
eureka:
  instance:
    hostname: 10.22.0.131
  client:
    register-with-eureka: false
    fetch-registry: false
    serviceUrl:
      defaultZone: http://10.22.0.130:8761/eureka/
依次启动两个进程
在10.22.0.130上:java -jar Eureka-Server-0.0.1-SNAPSHOT.jar
在10.22.0.131上:java -jar Eureka-Server-0.0.1-SNAPSHOT.jar
然后访问http://10.22.0.130:8761/ 可以看到如下图所示: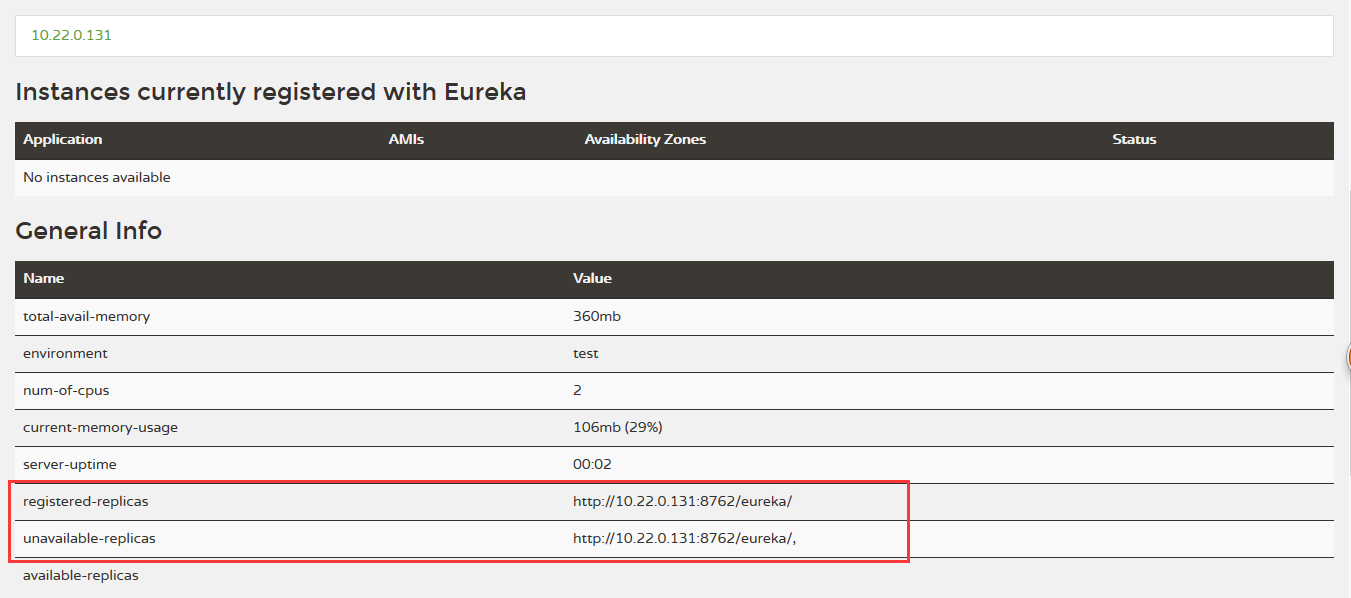
我们可以看到,registered-replicas(可用分片)中已经有10.22.0.131节点的eureka-server了,同样访问http://10.22.0.131:8762/ 中也可以看到registered-replicas中已经有10.22.0.130节点的eureka-server了,至此服务集群搭建完成
注意:在搭建了注册中心集群后,服务提供方也要做一定的配置调整才能将服务注册到Eureka server集群中,修改配置eureka.client.serviceUrl.defaultZone=http://10.22.0.130:8761/eureka,http://10.22.0.131:8762/eureka/
3.服务注册
服务注册中心搭建好了,之后我们需要注册服务到注册中心中,新建一个Spring Boot工程,在pom.xml中添加如下依赖:
<parent>
     <groupId>org.springframework.boot</groupId>
     <artifactId>spring-boot-starter-parent</artifactId>
     <version>1.5.2.RELEASE</version>
     <relativePath/> <!-- lookup parent from repository -->
  </parent>
<dependencies>
    <dependency>
        <groupId>org.springframework.cloud</groupId>
        <artifactId>spring-cloud-starter-eureka</artifactId>
    </dependency>
    <dependency>
        <groupId>org.springframework.boot</groupId>
        <artifactId>spring-boot-starter-web</artifactId>
    </dependency>
  </dependencies>
<dependencyManagement>
      <dependencies>
          <dependency>
              <groupId>org.springframework.cloud</groupId>
              <artifactId>spring-cloud-dependencies</artifactId>
              <version>Dalston.RC1</version>
              <type>pom</type>
              <scope>import</scope>
          </dependency>
      </dependencies>
  </dependencyManagement>
然后新建配置文件application.yml,配置如下:
eureka:
  client:
    serviceUrl:
      defaultZone: http://localhost:8761/eureka
server:
  port: 8763
spring:
  application:
    name: service-hello
新建启动类:HelloApplication.java
@RestController
@EnableEurekaClient
@SpringBootApplication
public class HelloApplication {

    public static void main(String[] args) {
        SpringApplication.run(HelloApplication.class, args);
    }

    @Value("${server.port}")
    String port;

    @RequestMapping("/hi")
    public String sayHi(String name){
        return "hi" + port + ";name"+name;
    }
}
启动注册中心,然后运行该应用,访问注册中心,会看到注册中心中多了个服务实例,如图所示: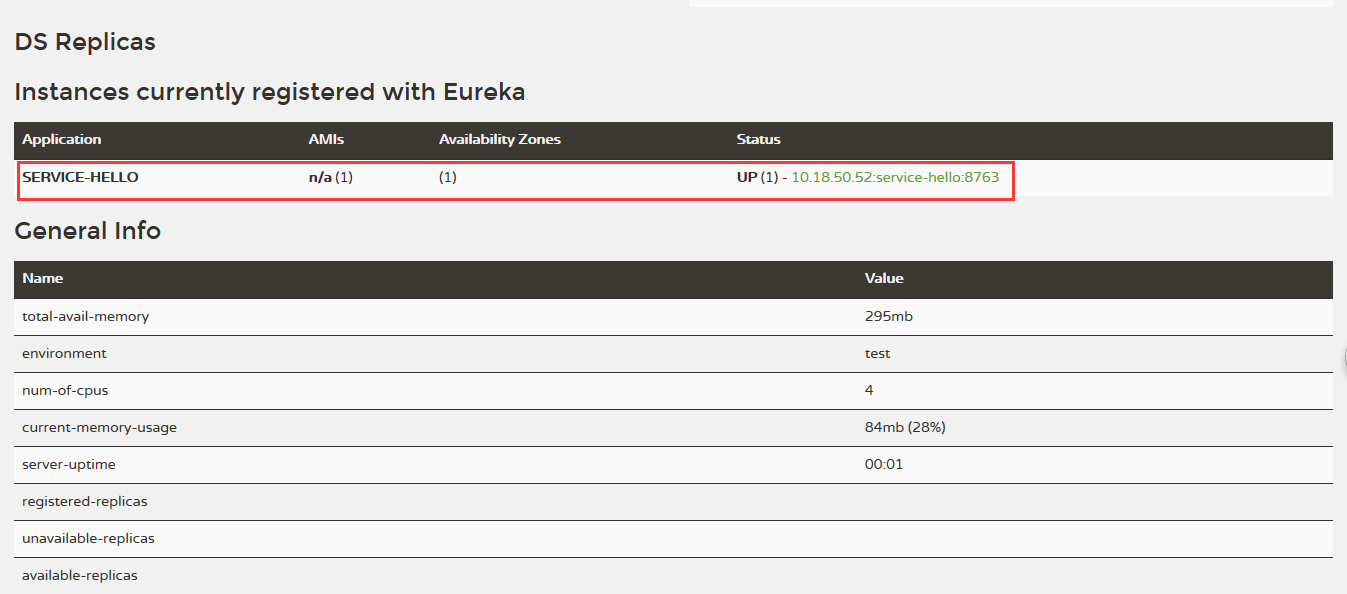
我们还可以直接通过浏览器调用该服务,在浏览器中访问http://localhost:8763/hi?name=123

4.服务发现与消费
服务发现由eureka客户端完成,而服务的消费由ribbon完成。ribbon是客户端的一个负载均衡器,用于对消费的服务实例进行负载均衡。
上面已经介绍了通过浏览器消费服务,现在是通过接口调用的方式消费服务,具体步骤如下:
首先向注册中心注册两个服务,如图所示: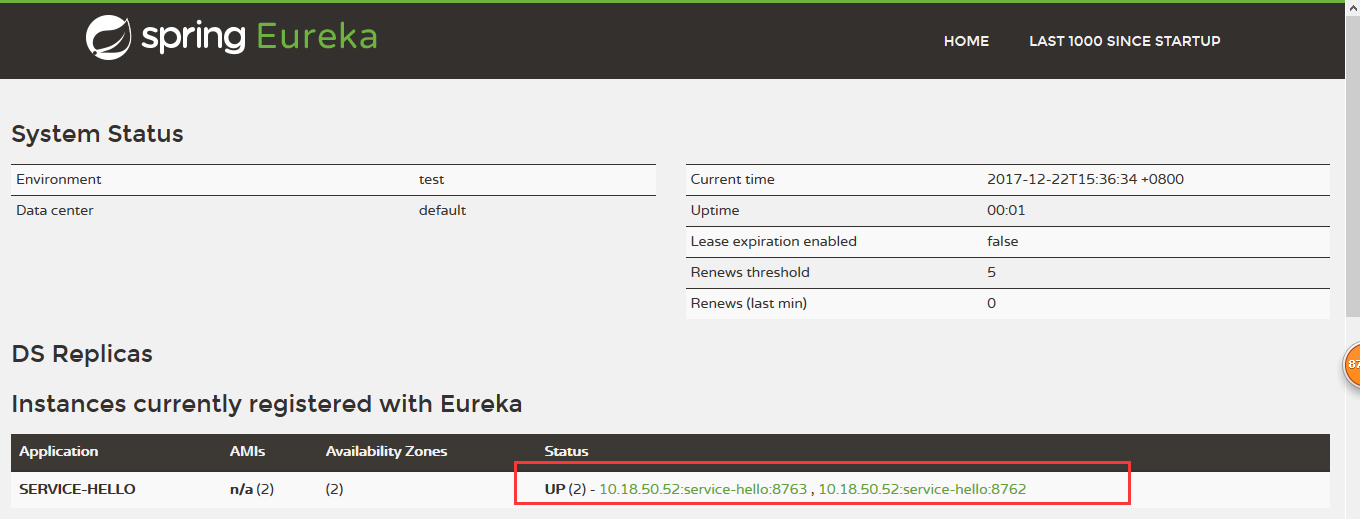
然后再构建一个eureka客户端,消费者两个服务
新建RibbonApplication.java
代码如下:
@EnableDiscoveryClient
@SpringBootApplication
public class RibbonApplication {

    public static void main(String[] args) {
        SpringApplication.run(RibbonApplication.class, args);
    }

    @Bean
    @LoadBalanced
    RestTemplate restTemplate(){
        return new RestTemplate();
    }
}
新建服务接口:HelloService.java
代码如下:
@Service
public class HelloService {

    @Autowired
    RestTemplate restTemplate;

    public String hiService(String name){
        return restTemplate.getForObject("http://SERVICE-HELLO/hi?name=" + name , String.class);
    }
}
新建控制器:HelloControler.java
代码如下:
@RestController
public class HelloControler {

    @Autowired
    HelloService helloService;

    @RequestMapping(value = "/hi")
    public String hi(@RequestParam String name){
        return helloService.hiService(name);
    }
}
新增配置文件:application.yml
eureka:
  client:
    serviceUrl:
      defaultZone: http://localhost:8761/eureka/
server:
  port: 8764
spring:
  application:
    name: service-ribbon
然后访问http://localhost:8764/hi?name=1,会轮询调用两个服务,如下图所示:


 2万+
2万+


 被折叠的 条评论
为什么被折叠?
被折叠的 条评论
为什么被折叠?
 到【灌水乐园】发言


