


转载请标明出处:http://blog.csdn.net/android_ls/article/details/45849447
声明:仿新浪微博项目,所用所有图片资源都来源于官方新浪微博IOS客户端,编写本应用的目的在于学习交流,如涉及侵权请告知,我会及时换掉用到的相关图片。
一、 在Xcode6下添加.pch文件
对于使用惯了之前版本Xcode的朋友来说,在系统提醒之下升级到Xcode 6之后,发现新建项目后Xcode不再帮我们创建.pch文件了。可是我们已经习惯了,把一些在很多地方都用的宏写到.pch文件中,那么没有这个文件该如何添加一个呢?下面先给我们的仿新浪微博项目添加一个.pch文件,具体步骤如下:
1、选中Supporting Files右键New File...,如下图

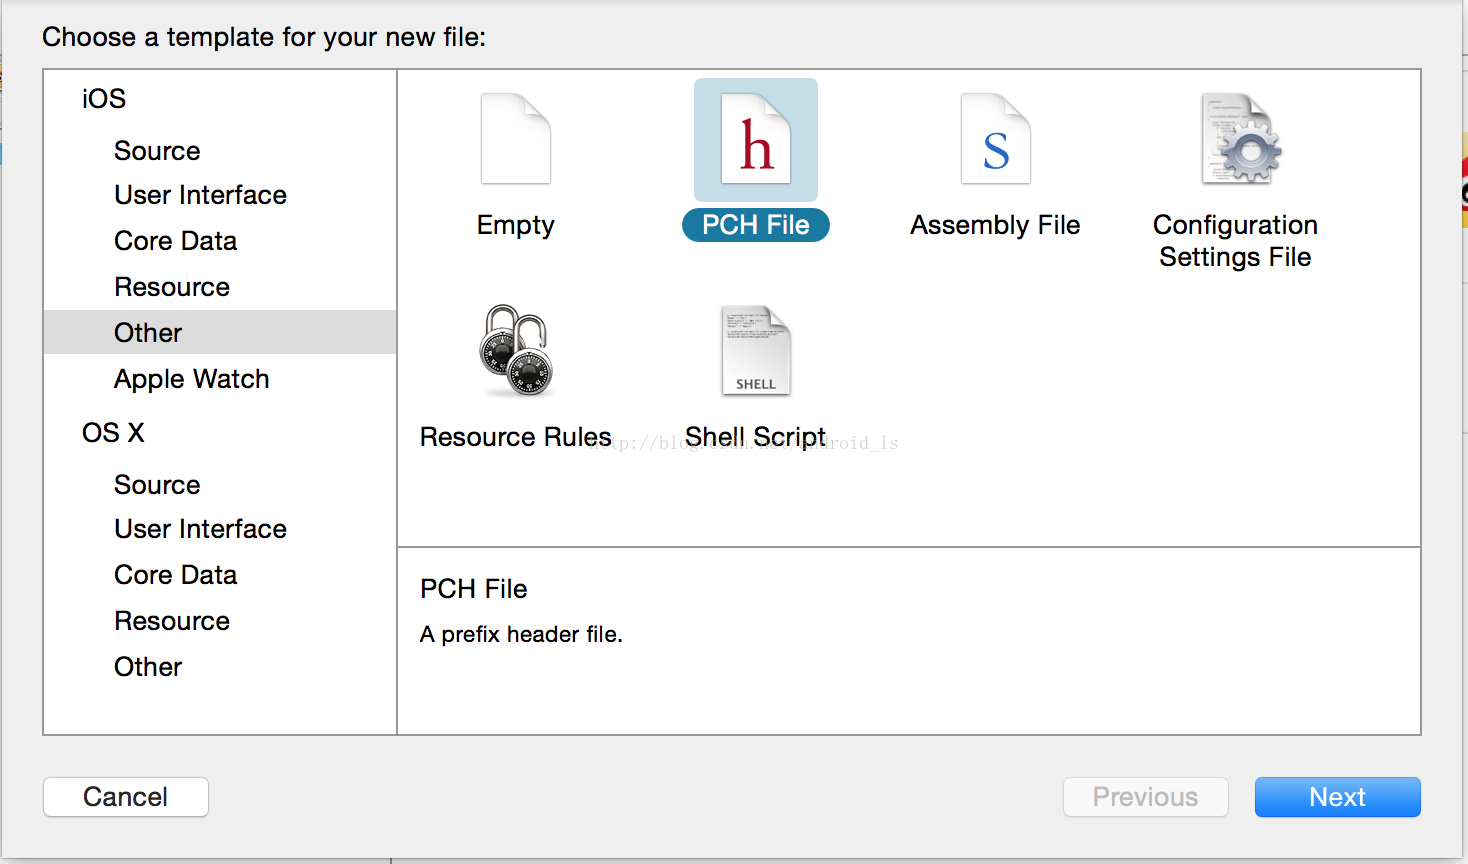
2、接下来选择创建一个PCH文件,如下图:
3、选择Next、Create就创建完毕了。接下来修改配置文件,在搜索框中输入“Prefix Header”,在Prefix Header这一项,填写上一步创建的pch文件的相对路径,修改完后如下图:

二、在上一篇的基础上,设置导航栏外观,具体实现如下:
1、创建WBNavigationController类,让其继承自UINavigationController。用我们自定义的WBNavigationController替换掉上一讲中使用UINavigationController类的地方,具体代码如下:
    // 使用系统默认的UINavigationController
    //[self addChildViewController:[[UINavigationController alloc] initWithRootViewController:childViewController]];

    // 使用我们自定义的导航栏(WBNavigationController继承自UINavigationController)
    WBNavigationController * navigationController = [[WBNavigationController alloc]initWithRootViewController:childViewController];
    [self addChildViewController:navigationController];
2、在WBNavigationController.m文件中添加,设置整个项目中所有UIBarButtonItem的外观样式,具体代码如下:
#pragma mark 在运行时仅被触发一次
#pragma mark 值得注意的是在此之前,父类的方法已经被执行过一次了,所以不需要调用super的该函数。
+ (void)initialize
{
    // 设置整个项目中所有UIBarButtonItem的外观样式
    UIBarButtonItem *item = [UIBarButtonItem appearance];

    // 设置在UIControlStateNormal下,导航栏文字的大小和颜色
    [item setTitleTextAttributes:@{NSForegroundColorAttributeName:kColor(64, 64, 64),
                                   NSFontAttributeName:[UIFont systemFontOfSize:15]}
                                forState:UIControlStateNormal];

    // 设置在UIControlStateHighlighted下,导航栏文字的大小和颜色
    [item setTitleTextAttributes:@{NSForegroundColorAttributeName:kColor(253, 109, 10),
                                   NSFontAttributeName:[UIFont systemFontOfSize:15]}
                                forState:UIControlStateHighlighted];
}
3、拦截所有push进来的控制器,设置除根控制器外的控制器的导航栏外观,具体实现如下:
#pragma mark 重写这个方法目的:能够拦截所有push进来的控制器
#pragma mark viewController这个参数是即将push进来的控制器
- (void)pushViewController:(UIViewController *)viewController animated:(BOOL)animated
{
    if (self.viewControllers.count > 0) {
        // 如果push进来的控制器viewController,不是根控制器

        // 自动显示和隐藏tabbar
        viewController.hidesBottomBarWhenPushed = YES;

        // 设置导航栏上左边的返回按钮
        viewController.navigationItem.leftBarButtonItem = [UIBarButtonItem itemWithTarget:self action:@selector(back)
            image:@"navigationbar_back_withtext"
            highImage:@"navigationbar_back_withtext_highlighted"
            title:self.title];
    }

    [super pushViewController:viewController animated:animated];
}

- (void)back
{
    [self popViewControllerAnimated:YES];
}
4、设置首页导航栏上的按钮,具体实现如下:
//
//  HomeViewController.m
//  SinaWeibo
//
//  Created by android_ls on 15/5/17.
//  Copyright (c) 2015年 android_ls. All rights reserved.
//
//  首页动态列表控制器

#import "HomeViewController.h"
#import "UIBarButtonItem+Category.h"
#import "FriendAttentionStatusViewController.h"

@interface HomeViewController ()

@end

@implementation HomeViewController

- (void)viewDidLoad {
    [super viewDidLoad];

    // 设置导航栏左侧的按钮
    self.navigationItem.leftBarButtonItem = [UIBarButtonItem leftBarButtonItemWithTarget:self
         action:@selector(friendsearch)
         image:@"navigationbar_friendsearch"
         highImage:@"navigationbar_friendsearch_highlighted"];

    // 设置导航栏右侧的弹出下拉菜单按钮
    self.navigationItem.rightBarButtonItem = [UIBarButtonItem rightBarButtonItemWithTarget:self
         action:@selector(pop)
         image:@"navigationbar_pop"
         highImage:@"navigationbar_pop_highlighted"];

}

#pragma mark 打开好友关注动态控制器
-(void)friendsearch
{
    MyLog(@"用户点击了左侧按钮");

    FriendAttentionStatusViewController *friendAttentionStatusVC = [[FriendAttentionStatusViewController alloc]init];
    [self.navigationController pushViewController:friendAttentionStatusVC animated:YES];
}

#pragma mark 弹出下拉菜单
-(void)pop
{
    MyLog(@"用户点击了右侧弹出下拉菜单按钮");

}

@end
5、已实现的效果图如下:

点击首页左侧按钮后:


点击底部ToolBar中的我,效果图如下:

点击导航栏设置按钮后,效果图如下:

三、目前用到的其它文件
1、自定义的UIView的分类,UIView+Category.h代码如下:
//
//  UIView+Category.h
//  SinaWeibo
//
//  Created by android_ls on 15/5/19.
//  Copyright (c) 2015年 android_ls. All rights reserved.
//

#import <UIKit/UIKit.h>

@interface UIView (Category)

@property (nonatomic, assign) CGFloat x;
@property (nonatomic, assign) CGFloat y;

@property (nonatomic, assign) CGFloat width;
@property (nonatomic, assign) CGFloat height;

@property (nonatomic, assign) CGPoint origin;
@property (nonatomic, assign) CGSize size;

@property (nonatomic, assign) CGFloat centerX;
@property (nonatomic, assign) CGFloat centerY;

@end
UIView+Category.m代码如下:
//
//  UIView+Category.m
//  SinaWeibo
//
//  Created by android_ls on 15/5/19.
//  Copyright (c) 2015年 android_ls. All rights reserved.
//

#import "UIView+Category.h"

@implementation UIView (Category)

- (void)setX:(CGFloat)x
{
    CGRect frame = self.frame;
    frame.origin.x = x;
    self.frame = frame;
}

- (CGFloat)x
{
    return self.frame.origin.x;
}

- (void)setY:(CGFloat)y
{
    CGRect frame = self.frame;
    frame.origin.y = y;
    self.frame = frame;
}

- (CGFloat)y
{
    return self.frame.origin.y;
}

- (void)setWidth:(CGFloat)width
{
    CGRect frame = self.frame;
    frame.size.width = width;
    self.frame = frame;
}

- (CGFloat)width
{
    return self.frame.size.width;
}

- (void)setHeight:(CGFloat)height
{
    CGRect frame = self.frame;
    frame.size.height = height;
    self.frame = frame;
}

- (CGFloat)height
{
    return self.frame.size.height;
}

- (void)setOrigin:(CGPoint)origin
{
    CGRect frame = self.frame;
    frame.origin = origin;
    self.frame = frame;
}

- (CGPoint)origin
{
    return self.frame.origin;
}

- (void)setSize:(CGSize)size
{
    CGRect frame = self.frame;
    frame.size = size;
    self.frame = frame;
}

- (CGSize)size
{
    return self.frame.size;
}

- (void)setCenterX:(CGFloat)centerX
{
    CGPoint center = self.center;
    center.x = centerX;
    self.center = center;
}

- (CGFloat)centerX
{
    return self.center.x;
}

- (void)setCenterY:(CGFloat)centerY
{
    CGPoint center = self.center;
    center.y = centerY;
    self.center = center;
}

- (CGFloat)centerY
{
    return self.center.y;
}

@end
2、自定义的 UIBarButtonItem的分类,UIBarButtonItem+Category.h 代码如下:
//
//  UIBarButtonItem+Category.h
//  SinaWeibo
//
//  Created by android_ls on 15/5/19.
//  Copyright (c) 2015年 android_ls. All rights reserved.
//

#import <UIKit/UIKit.h>

@interface UIBarButtonItem (Category)

#pragma mark 设置左侧文字和图片组成的按钮的外观样式
+ (UIBarButtonItem *)itemWithTarget:(id)target action:(SEL)action image:(NSString *)image highImage:(NSString *)highImage title:(NSString *)title;

#pragma mark 设置左侧按钮的外观样式(只有图片)
+ (UIBarButtonItem *)leftBarButtonItemWithTarget:(id)target action:(SEL)action image:(NSString *)image highImage:(NSString *)highImage;

#pragma mark 设置右侧按钮的外观样式(只有图片)
+ (UIBarButtonItem *)rightBarButtonItemWithTarget:(id)target action:(SEL)action image:(NSString *)image highImage:(NSString *)highImage;

@end
UIBarButtonItem+Category.m代码如下:
//
//  UIBarButtonItem+Category.m
//  SinaWeibo
//
//  Created by android_ls on 15/5/19.
//  Copyright (c) 2015年 android_ls. All rights reserved.
//

#import "UIBarButtonItem+Category.h"

@implementation UIBarButtonItem (Category)

#pragma mark 设置左侧文字和图片组成的按钮的外观样式
+ (UIBarButtonItem *)itemWithTarget:(id)target action:(SEL)action image:(NSString *)image highImage:(NSString *)highImage title:(NSString *)title
{
    UIButton *btn = [UIButton buttonWithType:UIButtonTypeCustom];
    [btn addTarget:target action:action forControlEvents:UIControlEventTouchUpInside];
    [btn setContentHorizontalAlignment:UIControlContentHorizontalAlignmentLeft];

    [btn.titleLabel setFont:[UIFont systemFontOfSize:15]];
    [btn setTitle:title?title:@"返回" forState:UIControlStateNormal];
    [btn setTitle:title?title:@"返回" forState:UIControlStateHighlighted];
    [btn setTitleColor:kColor(64, 64, 64) forState:UIControlStateNormal];
    [btn setTitleColor:kColor(253, 109, 10) forState:UIControlStateHighlighted];

    [btn setImage:[UIImage imageNamed:image] forState:UIControlStateNormal];
    [btn setImage:[UIImage imageNamed:highImage] forState:UIControlStateHighlighted];

    // 设置尺寸
    btn.size = CGSizeMake(60, 44);

    // 调整UIBarButtonItem左侧的外边距
    CGFloat left = -8;
    btn.imageEdgeInsets = UIEdgeInsetsMake(0, left, 0, 0);
    btn.titleEdgeInsets = UIEdgeInsetsMake(0, left, 0, 0);

    return [[UIBarButtonItem alloc] initWithCustomView:btn];
}

#pragma mark 设置左侧按钮的外观样式(只有图片)
+ (UIBarButtonItem *)leftBarButtonItemWithTarget:(id)target action:(SEL)action image:(NSString *)image highImage:(NSString *)highImage
{
    UIButton *btn = [UIButton buttonWithType:UIButtonTypeCustom];
    [btn setContentHorizontalAlignment:UIControlContentHorizontalAlignmentLeft];
    [btn addTarget:target action:action forControlEvents:UIControlEventTouchUpInside];

    [btn setImage:[UIImage imageNamed:image] forState:UIControlStateNormal];
    [btn setImage:[UIImage imageNamed:highImage] forState:UIControlStateHighlighted];

    // 设置尺寸
    btn.size = CGSizeMake(60, 44);

    // 调整UIBarButtonItem右侧的外边距
    CGFloat left = -8;
    btn.imageEdgeInsets = UIEdgeInsetsMake(0, left, 0, 0);
    return [[UIBarButtonItem alloc] initWithCustomView:btn];
}

#pragma mark 设置右侧按钮的外观样式(只有图片)
+ (UIBarButtonItem *)rightBarButtonItemWithTarget:(id)target action:(SEL)action image:(NSString *)image highImage:(NSString *)highImage
{
    UIButton *btn = [UIButton buttonWithType:UIButtonTypeCustom];
    [btn setContentHorizontalAlignment:UIControlContentHorizontalAlignmentRight];
    [btn addTarget:target action:action forControlEvents:UIControlEventTouchUpInside];

    [btn setImage:[UIImage imageNamed:image] forState:UIControlStateNormal];
    [btn setImage:[UIImage imageNamed:highImage] forState:UIControlStateHighlighted];

    // 设置尺寸
    btn.size = CGSizeMake(60, 44);

    // 调整UIBarButtonItem右侧的外边距
    CGFloat right = -8;
    btn.imageEdgeInsets = UIEdgeInsetsMake(0, 0, 0, right);
    return [[UIBarButtonItem alloc] initWithCustomView:btn];
}

@end
//
//  info.pch
//  SinaWeibo
//
//  Created by android_ls on 15/5/19.
//  Copyright (c) 2015年 android_ls. All rights reserved.
//

#ifndef SinaWeibo_info_pch
#define SinaWeibo_info_pch

#ifdef __OBJC__
#import <UIKit/UIKit.h>
#import <Foundation/Foundation.h>

#pragma mark 导入UIView的扩展类
#import "UIView+Category.h"

#endif

// 获得RGB颜色
#define kColor(r, g, b) [UIColor colorWithRed:(r)/255.0 green:(g)/255.0 blue:(b)/255.0 alpha:1]

// 日志输出宏定义
#ifdef DEBUG
// 调试状态
#define MyLog(...) NSLog(__VA_ARGS__)
#else
// 发布状态
#define MyLog(...)
#endif

#endif
4、ProfileViewController.m文件的源码如下:
//
//  ProfileViewController.m
//  SinaWeibo
//
//  Created by android_ls on 15/5/17.
//  Copyright (c) 2015年 android_ls. All rights reserved.
//

#import "ProfileViewController.h"
#import "SettingViewController.h"

@interface ProfileViewController ()

@end

@implementation ProfileViewController

- (void)viewDidLoad {
    [super viewDidLoad];

     // 设置导航栏右侧的设置按钮
     UIBarButtonItem * barButtonItem = [[UIBarButtonItem alloc] initWithTitle:@"设置"
                              style:0 target:self action:@selector(setting)];

    [barButtonItem setTitleTextAttributes:@{
                                   NSForegroundColorAttributeName:kColor(253, 109, 10),
                                   NSFontAttributeName:[UIFont systemFontOfSize:15]}
                        forState:UIControlStateNormal];

    self.navigationItem.rightBarButtonItem = barButtonItem;


}

- (void)setting
{
    MyLog(@"用户点击了设置按钮");
    SettingViewController * settingViewController = [[SettingViewController alloc]init];
    [self.navigationController pushViewController:settingViewController animated:YES];
}

@end
时候不早了,今天就先到这里,晚安。
源码下载地址:http://download.csdn.net/detail/android_ls/8718359


 1159
1159


 被折叠的 条评论
为什么被折叠?
被折叠的 条评论
为什么被折叠?
 到【灌水乐园】发言


