


我们通过操作hibernate保存一个数据来体验一下springAOP功能
需求:利用springAOP把一个person对象存放到数据库中.
需求分析:我们要定义一个接口来实现保存person的方法,然后让目标类来操作数据库保存,同时使用切面的通知来开启/提交事务
构建开发环境:
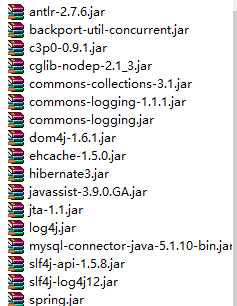
除了这些spring和hibernate的包之外,由于这里需要用到AOP,所以还要导入spring/lib/aspect/下的两个jar包
为了方便,在这里我们把全部类放到同一个包中。
步骤:
*首先创建Person类,代码如下:
public class Person implements Serializable{
    private long pid;
    private String pname;
    private String pdescription;
    //省略getter/setter
}
接下来是该类的映射文件:
<?xml version="1.0" encoding="utf-8"?>
<!DOCTYPE hibernate-mapping PUBLIC "-//Hibernate/Hibernate Mapping DTD 3.0//EN"
"http://hibernate.sourceforge.net/hibernate-mapping-3.0.dtd">
<hibernate-mapping>
    <!--
        把相应的核心类导入
     -->
    <class name="cn.ansel.aopExample.Person">
        <!--
            给其中的属性赋值
         -->
        <id name="pid" length="11">
            <generator class="increment"></generator>
        </id>
        <property name="pname" length="11"></property>
        <property name="pdescription" length="111"></property>
    </class>
</hibernate-mapping>
然后是hibernate的配置文件(记得使用图形化界面把Person.hbm.xml加载到映射文件中,比较方便):
<?xml version='1.0' encoding='utf-8'?>
<!DOCTYPE hibernate-configuration PUBLIC
        "-//Hibernate/Hibernate Configuration DTD 3.0//EN"
        "http://hibernate.sourceforge.net/hibernate-configuration-3.0.dtd">
<hibernate-configuration>
    <!--
        一个session-factory只能连接一个数据库
    -->
<session-factory>
    <!--
        数据库的用户名
    -->
    <property name="connection.username">root</property>
    <!--
        密码
    -->
    <property name="connection.password">root</property>
    <!--
        url
        这里的URL指的是数据库的地址,
        hibernate是不会帮我们创建数据库的,数据库要我们自己创建!
    -->
    <property name="connection.url">
        jdbc:mysql://localhost:3306/hibernate1
    </property>
    <!--
        作用:根据持久化类和映射文件生成表
        validate:只验证
        create-drop:在开启hibernate的时候创建表,在关闭hibernate的时候删除表
        create:每次打开hibernate的时候都创建表
        update:每次打开hibernate的时候先validate如果有修改就update,若没有,就create
        有了这个属性hbm2ddl.auto,可以让类生成表
    -->
    <property name="hbm2ddl.auto">update</property>
    <property name="show_sql">true</property>
    <!--
        如果要使用session.getCurrentSession这个方法的话,就要使用
        current_session_context_class属性,并且设置值为thread表示当前的session存放在
        当前线程中
     -->
    <property name="current_session_context_class">thread</property>
    <!--
        表示domian的映射
     -->
    <mapping resource="cn/ansel/aopExample/Person.hbm.xml" />


</session-factory>
</hibernate-configuration>
首先我们要创建一个工具类来加载hibernate的配置文件。
public class hibernateUtil {
    static SessionFactory sessionFactory;
    static{
        Configuration configuration=new Configuration();
        //加载制定位置及名字的配置文件
        configuration.configure("cn/ansel/aopExample/hibernate.cfg.xml");
        sessionFactory=configuration.buildSessionFactory();
    }
}
接下来的就是personDao:把person保存到数据库中
public interface PersonDao {
    //为了方便,这里只定义了保存方法
    public void savePerson(Person person);
}
dao的实现:
/**
 * 这里除了实现personDao接口,还要继承hibernate的工具类。
 * 因为这里的语句是操作数据库的,并且这里使用的时hibernate框架来保存数据,
 */
public class PersonDaoImpl extends hibernateUtil implements PersonDao {

    @Override
    public void savePerson(Person person) {
        //让hibernate发出sql语句
        sessionFactory.getCurrentSession().save(person);
    }
}
接下来是切面的编写:
//事务
public class MyTransaction extends hibernateUtil{
    private Transaction transaction;
    public void beginTransaction(){
        //调用当前session来开启事务
        transaction=sessionFactory.getCurrentSession().beginTransaction();
    }
    public void commit(){
        transaction.commit();
    }
}
接下来就是spring配置文件,把切面及目标类放到spring容器中,然后配置切面的信息:
<?xml version="1.0" encoding="UTF-8"?>
<beans xmlns="http://www.springframework.org/schema/beans"
xmlns:aop="http://www.springframework.org/schema/aop" xmlns:xsi="http://www.w3.org/2001/XMLSchema-instance"
xsi:schemaLocation="http://www.springframework.org/schema/beans
http://www.springframework.org/schema/beans/spring-beans-2.5.xsd
http://www.springframework.org/schema/aop http://www.springframework.org/schema/aop/spring-aop-2.5.xsd">
<!--
细心的人可以发现,这里的scheme约束又多了几行信息
-->
<!--
把目标类和切面配置到配置文件中
-->
<bean id="personDaoImpl" class="cn.ansel.aopExample.PersonDaoImpl"></bean>
<bean id="myTransaction" class="cn.ansel.aopExample.MyTransaction"></bean>
<!--
aop配置
-->
<aop:config>
<!--
aop:pointcut 指的是切入点判断,我们昨天使用的是在拦截器中使用if方法,具体内容可以看上一篇帖子
但是考虑到如果有很多个dao,那么就要判断很多次,效率会降低
expression 指的是切入点的表达式,该表达式的作用就是调用哪些方法,
一般都使用简写形式,即只需标明 (* *(..)),
第一个*是指返回值类型,第二个是指方法全名
括号中的.. 类似于可变参数的作用,
在这里我们执行的是目标类PersonDaoImpl 的某个方法
id 是指对这个切入点的唯一标识符
-->
<aop:pointcut expression="execution(* cn.ansel.aopExample.PersonDaoImpl.*(..))" id="perform"/>
<!--
aop:aspect 定义切面,因为要把相应的类定义到配置文件中才算是切面
id 该切面的唯一标识符
ref 该切面的引用对象
-->
<aop:aspect id="mytransaction" ref="myTransaction">
<!--
aop:before 指的是在执行目标方法之前执行的方法
pointcut-ref 指的是引用的切入点
method 要引用切入点里面的方法名
-->
<aop:before method="beginTransaction" pointcut-ref="perform"/>
<!--
aop:after-returning 在目标方法执行完之后,调用的方法
method、pointcut-ref与上意义一样
-->
<aop:after-returning method="commit" pointcut-ref="perform"/>
</aop:aspect>
</aop:config>
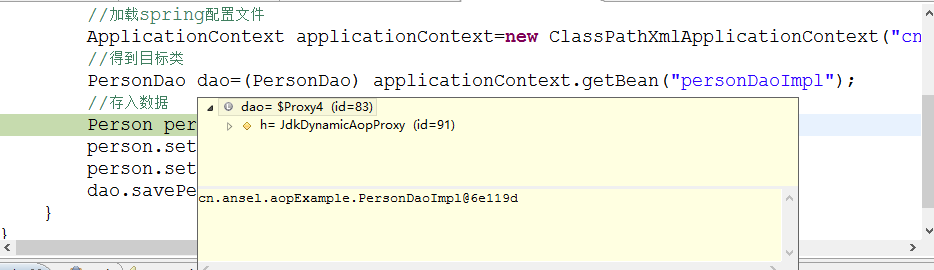
</beans>配置好之后,接下来的就是测试类:
public class testAOP {
    @Test
    public void test(){
        //加载spring配置文件
        ApplicationContext applicationContext=new ClassPathXmlApplicationContext("cn/ansel/aopExample/applicationContext.xml");
        //得到目标类
        PersonDao dao=(PersonDao) applicationContext.getBean("personDaoImpl");
        //存入数据
        Person person=new Person();
        person.setPname("ansel");
        person.setPdescription("fine");
        dao.savePerson(person);
    }
}
运行结果:

数据库:

注意:
在测试类中getBean获取到的目标类,是一个代理对象


 238
238

 被折叠的 条评论
为什么被折叠?
被折叠的 条评论
为什么被折叠?
 到【灌水乐园】发言


