


android4 SystemUI 流程分析
什么是SystemUI?
对于Phone来说SystemUI指的是:StatusBar(状态栏)、NavigationBar(导航栏)。而对于Tablet或者是TV来说SystemUI指的是:CombinedBar(包括了StatusBar和NavigationBar)。
启动后Phone界面上的信号,蓝牙标志,Wifi标志等等这些状态显示标志都会在StatusBar上显示。当我们的设备开机后,首先
需要给用户呈现的就是各种界面同时也包括了我们的SystemUI,因此对于整个Android系统来说,SystemUI都有举足轻重的作用。
现在就从代码开始一步步的分析
1、启动流程
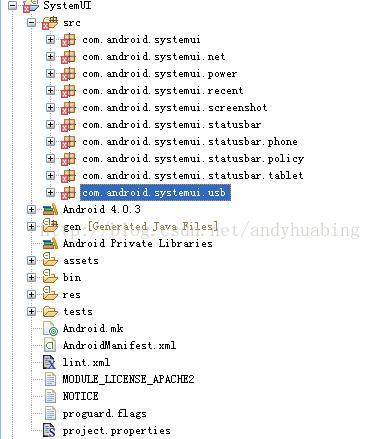
代码路径:fameworks/base/packages/SystemUI
建立工程导入到eclipse中代码具体图示:
先从 AndroidManifest.xml 看看有哪些东东,以前说过android中有四大组件,这里就有如下的三大部分:
系统服务 Service :
SystemUIService
TakeScreenshotService
LoadAverageService
广播接收器 BroadcastReceive:
BootReceiver
Activity 应用:
USB的挺多哟...
UsbStorageActivity
UsbConfirmActivity
UsbPermissionActivity
UsbStorageActivity
UsbAccessoryUriActivity
NetworkOverLimitActivity
<!-- started from ... somewhere -->
Nyandroid
具体定义请看 AndroidManifest.xml 文件,上面只是简单的列一下
先看第一个Activity -- Nyandroid 这里做了什么呢?
就是网上传说中的 好多安卓机器人飞过去。。。。其中代码很简单,简单说一下动画效果的代码:
public class FlyingCat extends ImageView {

	public FlyingCat(Context context, AttributeSet as) {
      super(context, as);
      setImageResource(R.drawable.nyandroid_anim); // @@@

      if (DEBUG) setBackgroundColor(0x80FF0000);
  }
  ...
}
定义在 frameworks\base\packages\SystemUI\res\drawable\nyandroid_anim.xml
<animation-list
        xmlns:android="http://schemas.android.com/apk/res/android"
        android:oneshot="false">
    <item android:drawable="@drawable/nyandroid00" android:duration="80" />
    <item android:drawable="@drawable/nyandroid01" android:duration="80" />
    <item android:drawable="@drawable/nyandroid02" android:duration="80" />
    <item android:drawable="@drawable/nyandroid03" android:duration="80" />
    <item android:drawable="@drawable/nyandroid04" android:duration="80" />
    <item android:drawable="@drawable/nyandroid05" android:duration="80" />
    <item android:drawable="@drawable/nyandroid06" android:duration="80" />
    <item android:drawable="@drawable/nyandroid07" android:duration="80" />
    <item android:drawable="@drawable/nyandroid08" android:duration="80" />
    <item android:drawable="@drawable/nyandroid09" android:duration="80" />
    <item android:drawable="@drawable/nyandroid10" android:duration="80" />
    <item android:drawable="@drawable/nyandroid11" android:duration="80" />
</animation-list>
相关图片在: frameworks\base\packages\SystemUI\res\drawable-nodpi 如图示:
然后再看最重要的服务:SystemUIService
一般来说,Service启动一般由开机广播或者StartService/BindService这几种方式来启动。既然这个Service是一个系统
服务,应该是由系统这边启动,那么看下 SystemServer.java ,果然发现如下启动代码:
startSystemUi(contextF);

static final void startSystemUi(Context context) {
    Intent intent = new Intent();
    intent.setComponent(new ComponentName("com.android.systemui",
                "com.android.systemui.SystemUIService"));
    Slog.d(TAG, "Starting service: " + intent);
    context.startService(intent);
}
对于Android启动流程请看如下系统文章:
http://blog.csdn.net/andyhuabing/article/details/7346203 android启动--深入理解init进程
http://blog.csdn.net/andyhuabing/article/details/7349986 android启动--深入理解zygote
http://blog.csdn.net/andyhuabing/article/details/7351691 android启动--深入理解zygote (II)
http://blog.csdn.net/andyhuabing/article/details/7353910 android启动--深入理解启动HOME
那么就继续跟踪 SystemUIService 中代码:
/**
 * The class names of the stuff to start.
 */
final Object[] SERVICES = new Object[] {
        0, // system bar or status bar, filled in below.
        com.android.systemui.power.PowerUI.class,
};

@Override
public void onCreate() {
    // Pick status bar or system bar.
    IWindowManager wm = IWindowManager.Stub.asInterface(
            ServiceManager.getService(Context.WINDOW_SERVICE));
    try {
        SERVICES[0] = wm.canStatusBarHide()
                ? R.string.config_statusBarComponent
                : R.string.config_systemBarComponent;
    } catch (RemoteException e) {
        Slog.w(TAG, "Failing checking whether status bar can hide", e);
    }

    final int N = SERVICES.length;
    mServices = new SystemUI[N];
    for (int i=0; i<N; i++) {
        Class cl = chooseClass(SERVICES[i]);
        Slog.d(TAG, "loading: " + cl);
        try {
            mServices[i] = (SystemUI)cl.newInstance();
        } catch (IllegalAccessException ex) {
            throw new RuntimeException(ex);
        } catch (InstantiationException ex) {
            throw new RuntimeException(ex);
        }
        mServices[i].mContext = this;
        Slog.d(TAG, "running: " + mServices[i]);
        mServices[i].start();
    }
}
在这代码中:
SERVICES[0] = wm.canStatusBarHide()
        ? R.string.config_statusBarComponent
        : R.string.config_systemBarComponent;
通过AIDL获取WindowManager对象并调用 wm.canStatusBarHide() 这个代码在哪里呢?
查看: frameworks/base/policy/src/com/android/internal/policy/impl/PhoneWindowManager.java
    public boolean canStatusBarHide() {
        return mStatusBarCanHide;
    }

    public void setInitialDisplaySize(int width, int height) {
    ...
	    // Determine whether the status bar can hide based on the size
	    // of the screen.  We assume sizes > 600dp are tablets where we
	    // will use the system bar.
	    int shortSizeDp = shortSize
	            * DisplayMetrics.DENSITY_DEFAULT
	            / DisplayMetrics.DENSITY_DEVICE;
	    mStatusBarCanHide = shortSizeDp < 600;

		}
从以上代码来看,shortSizeDp小于600dp时,则系统会认为该设备是Phone反之则认为是Tablet。
根据mStatusBarCanHide的值,设定StatusBar或者SystemBar(CombinedBar)的高度,以及是否显示NavigationBar。
2、StatusBar(状态栏)及NavigationBar(导航栏)
如果是 StatusBar 则 SERVICES[0] 存放 com.android.systemui.statusbar.phone.PhoneStatusBar 否则存放
com.android.systemui.statusbar.tablet.TabletStatusBar
SERVICES[1] 存放 com.android.systemui.power.PowerUI.class
从我的机器上打印来看,
E/SystemServer( 1299): Starting service: Intent { cmp=com.android.systemui/.SystemUIService }
D/SystemUIService( 1382): running: com.android.systemui.statusbar.tablet.TabletStatusBar@415b8b20
D/SystemUIService( 1382): running: com.android.systemui.power.PowerUI@416b5ae8
I/PowerUI ( 1382): start
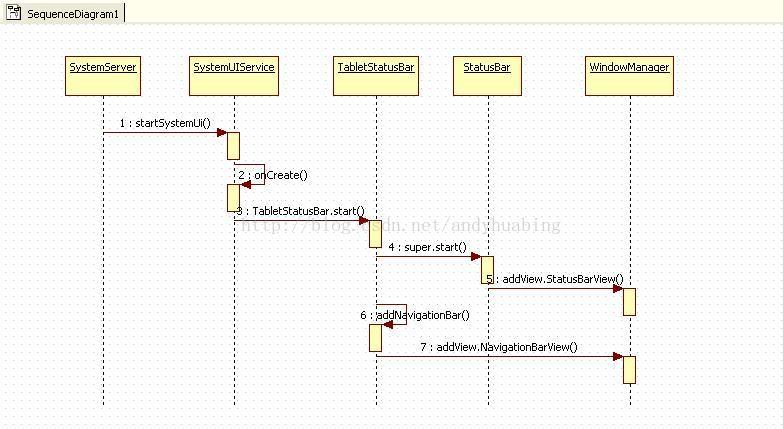
然后调用 mServices[i].start();那么就分析 TabletStatusBar 中的start方法吧
    @Override
    public void start() {
        super.start(); // will add the main bar view
    }
调用到 frameworks/base/packages/SystemUI/src/com/android/systemui/statusbar/StatusBar.java
public void start() {
        // First set up our views and stuff.
        View sb = makeStatusBarView();

        // Connect in to the status bar manager service
        StatusBarIconList iconList = new StatusBarIconList();
        ArrayList<IBinder> notificationKeys = new ArrayList<IBinder>();
        ArrayList<StatusBarNotification> notifications = new ArrayList<StatusBarNotification>();
        mCommandQueue = new CommandQueue(this, iconList);
        mBarService = IStatusBarService.Stub.asInterface(
                ServiceManager.getService(Context.STATUS_BAR_SERVICE));
        int[] switches = new int[7];
        ArrayList<IBinder> binders = new ArrayList<IBinder>();
        try {
            mBarService.registerStatusBar(mCommandQueue, iconList, notificationKeys, notifications,
                    switches, binders);
        } catch (RemoteException ex) {
            // If the system process isn't there we're doomed anyway.
        }

        disable(switches[0]);
        setSystemUiVisibility(switches[1]);
        topAppWindowChanged(switches[2] != 0);
        // StatusBarManagerService has a back up of IME token and it's restored here.
        setImeWindowStatus(binders.get(0), switches[3], switches[4]);
        setHardKeyboardStatus(switches[5] != 0, switches[6] != 0);

        // Set up the initial icon state
        int N = iconList.size();
        int viewIndex = 0;
        for (int i=0; i<N; i++) {
            StatusBarIcon icon = iconList.getIcon(i);
            if (icon != null) {
                addIcon(iconList.getSlot(i), i, viewIndex, icon);
                viewIndex++;
            }
        }

        // Set up the initial notification state
        N = notificationKeys.size();
        if (N == notifications.size()) {
            for (int i=0; i<N; i++) {
                addNotification(notificationKeys.get(i), notifications.get(i));
            }
        } else {
            Log.wtf(TAG, "Notification list length mismatch: keys=" + N
                    + " notifications=" + notifications.size());
        }

        // Put up the view
        final int height = getStatusBarHeight();

        final WindowManager.LayoutParams lp = new WindowManager.LayoutParams(
                ViewGroup.LayoutParams.MATCH_PARENT,
                height,
                WindowManager.LayoutParams.TYPE_STATUS_BAR,
                WindowManager.LayoutParams.FLAG_NOT_FOCUSABLE
                    | WindowManager.LayoutParams.FLAG_TOUCHABLE_WHEN_WAKING
                    | WindowManager.LayoutParams.FLAG_SPLIT_TOUCH,
                PixelFormat.OPAQUE);

        // the status bar should be in an overlay if possible
        final Display defaultDisplay
            = ((WindowManager)mContext.getSystemService(Context.WINDOW_SERVICE))
                .getDefaultDisplay();
        if (ActivityManager.isHighEndGfx(defaultDisplay)) {
            lp.flags |= WindowManager.LayoutParams.FLAG_HARDWARE_ACCELERATED;
        }

        lp.gravity = getStatusBarGravity();
        lp.setTitle("StatusBar");
        lp.packageName = mContext.getPackageName();
        lp.windowAnimations = R.style.Animation_StatusBar;
        WindowManagerImpl.getDefault().addView(sb, lp);

        if (SPEW) {
            Slog.d(TAG, "Added status bar view: gravity=0x" + Integer.toHexString(lp.gravity)
                   + " icons=" + iconList.size()
                   + " disabled=0x" + Integer.toHexString(switches[0])
                   + " lights=" + switches[1]
                   + " menu=" + switches[2]
                   + " imeButton=" + switches[3]
                   );
        }

        mDoNotDisturb = new DoNotDisturb(mContext);
    }
在这里,完成了SystemUI的整个初始化以及设置过程,并最终呈现到界面上。
启动过程中完成如下操作:
1、获取icon list,addIcon(iconList.getSlot(i), i, viewIndex, icon);
2、获取notification,addNotification(notificationKeys.get(i), notifications.get(i));
3、显示StatusBar,WindowManagerImpl.getDefault().addView(sb, lp);
显示NavigationBar,WindowManagerImpl.getDefault().addView(
mNavigationBarView, getNavigationBarLayoutParams());
时序图如下:
3、最近任务缩略图显示
长按home键,列出最近启动过的任务缩略图,重要的两个类
// Recent apps
private RecentsPanelView mRecentsPanel;
private RecentTasksLoader mRecentTasksLoader;
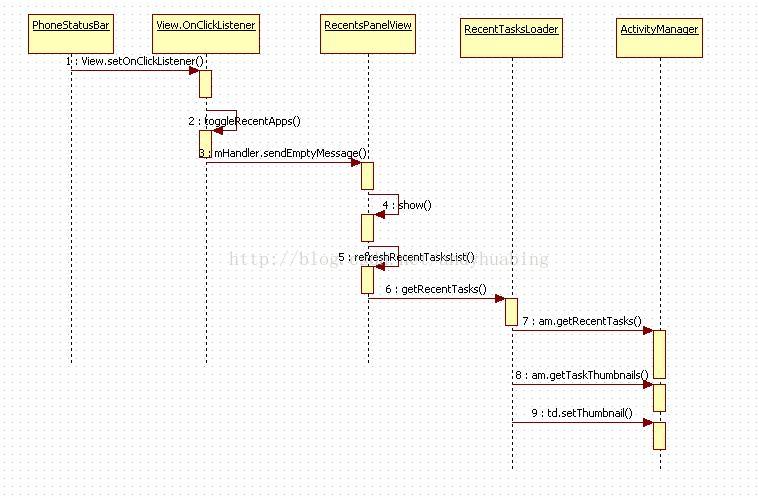
SystemUI 获取按键事件,获取缩略图并将其显示出来,最后响应view上按键响应相应事件:
对于我们来说,关注点主要有如下几个:
1、缩略图如何获取
RecentsPanelView.java 中
refreshRecentTasksList(recentTaskDescriptions);
-->
mRecentTaskDescriptions = mRecentTasksLoader.getRecentTasks();
-->
RecentTasksLoader.java 中

		// return a snapshot of the current list of recent apps
    ArrayList<TaskDescription> getRecentTasks() {
        cancelLoadingThumbnails();

        ArrayList<TaskDescription> tasks = new ArrayList<TaskDescription>();
        final PackageManager pm = mContext.getPackageManager();
        final ActivityManager am = (ActivityManager)
                mContext.getSystemService(Context.ACTIVITY_SERVICE);

        final List<ActivityManager.RecentTaskInfo> recentTasks =
                am.getRecentTasks(MAX_TASKS, ActivityManager.RECENT_IGNORE_UNAVAILABLE);

        ActivityInfo homeInfo = new Intent(Intent.ACTION_MAIN).addCategory(Intent.CATEGORY_HOME)
                    .resolveActivityInfo(pm, 0);

        HashSet<Integer> recentTasksToKeepInCache = new HashSet<Integer>();
        int numTasks = recentTasks.size();

        // skip the first task - assume it's either the home screen or the current activity.
        final int first = 1;
        recentTasksToKeepInCache.add(recentTasks.get(0).persistentId);
        for (int i = first, index = 0; i < numTasks && (index < MAX_TASKS); ++i) {
            final ActivityManager.RecentTaskInfo recentInfo = recentTasks.get(i);

            TaskDescription item = createTaskDescription(recentInfo.id,
                    recentInfo.persistentId, recentInfo.baseIntent,
                    recentInfo.origActivity, recentInfo.description, homeInfo);

            if (item != null) {
                tasks.add(item);
                ++index;
            }
        }

        // when we're not using the TaskDescription cache, we load the thumbnails in the
        // background
        loadThumbnailsInBackground(new ArrayList<TaskDescription>(tasks));
        return tasks;
    }
这里利用 ActivityManager 中的方法:getRecentTasks 获取当前任务的列表,然后再利用 getTaskThumbnails 获取
按键View 就是几个按键相应的View
    public View getRecentsButton() {
        return mCurrentView.findViewById(R.id.recent_apps);
    }

    public View getMenuButton() {
        return mCurrentView.findViewById(R.id.menu);
    }

    public View getBackButton() {
        return mCurrentView.findViewById(R.id.back);
    }

    public View getHomeButton() {
        return mCurrentView.findViewById(R.id.home);
    }
相应的应用缩略图,调用序列图如下:
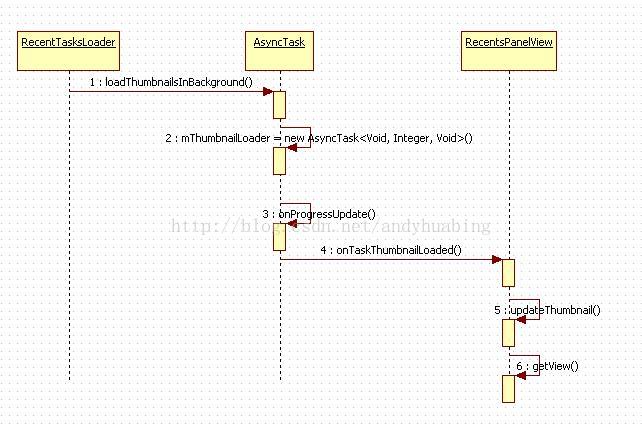
2、显示缩略图
public void show(boolean show, boolean animate,
ArrayList<TaskDescription> recentTaskDescriptions) {
if (show) {
// Need to update list of recent apps before we set visibility so this view's
// content description is updated before it gets focus for TalkBack mode
refreshRecentTasksList(recentTaskDescriptions);
// if there are no apps, either bring up a "No recent apps" message, or just
// quit early
boolean noApps = (mRecentTaskDescriptions.size() == 0);
if (mRecentsNoApps != null) { // doesn't exist on large devices
mRecentsNoApps.setVisibility(noApps ? View.VISIBLE : View.INVISIBLE);
} else {
if (noApps) {
if (DEBUG) Log.v(TAG, "Nothing to show");
return;
}
}
}else {
mRecentTasksLoader.cancelLoadingThumbnails();
mRecentTasksDirty = true;
}
...
}
如果 mRecentsNoApps 为空则表示没有任务,显示 "No recent apps" 否则显示应用列表
否则则显示任务的缩略图。时序图如下:
3、点击某个缩略图执行
这里分为点击某个缩略图执行程序及长按缩略图执行程序
这里直接继承了 View.OnItemClickListener 所以可以直接执行子项按键事件
public class RecentsPanelView extends RelativeLayout implements OnItemClickListener, RecentsCallback,
        StatusBarPanel, Animator.AnimatorListener, View.OnTouchListener
处理点击事件方法:
		public void onItemClick(AdapterView<?> parent, View view, int position, long id) {
		    handleOnClick(view);
		}

    public void handleOnClick(View view) {
        TaskDescription ad = ((ViewHolder) view.getTag()).taskDescription;
        final Context context = view.getContext();
        final ActivityManager am = (ActivityManager)
                context.getSystemService(Context.ACTIVITY_SERVICE);
        if (ad.taskId >= 0) {
            // This is an active task; it should just go to the foreground.
            am.moveTaskToFront(ad.taskId, ActivityManager.MOVE_TASK_WITH_HOME);
        } else {
            Intent intent = ad.intent;
            intent.addFlags(Intent.FLAG_ACTIVITY_LAUNCHED_FROM_HISTORY
                    | Intent.FLAG_ACTIVITY_TASK_ON_HOME
                    | Intent.FLAG_ACTIVITY_NEW_TASK);
            if (DEBUG) Log.v(TAG, "Starting activity " + intent);
            context.startActivity(intent);
        }
        hide(true);
    }
注意代码:context.startActivity(intent); 这里就是执行对应的 Activity
处理长按键点击事件方法:
		public void handleLongPress(
            final View selectedView, final View anchorView, final View thumbnailView) {
        thumbnailView.setSelected(true);
        PopupMenu popup = new PopupMenu(mContext, anchorView == null ? selectedView : anchorView);
        popup.getMenuInflater().inflate(R.menu.recent_popup_menu, popup.getMenu());
        popup.setOnMenuItemClickListener(new PopupMenu.OnMenuItemClickListener() {
            public boolean onMenuItemClick(MenuItem item) {
                if (item.getItemId() == R.id.recent_remove_item) {
                    mRecentsContainer.removeViewInLayout(selectedView);
                } else if (item.getItemId() == R.id.recent_inspect_item) {
                    ViewHolder viewHolder = (ViewHolder) selectedView.getTag();
                    if (viewHolder != null) {
                        final TaskDescription ad = viewHolder.taskDescription;
                        startApplicationDetailsActivity(ad.packageName);
                        mBar.animateCollapse();
                    } else {
                        throw new IllegalStateException("Oops, no tag on view " + selectedView);
                    }
                } else {
                    return false;
                }
                return true;
            }
        });
        popup.setOnDismissListener(new PopupMenu.OnDismissListener() {
            public void onDismiss(PopupMenu menu) {
                thumbnailView.setSelected(false);
            }
        });
        popup.show();
    }
这里弹出一个PopupMenu,分别是 A:"Remove from list" 及 B:"App Info"
其中A项表示将此任务移除出列表,执行 mRecentsContainer.removeViewInLayout(selectedView);
另外B是启动另外一个Acitivty列出应用信息:
    private void startApplicationDetailsActivity(String packageName) {
        Intent intent = new Intent(Settings.ACTION_APPLICATION_DETAILS_SETTINGS,
                Uri.fromParts("package", packageName, null));
        intent.setFlags(Intent.FLAG_ACTIVITY_NEW_TASK);
        getContext().startActivity(intent);
    }
总结:
这里详细的对SystemUI 的两个最重要的 StatusBar NavigationBar(SystemUIService) 及缩略图代码流程分析。
因此各家厂商根据自家的需求,需要定制SystemUI或者美化SystemUI,不同的平台也会有不同的修改,但大体框架是没有变的,
无非是在原有基础上的修修改改或者增加一些自己的类等等。


 1575
1575

 被折叠的 条评论
为什么被折叠?
被折叠的 条评论
为什么被折叠?
 到【灌水乐园】发言


