


Android LayoutInflater - Dynamically Add and Remove Views using Java code
How to manipulate Android screen using predefined XML layouts? This can be done with the help of LayoutInflater. This class is used to instantiate layout XML file into its corresponding View objects. It is never to be used directly -- use getLayoutInflater() or getSystemService(String) to retrieve a standard LayoutInflater instance that is already hooked up to the current context and correctly configured for the device you are running on. For example:
LayoutInflater inflater = (LayoutInflater)context.getSystemService (Context.LAYOUT_INFLATER_SERVICE);
Click here if you are interested in generating layout views such as Button, TextView, EditText, RadioButton, CheckBox, ToggleButton, etc. programmatically in Java code.
Source for main.xml
?
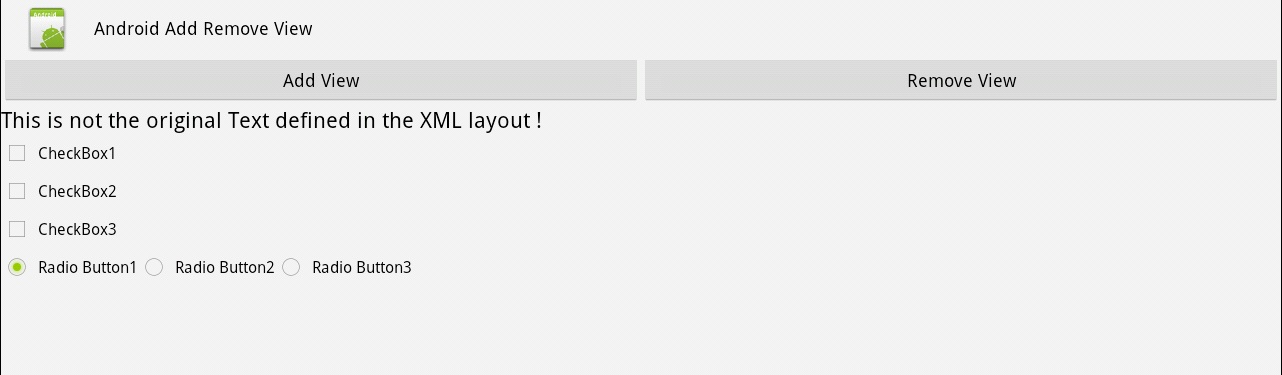
| 1 2 3 4 5 6 7 8 9 10 11 12 13 14 15 16 17 18 19 | <?xml version="1.0" encoding="utf-8"?> <LinearLayout xmlns:android="http://schemas.android.com/apk/res/android" android:orientation="vertical" android:layout_width="fill_parent" android:layout_height="fill_parent"> <LinearLayout android:id="@+id/linearLayout1" android:layout_height="wrap_content" android:orientation="horizontal" android:layout_width="match_parent"> <Button android:text="Add View" android:layout_height="wrap_content" android:id="@+id/add" android:layout_width="0dp" android:layout_weight=".5" /> <Button android:text="Remove View" android:layout_height="wrap_content" android:id="@+id/remove" android:layout_width="0dp" android:layout_weight=".5" /> </LinearLayout> <LinearLayout android:id="@+id/linearLayout2" android:layout_height="wrap_content" android:layout_width="match_parent" android:orientation="vertical"> </LinearLayout> </LinearLayout> |
Source for hidden.xml
?
| 1 2 3 4 5 6 7 8 9 10 11 12 13 14 15 16 17 18 19 20 21 22 23 24 25 26 27 28 | <?xml version="1.0" encoding="utf-8"?> <LinearLayout xmlns:android="http://schemas.android.com/apk/res/android" android:orientation="vertical" android:layout_width="match_parent" android:layout_height="match_parent" android:id="@+id/hiddenLayout"> <TextView android:textAppearance="?android:attr/textAppearanceLarge" android:text="This is a Text View" android:layout_height="wrap_content" android:id="@+id/textView1" android:layout_width="wrap_content" /> <CheckBox android:text="CheckBox1" android:id="@+id/checkBox1" android:layout_width="wrap_content" android:layout_height="wrap_content" /> <CheckBox android:text="CheckBox2" android:id="@+id/checkBox2" android:layout_width="wrap_content" android:layout_height="wrap_content" /> <CheckBox android:text="CheckBox3" android:id="@+id/checkBox3" android:layout_width="wrap_content" android:layout_height="wrap_content" /> <RadioGroup android:id="@+id/radioGroup1" android:layout_height="wrap_content" android:layout_width="wrap_content" android:orientation="horizontal"> <RadioButton android:text="Radio Button1" android:layout_width="wrap_content" android:id="@+id/radio0" android:layout_height="wrap_content" android:checked="true" /> <RadioButton android:text="Radio Button2" android:layout_width="wrap_content" android:id="@+id/radio1" android:layout_height="wrap_content" /> <RadioButton android:text="Radio Button3" android:layout_width="wrap_content" android:id="@+id/radio2" android:layout_height="wrap_content" /> </RadioGroup>
</LinearLayout> |
Source for DynamicViews.java
?
| 1 2 3 4 5 6 7 8 9 10 11 12 13 14 15 16 17 18 19 20 21 22 23 24 25 26 27 28 29 30 31 32 33 34 35 36 37 38 39 40 41 42 43 44 45 46 47 48 49 50 51 52 53 54 55 56 | package com.as400samplecode;
import android.app.Activity; import android.os.Bundle; import android.view.View; import android.view.View.OnClickListener; import android.view.ViewGroup; import android.widget.LinearLayout; import android.widget.TextView;
public class DynamicViews extends Activity implements OnClickListener{
@Override public void onCreate(Bundle savedInstanceState) { super.onCreate(savedInstanceState); setContentView(R.layout.main);
View buttonAdd = findViewById(R.id.add); buttonAdd.setOnClickListener(this);
View buttonRemove = findViewById(R.id.remove); buttonRemove.setOnClickListener(this); }
public void onClick(View v) { switch (v.getId()) {
case R.id.add: //Check if the Layout already exists LinearLayout hiddenLayout = (LinearLayout)findViewById(R.id.hiddenLayout); if(hiddenLayout == null){ //Inflate the Hidden Layout Information View LinearLayout myLayout = (LinearLayout)findViewById(R.id.linearLayout2); View hiddenInfo = getLayoutInflater().inflate(R.layout.hidden, myLayout, false); myLayout.addView(hiddenInfo); }
//Get References to the TextView TextView myTextView = (TextView) findViewById(R.id.textView1); // Update the TextView Text myTextView.setText("This is not the original Text defined in the XML layout !"); break;
case R.id.remove: View myView = findViewById(R.id.hiddenLayout); ViewGroup parent = (ViewGroup) myView.getParent(); parent.removeView(myView);
break; // More buttons go here (if any) ...
} }
} |
Source for AndroidManifest.xml
?
| 1 2 3 4 5 6 7 8 9 10 11 12 13 14 15 16 17 18 19 | <?xml version="1.0" encoding="utf-8"?> <manifest xmlns:android="http://schemas.android.com/apk/res/android" package="com.as400samplecode" android:versionCode="1" android:versionName="1.0"> <uses-sdk android:minSdkVersion="13" />
<application android:icon="@drawable/icon" android:label="@string/app_name" android:theme="@android:style/Theme.Holo.Light"> <activity android:name=".DynamicViews" android:label="@string/app_name"> <intent-filter> <action android:name="android.intent.action.MAIN" /> <category android:name="android.intent.category.LAUNCHER" /> </intent-filter> </activity>
</application> </manifest> |

Refer to: http://www.mysamplecode.com/2011/10/android-dynamic-layout-using-xml-add.html


 被折叠的 条评论
为什么被折叠?
被折叠的 条评论
为什么被折叠?
 到【灌水乐园】发言


