


目录
5.1.2 row_number()、rank() 、dense_rank()的区别
1.Hive入门
Hive:由Facebook开源用于解决海量结构化日志的数据统计。
Hive是基于Hadoop的一个数据仓库工具,可以将结构化的数据文件映射为一张表,并提供类SQL查询功能。只能用来分析Hadoop中的结构化数据
本质是:将HQL转化成MapReduce程序
1)Hive处理的数据存储在HDFS
2)Hive分析数据底层的实现是MapReduce
3)执行程序运行在Yarn上
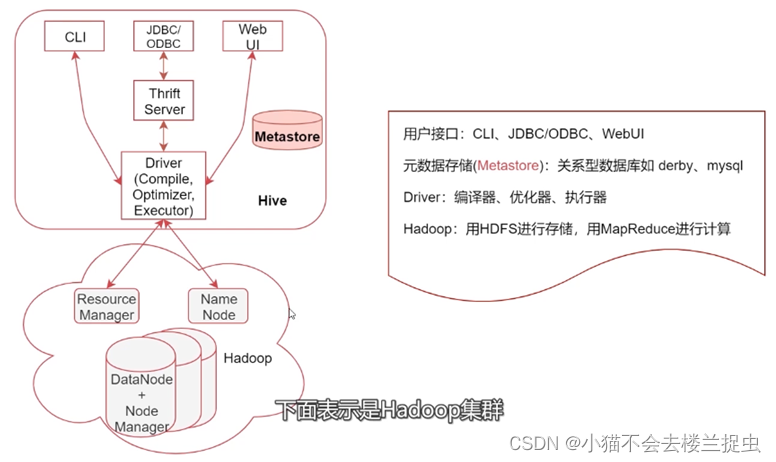
1.1 什么是Hive
- Hive是建立在Hadoop上的数据仓库基础架构,它提供一系列的工具,可以进行数据提取、转化、加载(ETL)
- Hive定义了简单的类SQL查询语言,成为HQL,它允许熟悉SQL的用户直接查询Hadoop中的数据
- Hive包含SQL解析引擎,它会将SQL语句转译成MR Job,然后再hadoop中执行
1.2 Hive的数据存储
- Hive的数据存储基础Hadoop的HDFS
- Hive没有专门的数据存储格式,默认可以直接加载本地文件TextFile, 还支持SequenceFile, RCFile等。
1.3 Hive的系统架构
1. Hive2.x 开始官方不建议使用MapReduce引擎了,建议使用Tez或Spark引擎
2. 大数据计算引擎:
1)MapReduce
2)Tez(没有被广泛使用,通常和Hive一起使用)
3)Spark
4)Flink (在实时计算领域优于SPARK, 也支持在yarn上执行)
3. select * from table 不会产生MapReduce任务
1.4 Metastore
- MetaStore是Hive元数据的集中存放地
- 元数据包括表的名字,表的列和分区及其属性,表的数据所在的目录等。
- metastore默认使用内嵌的Derby数据库作为存储引擎,推荐使用MySQL数据库作为外置存储引擎
1.5 数据库与数据仓库的区别
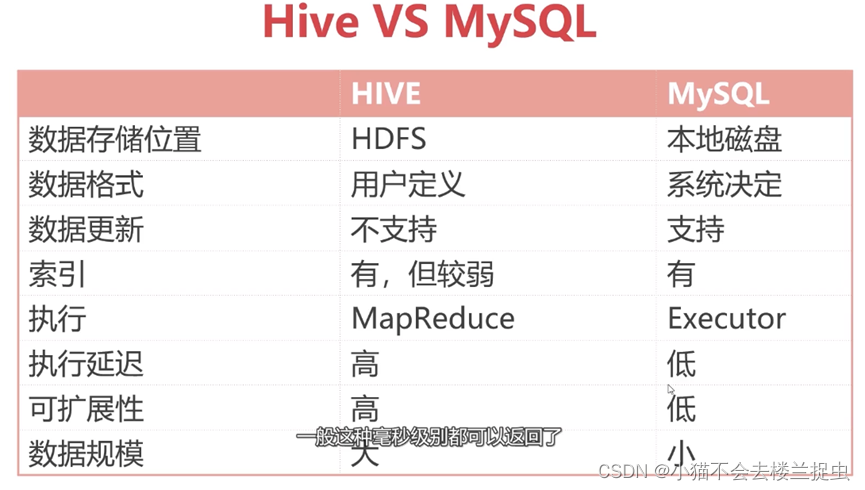
Hive不支持修改和删除,侧重查询分析
- 数据库: 传统的关系型数据库主要应用在基本的事务处理,例如银行交易;支持增删改查
- 数据仓库:主要做一些复杂的分析操作,侧重决策支持,相对数据库而言,数据仓库分析的数据规模要大的多;只支持查询。
数据库与数据仓库的本质区别是OLTP和OLAP的区别

2.Hive安装部署
2.1 下载
版本选择及下载参考:https://hive.apache.org/downloads.html
2.2 安装MySQL
略
2.3 安装hive
- 将安装包解压到指定目录并重命名为hive-2.3.9

- 在conf目录下复制hive-env.sh
cp hive-env.sh.template hive-env.sh - 配置hive-env.sh, 添加HADOOP_HOME
export HADOOP_HOME=/opt/module/hadoop-2.7.2- 在conf目录下 touch hive-site.xml, 添加如下内容
<?xml version="1.0"?>
<?xml-stylesheet type="text/xsl" href="configuration.xsl"?>
<configuration>
        <property>
          <name>javax.jdo.option.ConnectionURL</name>
          <value>jdbc:mysql://linux01:3306/metastore?serverTimezone=Asia/Shanghai</value>
          <description>JDBC connect string for a JDBC metastore</description>
        </property>

        <property>
          <name>javax.jdo.option.ConnectionDriverName</name>
          <value>com.mysql.jdbc.Driver</value>
          <description>Driver class name for a JDBC metastore</description>
        </property>

        <property>
          <name>javax.jdo.option.ConnectionUserName</name>
          <value>root</value>
          <description>username to use against metastore database</description>
        </property>

        <property>
          <name>javax.jdo.option.ConnectionPassword</name>
          <value>123456</value>
          <description>password to use against metastore database</description>
        </property>
</configuration>
!!需要手动创建hive元数据库metastore,注意此库必须是latin1,否则会出现奇怪问题!所以推荐手动创建!并且创建库之前不能有任意的hive操作,否则自动创建出来的库表将使用mysql默认的字符集,仍然报错!
!!另一种方法是修改mysql的配置文件,让mysql默认编码集就是latin1,这样hive自动创建的元数据库就是latin1的了,但是这已修改将会影响整个mysql数据库,如果mysql中有其他库,这种方式并不好。
- 配置hadoop 的core-site.xml ,添加如下配置
<property>
	<name>hadoop.proxyuser.root.hosts</name>
	<value>*</value>
</property>
<property>
	<name>hadoop.proxyuser.root.groups</name>
	<value>*</value>
</property>- 拷贝驱动包到hive/libs目录下

- 重启hadoop集群
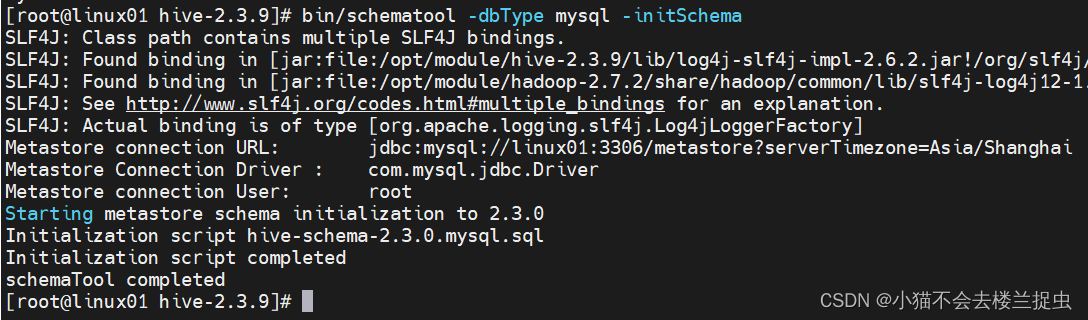
- 初始化metastore
当 MySQL 部署好,Hive 配置修改好之后,启动 metastore 并不会自动初始化 metastore 库,需要手动执行初始化操作。Hive 自带了 schematool 用于初始化 metastore,命令如下:
bin/schematool -dbType mysql -initSchema
3.Hive基础使用
3.1 Hive操作之命令行方式
- 直接使用hive
# 进入hive

bin/hive

# 选择数据库

hive> use default;

# 创建表
hive> create table t1 (id int, name string);

# 插入数据

hive> insert table t1 (id, name) values(1, "sanqian");

# 查看数据

hive> select * from t1;- 使用beeline
优点:每列都是对齐的,方便查看
# 启动hiveserver2服务
bin/hiveserver2
# 启动beeline
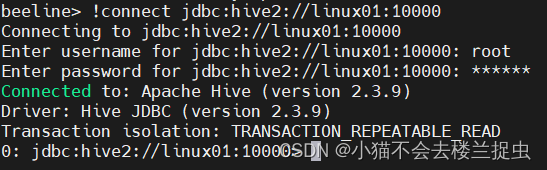
bin/beeline
# 连接hiveserver2
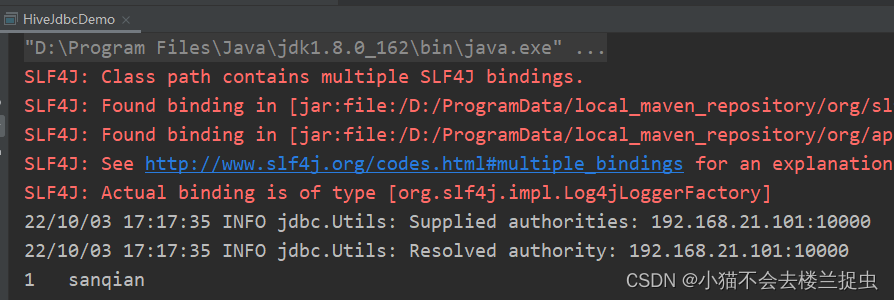
beeline> !connect jdbc:hive2://linux01:10000需要输入mysql的用户名和密码,如下图所示
0: jdbc:hive2://linux01:10000> show databases;
+----------------+
| database_name  |
+----------------+
| default        |
+----------------+
1 row selected (1.593 seconds)
0: jdbc:hive2://linux01:10000> use default;
No rows affected (0.138 seconds)
0: jdbc:hive2://linux01:10000> show tables;
+-----------+
| tab_name  |
+-----------+
| t1        |
+-----------+
1 row selected (0.146 seconds)
0: jdbc:hive2://linux01:10000> select * from t1;
+--------+----------+
| t1.id  | t1.name  |
+--------+----------+
| 1      | sanqian  |
+--------+----------+
1 row selected (1.922 seconds)
0: jdbc:hive2://linux01:10000>
3.2 Hive操作之JDBC方式
- 引入依赖
 <!-- Hive jdbc依赖-->
        <dependency>
            <groupId>org.apache.hive</groupId>
            <artifactId>hive-jdbc</artifactId>
            <version>2.3.9</version>
</dependency>- 代码
package com.sanqian.hive;

import java.sql.*;

/**
 * JDBC操作Hive
 * 注意: 需要先启动hiveserver2服务
 */
public class HiveJdbcDemo {
    public static void main(String[] args) throws SQLException {
        // 指定hiveserver2的url链接
        String jdbcUrl = "jdbc:hive2://192.168.21.101:10000";
        // 获取连接,这里的user是指linux中的用户名,password随便指定即可
        Connection conn = DriverManager.getConnection(jdbcUrl, "root", "any");
        //获取Statement
        Statement stmt = conn.createStatement();
        //查询sql
        String sql = "select * from t1";
        //执行sql
        ResultSet res = stmt.executeQuery(sql);
        //循环读取结果
        while(res.next()){
            System.out.println(res.getInt("id") + "\t" + res.getString("name"));
        }


    }
}
- 运行结果:
3.3 查询后信息显示配置
- Hive命令行下执行命令(仅当前会话有效)
hive> set hive.cli.print.current.db=true
    > ;
hive (default)> set hive.cli.print.header=true;
hive (default)> select * from t1;
OK
t1.id   t1.name
1       sanqian
Time taken: 6.35 seconds, Fetched: 1 row(s)
hive (default)>
- Hive脚本~/.hiverc中配置set命令 (当前用户有效)
set hive.cli.print.current.db=true;
set hive.cli.print.header=true;
- 在hive-site中配置对本机启动的所有hive进程都有效
<property>
	<name>hive.cli.print.header</name>
	<value>true</value>
</property>

<property>
	<name>hive.cli.print.current.db</name>
	<value>true</value>
</property>
查看hive历史操作命令
tail -10 ~/.hivehistory3.4 Hive的日志配置
Hive的log默认存放在/tmp/root/hive.log目录下(当前用户名下)
修改hive的log存放日志到/opt/module/hive-2.3.9/logs
- hive运行时日志
mv hive-log4j2.properties.template hive-log4j2.properties
- hive任务执行 日志
mv hive-exec-log4j2.properties.template hive-exec-log4j2.properties
4.Hive核心实战
4.1 数据库操作
# 查看数据库列表
show databases;
# 创建数据库
create database mydb1;
# 选择数据库
use default;
# 删除数据库
drop database mydb1;
创建一个数据库会增加/user/hive/warehouse增加一个目录
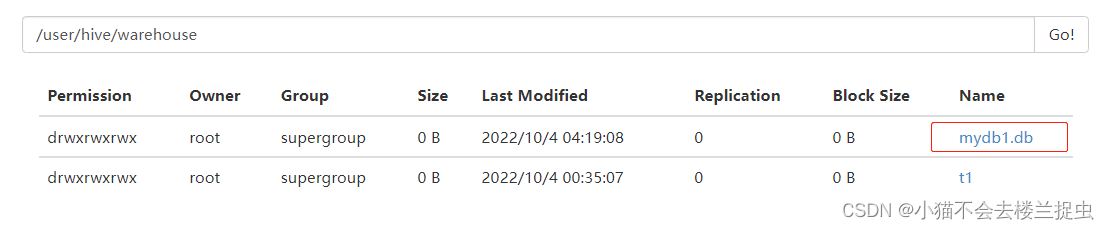
会在metastore数据的dbs表中增加一行记录

4.2 表的操作
4.2.1 创建表
create table t2(
  id int comment 'ID',
  stu_name string comment 'name',
  stu_birthday date comment 'birthday',
  online boolean comment 'is online'
)row format delimited fields terminated by '\t';
注意:写HQL语句时不能时使用table加空格,可以使用space
会在TBLS表中增加一条记录
行默认分隔符:\n (使用默认就行)
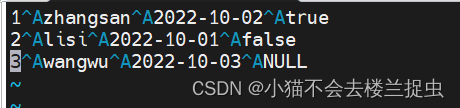
列默认分隔符:^A (可以使用ctrl + V ctrl + A 敲出)
4.2.2 加载数据
数据
1	zhangsan	2022-10-02	true
2	lisi	2022-10-01	false
3	wangwu	2022-10-03	NULL
加载到表中
load data local inpath '/opt/lwx1087471/hive_data/t2.txt' into table t2;4.2.3 查看表信息
# 查看有哪些表
show tables;
# 查看表信息
desc t2;
# 查看创建表的信息
show create table t2;
hive (default)> show tables;
OK
tab_name
t1
t2
t3
Time taken: 0.018 seconds, Fetched: 3 row(s)
hive (default)> desc t2;
OK
col_name        data_type       comment
id                      int                     ID
stu_name                string                  name
stu_birthday            date                    birthday
online                  boolean                 is online
Time taken: 0.034 seconds, Fetched: 4 row(s)
hive (default)> show create table t2;
OK
createtab_stmt
CREATE TABLE `t2`(
  `id` int COMMENT 'ID',
  `stu_name` string COMMENT 'name',
  `stu_birthday` date COMMENT 'birthday',
  `online` boolean COMMENT 'is online')
ROW FORMAT SERDE
  'org.apache.hadoop.hive.serde2.lazy.LazySimpleSerDe'
WITH SERDEPROPERTIES (
  'field.delim'='\t',
  'serialization.format'='\t')
STORED AS INPUTFORMAT
  'org.apache.hadoop.mapred.TextInputFormat'
OUTPUTFORMAT
  'org.apache.hadoop.hive.ql.io.HiveIgnoreKeyTextOutputFormat'
LOCATION
  'hdfs://linux01:9000/user/hive/warehouse/t2'
TBLPROPERTIES (
  'transient_lastDdlTime'='1664829544')
Time taken: 0.093 seconds, Fetched: 18 row(s)
hive (default)>
4.2.4 表增加字段及注释、删除表
#增加字段
alter table t2_bak add columns(address string);
# 删除表
drop table t2_bak
# 清空表
runcate table 表名
清空管理表,只清空数据
不能清空外部表
4.2.5 修改表名
hive (default)> alter table t2 rename to t2_bak;
相应的HDFS的目录也会变化

4.2.6 指定列和行的分隔符
create table t4(
  id int comment 'ID',
  stu_name string comment 'name',
  stu_birthday date comment 'birthday',
  online boolean comment 'is online'
)row format delimited fields terminated by '\t' lines terminated by '\n';
通常情况下不需要手动指定行分隔符使用默认\n就行
4.3 数据类型
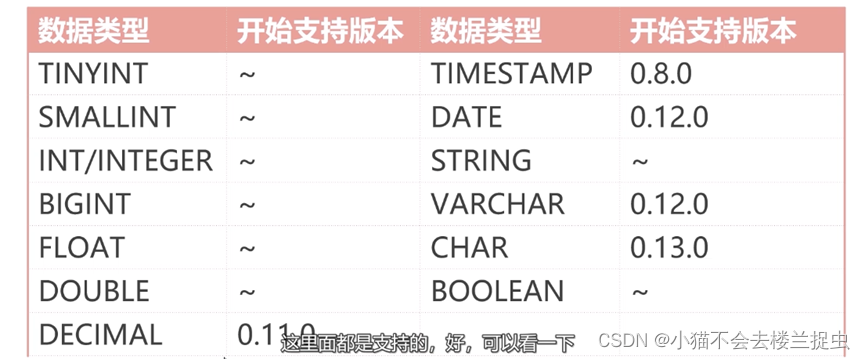
4.3.1 基本数据类型
4.3.2 复合数据类型
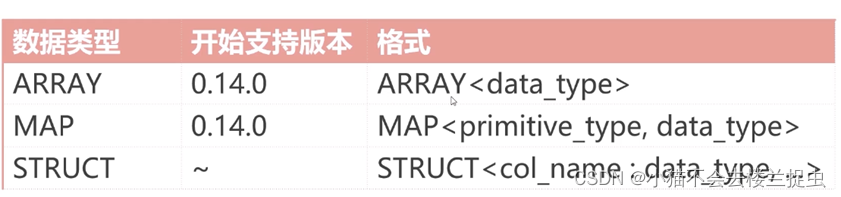
Hive有三种复杂数据类型ARRAY、MAP 和 STRUCT。ARRAY和MAP与Java中的Array和Map类似,而STRUCT与C语言中的Struct类似,它封装了一个命名字段集合,复杂数据类型允许任意层次的嵌套。
综合实战:
1)ARRAY字段存储用户的兴趣爱好
2)使用MAP字段存储学生的考试成绩
3)使用STRUCT字段存储员工地址信息
- 创建表
create table student(
  id int comment 'ID',
  name string comment 'name',
  favors array<string> comment 'favors',
  scores map<string, int> comment 'scores',
  address struct<home_addr:string, office_add:string>
)row format delimited
fields terminated by '\t'
collection items terminated by ','
map keys terminated by ':'
lines terminated by '\n';- 加载数据
1	zhangsan	english,sing,swing	chinese:80,math:90,english:100	beijing,shanghai
2	lisi	games,coding	chinese:79,math:85,english:95	guangzhou,shenzhen


load data local inpath '/opt/xxx/hive_data/student.txt' into table student;- 查询array类型某个元素使用下表
hive (default)> select favors[0] from student;
OK
_c0
english
games
- 查询map类型某个元素使用key
hive (default)> select scores['chinese'] from student;
OK
_c0
80
79
- 查询struct类型某个元素使用.
hive (default)> select address.home_addr from student;
OK
home_addr
beijing
guangzhou
4.4 表类型:内部表、外部表
内部表:
- hive中默认的表类型,表数据默认存储在warehouse目录中
- 在加载数据的过程中,实际数据会被移动到warehouse目录中
- 删除表时,表的中数据和元数据将会被同时删除
外部表:
- 建表语句中包含external的表叫外部表
- 外部表在加载数据的时候,实际数据并不会启动到warehouse目录中,只是与外部数据建立一个链接(映射关系)
- 当删除一个外部表时,只是删除元数据,不删除表中的数据,仅删除表和数据之间的链接。
- 创建外部表时如果不指定location,默认数据存储在warehouse目录下
- 外部表一般使用外部HDFS路径
内部表和外部表可以相互转化:
# 内部表转外部表
alter table tblName set tblproperties('external'='true')
# 外部表转内部表
alter table tblName set tblproperties('external'='false')
4.5 内部分区表
4.5.1 分区表:
- 分区表可以理解为分类,通过分区把不同类型数据放到不同目录里。
- 分区的标准就是指定分区字段,分区字段可以有一个或多个
- 分区表的意义在于优化查询,查询时尽量利用这个分区字段,如果不是分区字段,就会扫描全表,最典型的一个场景就是把天作为分区字段,查询的时候指定天。
4.5.2 创建分区表
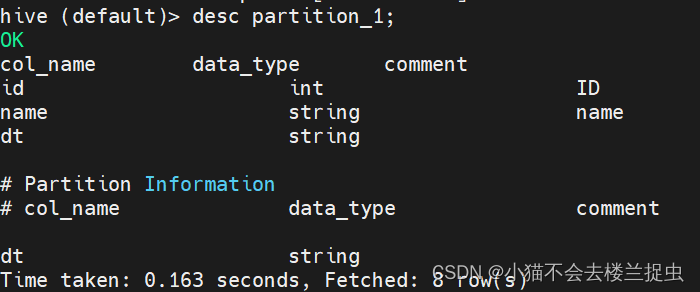
create table partition_1(
  id int comment 'ID',
  name string comment 'name'
)partitioned by (dt string)
row format delimited
fields terminated by '\t';
查看表信息
4.5.3 加载数据到指定分区
数据:原始数据不需要带分区字段
1       zhangsan
2       lisi
加载数据到分区表
load data local inpath '/opt/xxx/partition_1.txt' into table partition_1 partition(dt='20221004');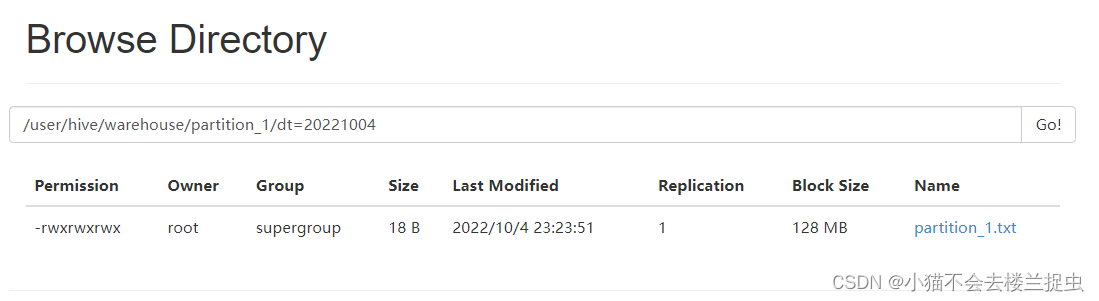
4.5.4 添加分区
alter table partition_1 add partition(dt='20221005');4.5.5 查看所有的分区信息
hive (default)> show partitions partition_1;
OK
partition
dt=20221004
dt=20221005
4.5.6 删除分区
alter table partition_1 drop partition(dt='20221005');4.5.7 针对已有的分区如何上传数据
(1)使用load 加载数据
(2)使用put 传到对应的HDFS分区目录下
4.5.8 多个分区字段的使用
创建表
create table partition_2(
  id int comment 'ID',
  name string comment 'name'
)partitioned by (year int, school string)
row format delimited
fields terminated by '\t';
准备数据
1 zhangsan
2 lisi
3 wangwu
加载数据到分区
load data local inpath '/opt/xxx/partition_2.txt' into table partition_2 partition(year=2022, school='xk');
load data local inpath '/opt/xxx/partition_2.txt' into table partition_2 partition(year=2022, school='english');
load data local inpath '/opt/xxx/partition_2.txt' into table partition_2 partition(year=2021, school='xk');
load data local inpath '/opt/xxx/partition_2.txt' into table partition_2 partition(year=2021, school='english');
查看数据

4.5.9 查询数据
select * from partition_2 where year=2022 and school='xk';
4.6 外部分区表(最常用)
- 外部分区表=外部表 + 分区(工作中最常用)
- 删除分区时,分区数据不会被删除
- load data ...partition 和 alter table .... add partition
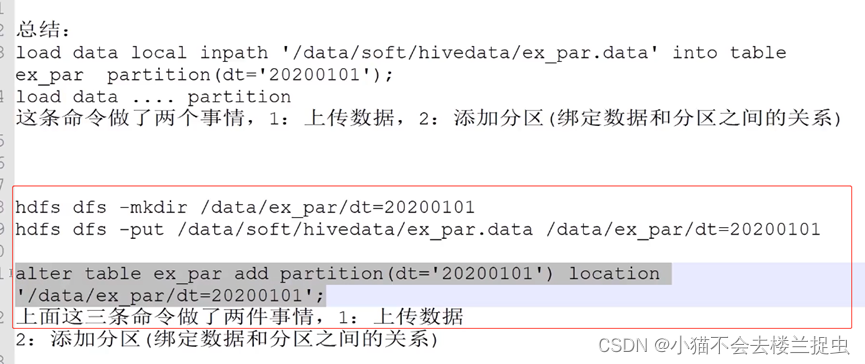
创建表:会在/data/ex_par创建一个目录
create external table ex_par(
  id int comment 'ID',
  name string comment 'name'
)partitioned by (dt string)
row format delimited
fields terminated by '\t'
location '/data/ex_par';
加载数据
load data local inpath '/opt/lwx1087471/partition_2.txt' into table ex_par partition(dt='20221004');删除分区
alter table ex_par drop partition(dt='20221004');绑定已有的数据到指定分区
alter table ex_par add partition(dt='20221005') location '/data/ex_par/dt=20221004';4.7 总结
第二种方式工作中更常用(95%)
方式1: load data .... partition
方式2: 创建目录,上传数据,绑定已有的数据到指定分区。
4.8 表类型:桶表 + 视图
4.8.1 桶表
- 桶表时对数据进行哈希取值,然后放到不同的文件中存储
- 物理上,每个桶就是表里(或分区)里的一个文件
- 设置几个桶就会产生几个reduce任务.
- 桶表的作用:1.抽样 2.提高某些查询效率
使用场景:当按照某字段就行分区时,会出现数据倾斜的情况,这时可以使用桶表。从源头解决数据倾斜问题。
# 创建桶表

create table bucket_tb(
  id int comment 'ID'
)clustered by (id) into 4 buckets;

# 加载数据到临时表
load data local inpath '/opt/lwx1087471/ids.txt' into table b_source;

# 开启分桶功能
set hive.enforce.bucketing=true

# 插入数据
insert into table bucket_tb select id from b_source where id is not null;
会产生四个文件
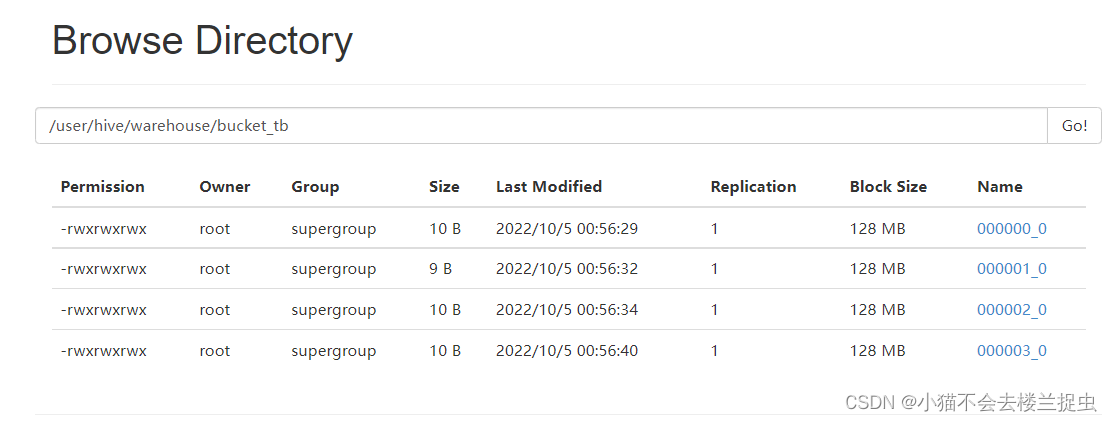
采样
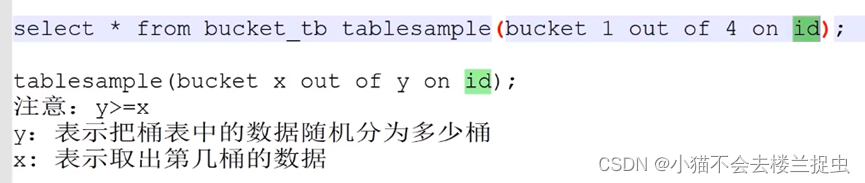
hive (default)> select * from bucket_tb tablesample(bucket 1 out of 4 on id);
OK
bucket_tb.id
16
12
8
4
Time taken: 0.276 seconds, Fetched: 4 row(s)
提高查询效率

普通表join会产生笛卡尔积,使用桶表join会避免笛卡尔积
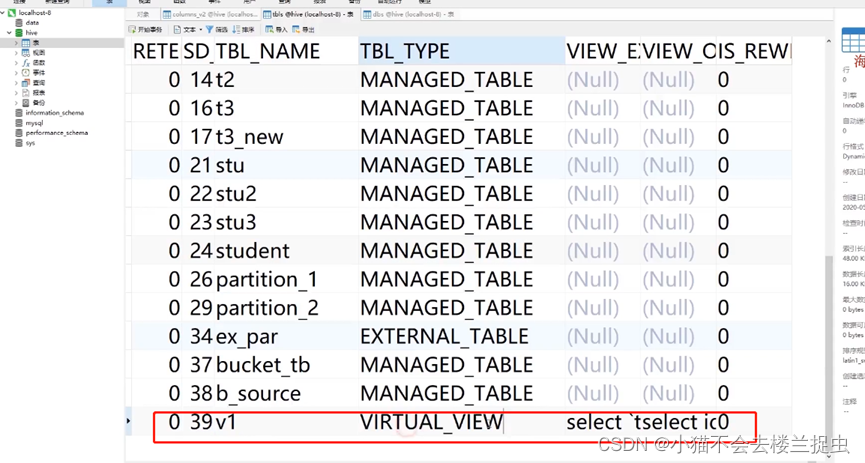
4.8.2 视图
使用视图可以降低查询的复杂度
视图时一个逻辑表(虚拟表),删除视图不会给其他表造成任务影响

4.8 数据处理综合案例
5.Hive高级函数实战
函数的基本操作
1)查看所有内置函数:show functions;
2)查看指定函数的信息:desc function FUNC;
3)查看指定函数的扩展信息:desc function extended FUNC;
hive支持的函数要比mysql多
5.1 分组排序取topN
窗口函数
格式:函数 over( partition by 字段 ,order by 字段 window_clause )
row_number():增加行号函数
over():函数工作的数据窗口
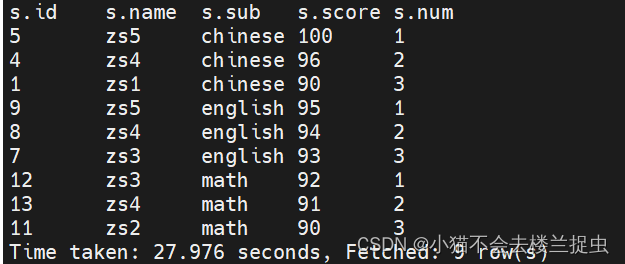
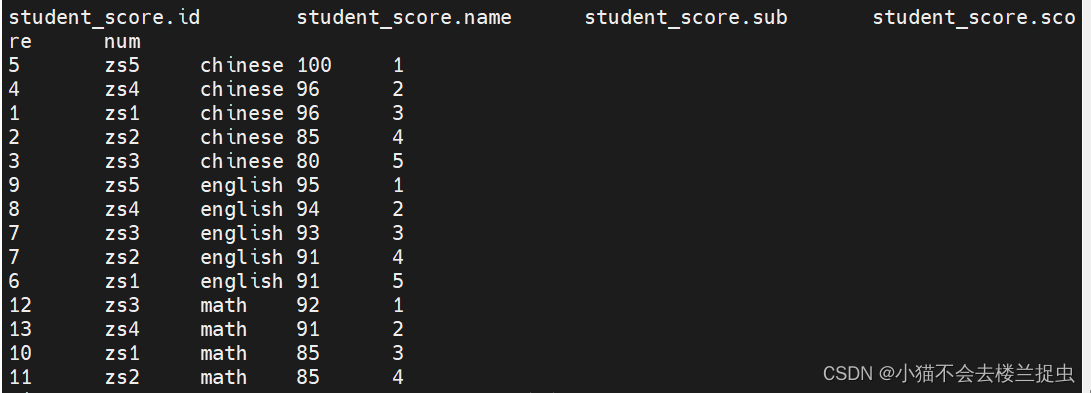
5.1.1 需求每个科目的前三名, 数据如下所示:
创建表
create external table student_score(
  id int,
  name string,
  sub string,
  score int
)row format delimited
fields terminated by '\t'
location '/data/student_score';
上传数据
hadoop fs -put score.txt /data/student_score/写HQL
select * from
(select *, row_number() over(partition by sub order by score desc) as num from student_score
) as s where s.num<=3;
运行结果
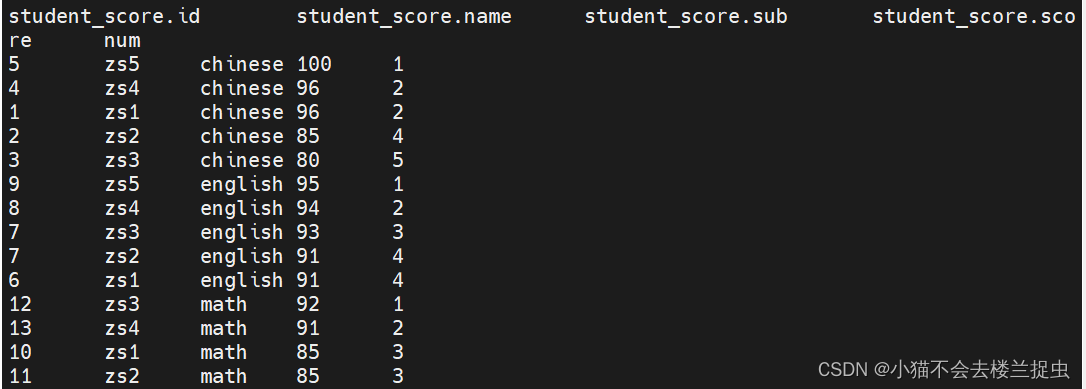
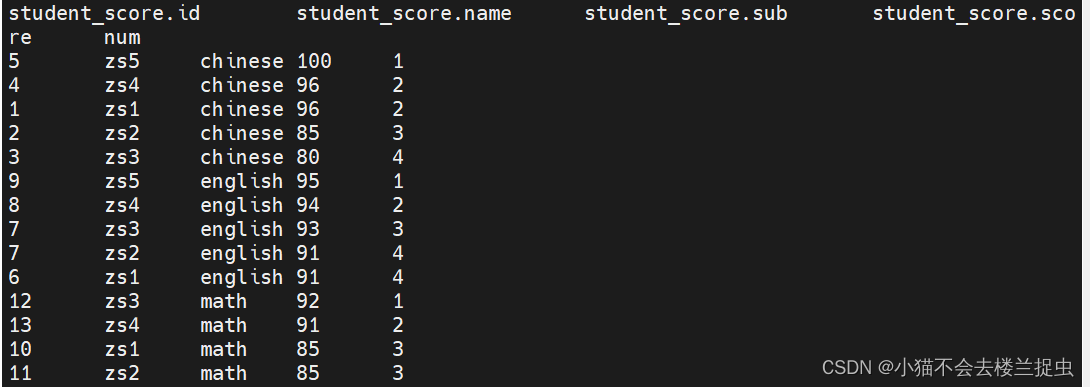
5.1.2 row_number()、rank() 、dense_rank()的区别
区别:
1)row_number() : 增加行号,从1,...n 不重复
2)rank() : 排序允许并列,一旦有并列跳号,总数不会变
3)dense_rank() : 排序允许并列,一旦有并列不跳号,总数会减少
row_number()
rank()
dense_rank()
5.2 行转列(多行转成1列)
三个函数:
- CONCAT_WS() : 接收一个Array字符串数组(或字符串)使用指定分隔符完成字符串的拼接,返回一个字符串
- COLLECT_LIST() : 接收基本数据类型,返回一个Array类型字段
- COLLECT_SET() : 接收基本数据类型,去重后返回一个Array类型字段
一般和group by 一起使用
- 创建表
create external table student_favors(
  name string,
  favor string
)row format delimited
fields terminated by '\t'
location '/data/student_favors';- 准备数据
zs	swing
zs	footbal
zs	sing
zs	codeing
zs swing- 上传数据
hadoop fs -put student_favors.txt /data/student_favors/- COLLECT_LIST() : 不去重
select name,COLLECT_LIST(favor) as favors from student_favors group by name;
- COLLECT_SET() : 不去重
select name,COLLECT_SET(favor) as favors from student_favors group by name;
- CONCAT_WS : 使用指定分隔符拼接
select name,CONCAT_WS(',',COLLECT_SET(favor)) as favors from student_favors group by name;
5.3 列转行(把一列数据转成多行)
三个函数
- split: 使用指定分隔符分割字符串
- explode : 接收Array或Map类型参数,每个元素成1行,对于Map类型key是一列value是一列。
- lateral view : 通常和explode一起使用,相当于把explode返回的数据作为一张虚表,然后原表join上这张虚表。
案例
- 创建表
create external table student_favors_2(
  name string,
  favors_list string
)row format delimited
fields terminated by '\t'
location '/data/student_favors_2';
- 准备数据
zs	swing,footbal,sing
ls codeing,swing- 上传数据
hadoop fs -put student_favors_2.txt /data/student_favors_2/- 使用explode
select explode(split(favors_list, ',')) from student_favors_2;

- 使用lateral view
select name,favor from student_favors_2 lateral view
explode(split(favors_list, ',')) t1 as favor;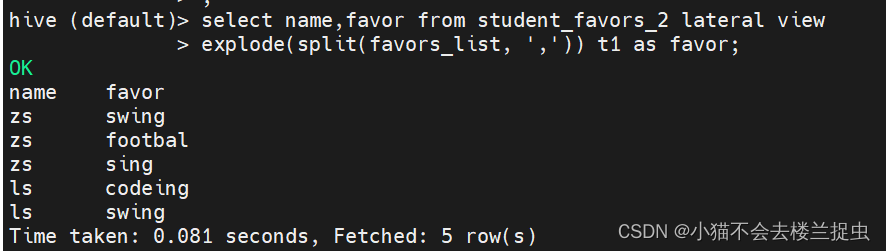
5.4 排序函数
排序
- order by :全局排序,生成reduce任务只有一个
- sort by :保证每个reduce有序,不能保证全局有序(除非只有一个reduce)
- distribute by :只分区,常和sort by一起使用,distribute by必须写在sort by之前
- cluster by: 作用相当于 distribute by + sort by, 不支持降序
案例:
- sort by
select id from bucket_tb order by id;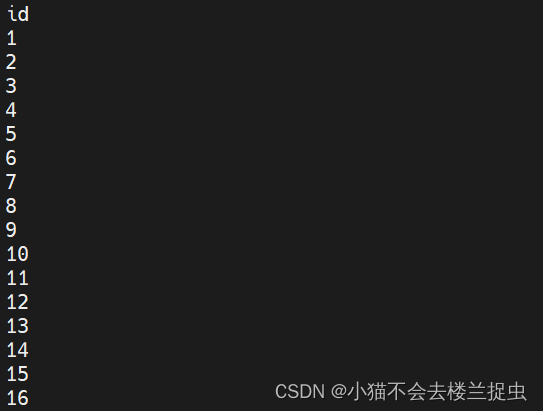
- sort by
设置reduce个数:set mapreduce.job.reduces=2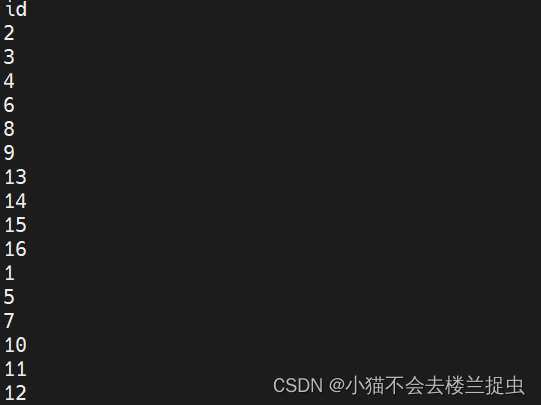
- cluster by
select id from bucket_tb distribute by id sort by id;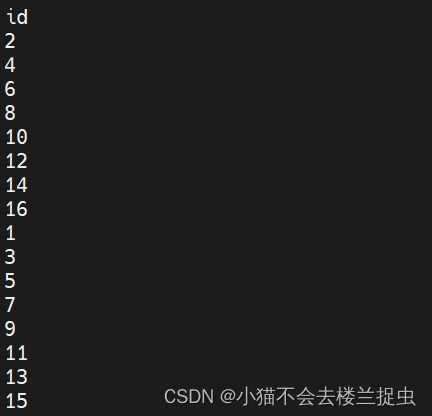
- cluster by
select id from bucket_tb cluster by id; 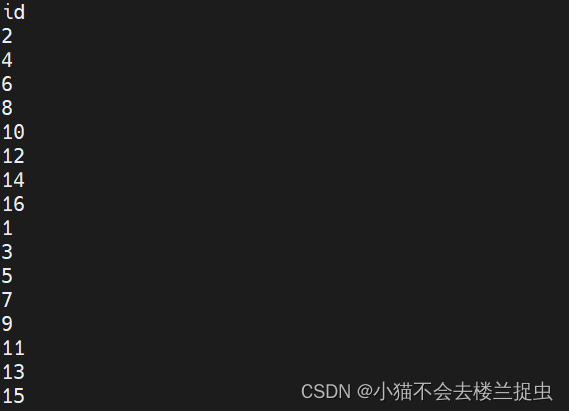
5.5 分组和去重函数
group by 和distict的区别
需求:统计t1表中 去重后name的数据量
方式一:使用distinct

select count(distinct name) from t1;

方式二: 使用group by

selec count(*) from (select name from group by name) temp
使用方式一会把所有的数据shuffle到一个reduce中去做统计,性能不高。使用group by性能更高。


 802
802


 被折叠的 条评论
为什么被折叠?
被折叠的 条评论
为什么被折叠?
 到【灌水乐园】发言


