


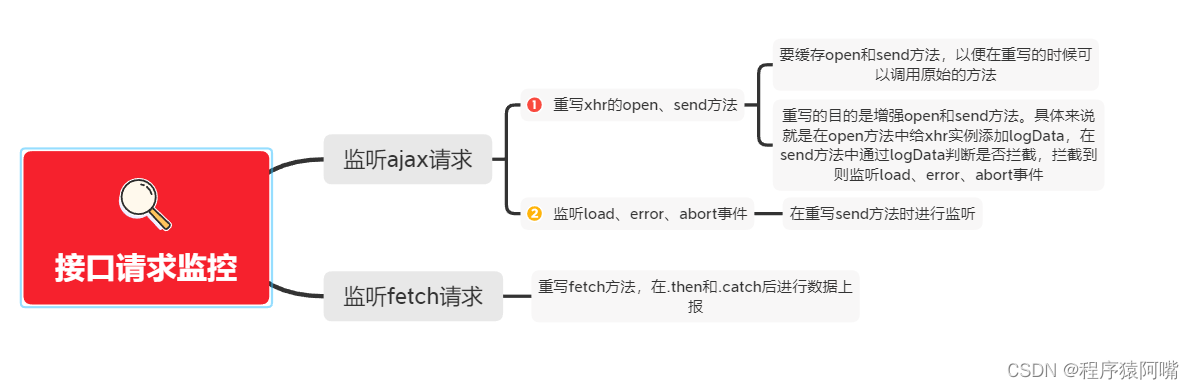
接口请求监控:
前端为什么需要监控接口?
- 目前大都是采用前后端分离的开发模式,接口成为了前端和后端进行通信的桥梁。因此接口的稳定性往往也决定这整个系统的稳定性。
- 鉴于不同浏览器对请求的处理机制可能不同,前端监控更能准确定位出现的问题。
监控什么以及如何监控
目标
- 监控所有的接口请求
- 记录请求的返回结果和状态
- 定位问题产生的原因以及分析接口的性能
请求分类
- 前端常见的发送请求的方式有:ajax、、axios库、Fetch等。虽然他们各自的实现方式略有不同,但都是对
XMLHttpRequest对象进行的封装或用Fetch请求。 - 对于浏览器来说,所有的接口均是基于XHR和Fetch实现的,为了捕获接口中的错误,可以通过重写该方法,然后通过接口返回的信息来判断当前接口的状况。
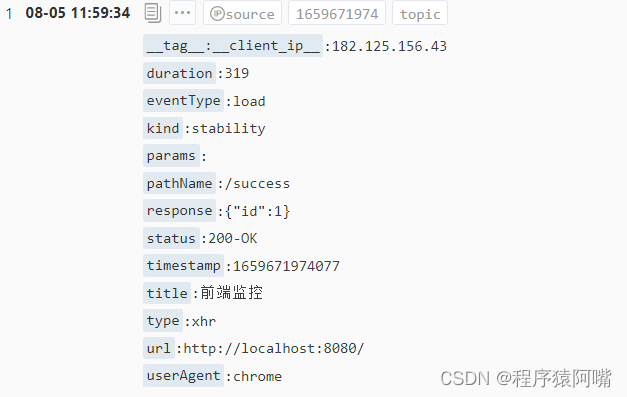
监听的字段
示例:
{
  "title": "前端监控系统", //标题
  "url": "http://localhost:8080/", //url
  "timestamp": "1590817024490", //timestamp
  "userAgent": "Chrome", //浏览器版本
  "kind": "stability", // 大类型:稳定性
  "type": "xhr", // 具体类型
  "eventType": "load", //事件类型
  "pathname": "/success", //路径
  "status": "200-OK", //状态码
  "duration": "7", //持续时间
  "response": "{\"id\":1}", //响应内容
  "params": ""  //参数
}
监听ajax请求
具体实现:
sdk:
/*
* 监听接口请求
*/

// 接口上报(这里用的是发送ajax的方法,接入阿里云SLS)
import tracker from "../utils/tracker";

export function injectXHR() {
    let XMLHttpRequest = window.XMLHttpRequest
    // 缓存原始的open方法
    let oldOpen = XMLHttpRequest.prototype.open
    // 重写open方法
    XMLHttpRequest.prototype.open = function (method, url, async) {
        // 上报到到阿里云的请求和webpack的请求不用处理
        if (!url.match(/logstores/) && !url.match(/sockjs/)) {
            // 给XMLHttpRequest实例身上增加logData属性
            this.logData = { method, url, async }
        }
        return oldOpen.apply(this, arguments)
    }

    // 缓存原始的send方法
    let oldSend = XMLHttpRequest.prototype.send

    // 重写send方法
    XMLHttpRequest.prototype.send = function (body) {
        console.log('logData', this.logData);
        // logData 说明拦截到了
        if (this.logData) {
            let startTime = Date.now()//记录开始时间
            let handler = (type) => (event) => {
                let duration = Date.now() - startTime // 持续时间
                let status = this.status // 状态码
                let statusText = this.statusText // 状态文本
                tracker.send({
                    kind: 'stability',
                    type: 'xhr',
                    eventType: type, // load error absort
                    pathName: this.logData.url,
                    status: status + '-' + statusText,
                    duration, // 持续时间
                    response: this.response ? JSON.stringify(this.response) : '', // 响应体
                    params: body || '' //
                })
            }
            this.addEventListener('load', handler('load'), false)
            this.addEventListener('error', handler('error'), false)
            this.addEventListener('abort', handler('abort'), false)
        }
        return oldSend.apply(this, arguments)
    }
}
配置webpack devServer模拟请求:
    // 配置开发服务器
    devServer: {
        contentBase: path.resolve(__dirname, 'dist'),// devServer静态文件根目录
        // before 是用来配置路由的
        // 内置了express
        before(router) {
            router.get('/success', function (req, res) {
                res.json({ id: 1 }) //200
            })
            router.post('/error', function (req, res) {
                res.sendStatus(500) //500
            })
        }
    },
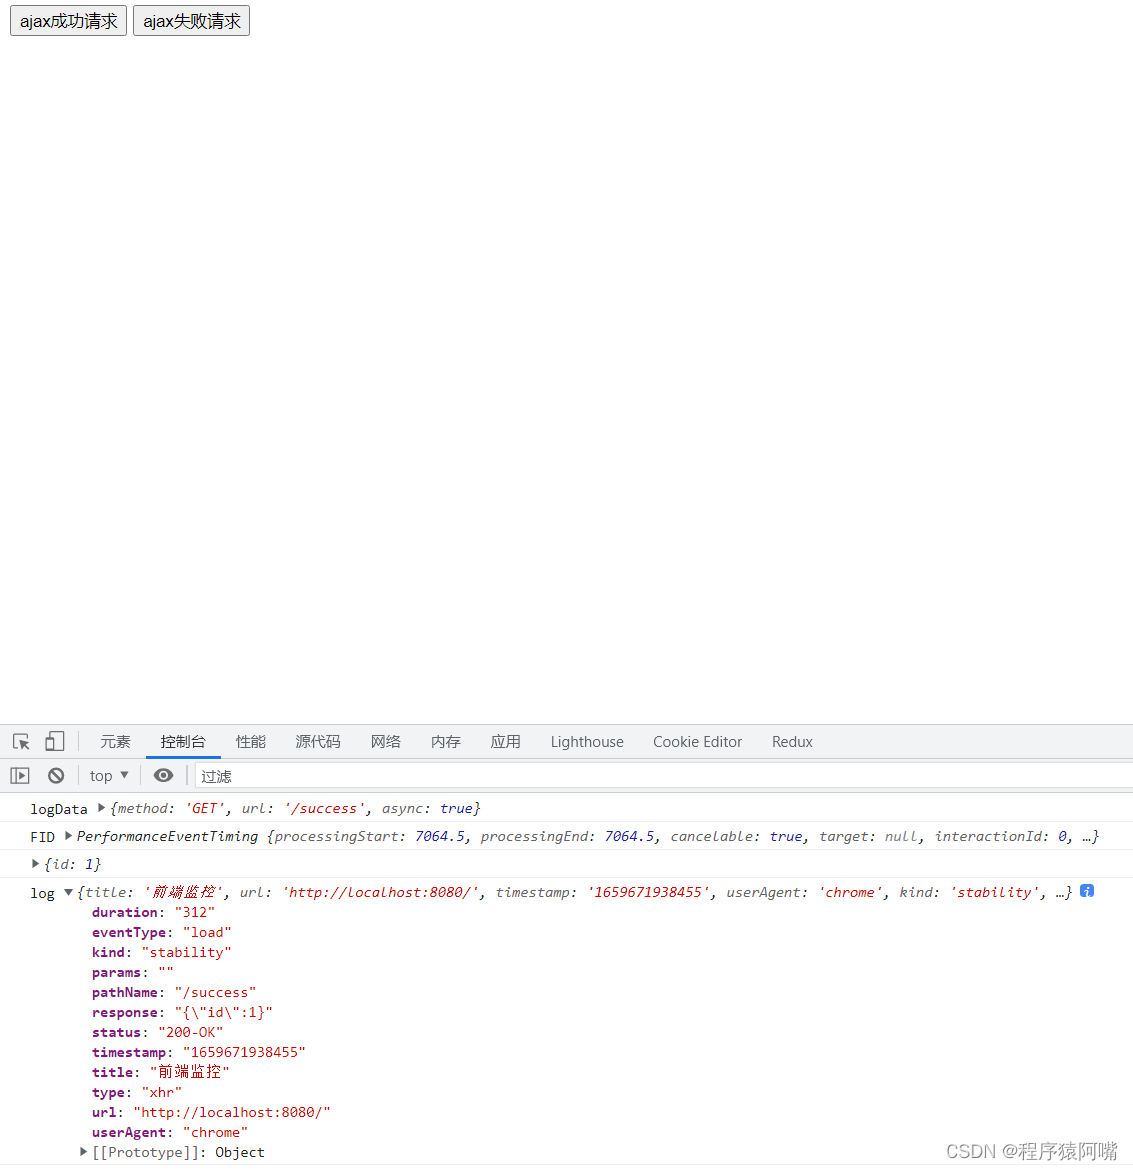
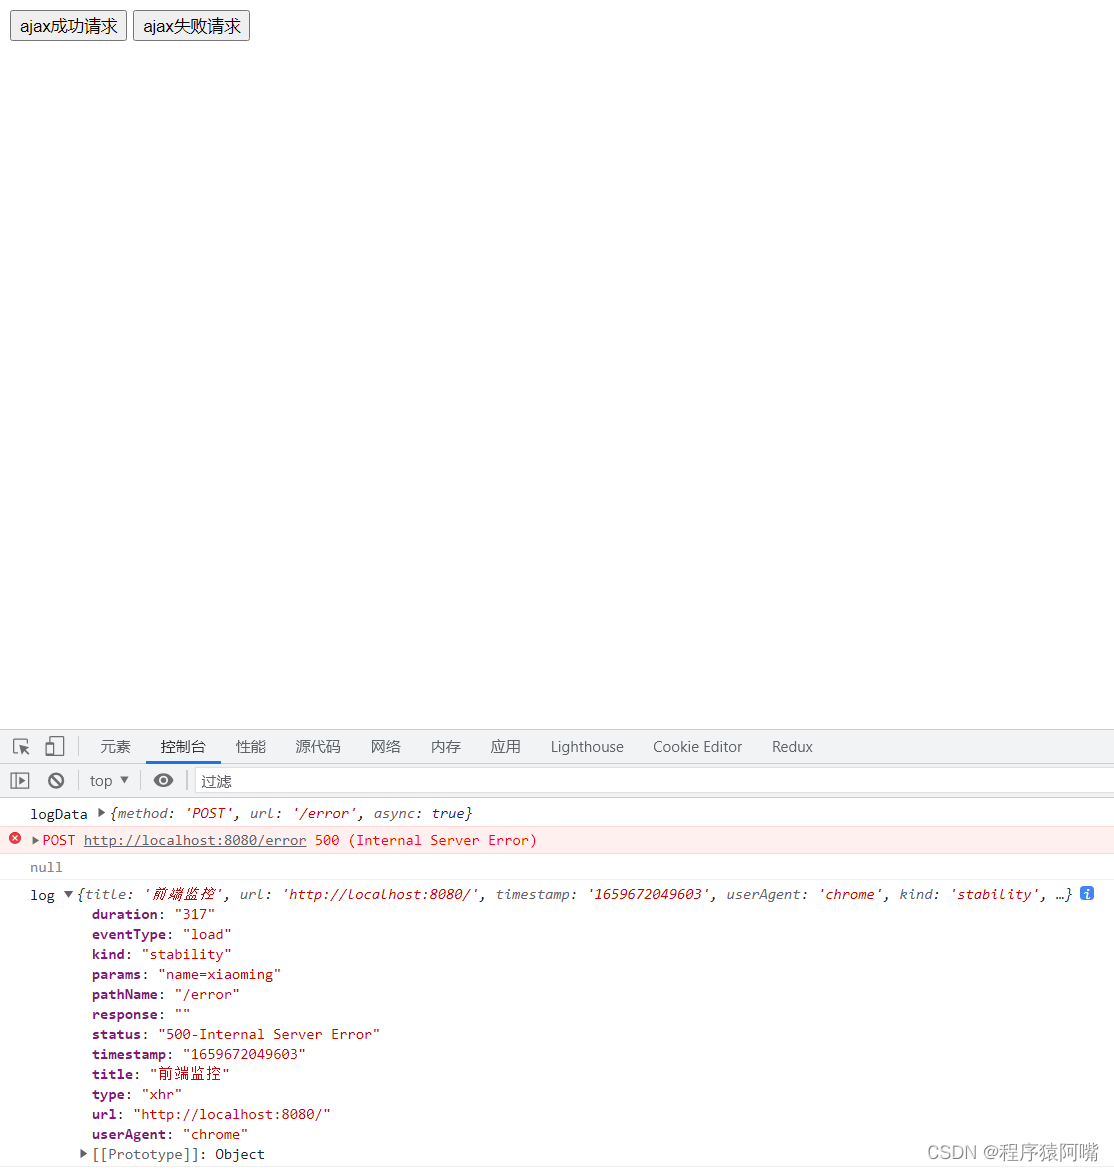
测试Demo:
<!DOCTYPE html>
<html lang="en">

<head>
    <meta charset="UTF-8">
    <meta http-equiv="X-UA-Compatible" content="IE=edge">
    <meta name="viewport" content="width=device-width, initial-scale=1.0">
    <title>前端监控</title>
</head>

<body>
    <div id="container">
        <div class="content">
             <input type="button" id="successAjaxBtn" value="ajax成功请求" onclick="sendSuccessAjax()">
            <input type="button" id="errorAjaxBtn" value="ajax失败请求" onclick="sendErrorAjax()">
        </div>
    </div>

    <script>
        function sendSuccessAjax() {
            let xhr = new XMLHttpRequest
            xhr.open('GET', '/success', true)
            xhr.responseType = 'json'
            xhr.onload = function () {
                console.log(xhr.response);
            }
            xhr.send()
        }

        function sendErrorAjax() {
            let xhr = new XMLHttpRequest
            xhr.open('POST', '/error', true)
            xhr.responseType = 'json'
            xhr.onload = function () {
                console.log(xhr.response);
            }
            xhr.onerror = function (error) {
                console.log(error);
            }
            xhr.send('name=xiaoming')
        }
    </script>
</body>

</html>
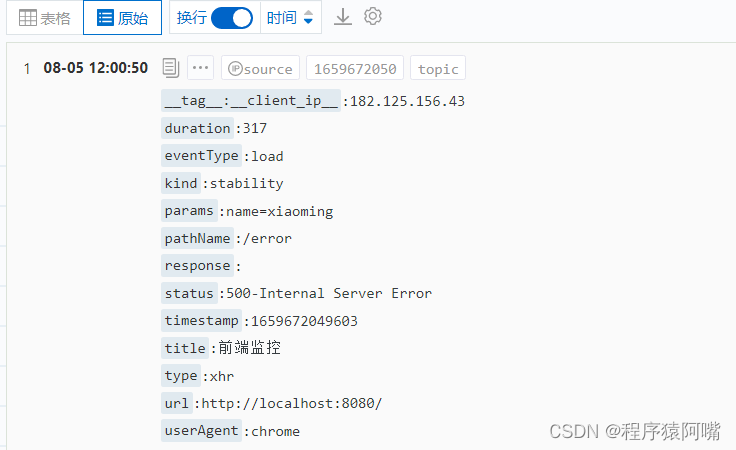
模拟ajax成功请求:
模拟ajax失败请求:
监听fetch请求
fetch请求和ajax有所不同,MDN中对fetch的一些描述:
当接收到一个代表错误的 HTTP 状态码时,从 fetch() 返回的 Promise 不会被标记为 reject,即使响应的 HTTP 状态码是 404 或 500。相反,它会将 Promise 状态标记为 resolve(如果响应的 HTTP 状态码不在 200 - 299 的范围内,则设置 resolve 返回值的 ok 属性为 false),仅当网络故障时或请求被阻止时,才会标记为 reject。
因此,对于fetch,我们可以根据返回数据的ok字段来判断请求是否成功,如果为 true 则请求成功,否则失败。
监听思路:
也是重写fetch方法,在.then和.catch中进行数据上报。
具体实现:
sdk:
// 监听fetch请求
import tracker from "../utils/tracker";

const originalFetch = window.fetch

export function overwriteFetch() {
    // 重写fetch方法
    window.fetch = function newFetch(url, config) {
        let method;
        let params;
        if (config) {
            method = config.method.toUpperCase() || 'get'
            params = config.body || ''
        } else {
            method = 'get'
            params = ''
        }
        const startTime = Date.now()
        const reportData = {
            kind: 'stability',
            type: 'fetch',
            startTime,
            url,
            method,
            params,
        }

        return originalFetch(url, config)
            .then(res => {
                reportData.endTime = Date.now()
                reportData.duration = reportData.endTime - reportData.startTime

                const data = res.clone()
                reportData.status = data.status
                reportData.success = String(data.ok)

                console.log(reportData)
                //数据上报
                tracker.send({
                    kind: reportData.kind,
                    type: reportData.type,
                    startTime: reportData.startTime,
                    duration: reportData.duration,
                    url: reportData.url,
                    method: reportData.method,
                    params: reportData.params,
                    status: reportData.status,
                    success: reportData.success,
                })

                return res
            })
            .catch(err => {
                reportData.endTime = Date.now()
                reportData.duration = reportData.endTime - reportData.startTime
                reportData.status = 0
                reportData.success = 'false'

                console.log(reportData)
                //数据上报
                tracker.send({
                    kind: reportData.kind,
                    type: reportData.type,
                    startTime: reportData.startTime,
                    duration: reportData.duration,
                    url: reportData.url,
                    method: reportData.method,
                    params: reportData.params,
                    status: reportData.status,
                    success: reportData.success,
                })
                throw err
            })
    }
}
测试demo:
<!DOCTYPE html>
<html lang="en">

<head>
    <meta charset="UTF-8">
    <meta http-equiv="X-UA-Compatible" content="IE=edge">
    <meta name="viewport" content="width=device-width, initial-scale=1.0">
    <title>前端监控</title>
    <!-- 脚本加载错误 -->
    <!-- <link rel="stylesheet" href="cssError.css"> -->
</head>

<body>
    <div id="container">
        <div class="content">
            <input type="button" id="successFetchBtn" value="fetch成功请求" onclick="sendSuccessFetch()">
            <input type="button" id="errorFetchBtn" value="fetch失败请求" onclick="sendErrorFetch()">
        </div>
    </div>

    <script>
        function sendSuccessFetch() {
            fetch('/success').then(response => {
                console.log(response);
                response.json()
            }).then(data => console.log('data', data))
        }

        async function sendErrorFetch() {
            // fetch('/error').then(response => response.json()).then(data => console.log('data', data))
            // 发送post请求
            const response = await fetch('/error', {
                method: 'POST',
                body: JSON.stringify({ name: 'xiaoMi' })
            })
            console.log(response);
            return response.json().then(data => console.log(data))
        }
    </script>

</body>

</html>
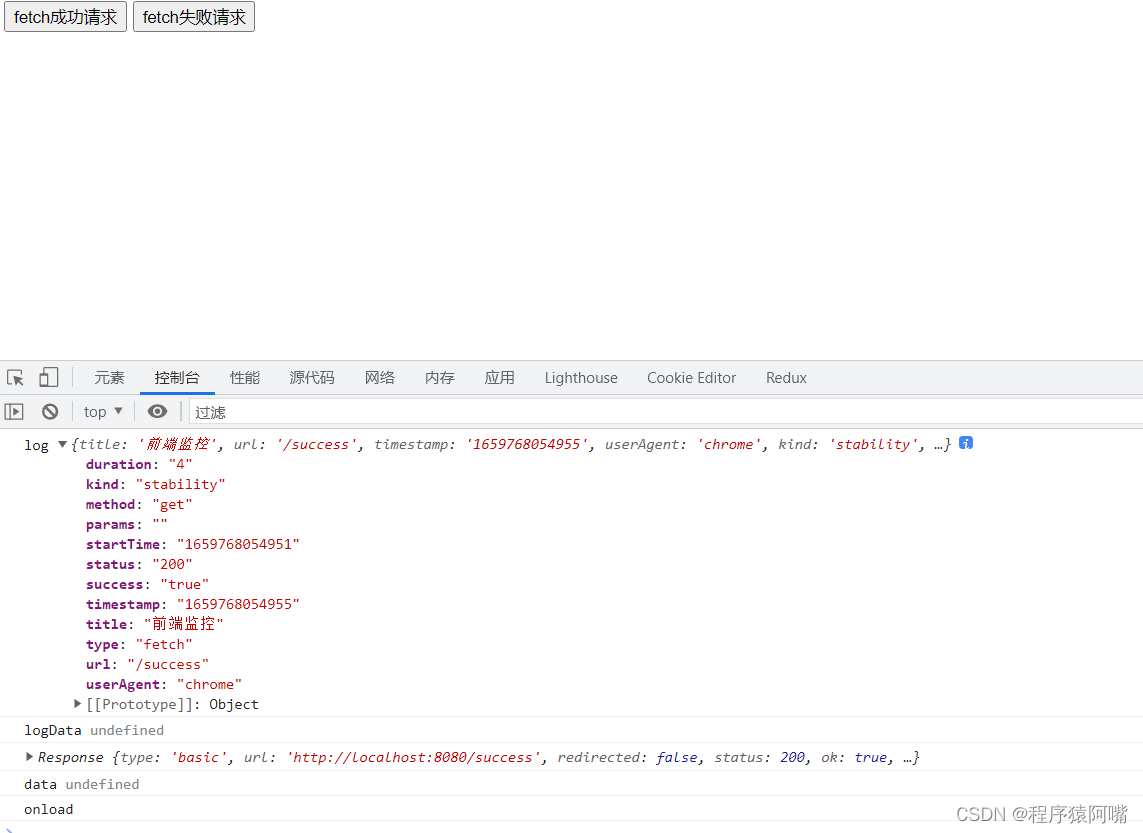
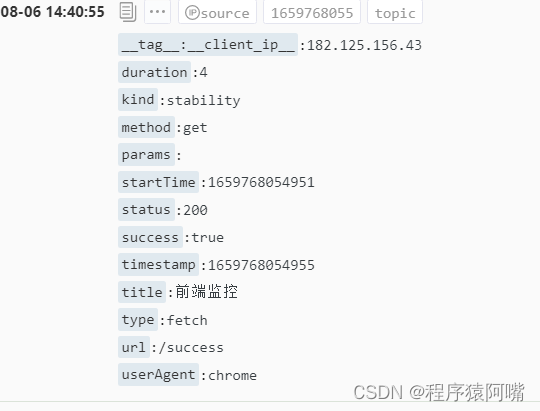
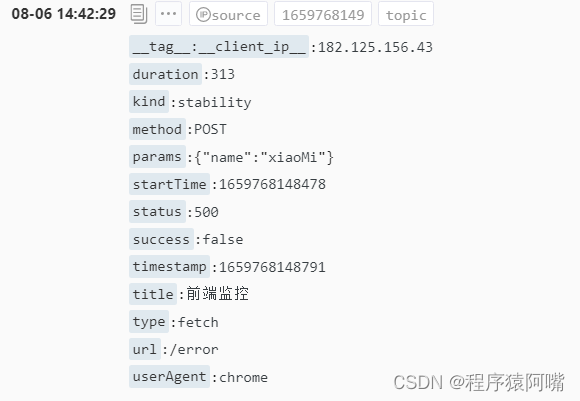
测试成功fetch请求:
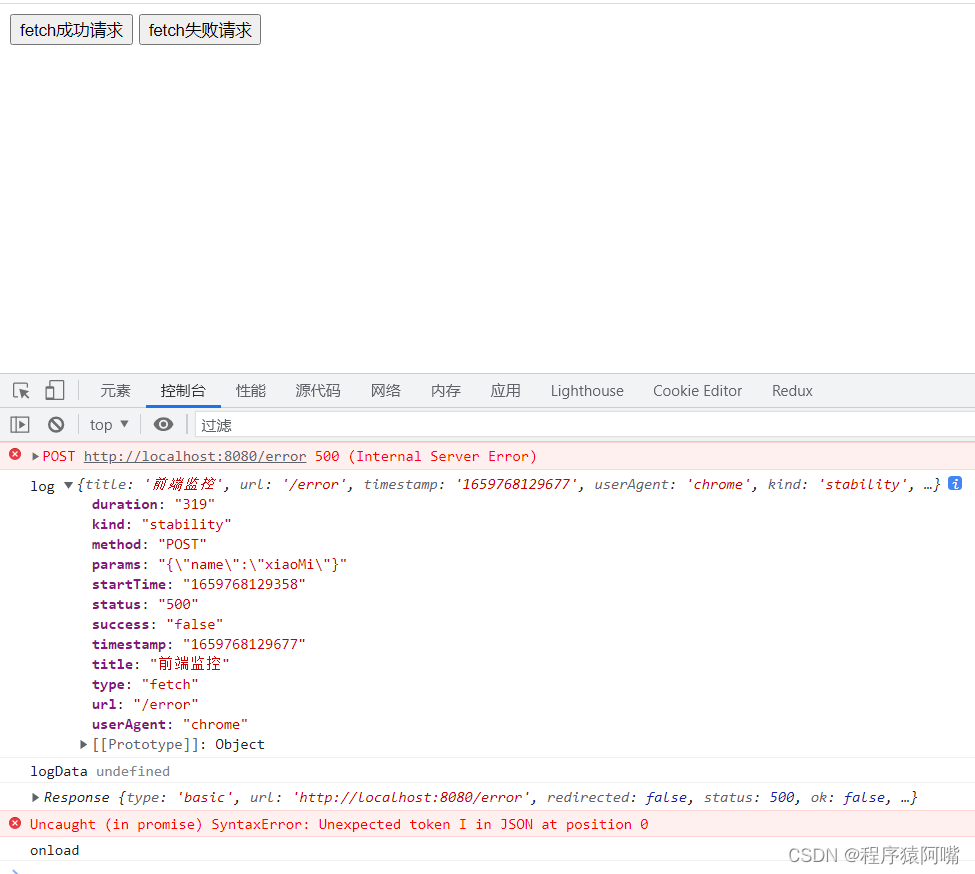
测试失败的fetch请求:
参考链接:
https://developer.mozilla.org/zh-CN/docs/Web/Guide/AJAX
https://www.ruanyifeng.com/blog/2020/12/fetch-tutorial.html
https://zhuanlan.zhihu.com/p/89089088
https://www.zhihu.com/question/335786718


 1100
1100


 被折叠的 条评论
为什么被折叠?
被折叠的 条评论
为什么被折叠?
 到【灌水乐园】发言


