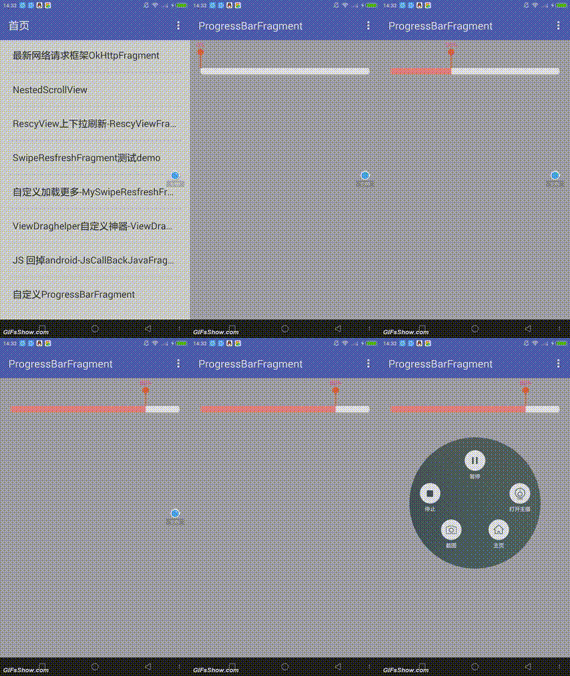
大家好!由于最近公司需求要求,撸了一晚上,弄出了一个自定义ProgressBar;
废话不多说,看效果!

1.看着效果还不错吧!果然不会让大家失望的! 哈哈哈….
这是一个组合控件,首先自定义一个ProgressDragLayout 继承Viewgroup.
public class ProgressDragLayout extends ViewGroup {
    private final String TAG = this.getClass().getSimpleName();
    /**
     * 滑动view 的滑动距离占自身高度的比例
     */
    private double mDrange = 0;
    private ProgressBar pb;
    private ImageView view_mid;
    private TextView view_top;
    private int viewWidth = 1080 - dip2px(getContext(), 40);
    private int size;

    public ProgressDragLayout(Context context) {
        this(context, null);
    }

    public ProgressDragLayout(Context context, AttributeSet attrs) {
        this(context, attrs, 0);
    }

    public ProgressDragLayout(Context context, AttributeSet attrs, int defStyleAttr) {
        super(context, attrs, defStyleAttr);
    }

    @Override
    protected void onFinishInflate() {
        super.onFinishInflate();
        view_top = (TextView) findViewById(R.id.view_top);
        view_mid = (ImageView) findViewById(R.id.view_mid);
        pb = (ProgressBar) findViewById(R.id.pb);
    }
并做一些初始化的工作!
2. 丈量VIewGroup 的大小 ,这样我们才能够知道控件大体在view中显示的大小,我们才能够去做一些相关的辅助工作。
 `  /**
     * 丈量所有控件的高度
     * 可以得到每个控件的最终高度
     *
     * @param widthMeasureSpec
     * @param heightMeasureSpec
     */
    @Override
    protected void onMeasure(int widthMeasureSpec, int heightMeasureSpec) {
        measureChildren(widthMeasureSpec, heightMeasureSpec);
        int maxWidth = MeasureSpec.getSize(widthMeasureSpec);
        int maxHeight = MeasureSpec.getSize(heightMeasureSpec);
        setMeasuredDimension(resolveSizeAndState(maxWidth, widthMeasureSpec, 0),
                resolveSizeAndState(maxHeight, heightMeasureSpec, 0));
    }`
3.接下来我们自然要固定Viewgroup中的每个控件的具体位置:
  @Override
    protected void onLayout(boolean changed, int l, int t, int r, int b) {
//        Log.e("onLayout", l + "|" + t + "|" + r + "|" + b);
        view_top.layout((int) mDrange + dip2px(getContext(), 20) - view_top.getMeasuredWidth() / 2, t, (int) mDrange + view_top.getMeasuredWidth() / 2 + dip2px(getContext(), 20), view_top.getMeasuredHeight());
        view_mid.layout((int) mDrange + dip2px(getContext(), 20) - view_mid.getMeasuredWidth() / 2, view_top.getMeasuredHeight(), (int) mDrange + view_mid.getMeasuredWidth() / 2 + dip2px(getContext(), 20), view_top.getMeasuredHeight() + view_mid.getMeasuredHeight());
        pb.layout(dip2px(getContext(), 20) + l, view_top.getMeasuredHeight() + view_mid.getMeasuredHeight(), r - dip2px(getContext(), 20), view_top.getMeasuredHeight() + view_mid.getMeasuredHeight() + pb.getMeasuredHeight());
    }

    /**
     * 根据手机的分辨率从 dp 的单位 转成为 px(像素)
     */
    private int dip2px(Context context, float dpValue) {
        final float scale = context.getResources().getDisplayMetrics().density;
        return (int) (dpValue * scale + 0.5f);
    }
5.固定了具体的位置后,我们接下来就可以进行进度条传值操作的步骤了,下面是该自定义view 的核心部分:
   private int progressAdd = 0;
    private double drange_1 = 0;

    /**
     * RelativeLayout.LayoutParams params_top =  (RelativeLayout.LayoutParams)view_top.getLayoutParams();
     * RelativeLayout.LayoutParams params_mid =  (RelativeLayout.LayoutParams)view_mid.getLayoutParams();
     *
     * @param value
     */
    public void setValue(double value) {
        if(value<=0){
            mDrange = 0;
            pb.setProgress(0);
            ProgressDragLayout.this.requestLayout();
            ProgressDragLayout.this.invalidate();
            return;
        }
        progressAdd = 0;
        mDrange = 0;
        drange_1=0;
        int progress = (int) (value * 100);
        size = progress;
        double drange = (int) (value * viewWidth);
        drange_1 = drange / size;
        Log.e("size-------", size +"");
        mhander.sendEmptyMessageDelayed(view_top.hashCode(),20);
    }
    private Handler mhander = new Handler(){
        @Override
        public void handleMessage(Message msg) {
            super.handleMessage(msg);
            progressAdd++;
            mDrange = mDrange +drange_1;
            pb.setProgress(progressAdd);
            view_top.setText(progressAdd + "%");
            ProgressDragLayout.this.requestLayout();
            ProgressDragLayout.this.invalidate();
            Log.e("tag", "progressAdd--" + progressAdd + "|mDrange--" + mDrange);
            if(progressAdd<size){
                mhander.sendEmptyMessageDelayed(view_top.hashCode(),20);
            }
        }
    };
注明下: hander 的工作就是初始化 自定义progressBar 的动画效果!
- 接下来贴出完整的代码示例:
package com.example.administrator.myapplication.fragment;

import android.os.Bundle;
import android.support.annotation.Nullable;
import android.support.v4.app.Fragment;
import android.view.LayoutInflater;
import android.view.View;
import android.view.ViewGroup;

import com.example.administrator.myapplication.R;
import com.example.administrator.myapplication.widget.BotomDragLayout;
import com.example.administrator.myapplication.widget.ProgressDragLayout;
import com.example.administrator.myapplication.widget.TopDragLayout;

/**
 * 自定义progressbar
 * 2016/4/21
 */
public class ProgressBarFragment extends Fragment {
    @Override
    public void onCreate(@Nullable Bundle savedInstanceState) {
        super.onCreate(savedInstanceState);
        getActivity().setTitle("ProgressBarFragment");
    }

    @Nullable
    @Override
    public View onCreateView(LayoutInflater inflater, @Nullable ViewGroup container, @Nullable Bundle savedInstanceState) {
        final ProgressDragLayout view = (ProgressDragLayout) inflater.inflate(R.layout.view_progress_layout, container, false);
        view.setValue(0.8);
        return view;
    }

    @Override
    public void onActivityCreated(@Nullable Bundle savedInstanceState) {
        super.onActivityCreated(savedInstanceState);

    }
}
完整的 自定义ProgressBarVIew 类:
package com.example.administrator.myapplication.widget;

import android.content.Context;
import android.os.CountDownTimer;
import android.os.Handler;
import android.os.Message;
import android.support.v4.view.MotionEventCompat;
import android.support.v4.widget.ViewDragHelper;
import android.util.AttributeSet;
import android.util.Log;
import android.view.MotionEvent;
import android.view.View;
import android.view.ViewGroup;
import android.widget.ImageView;
import android.widget.ProgressBar;
import android.widget.RelativeLayout;
import android.widget.TextView;

import com.example.administrator.myapplication.R;


/**
 * 自定义progressBar
 * gxj
 */
public class ProgressDragLayout extends ViewGroup {
    private final String TAG = this.getClass().getSimpleName();
    /**
     * 滑动view 的滑动距离占自身高度的比例
     */
    private double mDrange = 0;
    private ProgressBar pb;
    private ImageView view_mid;
    private TextView view_top;
    private int viewWidth = 1080 - dip2px(getContext(), 40);
    private int size;

    public ProgressDragLayout(Context context) {
        this(context, null);
    }

    public ProgressDragLayout(Context context, AttributeSet attrs) {
        this(context, attrs, 0);
    }

    public ProgressDragLayout(Context context, AttributeSet attrs, int defStyleAttr) {
        super(context, attrs, defStyleAttr);
    }

    @Override
    protected void onFinishInflate() {
        super.onFinishInflate();
        view_top = (TextView) findViewById(R.id.view_top);
        view_mid = (ImageView) findViewById(R.id.view_mid);
        pb = (ProgressBar) findViewById(R.id.pb);
    }

    private int progressAdd = 0;
    private double drange_1 = 0;

    /**
     * RelativeLayout.LayoutParams params_top =  (RelativeLayout.LayoutParams)view_top.getLayoutParams();
     * RelativeLayout.LayoutParams params_mid =  (RelativeLayout.LayoutParams)view_mid.getLayoutParams();
     *
     * @param value
     */
    public void setValue(double value) {
        if(value<=0){
            mDrange = 0;
            pb.setProgress(0);
            ProgressDragLayout.this.requestLayout();
            ProgressDragLayout.this.invalidate();
            return;
        }
        progressAdd = 0;
        mDrange = 0;
        drange_1=0;
        int progress = (int) (value * 100);
        size = progress;
        double drange = (int) (value * viewWidth);
        drange_1 = drange / size;
        Log.e("size-------", size +"");
        mhander.sendEmptyMessageDelayed(view_top.hashCode(),20);
    }
    private Handler mhander = new Handler(){
        @Override
        public void handleMessage(Message msg) {
            super.handleMessage(msg);
            progressAdd++;
            mDrange = mDrange +drange_1;
            pb.setProgress(progressAdd);
            view_top.setText(progressAdd + "%");
            ProgressDragLayout.this.requestLayout();
            ProgressDragLayout.this.invalidate();
            Log.e("tag", "progressAdd--" + progressAdd + "|mDrange--" + mDrange);
            if(progressAdd<size){
                mhander.sendEmptyMessageDelayed(view_top.hashCode(),20);
            }
        }
    };

    /**
     * 丈量所有控件的高度
     * 可以得到每个控件的最终高度
     *
     * @param widthMeasureSpec
     * @param heightMeasureSpec
     */
    @Override
    protected void onMeasure(int widthMeasureSpec, int heightMeasureSpec) {
        measureChildren(widthMeasureSpec, heightMeasureSpec);
        int maxWidth = MeasureSpec.getSize(widthMeasureSpec);
        int maxHeight = MeasureSpec.getSize(heightMeasureSpec);
        setMeasuredDimension(resolveSizeAndState(maxWidth, widthMeasureSpec, 0),
                resolveSizeAndState(maxHeight, heightMeasureSpec, 0));
    }

    @Override
    protected void onLayout(boolean changed, int l, int t, int r, int b) {
//        Log.e("onLayout", l + "|" + t + "|" + r + "|" + b);
        view_top.layout((int) mDrange + dip2px(getContext(), 20) - view_top.getMeasuredWidth() / 2, t, (int) mDrange + view_top.getMeasuredWidth() / 2 + dip2px(getContext(), 20), view_top.getMeasuredHeight());
        view_mid.layout((int) mDrange + dip2px(getContext(), 20) - view_mid.getMeasuredWidth() / 2, view_top.getMeasuredHeight(), (int) mDrange + view_mid.getMeasuredWidth() / 2 + dip2px(getContext(), 20), view_top.getMeasuredHeight() + view_mid.getMeasuredHeight());
        pb.layout(dip2px(getContext(), 20) + l, view_top.getMeasuredHeight() + view_mid.getMeasuredHeight(), r - dip2px(getContext(), 20), view_top.getMeasuredHeight() + view_mid.getMeasuredHeight() + pb.getMeasuredHeight());
    }

    /**
     * 根据手机的分辨率从 dp 的单位 转成为 px(像素)
     */
    private int dip2px(Context context, float dpValue) {
        final float scale = context.getResources().getDisplayMetrics().density;
        return (int) (dpValue * scale + 0.5f);
    }
}
最后附上demo的下载地址 : 猛戳这里–https://github.com/g1258624735/MyApplication2
5. 所有的代码已经全部上传,注释很详细,包你看懂,已经详细的不能在详细了,看不懂的可以板砖拍我。
6. 大家在看的过程 当中,如果有什么不懂得话可以发邮件给我 ,1258624735@qq.com
7. ps: 如果大家觉得文章对你有帮助:不妨大赏一下支持原创,你的支持是我最大的动力:


 926
926


 被折叠的 条评论
为什么被折叠?


