


因为工作需要,这一两周在折腾多模态模型minicpm-o-2.6以及其int4版本的环境搭建。o26的环境搭建比较正常,从github上,下载code,然后运行按照脚本pip install -r requirements_o2.6.txt就好了。code的link如下:
我遇到的问题是文件requirements_o2.6.txt中,只安装了cpu的版本,在GPU上跑不起来,给出的错误是没有安装CUDA,然后我又去下载了cuda,在版本上纠结了一阵子,因为他要求torch是2.3.1版本的,而我的显卡是16GB的3080Ti,有点老的版本了,所以,在cu121和cu118之间纠结了一阵子之后,就选择了cd121。而且,通过pip install torch==2.3.1的时候,国内的网非常慢,经常超时,就装不上,很着急上火,就又找了一个网站,pytorch-wheels-cu121安装包下载_开源镜像站-阿里云,把安装包下来之后,再进行安装就快很多了。
运行minicpm-o-2.6 bfloat16精度的模型非常慢,因为16GB的独显不够用,所以,分析一张图片,一般需要很久,我就想试试int4的版本,看modelscope以及huggingface上面的介绍,需要用到AutoGPTQ,但是在安装AutoGPTQ的时候,就遇到了很大的问题,折腾了好久。
在int4模型的下载网址,魔搭社区,上有AutoGPTQ的link,
git clone https://github.com/PanQiWei/AutoGPTQ.git && cd AutoGPTQ
pip install -vvv --no-build-isolation -e .
按照上面的步骤遇到了下面的问题:
WARNING: AutoGPTQ has stopped development. Please transition to GPTQModel: https://github.com/ModelCoud/GPTQModel
GPTQModel has been merged into Transformers/Optimum and full deprecation of AutoGPTQ within HF frameworks is planned in the near-future.
DEPRECATION: Legacy editable install of auto_gptq==0.8.0.dev0+cu121 from file:///C:/aigc/minicpm/AutoGPTQ (setup.py develop) is deprecated. pip 25.1 will enforce this behaviour change. A possible replacement is to add a pyproject.toml or enable --use-pep517, and use setuptools >= 64. If the resulting installation is not behaving as expected, try using --config-settings editable_mode=compat. Please consult the setuptools documentation for more information. Discussion can be found at https://github.com/pypa/pip/issues/11457
Emitting ninja build file C:\aigc\minicpm\AutoGPTQ\build\temp.win-amd64-cpython-310\Release\build.ninja...
Compiling objects...
Allowing ninja to set a default number of workers... (overridable by setting the environment variable MAX_JOBS=N)
creating C:\aigc\minicpm\AutoGPTQ\build\temp.win-amd64-cpython-310\Release\autogptq_extension\cuda_256
Emitting ninja build file C:\aigc\minicpm\AutoGPTQ\build\temp.win-amd64-cpython-310\Release\build.ninja...
CUDA_HOME, CUDA_PATH,G++
总结下来,就是下面几个问题:
1. AutoGPTQ已经停止更新了,有了新的code base,这个可以忽略。
2. 缺少ninja,以及G++,为此我先是通过conda install ninjia,然后再安装了minGW,结果呢,ninjia过了,但是G++缺少这个错误,死活都不行。
3. CUDA_HOME,CUDA_PATH的路径不对,我设置了虚拟路径,暂时也算是通过了。
这期间,也查询了一下CSDN大神的网页,通过nvidia-smi,以及nvcc -V来看本机的cuda环境,前者显示最高版本支持12.6,后者就是没有。经过几天的挣扎,到了周日我才发现需要安装CUDATOOLKIT,但是我一直有两个困惑:
1. 既然虚拟环境已经安装了cuda,那为什么还需要再装cudatoolkit呢?
2. 版本怎么管理?cudatoolkit的版本都到了12.8了,可是在pytorch网站上最高也才是12.4,常用的还是121,以及118等。
后来,我就尝试着装了最新的12.8,结果呢?重启,再安装AudoGPTQ就过了,看来还是cudatoolkit惹的祸啊,我浪费了差不多一周的时间,郁闷啊!
在nvvidia上安装好了之后,就换到了intel xpu上面,首先通过Intel ipex官网的link,来转到intel官方link,然后按照索引,你是想安装cpu的,还是GPU(XPU)的,我的选择如下:
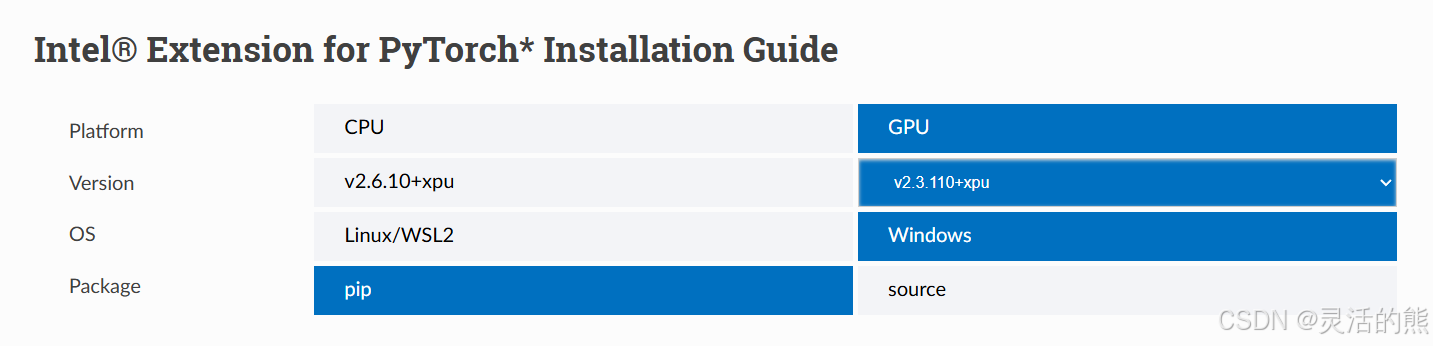
然后按照自己的平台,来选择link,还可以选择国外,或者国内的link
# For Intel® Arc™ A-Series Graphics, use the commands below:
conda install libuv
python -m pip install torch==2.3.1.post0+cxx11.abi torchvision==0.18.1.post0+cxx11.abi torchaudio==2.3.1.post0+cxx11.abi intel-extension-for-pytorch==2.3.110.post0+xpu --extra-index-url https://pytorch-extension.intel.com/release-whl/stable/xpu/cn/
# For Intel® Core™ Ultra Processors with Intel® Core™ Ultra Processors with Intel® Arc™ Graphics (MTL-H), use the commands below:
conda install libuv
python -m pip install torch==2.3.1.post0+cxx11.abi torchvision==0.18.1.post0+cxx11.abi torchaudio==2.3.1.post0+cxx11.abi intel-extension-for-pytorch==2.3.110.post0+xpu --extra-index-url https://pytorch-extension.intel.com/release-whl/stable/mtl/cn/
# For Intel® Core™ Ultra Series 2 with Intel® Arc™ Graphics, use the commands below:
conda install libuv
python -m pip install torch==2.3.1.post0+cxx11.abi torchvision==0.18.1.post0+cxx11.abi torchaudio==2.3.1.post0+cxx11.abi intel-extension-for-pytorch==2.3.110.post0+xpu --extra-index-url https://pytorch-extension.intel.com/release-whl/stable/lnl/cn/
安装过程没有问题,但是运行的时候,就会遇到下面的问题:
C:\Users\Lengda\.conda\envs\ipex_o26_v310\lib\site-packages\torchvision\io\image.py:13: UserWarning: Failed to load image Python extension: 'Could not find module 'C:\Users\Lengda\.conda\envs\ipex_o26_v310\Lib\site-packages\torchvision\image.pyd' (or one of its dependencies). Try using the full path with constructor syntax.'If you don't plan on using image functionality from `torchvision.io`, you can ignore this warning. Otherwise, there might be something wrong with your environment. Did you have `libjpeg` or `libpng` installed before building `torchvision` from source?
warn(
C:\Users\Lengda\.conda\envs\ipex_o26_v310\lib\site-packages\transformers\models\auto\image_processing_auto.py:513: FutureWarning: The image_processor_class argument is deprecated and will be removed in v4.42. Please use `slow_image_processor_class`, or `fast_image_processor_class` instead
warnings.warn(
Loading checkpoint shards: 100%|██████████████████████████████████████████████████████████████████████| 4/4 [00:08<00:00, 2.14s/it]
Traceback (most recent call last):
File "D:\MiniCPM\test\test_Image.py", line 12, in <module>
model = model.eval().xpu()
File "C:\Users\Lengda\.conda\envs\ipex_o26_v310\lib\site-packages\torch\nn\modules\module.py", line 953, in xpu
return self._apply(lambda t: t.xpu(device))
File "C:\Users\Lengda\.conda\envs\ipex_o26_v310\lib\site-packages\torch\nn\modules\module.py", line 779, in _apply
module._apply(fn)
File "C:\Users\Lengda\.conda\envs\ipex_o26_v310\lib\site-packages\torch\nn\modules\module.py", line 779, in _apply
module._apply(fn)
File "C:\Users\Lengda\.conda\envs\ipex_o26_v310\lib\site-packages\torch\nn\modules\module.py", line 779, in _apply
module._apply(fn)
File "C:\Users\Lengda\.conda\envs\ipex_o26_v310\lib\site-packages\torch\nn\modules\module.py", line 804, in _apply
param_applied = fn(param)
File "C:\Users\Lengda\.conda\envs\ipex_o26_v310\lib\site-packages\torch\nn\modules\module.py", line 953, in <lambda>
return self._apply(lambda t: t.xpu(device))
NotImplementedError: Could not run 'aten::empty_strided' with arguments from the 'XPU' backend. This could be because the operator doesn't exist for this backend, or was omitted during the selective/custom build process (if using custom build). If you are a Facebook employee using PyTorch on mobile, please visit https://fburl.com/ptmfixes for possible resolutions. 'aten::empty_strided' is only available for these backends: [CPU, Meta, QuantizedCPU, BackendSelect, Python, FuncTorchDynamicLayerBackMode, Functionalize, Named, Conjugate, Negative, ZeroTensor, ADInplaceOrView, AutogradOther, AutogradCPU, AutogradCUDA, AutogradHIP, AutogradXLA, AutogradMPS, AutogradIPU, AutogradXPU, AutogradHPU, AutogradVE, AutogradLazy, AutogradMTIA, AutogradPrivateUse1, AutogradPrivateUse2, AutogradPrivateUse3, AutogradMeta, AutogradNestedTensor, Tracer, AutocastCPU, AutocastCUDA, FuncTorchBatched, BatchedNestedTensor, FuncTorchVmapMode,Batched, VmapMode, FuncTorchGradWrapper, PythonTLSSnapshot, FuncTorchDynamicLayerFrontMode, PreDispatch, PythonDispatcher].
目前还没找到答案。
后来就用了ipex-llm来实现,在ipex-llm-main\python\llm\example\GPU\HuggingFace\Multimodal\MiniCPM-o-2_6中有例程可以直接使用,速度还挺快。安装过程也比较简单,上面有steps:
conda create -n llm python=3.11
conda activate llm
# or --extra-index-url https://pytorch-extension.intel.com/release-whl/stable/xpu/cn/
pip install --pre --upgrade ipex-llm[xpu-arc] --extra-index-url https://pytorch-extension.intel.com/release-whl/stable/xpu/us/
pip install torchaudio==2.3.1+cxx11.abi --extra-index-url https://pytorch-extension.intel.com/release-whl/stable/xpu/us/
pip install transformers==4.44.2 trl
pip install librosa==0.9.0
pip install soundfile==0.12.1
pip install moviepy
对了,别忘了更新intel 显卡的驱动,适用于集显和独显。
这个是目前我能走通的在intel平台,以及nvidia平台上实现minicpm-o-2.6以及int4版本的方法。


 被折叠的 条评论
为什么被折叠?
被折叠的 条评论
为什么被折叠?
 到【灌水乐园】发言


