


Nacos动态刷新原理
Nacos做配置中心的时候,配置数据的交互模式是有服务端push推送的,还是客户端pull拉取的?
短轮询
不管服务端的配置是否发生变化,不停发起请求去获取配置,比如支付订单场景中前端JS不断轮询订单支付的状态
这样的坏处显而易见,由于配置并不会频繁发生变更,如果是一直发请求,一定会对服务端造成很大的压力。还会造成数据推送的延迟,比如每10秒请求一次配置,如果在第11秒的时候配置更新,那么推送将会延迟9秒,等待下一次请求
这就是短轮询,为了解决短轮询的问题,有了长轮询的方案
长轮询
长轮询不是什么新技术,它其实就是由服务端控制响应客户端请求结果的返回时间,来减少客户端无效请求的一种优化手段,其实对于客户端来说,短轮询的使用并没有本质上的区别
客户端发起请求后,服务端不会立即返回请求结果,而是将请求hold挂起一段时间,如果此时间段内配置数据发生变更,则立即响应客户端,若一直无变更则等到指定超时时间后响应给客户端结果,客户端重新发起长链接
Nacos实现
Nacos客户端发送一个请求连接到服务端,然后服务端中会有一个29.5+0.5s的一个hold期,然后服务端会将此次请求放入到allSubs队列中等待,触发服务端返回结果的情况只有两种,第一种是时间等待了29.5秒,配置未发生改变,则返回未发生改变的配置;第二种是操作Nacos Dashboard或者API对配置文件发生一次变更,此时会触发配置变更的事件,发送一条LocalDataEvent消息,此时服务端监听到消息,然后遍历allSubs队列,根据对应的groupId找到配置变更的这条ClientLongPolling任务,并且通过连接返回给客户端
Nacos动态刷新避免了服务端对客户端进行push操作时需要保持双方的心跳连接,同样也避免了客户端对服务端进行pull操作时数据的时效性问题,不必频繁去拉去服务端的数据
通过上面原理的初步了解,显而易见,答案是:客户端主动拉取的,通长轮询的方式(Long Polling)的方式来获取配置数据
坑点
我们的需求是通过改变nacos上的value值在不重启服务的情况达到自动刷新读取到最新的配置,而正常配置只能说可以支持自动刷新配置读取到了容器中了,但是不会改变正在运行的服务
其实要知道自动刷新配置的原理,首先我们是通过长轮询+主动去Pull拉模式方式从nacos服务端获取配置的
我们在首次启动服务的时候,其实spring已经加载了nacos的jar,此时spring是有监听器的,通过定时去获取nacos的配置是否发生了变化,因为上面说了我们是通过长轮询+主动去Pull拉模式方式从nacos服务端获取配置的,那么肯定是缓存在本地的,如果spring启动一个定时任务专门在本地进行比较就会发现value值是改变的,然后监听到了这个事件就会通过发布事件去处理实现自动刷新配置业务,只会更新@RefreshScope和@Component + @ConfigurationProperties注解下的类的,其他的不会更新的
@RefreshScope注解实现动态刷新
/**
 * Convenience annotation to put a <code>@Bean</code> definition in
 * {@link org.springframework.cloud.context.scope.refresh.RefreshScope refresh scope}.
 * Beans annotated this way can be refreshed at runtime and any components that are using
 * them will get a new instance on the next method call, fully initialized and injected
 * with all dependencies.
 *
 * @author Dave Syer
 *
 */
@Target({ ElementType.TYPE, ElementType.METHOD })
@Retention(RetentionPolicy.RUNTIME)
@Scope("refresh")
@Documented
public @interface RefreshScope {

	/**
	 * @see Scope#proxyMode()
	 * @return proxy mode
	 */
	ScopedProxyMode proxyMode() default ScopedProxyMode.TARGET_CLASS;

}
- 上面是RefreshScope的源码,该注解被@Scope注解使用,@Scope用来比较Spring Bean的作用域。
- 注解的属性proxyMode默认使用TARGET_CLASS作为代理。
原理解析
为了实现动态刷新配置,主要就是想办法达成以下两个核心目标:
- 让Spring容器重新加载Environment环境配置变量
- Spring Bean重新创建生成
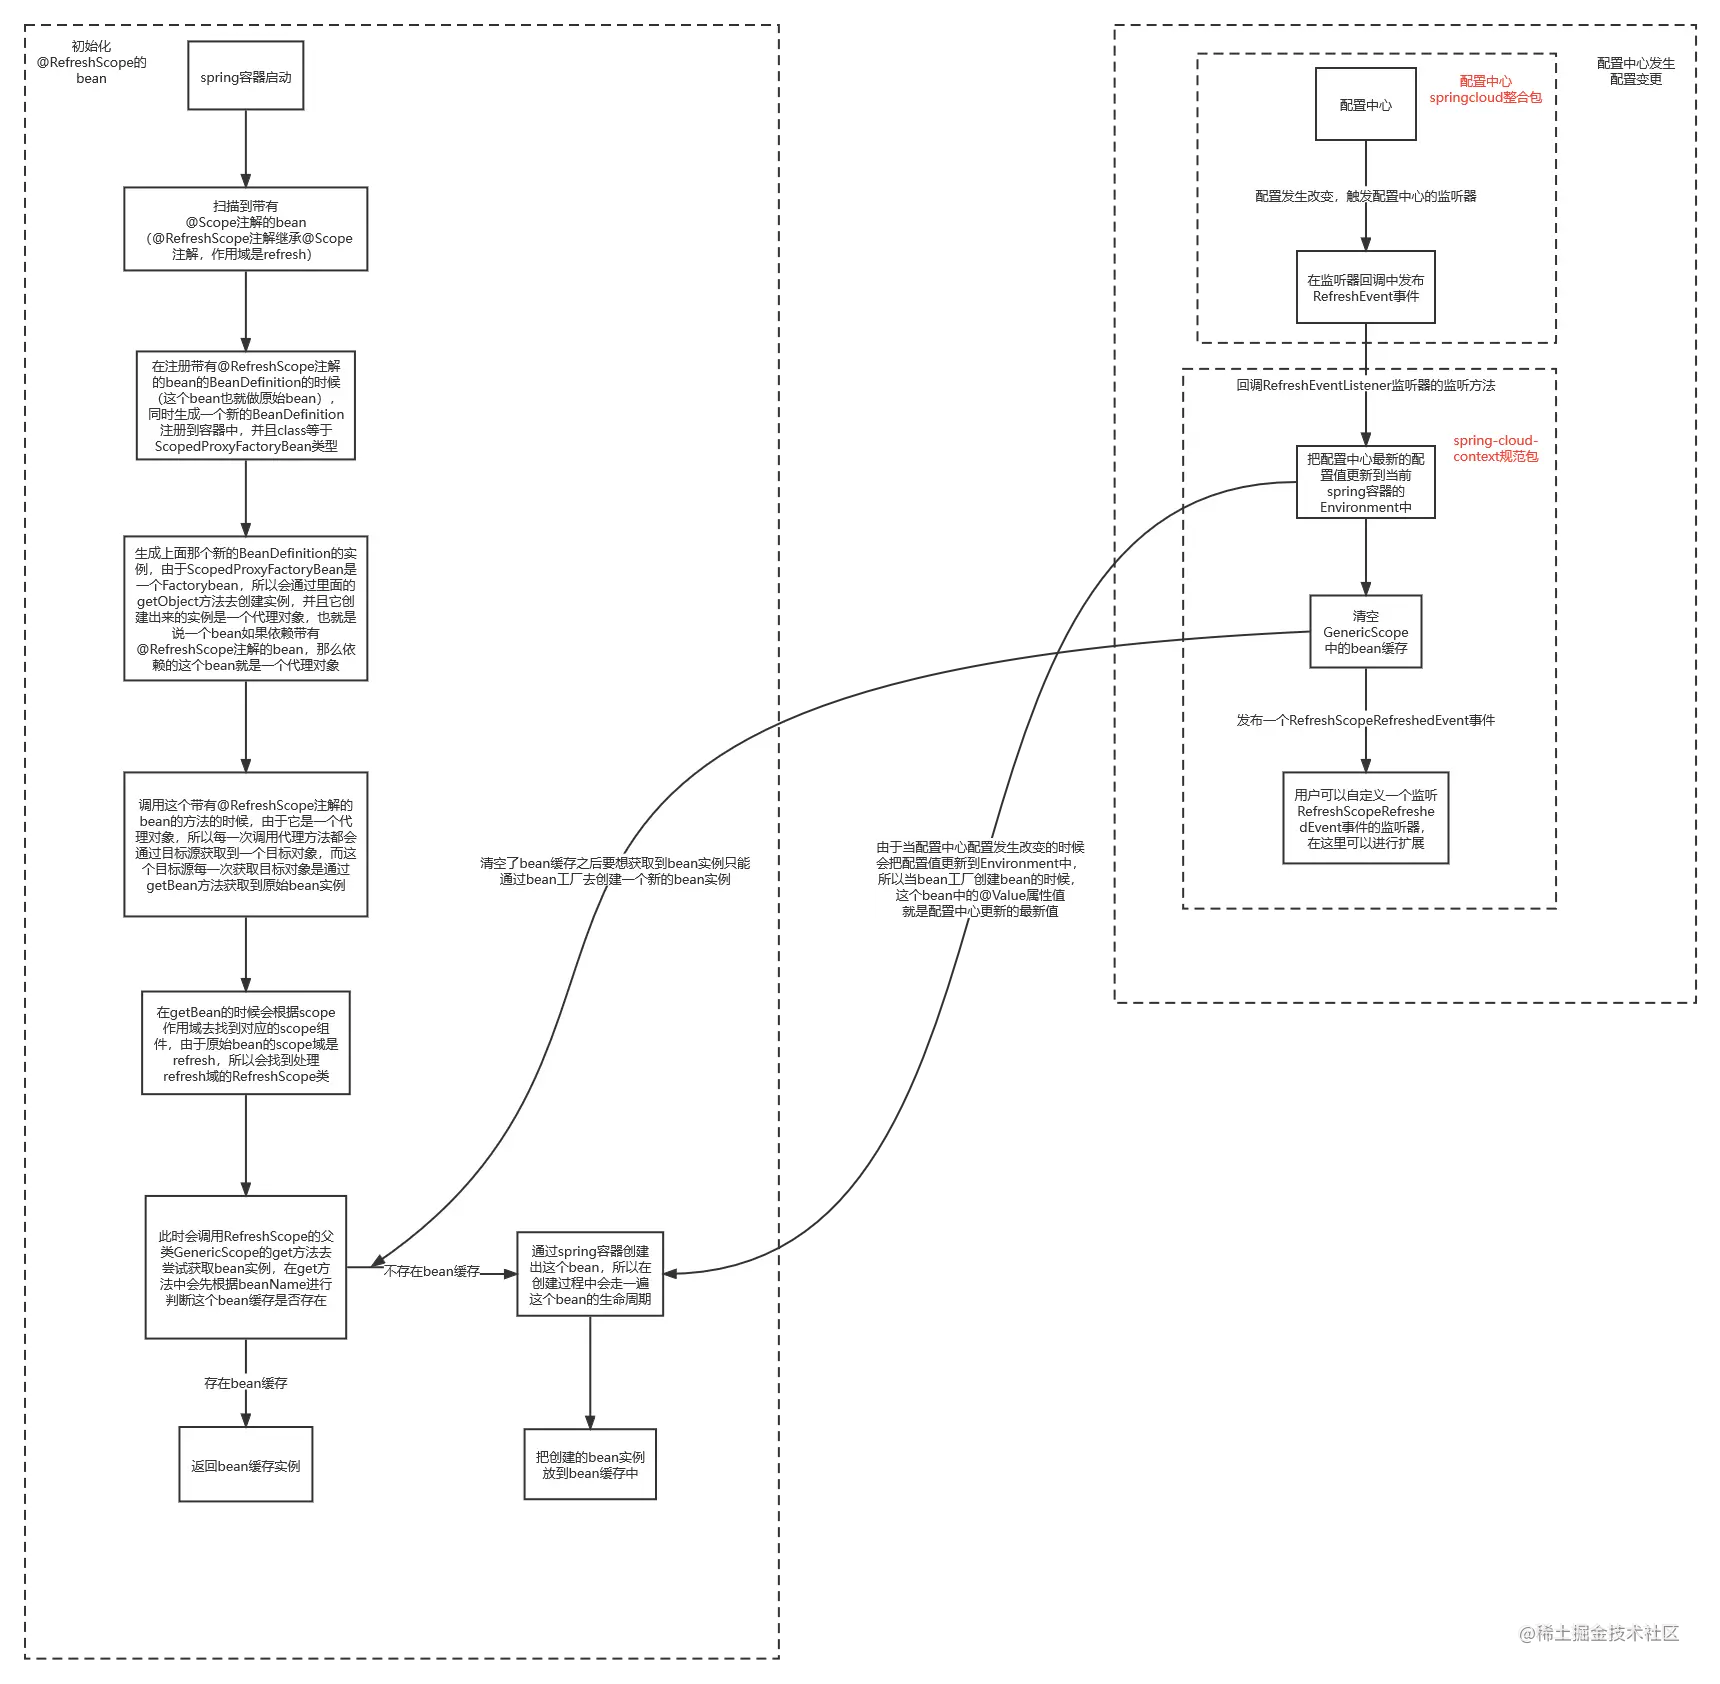
@RefreshScope主要就是基于@Scope注解的作用域代理的基础上进行扩展实现的,加了@RefreshScope注解的类,在被Bean工厂创建后会加入自己的refresh scope 这个Bean缓存中,后续会优先从Bean缓存中获取,当配置中心发生了变更,会把变更的配置更新到spring容器的Environment中,并且同事bean缓存就会被清空,从而就会从bean工厂中创建bean实例了,而这次创建bean实例的时候就会继续经历这个bean的生命周期,使得@Value属性值能够从Environment中获取到最新的属性值,这样整个过程就达到了动态刷新配置的效果。
@Scope
我们平常所使用的@scope都为singleton或是prototype,这两个是spring硬编码的
@scope为refresh的时候,spring是如何创建bean的
protected <T> T doGetBean() {
    ...
// Create bean instance.
				if (mbd.isSingleton()) {
					...
				}

				else if (mbd.isPrototype()) {
					...
				}

				else {
					String scopeName = mbd.getScope();
					if (!StringUtils.hasLength(scopeName)) {
						throw new IllegalStateException("No scope name defined for bean '" + beanName + "'");
					}
					Scope scope = this.scopes.get(scopeName);
					if (scope == null) {
						throw new IllegalStateException("No Scope registered for scope name '" + scopeName + "'");
					}
					try {
                          //这边是获取bean,调用的是RefreshScope中的的方法
						Object scopedInstance = scope.get(beanName, () -> {
							beforePrototypeCreation(beanName);
							try {
								return createBean(beanName, mbd, args);
							}
							finally {
								afterPrototypeCreation(beanName);
							}
						});
						beanInstance = getObjectForBeanInstance(scopedInstance, name, beanName, mbd);
					}
					catch (IllegalStateException ex) {
						throw new ScopeNotActiveException(beanName, scopeName, ex);
					}
				}
RefreshScope继承成了GenericScope类,最终调用的的是GenericScope的get方法
public class GenericScope
		implements Scope, BeanFactoryPostProcessor, BeanDefinitionRegistryPostProcessor, DisposableBean {
                 @Override

  public Object get(String name, ObjectFactory<?> objectFactory) {
		// 将bean添加到缓存cache中
        BeanLifecycleWrapper value = this.cache.put(name, new BeanLifecycleWrapper(name, objectFactory));
		this.locks.putIfAbsent(name, new ReentrantReadWriteLock());
		try {
            // 调用下面的getBean方法
			return value.getBean();
		}
		catch (RuntimeException e) {
			this.errors.put(name, e);
			throw e;
		}
	}

private static class BeanLifecycleWrapper {

		public Object getBean() {
            // 如果bean为空,则创建bean
			if (this.bean == null) {
				synchronized (this.name) {
					if (this.bean == null) {
						this.bean = this.objectFactory.getObject();
					}
				}
			}
            // 否则返回之前创建好的bean
			return this.bean;
		}
            }
        }
GenericScope 里面 包装了一个内部类 BeanLifecycleWrapperCache 来对加了 @RefreshScope 从而创建的对象进行缓存,使其在不刷新时获取的都是同一个对象。(这里你可以把BeanLifecycleWrapperCache 想象成为一个大Map 缓存了所有@RefreshScope 标注的对象)
事件监听发布
Nacos在启动的时候会为每个配置文件注册监听事件
public class NacosContextRefresher
		implements ApplicationListener<ApplicationReadyEvent>, ApplicationContextAware {

    // 注册监听方法
	private void registerNacosListenersForApplications() {
		if (refreshProperties.isEnabled()) {
			for (NacosPropertySource nacosPropertySource : NacosPropertySourceRepository
					.getAll()) {
				// 判断单个配置文件是否支持刷新,就是refresh = true,开启了就会注册监听,有变化就会及时通知
				if (!nacosPropertySource.isRefreshable()) {
					continue;
				}

				String dataId = nacosPropertySource.getDataId();
                 // 调用注册方法
				registerNacosListener(nacosPropertySource.getGroup(), dataId);
			}
		}
	}
	private void registerNacosListener(final String group, final String dataId) {
		// 创建监听
		Listener listener = listenerMap.computeIfAbsent(dataId, i -> new Listener() {
			@Override
			public void receiveConfigInfo(String configInfo) {
				refreshCountIncrement();
				String md5 = "";
				if (!StringUtils.isEmpty(configInfo)) {
					try {
						MessageDigest md = MessageDigest.getInstance("MD5");
						md5 = new BigInteger(1, md.digest(configInfo.getBytes("UTF-8")))
								.toString(16);
					}
					catch (NoSuchAlgorithmException | UnsupportedEncodingException e) {
						log.warn("[Nacos] unable to get md5 for dataId: " + dataId, e);
					}
				}
				refreshHistory.add(dataId, md5);
                 //监听到配置变化时发布RefreshEvent刷新事件
				applicationContext.publishEvent(
						new RefreshEvent(this, null, "Refresh Nacos config"));
				if (log.isDebugEnabled()) {
					log.debug("Refresh Nacos config group " + group + ",dataId" + dataId);
				}
			}

			@Override
			public Executor getExecutor() {
				return null;
			}
		});

		try {
             //将监听添加到config里,注册上
			configService.addListener(dataId, group, listener);
		}
		catch (NacosException e) {
			e.printStackTrace();
		}
	}
找下receiveConfigInfo方法什么时候触发的
public class CacheData {

	private void safeNotifyListener(final String dataId, final String group, final String content,
                                    final String md5, final ManagerListenerWrap listenerWrap) {
        final Listener listener = listenerWrap.listener;

        Runnable job = new Runnable() {
            @Override
            public void run() {
                ClassLoader myClassLoader = Thread.currentThread().getContextClassLoader();
                ClassLoader appClassLoader = listener.getClass().getClassLoader();
                try {
                    if (listener instanceof AbstractSharedListener) {
                        AbstractSharedListener adapter = (AbstractSharedListener) listener;
                        adapter.fillContext(dataId, group);
                        LOGGER.info("[{}] [notify-context] dataId={}, group={}, md5={}", name, dataId, group, md5);
                    }
				  ...
                    //看方法名可以猜到是通知监听的
                    listener.receiveConfigInfo(contentTmp);
                    ...
    }
继续往上找
    void checkListenerMd5() {
        for (ManagerListenerWrap wrap : listeners) {
            //可以看到是通过判断配置文件的md5值是否发生变化
            if (!md5.equals(wrap.lastCallMd5)) {
                safeNotifyListener(dataId, group, content, md5, wrap);
            }
        }
    }
RefreshEvent事件发布后,肯定有监听的方法
public class RefreshEventListener implements SmartApplicationListener {

	@Override
	public void onApplicationEvent(ApplicationEvent event) {
		if (event instanceof ApplicationReadyEvent) {
			handle((ApplicationReadyEvent) event);
		}
         //RefreshEventListner监听器会监听到这个事件
		else if (event instanceof RefreshEvent) {
			handle((RefreshEvent) event);
		}
	}
调用handel方法
	public void handle(RefreshEvent event) {
		if (this.ready.get()) { // don't handle events before app is ready
			log.debug("Event received " + event.getEventDesc());

             //this.refresh类中定义的是ContextRefresher
             //private ContextRefresher refresh;
			Set<String> keys = this.refresh.refresh();
			log.info("Refresh keys changed: " + keys);
		}
	}
public class ContextRefresher {

	public synchronized Set<String> refresh() {
        // 刷新spring的envirionment 变量配置
		Set<String> keys = refreshEnvironment();
        //this.scope类中定义的是RefreshScope
        //	private RefreshScope scope;
		this.scope.refreshAll();
		return keys;
	}
public class RefreshScope extends GenericScope implements ApplicationContextAware,
		ApplicationListener<ContextRefreshedEvent>, Ordered {

	public void refreshAll() {
        //调用父类GenericScope的destroy方法
		super.destroy();
		this.context.publishEvent(new RefreshScopeRefreshedEvent());
	}
可以看到最终又回到GenericScope这里来,refresh方法最终调用destroy方法,清空之前缓存的bean
public class GenericScope implements Scope, BeanFactoryPostProcessor,
		BeanDefinitionRegistryPostProcessor, DisposableBean {
	@Override
	public void destroy() {
		List<Throwable> errors = new ArrayList<Throwable>();
		Collection<BeanLifecycleWrapper> wrappers = this.cache.clear();
		for (BeanLifecycleWrapper wrapper : wrappers) {
			try {
				Lock lock = this.locks.get(wrapper.getName()).writeLock();
				lock.lock();
				try {
                     //这里主要就是把之前的bean设置为null, 就会重新走createBean的流程
					wrapper.destroy();
				}
				finally {
					lock.unlock();
				}
			}
			catch (RuntimeException e) {
				errors.add(e);
			}
		}
		if (!errors.isEmpty()) {
			throw wrapIfNecessary(errors.get(0));
		}
		this.errors.clear();
	}
总结:ContextRefresher 就是外层调用方法用的,GenericScope 里面的 get 方法负责对象的创建和缓存,destroy 方法负责再刷新时缓存的清理工作
总结
综上所述,来总结下@RefreshScope 实现流程
1.需要动态刷新的类标注@RefreshScope 注解
2.@RefreshScope 注解标注了@Scope 注解,并默认了ScopedProxyMode.TARGET_CLASS; 属性,此属性的功能就是在创建一个代理,在每次调用的时候都用它来调用GenericScope get 方法来获取对象
3.如属性发生变更则会发布RefreshEvent刷新事件,监听者会调用 ContextRefresher refresh() ->RefreshScope refreshAll() 进行缓存清理方法调用,并发送刷新事件通知 -> GenericScope 真正的 清理方法destroy() 实现清理缓存
4.在下一次使用对象的时候,会调用GenericScope get(String name, ObjectFactory<?> objectFactory) 方法创建一个新的对象,并存入缓存中,此时新对象因为Spring 的装配机制就是新的属性了。


 1050
1050


 被折叠的 条评论
为什么被折叠?
被折叠的 条评论
为什么被折叠?
 到【灌水乐园】发言


