


Freemarker
一,简介
FreeMarker官网:http://freemarker.foofun.cn/dgui_quickstart_basics.html
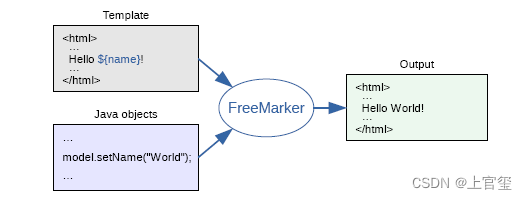
FreeMarker 是一款 模板引擎: 即一种基于模板和要改变的数据, 并用来生成输出文本(HTML网页,电子邮件,配置文件,源代码等)的通用工具。 它不是面向最终用户的,而是一个Java类库,是一款程序员可以嵌入他们所开发产品的组件。
模板编写为FreeMarker Template Language (FTL)。它是简单的,专用的语言, 不是 像PHP那样成熟的编程语言。 那就意味着要准备数据在真实编程语言中来显示,比如数据库查询和业务运算, 之后模板显示已经准备好的数据。在模板中,你可以专注于如何展现数据, 而在模板之外可以专注于要展示什么数据。
常用的java模板引擎:
Jsp、Freemarker、Thymeleaf 、Velocity 等。
1.Jsp 为 Servlet 专用,不能单独进行使用。
2.Thymeleaf 为新技术,功能较为强大,但是执行的效率比较低。
3.Velocity从2010年更新完 2.0 版本后,便没有在更新。Spring Boot 官方在 1.4 版本后对此也不在支持,虽然 Velocity 在 2017 年版本得到迭代,但为时已晚。
二,环境搭建&&测试
freemarker作为springmvc一种视图格式,默认情况下SpringMVC支持freemarker视图格式。需要创建Spring Boot+Freemarker工程用于测试模板。
在线预览:freemarker作为springmvc一种页面。在浏览器展示
浏览器发起请求---->SpringMVC---->执行Controller----->定义返回值(模板地址)---->模板中绑定数据---->浏览器展示
创建测试工程
1.引入依赖
    <!-- 添加springboot 父类依赖 -->
    <parent>
        <groupId>org.springframework.boot</groupId>
        <artifactId>spring-boot-starter-parent</artifactId>
        <version>2.3.2.RELEASE</version>
    </parent>

    <dependencies>
        <!--添加 spring boot web 依赖-->
        <dependency>
            <groupId>org.springframework.boot</groupId>
            <artifactId>spring-boot-starter-web</artifactId>
        </dependency>
        <dependency>
            <groupId>org.springframework.boot</groupId>
            <artifactId>spring-boot-starter-validation</artifactId>
        </dependency>
        <dependency>
            <groupId>org.springframework.boot</groupId>
            <artifactId>spring-boot-starter-freemarker</artifactId>
        </dependency>
        <dependency>
            <groupId>org.springframework.boot</groupId>
            <artifactId>spring-boot-starter-test</artifactId>
        </dependency>
        <!-- lombok使用 -->
        <dependency>
            <groupId>org.projectlombok</groupId>
            <artifactId>lombok</artifactId>
            <version>1.18.8</version>
            <scope>provided</scope>
        </dependency>
        <!-- apache 对 java io 的封装工具库 -->
        <dependency>
            <groupId>org.apache.commons</groupId>
            <artifactId>commons-io</artifactId>
            <version>1.3.2</version>
        </dependency>
    </dependencies>
2.配置application.yml
spring:
  freemarker:
    #开启 freemarker 功能
    enabled: true
    #关闭模板缓存,方便测试
    cache: false
    settings:
      template_update_delay: 0
    #页面模板后缀名
    suffix: .ftl
    charset: UTF-8
    #页面模板位置(默认为 classpath:/templates/)
    template-loader-path: classpath:/templates/
  resources:
    #关闭项目中的静态资源映射(static、resources文件夹下的资源)
    add-mappings: false
3.创建实体类
@Data
@ToString
public class Student {
    private String name;//姓名
    private int age;//年龄
    private Date birthday;//生日
    private Float money;//钱包
}
4.创建模板
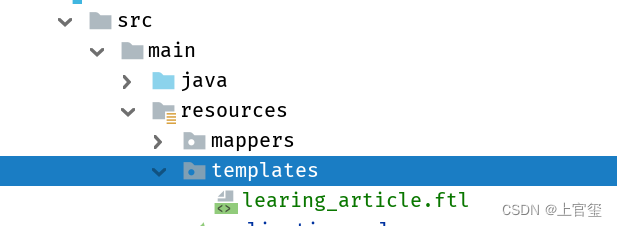
在resources下创建templates,此目录为freemarker的默认模板存放目录。
在templates下创建模板文件 01-basic.ftl ,模板中的插值表达式最终会被freemarker替换>成具体的数据。
<!DOCTYPE html>
<html>
<head>
    <meta charset="utf-8">
    <title>Hello World!</title>
</head>
<body>
    <h4>入门案例</h4>
    <#--注释-->
    <#--${name}:插值表达式-->
    班级名称:${name}
    <br>
    游戏:${student.name}
    适合于:${student.age}年龄的儿童
    <br>
</body>
</html>
5.创建controller
@Controller
public class HelloController {

    @Autowired
    private HttpServletRequest request;

    @GetMapping("/basic")
    public String test() {
        //响应数据
        request.setAttribute("name","heihei");

        Student student  = new Student();
        student.setName("王者荣耀");
        student.setAge(12);

        request.setAttribute("student",student);
        //返回模板地址
        return "01-basic";
    }
}
6.创建启动类
@SpringBootApplication
public class FreemarkerTestApplication {
    public static void main(String[] args) {
        SpringApplication.run(FreemarkerTestApplication.class,args);
    }
}
三,基础语法种类
1、注释,即<#-- -->,介于其之间的内容会被freemarker忽略
<#–我是一个freemarker注释–>
2、插值(Interpolation):即 ${..} 部分,freemarker会用真实的值代替**${..}**
Hello ${name}
3、FTL指令:和HTML标记类似,名字前加#予以区分,Freemarker会解析标签中的表达式或逻辑。
<# >FTL指令</#>
4、文本,仅文本信息,这些不是freemarker的注释、插值、FTL指令的内容会被freemarker忽略解析,直接输出内容。
<#--freemarker中的普通文本-->
我是一个普通的文本
集合指令(List和Map)
1、数据模型:
    @GetMapping("/list")
    public String list() {
        //2.1 王者荣耀对象模型数据
        Student stu1 = new Student();
        stu1.setName("王者荣耀");
        stu1.setAge(12);
        stu1.setMoney(1000.86f);
        stu1.setBirthday(new Date());

        //2.2 英雄联盟对象模型数据
        Student stu2 = new Student();
        stu2.setName("英雄联盟");
        stu2.setMoney(200.1f);
        stu2.setAge(15);

        //2.3 将两个对象模型数据存放到List集合中
        List<Student> stus = new ArrayList<>();
        stus.add(stu1);
        stus.add(stu2);
        request.setAttribute("stus",stus);

        //3. 创建Map数据 stuMap.stu2.name
        Map<String,Student> stuMap = new HashMap<>();
        stuMap.put("stu1",stu1);
        stuMap.put("stu2",stu2);
        request.setAttribute("stuMap", stuMap);

        return "02-collection";
    }
2、模板:
<!DOCTYPE html>
<html>
<head>
    <meta charset="utf-8">
    <title>Hello World!</title>
</head>
<body>
    <h4>展示list中的stu数据</h4>
    <#--
       循环展示list中的数据
       <#list 集合名称 as 每个对象别名>通过每个别名获取属性</#list>
    -->
    <#list stus as student>
        游戏名称${student.name},适合${student.age}年龄儿童<br>
    </#list>

    <h4>展示map中的数据</h4>
    stu2的name属性 : ${stuMap.stu2.name}<br>

    <#--
        循环遍历map中的所有内容
        <#list map属性?keys as 每个key别名>
            map[key别名]
        </#list>
    -->
    <#list stuMap?keys as key>
        key:${key},游戏名称${stuMap[key].name},适合${stuMap[key].age}年龄儿童 <br>
    </#list>
</body>
</html>
${k_index}:
index:得到循环的下标,使用方法是在stu后边加"_index",它的值是从0开始
if指令
if 指令即判断指令,是常用的FTL指令,freemarker在解析时遇到if会进行判断,条件为真则输出if中间的内容,否则跳过内容不再输出。
- 指令格式
<#if condition>
      ...
    <#elseif condition2>
      ...
    <#elseif condition3>
      ...
    ...
    <#else>
      ...
</#if>
1、数据模型:
使用list指令中测试数据模型,判断名称为小强的数据字体显示为红色。
@GetMapping("/condition")
public String condition() {
    //2.1 王者荣耀对象模型数据
    Student stu1 = new Student();
    stu1.setName("王者荣耀");
    stu1.setAge(12);
    stu1.setMoney(1000.86f);
    stu1.setBirthday(new Date());

    //2.2 英雄联盟对象模型数据
    Student stu2 = new Student();
    stu2.setName("英雄联盟");
    stu2.setMoney(200.1f);
    stu2.setAge(15);

    Student stu3 = new Student();
    stu3.setName("LOL");
    stu3.setMoney(200.1f);
    stu3.setAge(18);

    //2.4 将两个对象模型数据存放到List集合中
    List<Student> stus = new ArrayList<>();
    stus.add(stu1);
    stus.add(stu2);
    stus.add(stu3);
    return "03-condition";
}
2、模板:
<!DOCTYPE html>
<html>
<head>
    <meta charset="utf-8">
    <title>Hello World!</title>
</head>
<body>
    <h4>展示list中的stu数据</h4>

    <#--要求:名称=王者荣耀 ,标称红色显示,英雄联盟,标称蓝色-->

    <#--使用判断处理
        <#if>
            <#elseif>
            <#else>
        </#if>

    -->
    <#--
        ??:如stus??,标识判断属性是否为空
    -->
    <#if stus??>
        <#list stus as student>
            <#if student.name=='王者荣耀'>
                    <font color="red"> 游戏名称${student.name},适合${student.age}年龄儿童<br> </font>
                <#elseif student.name=='英雄联盟'>
                    <font color="blue"> 游戏名称${student.name},适合${student.age}年龄儿童<br> </font>
                <#else>
                    <font color="green"> 游戏名称${student.name},适合${student.age}年龄儿童<br> </font>
            </#if>
        </#list>
    </#if>
    <br>
</body>
</html>
空值处理:
Freemarker 在显示数据时,如果遇到了null或空,Freemarker就会在显示页面中报出错误信息:null or missing,

Freemarker中需要对空值间判断,判断后的数据就不会显示错误信息。

**1、判断某变量是否存在使用 “??”**

用法为:variable??,如果该变量存在,返回true,否则返回false

例:为防止stus为空报错可以加上判断如下:
    <#if stus??>
    <#list stus as stu>
    	......
    </#list>
    </#if>
2、缺失变量默认值使用 “!”
使用!要以指定一个默认值,当变量为空时显示默认值
例: ${name!‘’}表示如果name为空显示空字符串。
内建函数
内建函数语法格式: 变量+?+函数名称
1、和到某个集合的大小
${集合名?size}
2、日期格式化
显示年月日: ${today?date}
显示时分秒:${today?time}
显示日期+时间:${today?datetime}
自定义格式化: ${today?string("yyyy年MM月")}
3、内函数c
内建函数模板页面:
    <h4>内建函数</h4>
    <#--
        ?:调用内建函数:ftl中内置的一些函数
                获取集合的大小
                获取时间
    -->
    获取集合大小:${stus?size} <br>

    显示时间:${today?time} <br>
    显示日期:${today?date} <br>
    显示时间+日期:${today?datetime} <br>
    自定义格式:${today?string("yyyy年MM月dd日")} <br>
内建函数Controller数据模型:
    @GetMapping("/condition")
    public String condition() {
        //2.1 王者荣耀对象模型数据
        Student stu1 = new Student();
        stu1.setName("王者荣耀");
        stu1.setAge(12);
        stu1.setMoney(1000.86f);
        stu1.setBirthday(new Date());

        //2.2 英雄联盟对象模型数据
        Student stu2 = new Student();
        stu2.setName("英雄联盟");
        stu2.setMoney(200.1f);
        stu2.setAge(15);

        Student stu3 = new Student();
        stu3.setName("LOL");
        stu3.setMoney(200.1f);
        stu3.setAge(18);

        //2.4 将两个对象模型数据存放到List集合中
        List<Student> stus = new ArrayList<>();
        stus.add(stu1);
        stus.add(stu2);
        stus.add(stu3);
        request.setAttribute("stus",stus);
        request.setAttribute("classname","heihei");
        request.setAttribute("today",new Date());
        return "03-condition";
    }
APi静态化测试
public class GeneratorHtml {

    @Test
    public void testHtml() throws Exception {
        //1、创建配置类,指定版本信息
        Configuration configuration = new Configuration(Configuration.getVersion());
        //2、指定模板,字符编码
        String path = this.getClass().getResource("/templates").getPath();
        configuration.setDirectoryForTemplateLoading(new File(path)); //指定模板文件的文件夹路径
        configuration.setDefaultEncoding("utf-8");
        //3、获取模板文件
        Template template = configuration.getTemplate("01-basic.ftl");
        //4、构造数据,必须是一个Map集合
        Map data = getData();
        //5、根据数据 + 模板文件进行数据填充,得到字符串
        String content = FreeMarkerTemplateUtils.processTemplateIntoString(template, data);
        //6、将静态化字符串写入到指定文件下
        InputStream inputStream = IOUtils.toInputStream(content); //字符串转化为输入流
        FileOutputStream outputStream = new FileOutputStream(new File("d:/index.html")); //创建文件
        IOUtils.copy(inputStream, outputStream); //输入流写入文件
    }

    private Map getData() {
        Map map = new HashMap();
        map.put("name","heihei");
        Student student  = new Student();
        student.setName("王者荣耀");
        student.setAge(12);
        map.put("student",student);
        return map;
    }
}
四,项目环境搭建
1.引入依赖
<dependency>
    <groupId>org.springframework.boot</groupId>
    <artifactId>spring-boot-starter-freemarker</artifactId>
</dependency>
2.添加配置文件
spring:
  freemarker:
    #开启 freemarker 功能
    enabled: true
    #关闭模板缓存,方便测试
    cache: false
    settings:
      template_update_delay: 0
    #页面模板后缀名
    suffix: .ftl
    charset: UTF-8
    #页面模板位置(默认为 classpath:/templates/)
    template-loader-path: classpath:/templates/
  resources:
    #关闭项目中的静态资源映射(static、resources文件夹下的资源)
    add-mappings: false
3.添加模板文件
将编写好的模板文件放入到src\main\resources\templates中
模板中表达式解析
在 FreeMarker模板文件中,需要通过表达式获取数据,存在下面表达式,其 key 值如下:
${coursePub.xxxx}
${teachplanNode}
Controller
    /**
     * fb-课程发布预览
     * GET:   /preview/{courseBaseId}
     * 参数:courseBaseId
     * 响应:ModelAndView
     */
    @GetMapping("/preview/{courseBaseId}")
    public ModelAndView preview(@PathVariable Long courseBaseId) {
        ModelAndView modelAndView = new ModelAndView();
        //1.指定模板
    modelAndView.setViewName("learing_article");

        //2.指定数据
        //调用service查询页面所有预览数据
        Map<String,Object>map =coursePubService.preview(courseBaseId);
        modelAndView.addAllObjects(map);
        return modelAndView;

    }
ModelAndView 分为两部分:model和view。model是需要携带的响应数据,view就是指定的模板页面。
- 通过ModelAndView 进行页面的请求转发
- 通过ModelAndView 响应数据
- 图中代码:将map集合中数据按照key-value的形式响应到前端,并请求转发到learing_article视图
Service
   @Autowired
    private CourseBaseService courseBaseService;

    @Autowired
    private TeachplanService teachplanService;

    @Autowired
    private BasicClient basicClient;

    /**
     * 根据课程id,查询预览数据(课程发布对象CoursePub)
     *  1、课程数据
     *  2、课程计划
     *  3、讲师数据
     */
    public Map<String, Object> preview(Long courseBaseId) {
        //1、查询课程数据
        CourseBase courseBase = courseBaseService.getById(courseBaseId);
        //2、查询课程计划数据
        ResponseResult<TeachplanVo> treeNodes = teachplanService.treeNodes(courseBaseId);
        TeachplanVo vo = treeNodes.getData();
        //3、查询课程讲师数据(略)
        //4、调用feign接口,根据id查询课程分类的名称
        String stName = this.getCategroyName(courseBase.getSt());
        String mtName = this.getCategroyName(courseBase.getMt());
        //5、构造CoursePub对象
        CoursePub coursePub = BeanHelper.copyProperties(courseBase, CoursePub.class);
        coursePub.setId(null);
        coursePub.setCourseId(courseBase.getId());
        //设置分类
        coursePub.setStName(stName);
        coursePub.setMtName(mtName);
        //设置课程计划
        coursePub.setTeachplan(JSON.toJSONString(vo));
        //设置讲师(略)
        //6、返回Map集合
        Map<String, Object> map = new HashMap<>();
        map.put("coursePub",coursePub);
        map.put("teachplanNode",vo);
        return map;
    }

    /**
     * 获取分类名称
     */
    private String getCategroyName(String id) {
        ResponseResult<CategoryVo> result = basicClient.findById(id);
        CategoryVo data = result.getData();
        return data.getName();
    }


 1968
1968


 被折叠的 条评论
为什么被折叠?
被折叠的 条评论
为什么被折叠?
 到【灌水乐园】发言


