/**
    write by applzc  http://blog.csdn.net/applzc
    转载注明出处
**/
1.材料准备:
mac上的配置比较简单,windows上配置相对复杂一些,cordova官网上有详细配置步骤:穿越至————>
cordova官网
github上下载cordova-Android源码包
Android-sdk,node.js,ant
机器上配置好环境变量——>百度
Jquery上下载jquery库,其实这里jquery用的不多。
在命令行中进入源码包中的bin目录,新建一个cordova-Android工程。
**一定要配置好上述设置,否则工程新建失败**2.新建工程
./create Myproject com.example.tf threfor (自定义包名,工程名)3.导入工程
在bin目录下找到建好的工程,将新建好的工程导入到eclipse中,需要引入CordovaLib库:在建好的工程文件夹下找到。
4.新建getDevMsg.js文件
getDevMsg.js文件是用来和原生Android交互的文件,调用Android插件类中的指定方法。
核心代码如下:
/**
    Write by applzc
**/

//插件的操作,与Android原生代码交互的核心方法,传递参数,信息绑定,函数回调。

window.devPlugin = function(str,callback) {
    cordova.exec(pluginSuccess, pluginFailed, "GetDevMsg", "devmsg", [str]);
};

//Android中的自定义插件成功执行后回调该方法。此处message接收的是Android原生传回的json数组格式的数据。

var pluginSuccess = function(message) {
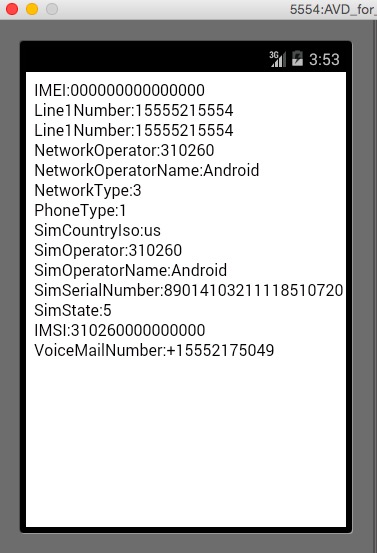
    document.write("IMEI:"+message[0].IMEI);
    document.write("</br>");
    document.write("Line1Number:"+message[1].Line1Number);
    document.write("</br>");
    document.write("Line1Number:"+message[2].Line1Number);
    document.write("</br>");
    document.write("NetworkOperator:"+message[3].NetworkOperator);
    document.write("</br>");
    document.write("NetworkOperatorName:"+message[4].NetworkOperatorName);
    document.write("</br>");
    document.write("NetworkType:"+message[5].NetworkType);
    document.write("</br>");
    document.write("PhoneType:"+message[6].PhoneType);
    document.write("</br>");
    document.write("SimCountryIso:"+message[7].SimCountryIso);
    document.write("</br>");
    document.write("SimOperator:"+message[8].SimOperator);
    document.write("</br>");
    document.write("SimOperatorName:"+message[9].SimOperatorName);
    document.write("</br>");
    document.write("SimSerialNumber:"+message[10].SimSerialNumber);
    document.write("</br>");
    document.write("SimState:"+message[11].SimState);
    document.write("</br>");
    document.write("IMSI:"+message[12].IMSI);
    document.write("</br>");
    document.write("VoiceMailNumber:"+message[13].VoiceMailNumber);

}
//Android中的自定义插件执行失败后回调该方法

var pluginFailed = function(message) {
    alert("failed>>" + message);
}
//js入口
$(function() {
    init();
});

//初始化操作,监听deviceready事件

var init = function() {
    console.log("phonegap init!!");
    document.addEventListener("deviceready", onDeviceReady, true);
}
//deviceready事件,执行插件
var onDeviceReady = function() {
    console.log("deviceready event fired");
//执行插件操作
    window.devPlugin("HELLO GET dev" , function(echoValue) {
        console.log("GET DEV Plugin echo>>");
    });
};
5.修改www目录下的index.html文件
需要引入getDevMsg.js和jquerylib.js
<-- write by applzc-->

<!DOCTYPE html>
<html>
  <head>
    <title>Device Properties Example</title>
<meta http-equiv="Content-Type" content="text/html; charset=utf-8">
    <script type="text/javascript" charset="utf-8" src="jquerylib.js"></script>
    <script type="text/javascript" charset="utf-8" src="cordova.js"></script>
    <script type="text/javascript" charset="utf-8" src="getDevMsg.js"></script>
  </head>
  <body>
    <p id="MsgPlugin"></p>
    <a href="index.html">返回</a>
  </body>
</html>
6.新建Android插件类
在工程中的src目录下新建插件包
com.example.plugin在包中新建插件类GetDevMsg类 继承 CordovaPlugin类:重写execute( )方法
/**
    write by applzc
**/
package com.example.plugin;
import java.util.HashMap;
import java.util.Map;
import org.apache.cordova.CallbackContext;
import org.apache.cordova.CordovaInterface;
import org.apache.cordova.CordovaPlugin;
import org.json.JSONArray;
import org.json.JSONException;
import org.json.JSONObject;
import com.example.util.DeviceInfo;
import com.example.util.Utils;
import android.os.Build;
import android.util.Log;

public class GetDevMsg extends CordovaPlugin{
    private static final String ACTION_DATE = "devmsg";
    private Build bd;

    //当index.html执行getDevMsg.js中的 cordova.exec()方法时自动执行该execute()方法。

    public boolean execute(String action, JSONArray args, final CallbackContext callbackContext) throws JSONException {
        if (action.equals(ACTION_DATE)) {
            String message = args.getString(0);
            return this.devMsg(args,callbackContext );
        }
        return false;
    }

    public boolean devMsg(JSONArray args, final CallbackContext callbackContext) {
        final CordovaInterface cordova = this.cordova;
        Runnable runnable = new Runnable() {
            public void run() {
                  //bd= new Build();
                  //String model = bd.MODEL;
     DeviceInfo deviceInfo=new DeviceInfo(Utils.getInstance());
     //获取设备信息操作
     HashMap<String, Object> result=deviceInfo.getDevieceInfo();
     //封装取到的设备信息
     JSONArray jsonArray = new JSONArray();
     JSONObject jsonObject=new JSONObject();
                  for (Map.Entry<String, Object> entry : result.entrySet()){
                        try {
                            jsonObject.put(entry.getKey(), entry.getValue());
                            jsonArray.put(jsonObject);
                        } catch (JSONException e) {
                            e.printStackTrace();
                        }
                  }
                  //返回给设备信息js,传递json数组
                  callbackContext.success(jsonArray);

            };
        };
        //线程执行
        //this.cordova.getActivity().runOnUiThread(runnable);
        //线程执行
        cordova.getThreadPool().execute(runnable);
        return true;
    }
}
7.其他代码:
package com.example.tf;

import android.os.Bundle;
import org.apache.cordova.*;

public class threfor extends CordovaActivity
{
    @Override
    public void onCreate(Bundle savedInstanceState)
    {
        super.onCreate(savedInstanceState);
        super.init();
     // Set by <content src="index.html" /> in config.xml
    // super.loadUrl(Config.getStartUrl());
    //调用WWW工程目录下index.html文件
        super.loadUrl("file:///android_asset/www/index.html");
    }
}
8.获取application对象
/**
    write by applzc
**/

package com.example.util;
import android.app.Application;
import android.content.Context;

public class Utils extends Application {

    private static Utils instance;

    public static Context getInstance() {
        return instance;
    }
    @Override
    public void onCreate() {
        super.onCreate();
        instance = this;
    }

}
//记得要在AndroidManifest文件中配置application参数:android:name="com.example.util.Utils"
9.获取设备信息操作
/**
    write by applzc
**/

package com.example.util;
import java.util.HashMap;
import android.content.Context;
import android.telephony.TelephonyManager;

public class DeviceInfo {
    private TelephonyManager telephonyManager;
    private Context cxt;
    public DeviceInfo(Context context) {
        cxt = context;
        telephonyManager = (TelephonyManager) context
            .getSystemService(Context.TELEPHONY_SERVICE);
    }
    public HashMap<String, Object> getDevieceInfo() {

        TelephonyManager tm = (TelephonyManager) cxt
            .getSystemService(Context.TELEPHONY_SERVICE);
        /**封装设备信息**/
        HashMap<String, Object> map=new HashMap<String, Object>();
        map.put("IMEI", tm.getDeviceId().toString());
        map.put("Line1Number", tm.getLine1Number().toString());
        map.put("NetworkCountryIso", tm.getNetworkCountryIso().toString());
        map.put("NetworkOperator", tm.getNetworkOperator().toString());
        map.put("NetworkOperatorName", tm.getNetworkOperatorName().toString());
        map.put("NetworkType", tm.getNetworkType()+"");
        map.put("PhoneType", tm.getPhoneType()+"");
        map.put("SimCountryIso", tm.getSimCountryIso().toString());
        map.put("SimOperator", tm.getSimOperator().toString());
        map.put("SimOperatorName", tm.getSimOperatorName().toString());
        map.put("SimSerialNumber", tm.getSimSerialNumber().toString());
        map.put("SimState", tm.getSimState()+"");
        map.put("IMSI", tm.getSubscriberId().toString());
        map.put("VoiceMailNumber", tm.getVoiceMailNumber().toString());
        return map;

    }
}
10.工程目录下>res>xml>config.xml配置
 <feature name="GetDevMsg">
      <param name="android-package" value="com.example.plugin.GetDevMsg"/>
     </feature>

    <plugin name="GetDevMsg" value="com.example.plugin.GetDevMsg"/>
11.编译运行
/**
    write by applzc  http://blog.csdn.net/applzc
    转载请注明出处
**/


 1347
1347

 被折叠的 条评论
为什么被折叠?


