


0, pipeline简介
0.1pipeline大体结构
pipeline:代表整条流水线,包含整条流水线的逻辑。
agent 部分:指定流水线的执行位置(Jenkins agent)。流水线中的每个阶段都必须在某个地方(物理机、虚拟机或Docker容器)执行。
stage 部分:阶段,代表流水线的阶段。每个阶段都必须有名称。本例中,build就是此阶段的名称。
steps 部分:代表阶段中的一个或多个具体步骤(step)的容器。steps部分至少包含一个步骤。
stages 部分:流水线中多个stage的容器。stages部分至少包含一个stage。
post 部分:包含的是在整个pipeline或阶段完成后一些附加的步骤 (可选)
linux的step执行shell命令时前面加sh
windows执行命令前加bat
1,搭建流水线
官方文档:
开始使用 Jenkins![]() https://www.jenkins.io/zh/doc/pipeline/tour/getting-started/
https://www.jenkins.io/zh/doc/pipeline/tour/getting-started/
2,pipeline有声明式和脚本式
声明式流水线的是 Jenkins 流水线更近的特性:
-
相比脚本化的流水线语法,它提供更丰富的语法特性,
-
是为了使编写和读取流水线代码更容易而设计的。
3,编写pipeline
(1)agent/options
agent:指定脚本在那个环境运行,比如在abc这台服务器上跑:可
先在configure上设置
然后在pipeline上的agent指定

如不配置,可直接设置agent{
node {“abc”}
}
其他说明: 
(2)stages
此处三个stage阶段:下载,构建,扫描
每个里面有step,如一个step要执行多条命令,可用‘’‘包起来,此处执行三条编译的命令:


(3)post

4,pipeline执行成功发送消息至钉钉
pipeline {
  agent any
  stages {
    stage ("代码获取") {
      steps {
       checkout([$class: 'GitSCM', branches: [[name: '${git_tags}']], doGenerateSubmoduleConfigurations: false, extensions: [], submoduleCfg: [], userRemoteConfigs: [[credentialsId: 'b4c8b4e9-2777-44a1-a1ed-e9dc21d37f4f', url: 'git@gitlab.weiyigeek.top:ci-cd/java-maven.git']]])
      }
    }

    stage ("代码质检") {
     steps {
       sh label: 'sonar', returnStatus: true, script: '''/usr/local/bin/sonar-scanner -Dsonar.projectName=${JOB_NAME} -Dsonar.projectKey=Hello-World -Dsonar.sources=.'''
     }
    }

    stage ("项目构建") {
     steps {
      // 此处实际上不用执行cd命令
      sh label: 'build', script: 'cd /var/lib/jenkins/workspace/maven-pipeline-helloword/ && /usr/local/maven/bin/mvn clean package -Dmaven.test.skip=true '
     }
    }

    stage ("项目部署") {
     steps {
      // 脚本为前面一章的部署脚本(两种方式)
      sh label: 'deploy', script: '/tmp/script/maven-jenkins-ci-script.sh'
      // sh "/tmp/script/maven-jenkins-ci-script.sh"
     }
    }
  }

  // 消息通知: POST阶段当所有任务执行后触发
  post {
    // 企业微信
    always {
      qyWechatNotification aboutSend: true, failNotify: true, failSend: true, mentionedId: 'ALL', mentionedMobile: '', startBuild: true, successSend: true, unstableSend: true, webhookUrl: 'https://qyapi.weixin.qq.com/cgi-bin/webhook/send?key=c222f3fc-f645-440a-ad24-0ce8d9626fa0'
    }

    // 钉钉
    success {
      //当此Pipeline成功时打印消息(注意此处的robot为您在Jenkins全局配置中设置钉钉的id值)
      echo 'success'
      dingtalk (
          robot: 'weiyigeek-1000',
          type: 'LINK',
          title: 'Jenkins 持续集成 - 任务名称 ${JOB_NAME}',
          text: [
              '项目构建成功',
              'Pipeline 流水线测试'
          ],
          messageUrl: 'http://www.weiyigeek.top',
          picUrl: 'https://ss2.bdstatic.com/70cFvnSh_Q1YnxGkpoWK1HF6hhy/it/u=2319834554,1372531032&fm=26&gp=0.jpg',
          atAll: true
      )
    }
  }
}
5,执行仓内的脚本script for scm
也可以将上面流水线的脚本放在我们的代码项目之中,在流水线拉取项目时候便会自动按照项目中的Jenkinsfile文件内容进行执行对于操作。
Step 1.修改项目首页文件以及在项目根添加Jenkinsfile文件(内容将取消第一阶段的代码拉取)
# (1) E:\EclipseProject\hello-world\src\main\webapp\index.jsp# (2) 项目信息
/e/EclipseProject/hello-world (master)
$ ls
Jenkinsfile pom.xml src/ target/
# (3) Jenkinsfile :注意内容将取消第一阶段的代码拉取
pipeline {
agent any
stages {
stage ("代码质检") {
steps {
sh label: 'sonar', returnStatus: true, script: '''/usr/local/bin/sonar-scanner -Dsonar.projectName=${JOB_NAME} -Dsonar.projectKey=Hello-World -Dsonar.sources=.'''
}
}
stage ("项目构建") {
steps {
sh label: 'build', script: 'cd /var/lib/jenkins/workspace/maven-pipeline-helloword/ && /usr/local/maven/bin/mvn clean package -Dmaven.test.skip=true '
}
}
stage ("项目部署") {
steps {
// 脚本为前面一章的部署脚本
sh label: 'deploy', script: '/tmp/script/maven-jenkins-ci-script.sh'
}
}
}
// 消息通知: POST阶段当所有任务执行后触发
post {
// 企业微信
always {
qyWechatNotification aboutSend: true, failNotify: true, failSend: true, mentionedId: 'ALL', mentionedMobile: '', startBuild: true, successSend: true, unstableSend: true, webhookUrl: 'https://qyapi.weixin.qq.com/cgi-bin/webhook/send?key=c222f3fc-f645-440a-ad24-0ce8d9626fa0'
}
// 钉钉
success {
//当此Pipeline成功时打印消息 (注意此处的robot为您在Jenkins全局配置中设置钉钉的id值)
echo 'success'
dingtalk (
robot: 'weiyigeek-1000',
type: 'LINK',
title: 'Jenkins 持续集成 - 任务名称 ${JOB_NAME}',
text: [
'项目构建成功',
'Pipeline 流水线测试'
],
messageUrl: 'http://www.weiyigeek.top',
picUrl: 'https://ss2.bdstatic.com/70cFvnSh_Q1YnxGkpoWK1HF6hhy/it/u=2319834554,1372531032&fm=26&gp=0.jpg',
atAll: true
)
}
}
}-
Step 2.上传修改的项目到Gitlab内部私有仓库中
$ git add .
$ git commit -m "v1.10 pipeline script for SCM"
# [master 3f9b6e8] v1.10 pipeline
#  2 files changed, 26 insertions(+), 1 deletion(-)
#  create mode 100644 Jenkinsfile
$ git push
# To http://gitlab.weiyigeek.top/ci-cd/java-maven.git
#    0f50b10..3f9b6e8  master -> master
$ git tag -a "v1.10" -m "v1.10 Pipelinescript for SCM "
$ git push origin v1.10
# To http://gitlab.weiyigeek.top/ci-cd/java-maven.git
#  * [new tag]         v1.10 -> v1.10
6,语法总结
此次对 Scripted Pipeline 语法的使用进行一个简单的总结, 或许在后面的Declarative Pipeline中可以进行使用;
node {
  // 变量定义
  def foo
  // 字符串
  def project="HelloWorld"
  // 单引号字符串(Single quoted string)不能解析变量
  def name='weiyigeek - ${project}'
  // 三单引号字符串(Triple single quoted string)不能解析变量
  def line='''\
  Line one
  Line ${project}
  '''
  // 定义字典Maps
  def person = [name: 'WeiyiGeek', age: 96]


  stage('Scripted Pipeline Syntax') {
    // (1) 变量声明
    foo="Identifiers"
    // (2) 变量调用
    echo "${foo} -- ${project}" // == Identifiers -- HelloWorld
    // (3) 字符串输出
    echo "my name is ${name}" // == my name is weiyigeek - ${project}
    // (4) 多行字符串输出
    echo "${line}" /* ==
    Line one
    Line ${project}
    */

    // (5) 变量对象属性输出
    echo "$person.name is $person.age years old" // == WeiyiGeek is 96 years old

    name = 'WeiyiGeek'
    project = "my name is ${name}"
    def greeting = "Hello ${name}" // name变量的值会被替换进去

    // (6) 字符串格式化声明
    assert greeting.toString()
    println "${project.toString()}" //调用方法后直接输出 ==  my name is  WeiyiGeek

    // 闭包
    def number = 1
    def eagerGString = "value == ${number}"   // 普通形式
    def lazyGString = "value == ${-> number}" // 这是一个闭包
    println eagerGString // == value == 1
    println lazyGString  // 此处输出为空 (value == 1)
    number=1024
    echo "-----------------"
    println eagerGString // == value == 1
    println lazyGString  // 此处输出为空 (value == 1024)


    // (7) 变量类型输出
    println "变量name类型:"+name.class+", \n 变量project类型: "+project.class+", \n 变量greeting类型: "+greeting.class
    /* == 变量name类型:class java.lang.String,
          变量project类型: class org.codehaus.groovy.runtime.GStringImpl,
          变量greeting类型: class org.codehaus.groovy.runtime.GStringImpl */


    // (8) 数值类型与类型强转
    def decimal = 123.456
    println "${decimal.getClass()} -- ${decimal} " // ==  class java.math.BigDecimal -- 123.456
    //assert decimal instanceof BigDecimal

    // (9) 数组列表
    def arrayList = [1,2,3,"number"]
    println arrayList[0]   // == 1
    arrayList << '5'
    echo "assert ${arrayList[0]} ---  ${arrayList[-2]} --- ${arrayList[-1]}"   // == assert 1 ---  number --- 5

    def multi = [[0, 1], [2, 3]]  // 二维数组
    echo "assert ${multi[1][0]}"  // == 2

    // (10) 字典Map
    def colors = [red: '#FF0000', green: '#00FF00', blue: '#0000FF']
    colors['pink'] = '#FF00FF'
    colors.yellow = '#FFFF00'
    println "colors 类型 : "+ colors.pink.class + ", assert colors.pink : " + colors.pink + ",assert colors['yellow'] : " + colors['yellow']
    /*       colors 类型 : class java.lang.String, assert colors.pink : #FF00FF,assert colors['yellow'] : #FFFF00     */

    // 如果要使用一个变量作为key(缺省为字符串),需要用括号括住:
    def keyVal = 'name'
    def persons = [(keyVal): 'WeiyiGeek'] // 相当于[ 'name' : 'WeiyiGeek' ]
    println "key is name: " + persons.containsKey('name') + " , Key not is KeyVal : " + !persons.containsKey('keyVal')
    /* key is name: true , Key is  KeyVal : true */

    // (11) 条件语句 - if - for - switch
    if ( keyVal == 'name' ) {
      echo "keyVal value is name"   // == keyVal value is name
    } else {
      echo "keyVal value is not name"
    }

    if (env.BRANCH_NAME == 'master') {
      echo 'I only execute on the master branch'
    } else {
      echo 'I execute elsewhere'
    }

    for (int i=0; i < 5; i++) {
      println arrayList[i]  // 如果越界显示则 `null` // == 1,2,3,number,5
    }

    def option = "deploy"
    switch ("${option}") {
      case 'deploy':
          echo "deploy"   // == deploy
          break
      case 'rollback':
          echo "rollback"
          break
      default:
          echo "default"
    }

    // (12) 异常捕获
    try {
        helloWorld()  // == Scripted Pipeline - Hello Wrold - STARTED - 1024!
        dir("place") {
            sh 'id'  // == uid=112(jenkins) gid=117(jenkins) groups=117(jenkins)
        }
    } catch (e) {
        // If there was an exception thrown, the build failed
        currentBuild.result = "FAILED"
        throw e
    } finally {
        println "success or failure, always send notifications"   // == Success or failure, always send notifications
    }

    // (13)函数调用
    helloWorld("weiyigeek")  /* Scripted Pipeline - Hello Wrold - weiyigeek - 1024! */
  }
}

// (13) 函数声明定义时 不能包括在node中
def helloWorld (String username = 'STARTED',int age = 1024) {
    println "Scripted Pipeline - Hello Wrold - ${username} - ${age}!"
}
7,Directives - 指令
基本结构满足不了现实多变的需求。所以Jenkins pipeline通过各种指令(directive)来丰富自己。指令可以被理解为对Jenkins pipeline基本结构的补充。
7.1 指令总结
-
environment:用于设置环境变量,可定义在stage或pipeline部分。
-
tools:可定义在pipeline或stage部分。它会自动下载并安装我们指定的工具,并将其加入PATH变量中。
-
input:定义在stage部分,会暂停pipeline,提示你输入内容。
-
options:用于配置Jenkins pipeline本身的选项,比如options {retry(3)}指当pipeline失败时再重试2次。options指令可定义在stage或pipeline部分。
-
parallel:并行执行多个step。在pipeline插件1.2版本后,parallel开始支持对多个阶段进行并行执行。
-
parameters:与input不同,parameters是执行pipeline前传入的一些参数。
-
triggers:用于定义执行pipeline的触发器。
-
when:当满足when定义的条件时,阶段才执行。
Tips: 在使用指令时需要注意的是每个指令都有自己的“作用域”。如果指令使用的位置不正确Jenkins将会报错。
7.2 指令详解
environment - 环境
描述: 该指定了一系列键值对,这些键值对将被定义为所有步骤或特定于阶段的步骤的环境变量,具体取决于该environment指令在 Pipeline中的位置。
支持的凭证类型:Supported Credentials Type
-
Secret Text :设置为加密文本字符串内容
-
Secret File : 设置为临时创建的文件文件的位置, 并自动定义变量存储该文件内容。
-
Username and password : 将设置为
username:password并且两个其他环境变量将自动定义为MYVARNAME_USR 和MYVARNAME_PSW。 -
SSH with Private Key : 设置为临时创建的SSH密钥文件的位置,并且可能会自动定义两个其他环境变量:MYVARNAME_USR和MYVARNAME_PSW(保留密码)。
示例1:秘密文本凭证,声明性 Pipeline
pipeline {
  agent any
  // (1) 由于在pipeline下一层,则使用的指令将应用于 Pipeline中的所有步骤。
  environment {
    CC = 'clang'
  }
  stages {
    stage('Example') {
      // (2) 在 stage 中定义的 environment指令只会将给定的环境变量应用于Example内的步骤。
        environment {
          // 在environment块中credentials('凭据名称')定义的帮助程序方法通过其在Jenkins环境中的标识符来访问预定义的凭据
          AN_ACCESS_KEY = credentials('my-predefined-secret-text')
        }
        steps {
          sh 'printenv'
          echo "${env.AN_ACCESS_KEY}"
          echo "${env.CC}"
        }
    }
  }
}
Tips : 该指令支持特殊的帮助程序方法credentials(),该方法可用于在Jenkins环境中通过其标识符访问预定义的凭据。
Tips : 如有不支持的凭据类型导致 Pipeline失败,并显示以下消息:org.jenkinsci.plugins.credentialsbinding.impl.CredentialNotFoundException: No suitable binding handler could be found for type .
options - 选项
描述: options 指令 允许在 Pipeline 本身内配置 Pipeline 专用选项, 例如 buildDiscarder 它们也可能由插件提供;
可用选项:
-
1.
buildDiscarder: 保存最近历史构建记录的数量。设置此选项后会自动清理pipeline 的构建历史。
options { buildDiscarder(logRotator(numToKeepStr: '1')) }
-
2.
disableConcurrentBuilds: 禁止并发执行 Pipeline 对于防止同时访问共享资源等很有用
options { disableConcurrentBuilds() }
-
3.
checkoutToSubdirectory: Jenkins从版本控制库拉取源码时,默认检出到工作空间的根目录中,此选项可以指定检出到工作空间的子目录中。
options { checkoutToSubdirectory('foo') }
-
4.
newContainerPerStage: 当agent为docker或dockerfile时,指定在同一个Jenkins节点上,每个stage都分别运行在一个新的容器中,而不是所有stage都运行在同一个容器中。 -
5.
disableResume: 如果控制器重新启动则不允许 Pipeline恢复
options { disableResume() }
-
6.
overrideIndexTriggers: 允许重写分支索引触发器的默认处理,如果在多分支或组织标签处禁用了分支索引触发器。
# 仅为该作业启用分支索引触发器
options { overrideIndexTriggers(true) }

# 仅为此作业禁用分支索引触发器
options { overrideIndexTriggers(false) }
-
7.
preserveStashes: 保留已完成构建中的隐藏项,以用于阶段重新启动。
# 保存构建
options { preserveStashes() }

# 保存最近5次构建
options { preserveStashes(buildCount: 5) }
-
8.
quietPeriod:设置 Pipeline的静默时间段(以秒为单位),以覆盖全局默认值
options { quietPeriod(30) }
-
9.
retry:如果失败重试整个 Pipeline指定次数。该次数是指总次数包括第1次失败。
options { retry(3) }
-
10.
skipDefaultCheckout: 默认跳过来自源代码控制的代码(代理指令)。
options { skipDefaultCheckout() }
-
11.
skipStagesAfterUnstable: 一旦构建状态变得不稳定就跳过各个阶段;
options { skipStagesAfterUnstable() }
-
12.
timestamps: 预定义由Pipeline生成的所有控制台输出时间
options { timestamps() }
-
13.
parallelsAlwaysFailFast:将 Pipeline中所有后续并行阶段的failfast设置为true。
options { parallelsAlwaysFailFast() }
-
14.
timeout(常用) : 设置 Pipeline运行的超时时间在此之后Jenkins 应中止 Pipeline(运行的超时时间)。
EXAMPLE:
操守时间一个小时(HOURS/Minute)
# 操守时间一个小时(HOURS/Minute)
options { timeout(time: 1, unit: 'HOURS') }

# Global Timeout, Declarative Pipeline
pipeline {
    agent any
    options {
      // 将全局执行超时指定为一小时,然后Jenkins将中止 Pipeline运行。
      timeout(time: 1, unit: 'HOURS')
    }
    stages {
        stage('Example') {
            steps {
                echo 'Hello World'
            }
        }
    }
}
parameters - 参数
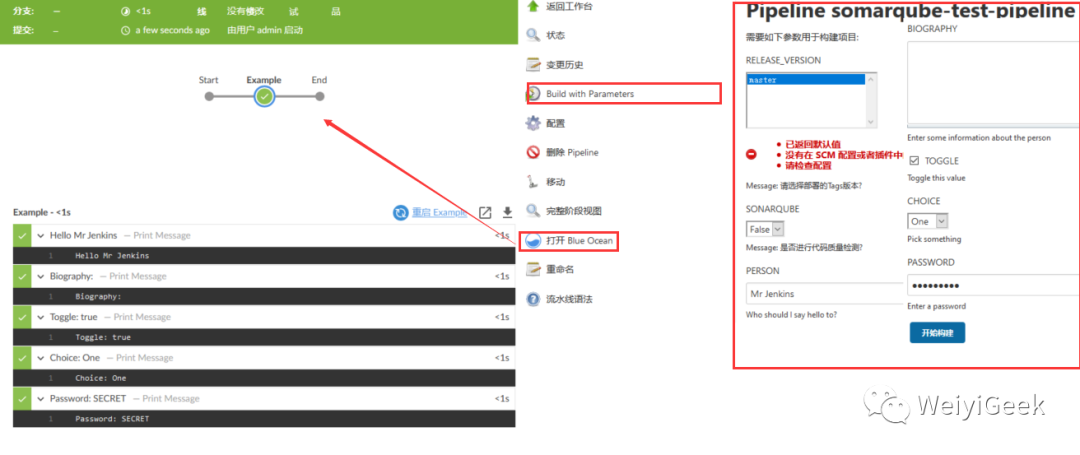
描述: 该指令提供了一个用户在触发 Pipeline时应该提供的参数列表。这些用户指定参数的值通过params对象提供给 Pipeline步骤,请参阅参数,声明式 Pipeline的具体用法。
目前可用参数有string , text, booleanParam, choice, password等参数,其他高级参数化类型还需等待社区支持。
EXAPLE:
Parameters, Declarative Pipeline
pipeline {
    agent any

    // Jenkins -> 原生 Build With Parameters 支持
    parameters {
      gitParameter name: 'RELEASE_VERSION',
                      type: 'PT_BRANCH_TAG',
                      branchFilter: 'origin/(.*)',
                      defaultValue: 'master',
                      selectedValue: 'DEFAULT',
                      sortMode: 'DESCENDING_SMART',
            description: 'Message: 请选择部署的Tags版本?'
      choice(name: 'SONARQUBE', choices: ['False','True'], description: 'Message: 是否进行代码质量检测?')

      //  Jenkins -> 原生 Build With Parameters 支持 和 BlueOcean 都支持
      string(name: 'PERSON', defaultValue: 'Mr Jenkins', description: 'Who should I say hello to?')

      text(name: 'BIOGRAPHY', defaultValue: '', description: 'Enter some information about the person')

      booleanParam(name: 'TOGGLE', defaultValue: true, description: 'Toggle this value')

      choice(name: 'CHOICE', choices: ['One', 'Two', 'Three'], description: 'Pick something')

      password(name: 'PASSWORD', defaultValue: 'SECRET', description: 'Enter a password')
    }
    stages {
        stage('Example') {
            steps {
                // 调用
                echo "Hello ${params.PERSON}"

                echo "Biography: ${params.BIOGRAPHY}"

                echo "Toggle: ${params.TOGGLE}"

                echo "Choice: ${params.CHOICE}"

                echo "Password: ${params.PASSWORD}"
            }
        }
    }
}
triggers - 触发器
描述: 该指令定义了Pipeline自动化触发的方式,对于与GitHub或BitBucket等源集成的 Pipeline可能不需要触发器,因为基于webhook的集成可能已经存在了。
当前可用的触发器是cron、pollSCM和upstream
-
1.
cron: 以Linux中Cron风格的字符串,以定义应该重新触发 Pipeline的定期间隔
triggers { cron('H */4 * * 1-5') }
cron表达式:
cron的表达式是字符串,实际上是由七子表达式,描述个别细节的时间表。这些子表达式是分开的空白,代表:
1.Seconds(秒) :可以用数字0-59 表示,
2.Minutes(分) :可以用数字0-59 表示,
3.Hours(时) :可以用数字0-23表示,
4.Day-of-Month(天) :可以用数字1-31 中的任一一个值,但要注意一些特别的月份
5.Month(月) :可以用0-11 或用字符串 “JAN, FEB, MAR, APR, MAY, JUN, JUL, AUG, SEP, OCT, NOV and DEC” 表示
6.Day-of-Week可以用数字1-7表示(1 = 星期日)或用字符串“SUN, MON, TUE, WED, THU, FRI and SAT”表示
7.Year (可选字段)
“/”:为特别单位,表示为“每”如“0/15”表示每隔15分钟执行一次,“0”表示为从“0”分开始, “3/20”表示表示每隔20分钟执行一次,“3”表示从第3分钟开始执行
“?”:表示每月的某一天,或第周的某一天
“L”:用于每月,或每周,表示为每月的最后一天,或每个月的最后星期几如“6L”表示“每月的最后一个星期五”
“W”:表示为最近工作日,如“15W”放在每月(day-of-month)字段上表示为“到本月15日最近的工作日”
““#”:是用来指定“的”每月第n个工作日,例 在每周(day-of-week)这个字段中内容为"6#3" or "FRI#3" 则表示“每月第三个星期五”
1)Cron表达式的格式:秒 分 时 日 月 周 年(可选)。
字段名 允许的值 允许的特殊字符
秒 0-59 , - * /
分 0-59 , - * /
小时 0-23 , - * /
日 1-31 , - * ? / L W C
月 1-12 or JAN-DEC , - * /
周几 1-7 or SUN-SAT , - * ? / L C #
年 (可选字段) empty, 1970-2099 , - * /
“?”字符:表示不确定的值
“,”字符:指定数个值
“-”字符:指定一个值的范围
“/”字符:指定一个值的增加幅度。n/m表示从n开始,每次增加m
“L”字符:用在日表示一个月中的最后一天,用在周表示该月最后一个星期X
“W”字符:指定离给定日期最近的工作日(周一到周五)
“#”字符:表示该月第几个周X。6#3表示该月第3个周五
2)Cron表达式范例:
每隔5秒执行一次:*/5 * * * * ?
每隔1分钟执行一次:0 */1 * * * ?
每天23点执行一次:0 0 23 * * ?
每天凌晨1点执行一次:0 0 1 * * ?
每月1号凌晨1点执行一次:0 0 1 1 * ?
每月最后一天23点执行一次:0 0 23 L * ?
每周星期天凌晨1点实行一次:0 0 1 ? * L
在26分、29分、33分执行一次:0 26,29,33 * * * ?
每天的0点、13点、18点、21点都执行一次:0 0 0,13,18,21 * * ?
例 "0 0 12 ? * WED" 在每星期三下午12:00 执行,
个别子表达式可以包含范围, 例如,在前面的例子里("WED")可以替换成 "MON-FRI", "MON, WED, FRI"甚至"MON-WED,SAT".
“*” 代表整个时间段.
-
2.
pollSCM: 接受cron样式的字符串以定义Jenkins应检查新源更改的定期间隔。如果存在新的更改则将重新触发 Pipeline。
triggers { pollSCM('H */4 * * 1-5') }

Tips : pollSCM触发器仅在Jenkins 2.22或更高版本中可用。
- 3.
upstream: 接受以逗号分隔的作业字符串和阈值。当字符串中的任何作业以最小阈值结束时 Pipeline将被重新触发
triggers { upstream(upstreamProjects: 'job1,job2', threshold: hudson.model.Result.SUCCESS) }
stage - 单阶段
描述: 该 stage 指令位于stages中并且应包含Step 节,可选 agent 节或其他特定于阶段的指令, 实际上管道完成的所有实际工作都将包含在一个或多个stage指令中。
EXAMPLE:
// Declarative
pipeline {
  agent any
  stages {
    stage('Example') {
      steps {
        echo 'Hello World'
      }
    }
  }
}
Tools - 工具
描述: 定义自定义安装的Tools工具路径,并放置环境变量到PATH。如果agent none 这将被忽略
Supported Tools(Global Tool Configuration) : maven / jdk / gradle / Sonarqube
pipeline {
    agent any
    tools {
      // 工具名称必须在Jenkins中的 Manage Jenkins → Global Tool Configuration 下预先配置。
      maven 'apache-maven-3.0.1'
    }
    stages {
      stage('Example') {
        steps {
          sh 'mvn --version'
          script {
            // 无指定名称时可用采用tool指定设置的全局工具名称,这里这个tool是直接根据名称,获取自动安装的插件的路径
            def scannerHome = tool 'sonarqubescanner'
          }
          withSonarQubeEnv('SonarQube') {
            sh "${scannerHome}/bin/sonar-scanner -Dsonar.projectKey=YourProjectKey -Dsonar.sources=."
          }
        }
      }
    }
}
Input - 输入
描述: input指令允许您使用输入步骤提示输入。在应用了任何选项之后,在进入该阶段的代理块或评估该阶段的when条件之前,该阶段将暂停。如果输入被批准,该阶段将继续。作为输入提交的一部分提供的任何参数都将在该阶段的其余部分的环境中可用。
配置选项
-
message : 必须的前台输入时提示用户的信息;
-
id : 此输入的可选标识符。默认为阶段名称。
-
ok : 输入表单上“确定”按钮的可选文本。
-
Parameter : 提示提交者提供的可选参数列表。请参阅参数以获取更多信息。
-
submitter : 可选的用逗号分隔的用户或允许输入此输入的外部组名的列表,默认为允许任何用户。
-
submitterParameter : 可以使用提交者名称设置的环境变量的可选名称(如果存在)。
when - 执行条件
描述: 该指令允许管道根据给定条件确定是否应执行该阶段,when指令必须至少包含一个条件,如果when指令包含多个条件,则所有子条件必须返回true才能执行该阶段;
使用嵌套条件构建更复杂的条件结构:not,allOf或anyOf,嵌套条件可以嵌套到任意深度。
-
1.如果使用allOf条件,则表示所有条件为真才继续执行。
-
2.如果使用anyOf条件,请注意一旦找到第一个“真”条件,该条件将跳过其余测试。
-
3.使用使用not条件是,则当条件为false是为真才进行执行
// 1.不匹配分支
when { not { branch 'master' } }

// 2.分别满足分支为master并且DEPLOY_TO环境变量值为production是继续执行
when { allOf { branch 'master'; environment name: 'DEPLOY_TO', value: 'production' } }

// 3.满足分支为master或者分支为staging都可以继续执行.
when { anyOf { branch 'master'; branch 'staging' } }


 955
955


 被折叠的 条评论
为什么被折叠?
被折叠的 条评论
为什么被折叠?
 到【灌水乐园】发言


