


诉求
模拟服务端主动推送消息给客户端,同时展示客户端发送给客户端的消息以及服务端推送给客户的消息。
相关技术
Springboot(2.7.0)+Websocket+javascript
相关步骤
项目创建
创建一个Spring Boot项目,并在pom.xml文件中添加Websocket依赖。完整依赖如下
<?xml version="1.0" encoding="UTF-8"?>
<project xmlns="http://maven.apache.org/POM/4.0.0" xmlns:xsi="http://www.w3.org/2001/XMLSchema-instance"
         xsi:schemaLocation="http://maven.apache.org/POM/4.0.0 https://maven.apache.org/xsd/maven-4.0.0.xsd">
    <modelVersion>4.0.0</modelVersion>
    <parent>
        <groupId>org.springframework.boot</groupId>
        <artifactId>spring-boot-starter-parent</artifactId>
        <version>2.7.0</version>
    </parent>
    <groupId>com.example</groupId>
    <artifactId>demo</artifactId>
    <version>0.0.1-SNAPSHOT</version>
    <packaging>war</packaging>
    <name>demo</name>
    <description>Demo project for Spring Boot</description>
    <properties>
        <java.version>8</java.version>
        <java.encoding>UTF-8</java.encoding>
        <slf4j.version>1.7.30</slf4j.version>
    </properties>
    <dependencies>

        <dependency>
            <groupId>org.springframework.boot</groupId>
            <artifactId>spring-boot-starter-web</artifactId>
        </dependency>

        <!--  springboot集成websocket -->
        <dependency>
            <groupId>org.springframework.boot</groupId>
            <artifactId>spring-boot-starter-websocket</artifactId>
        </dependency>

        <dependency>
            <groupId>org.springframework.boot</groupId>
            <artifactId>spring-boot-starter-tomcat</artifactId>
            <scope>provided</scope>
        </dependency>

        <!-- 引入日志管理相关依赖-->
        <dependency>
            <groupId>org.slf4j</groupId>
            <artifactId>slf4j-api</artifactId>
            <version>${slf4j.version}</version>
        </dependency>
        <dependency>
            <groupId>org.slf4j</groupId>
            <artifactId>slf4j-log4j12</artifactId>
            <version>${slf4j.version}</version>
        </dependency>
        <dependency>
            <groupId>org.apache.logging.log4j</groupId>
            <artifactId>log4j-to-slf4j</artifactId>
            <version>2.14.0</version>
        </dependency>


    </dependencies>

    <build>
        <pluginManagement>
            <plugins>
                <plugin>
                    <groupId>org.apache.maven.plugins</groupId>
                    <artifactId>maven-compiler-plugin</artifactId>
                    <version>3.1</version>
                    <configuration>
                        <target>${java.version}</target>
                        <source>${java.version}</source>
                        <encoding>${java.encoding}</encoding>
                    </configuration>
                </plugin>
                <plugin>
                    <groupId>org.apache.maven.plugins</groupId>
                    <artifactId>maven-surefire-plugin</artifactId>
                    <version>2.6</version>
                </plugin>
                <plugin>
                    <groupId>org.apache.maven.plugins</groupId>
                    <artifactId>maven-release-plugin</artifactId>
                    <configuration>
                        <arguments>-Prelease</arguments>
                    </configuration>
                </plugin>
                <plugin>
                    <groupId>org.apache.maven.plugins</groupId>
                    <artifactId>maven-source-plugin</artifactId>
                    <version>2.1</version>
                    <configuration>
                        <attach>true</attach>
                    </configuration>
                    <executions>
                        <execution>
                            <phase>compile</phase>
                            <goals>
                                <goal>jar</goal>
                            </goals>
                        </execution>
                    </executions>

                </plugin>
            </plugins>
        </pluginManagement>
    </build>

</project>
编写相关配置
编写WebSocketConfig和WebSocketHandler配置类,实现对WebSocket的配置。
import org.springframework.context.annotation.Bean;
import org.springframework.context.annotation.Configuration;
import org.springframework.web.socket.config.annotation.*;
import org.springframework.web.socket.server.standard.ServerEndpointExporter;

/**
 * @author
 * @date 2023年01月30日 14:07
 */
@Configuration
@EnableWebSocketMessageBroker
public class WebSocketConfig implements WebSocketMessageBrokerConfigurer {

//    @Override
//    public void configureMessageBroker(MessageBrokerRegistry registry) {
//        registry.enableSimpleBroker("/topic");
//        registry.setApplicationDestinationPrefixes("/app");
//    }

    @Override
    public void registerStompEndpoints(StompEndpointRegistry registry) {
        registry.addEndpoint("/websocket").withSockJS();
    }

    @Bean
    public ServerEndpointExporter serverEndpointExporter() {
        return new ServerEndpointExporter();
    }

}
import org.slf4j.Logger;
import org.slf4j.LoggerFactory;
import org.springframework.stereotype.Component;
import org.springframework.web.socket.CloseStatus;
import org.springframework.web.socket.TextMessage;
import org.springframework.web.socket.WebSocketSession;
import org.springframework.web.socket.handler.TextWebSocketHandler;

import java.io.IOException;
import java.util.ArrayList;
import java.util.List;

/**
 * handler
 * @date 2023年01月30日 14:08
 */
@Component
public class WebSocketHandler extends TextWebSocketHandler {

    private static final Logger LOGGER = LoggerFactory.getLogger(WebSocketHandler.class);

    private static final List<WebSocketSession> sessions = new ArrayList<>();

    @Override
    public void handleTextMessage(WebSocketSession session, TextMessage message) {
        LOGGER.info("Received message: {}", message.getPayload());
        for (WebSocketSession webSocketSession : sessions) {
            try {
                webSocketSession.sendMessage(message);
            } catch (IOException e) {
                LOGGER.error("Error: {}", e.getMessage());
            }
        }
    }

    @Override
    public void afterConnectionEstablished(WebSocketSession session) {
        sessions.add(session);
    }

    @Override
    public void afterConnectionClosed(WebSocketSession session, CloseStatus status) {
        sessions.remove(session);
    }
}
消息逻辑处理
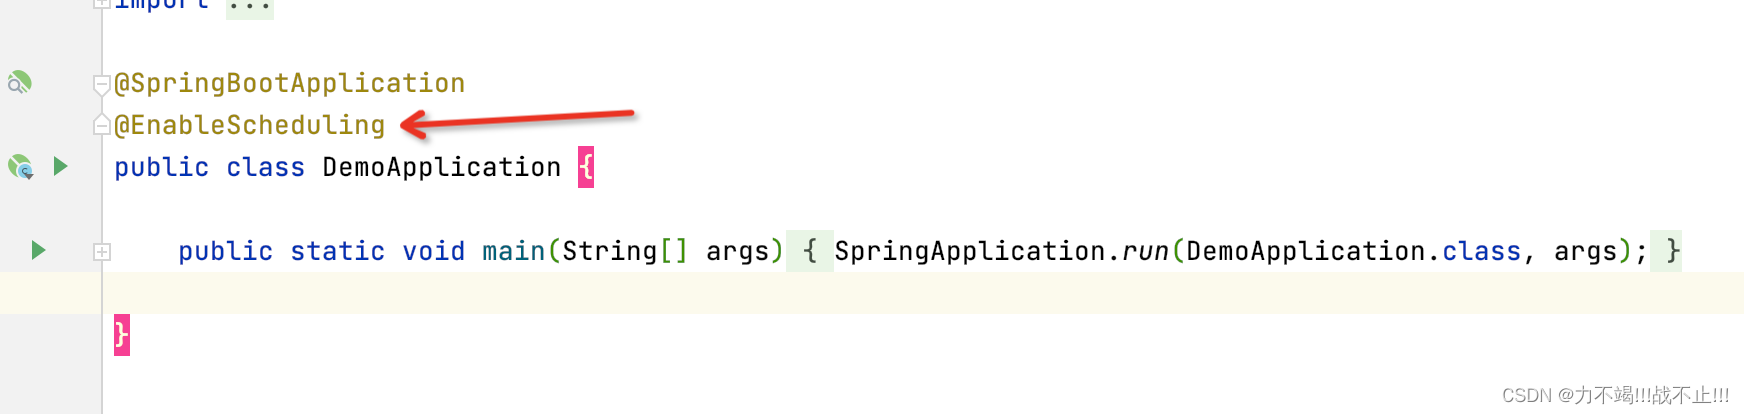
编写一个WebSocketServer类,实现服务端主动推送消息的逻辑(此处服务端推送客户端消息的逻辑采用定时任务自动推送,⚠️注意:必须在启动类中加入@EnableScheduling注解,开启定时任务的支持)。
import org.springframework.scheduling.annotation.Scheduled;
import org.springframework.stereotype.Component;
import org.springframework.util.CollectionUtils;

import javax.websocket.*;
import javax.websocket.server.ServerEndpoint;
import java.io.IOException;
import java.text.SimpleDateFormat;
import java.util.Random;
import java.util.concurrent.ConcurrentHashMap;

/**
 * @author
 * @date 2023年01月30日 11:19
 */
@ServerEndpoint("/websocket")
@Component
public class WebSocketServer {

    private Session session;

    /*    <sessionId, WebSocketServer> 用于存储websocket连接,key为sessionId  */
    private static ConcurrentHashMap<String, WebSocketServer> webSocketServerConcurrentHashMap = new ConcurrentHashMap();

    @OnOpen
    public void onOpen(Session session) {
        this.session = session;
        webSocketServerConcurrentHashMap.put(session.getId(), this);
        System.out.println("WebSocket opened: " + session.getId());
    }

    @OnMessage
    public void onMessage(String message, Session session) {
        System.out.println("WebSocket message received: " + message);
        String dateStr = new SimpleDateFormat("yyyy-MM-dd HH:mm:ss").format(System.currentTimeMillis());
        try {
            //发送的消息也返回给当前连接,用于展示
            session.getBasicRemote().sendText(dateStr + "发送消息:" + message);

            //写入DB或者其他存储系统中。。。

        } catch (IOException e) {
            e.printStackTrace();
        }
    }

    @OnClose
    public void onClose(Session session, CloseReason closeReason) {
        webSocketServerConcurrentHashMap.remove(session.getId());
        System.out.println("WebSocket closed: " + closeReason);
    }

    @OnError
    public void onError(Session session, Throwable throwable) {
        System.out.println("WebSocket error: " + throwable);
    }

    /**
     * 模拟服务端消息推送,5s推送一次(服务端 -> 客户端)
     */
    @Scheduled(fixedRate = 5000)
    public void sendMessageToClient() {
        //没有连接时不做任何事情
        if (CollectionUtils.isEmpty(webSocketServerConcurrentHashMap)){
            return;
        }

        System.out.println("服务端发送消息到客户端");
        String dateStr = new SimpleDateFormat("yyyy-MM-dd HH:mm:ss").format(System.currentTimeMillis());
        long number = new Random().nextInt(10000);
        webSocketServerConcurrentHashMap.forEach((k, v) -> {
            try {
                v.session.getBasicRemote().sendText(dateStr + "收到消息:" + number);

                //写入DB或者其他存储系统中。。。

            } catch (IOException e) {
                e.printStackTrace();
            }
        });
    }


}
启动类中加入@EnableScheduling注解以支持定时任务
使用JavaScript实现Websocket的前端功能
在页面中使用JavaScript实现Websocket的前端实现,建立连接,接收并显示消息。在页面关闭时通过JavaScript关闭Websocket连接,以确保连接正常关闭。
<!DOCTYPE html>
<html>
<head>
    <title>WebSocket Example</title>
    <script>
        var socket;

        //防止每次刷新页面产生新的WebSocket连接,在此加入判断
        if (socket === undefined || socket.readyState === WebSocket.CLOSED) {
            connect();
        }

        //建立websocket连接
        function connect() {
            var endpoint = "ws://localhost:8080/websocket";
            socket = new WebSocket(endpoint);

            socket.onopen = function (event) {
                console.log("WebSocket opened: " + endpoint);
            }

            socket.onmessage = function (event) {
                console.log("WebSocket message received: " + event.data);
                addMessageToList(event.data);
            }

            socket.onclose = function (event) {
                console.log("WebSocket closed");
            }
        }

        //追加信息到列表中
        function addMessageToList(message) {
            var list = document.getElementById("message-list");
            var item = document.createElement("li");
            item.innerHTML = message;
            list.appendChild(item);
        }

        //模拟触发服务端发送信息
        function send() {
            var message = document.getElementById("message").value;
            socket.send(message);
        }

        //断开连接
        function disconnect() {
            socket.close();
        }
    </script>
</head>
<!--<body οnlοad="connect()">-->
<!--关闭页面时关闭连接-->
<body onbeforeunload="disconnect()">

<input type="text" id="message" placeholder="Type your message here">
<button onclick="send()">Send msg to server</button>
<button onclick="disconnect()">Disconnect</button>
<button onclick="connect()">Open connect</button>
<ul id="message-list"></ul>
</body>
</html>
功能测试
前端效果
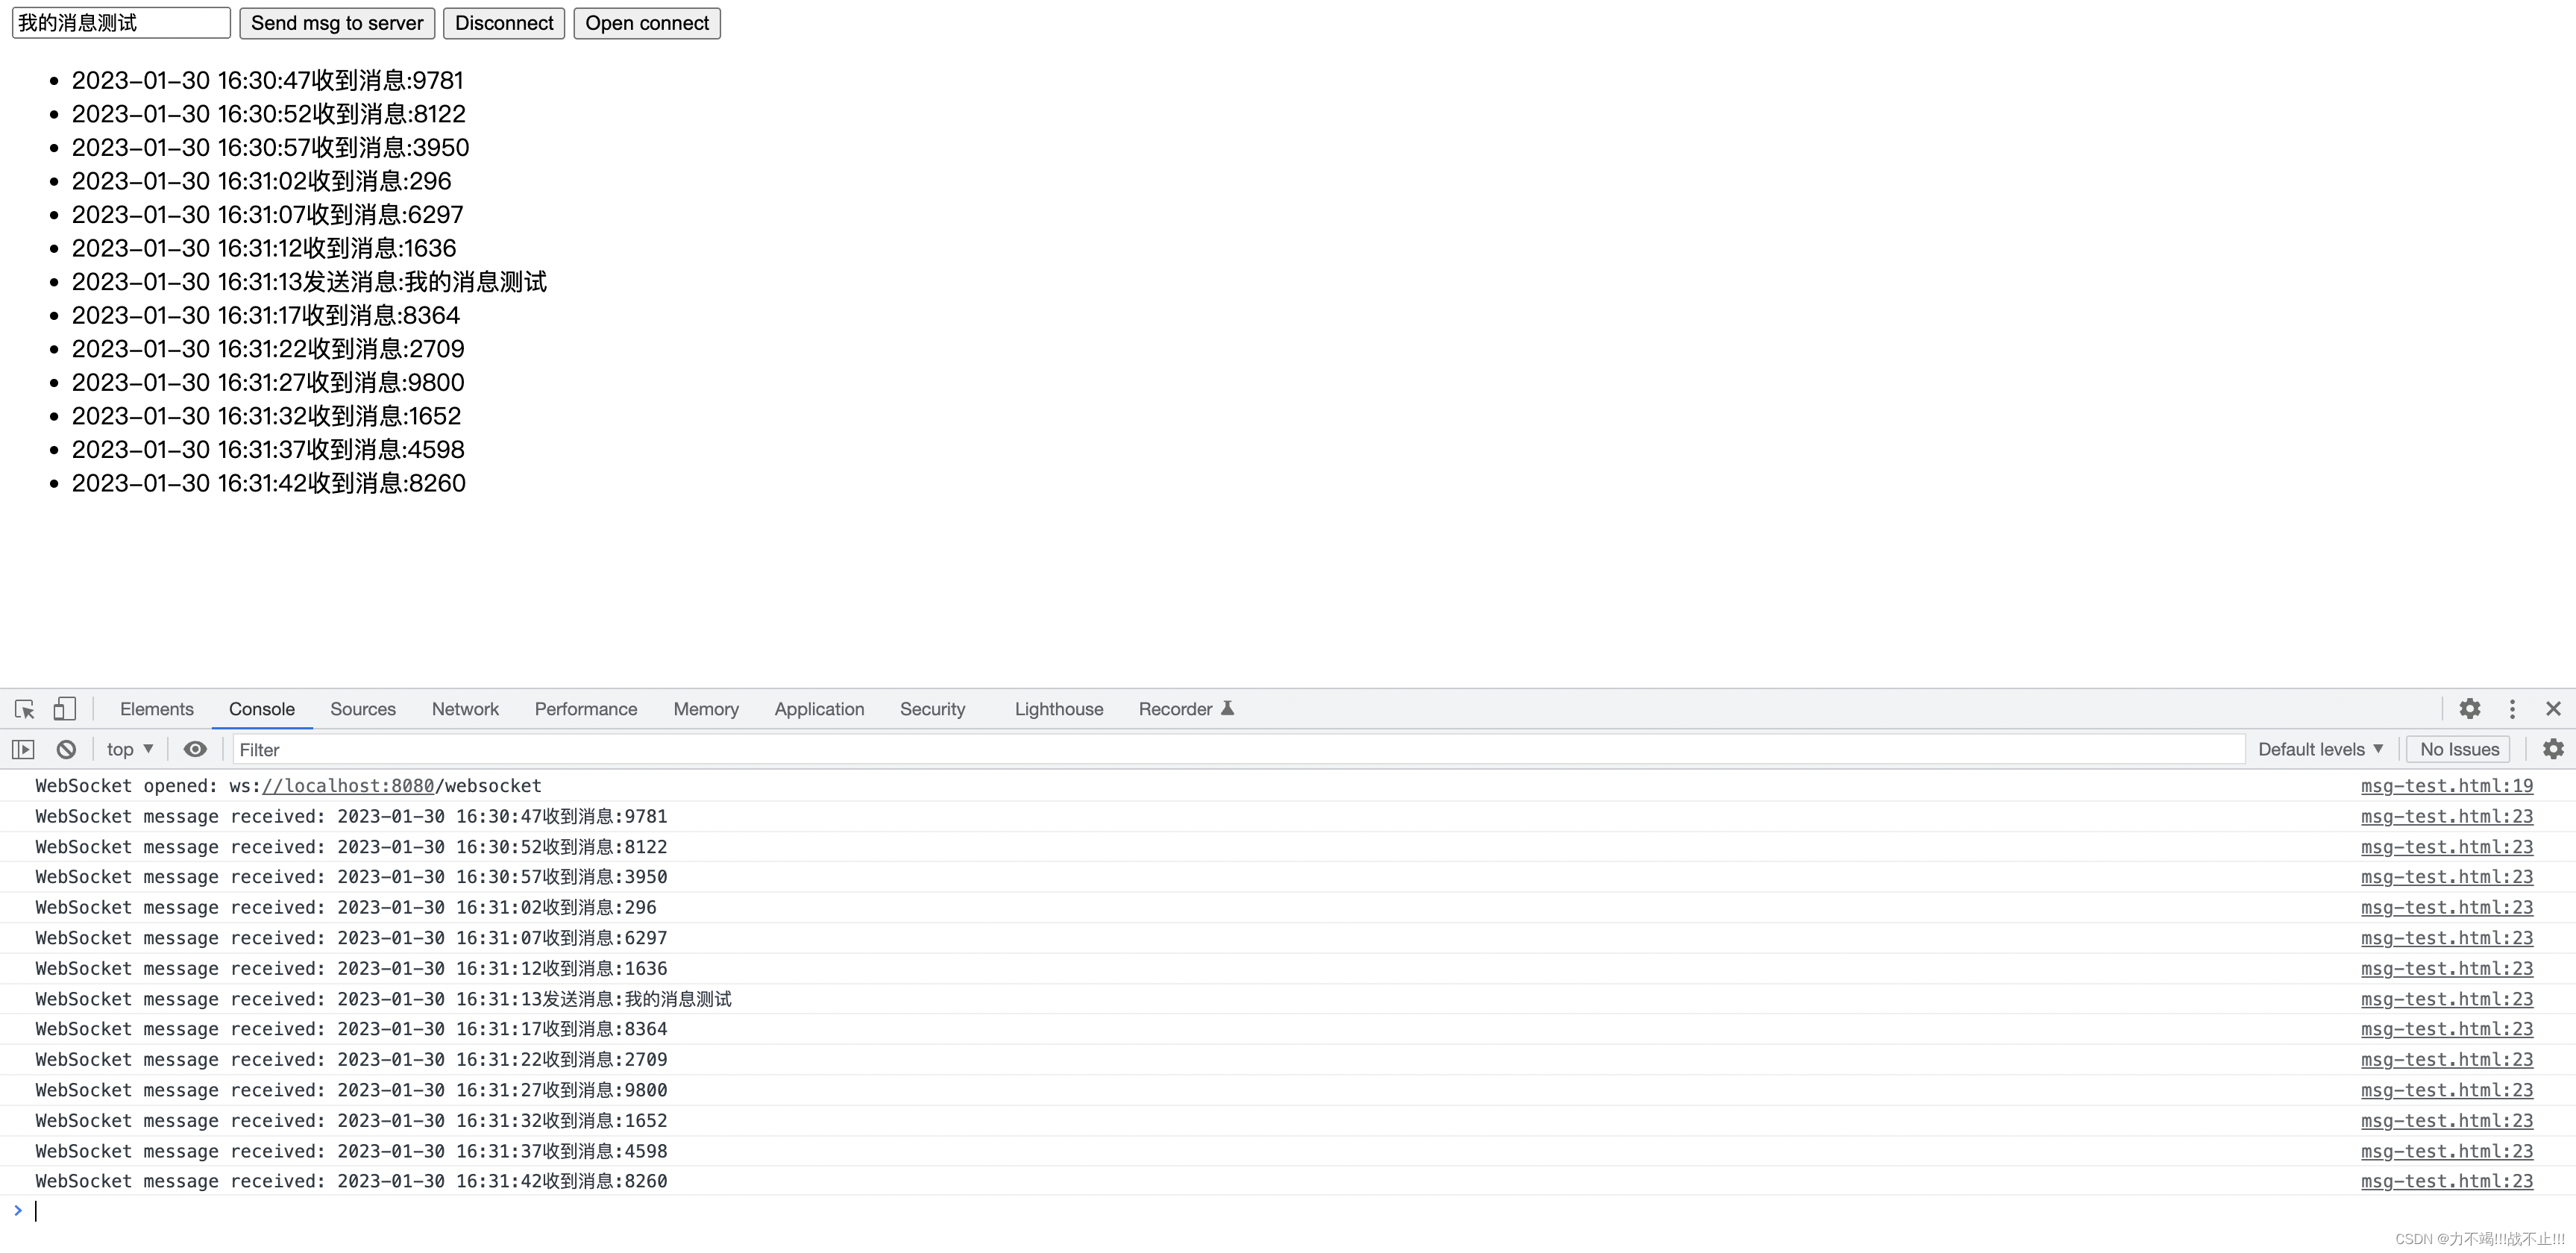
后端日志消息


 526
526


 被折叠的 条评论
为什么被折叠?
被折叠的 条评论
为什么被折叠?
 到【灌水乐园】发言


