


32-nginx配置详解
文章目录
Nginx简述
Nginx是一个开源且高性能、可靠的Http Web服务、代理服务
开源:直接获取源代码
高性能:支持海量并发
可靠:服务稳定
为什么选择Nginx服务?
Nginx非常轻量

功能模块少(源代码仅保留http与核心模块代码,其余不够核心代码会作为插件来安装)

代码模块化 (易读,便于二次开发,对于开发人员非常友好)

互联网公司都选择Nginx

1.Nginx技术成熟,具备的功能是企业最常使用而且最需要的

2.适合当前主流架构趋势, 微服务、云架构、中间层

3.统一技术栈, 降低维护成本*,* 降低技术更新成本。

Nginx采用Epool网络模型,Apache采用Select模型

Select: 当用户发起一次请求,select模型就会进行一次遍历扫描,从而导致性能低下。

Epool: 当用户发起请求,epool模型会直接进行处理,效率高效,并无连接限制。
处理大量的连接的读写,Apache所采用的select网络I/O模型非常低效。用一个比喻来解释Apache采用的select模型和Nginx采用的epoll模型进行之间的区别:

假设你在大学读书,住的宿舍楼有很多间房间,你的朋友要来找你。select版宿管大妈就会带着你的朋友挨个房间去找,直到找到你为止。而epoll版宿管大妈会先记下每位同学的房间号,你的朋友来时,只需告诉你的朋友你住在哪个房间即可,不用亲自带着你的朋友满大楼找人。如果来了10000个人,都要找自己住这栋楼的同学时,select版和epoll版宿管大妈,谁的效率更高,不言自明。同理,在高并发服务器中,轮询I/O是最耗时间的操作之 一,select和epoll的性能谁的性能更高,同样十分明了。

Nginx和Apache区别
Nginx

轻量级,采用 C 进行编写,同样的 web 服务,会占用更少的内存及资源

抗并发,nginx 以 epoll and kqueue 作为开发模型,处理请求是异步非阻塞的,负载能力比 apache 高很多,而 apache 则是阻塞型的。在高并发下 nginx 能保持低资源低消耗高性能 ,而 apache 在 PHP 处理慢或者前端压力很大的情况下,很容易出现进程数飙升,从而拒绝服务的现象。

nginx 处理静态文件好,静态处理性能比 apache 高三倍以上

nginx 的设计高度模块化,编写模块相对简单

nginx 配置简洁,正则配置让很多事情变得简单,而且改完配置能使用 -t 测试配置有没有问题,apache 配置复杂 ,重启的时候发现配置出错了,会很崩溃

nginx 作为负载均衡服务器,支持 7 层负载均衡

nginx 本身就是一个反向代理服务器,而且可以作为非常优秀的邮件代理服务器

启动特别容易, 并且几乎可以做到 7*24 不间断运行,即使运行数个月也不需要重新启动,还能够不间断服务的情况下进行软件版本的升级

社区活跃,各种高性能模块出品迅速

Apache
apache 的 rewrite 比 nginx 强大,在 rewrite 频繁的情况下,用 apache

apache 发展到现在,模块超多,基本想到的都可以找到

apache 更为成熟,少 bug ,nginx 的 bug 相对较多

apache 超稳定

apache 对 PHP 支持比较简单,nginx 需要配合其他后端用

apache 在处理动态请求有优势,nginx 在这方面是鸡肋,一般动态请求要 apache 去做,nginx 适合静态和反向
Nginx典型应用场景
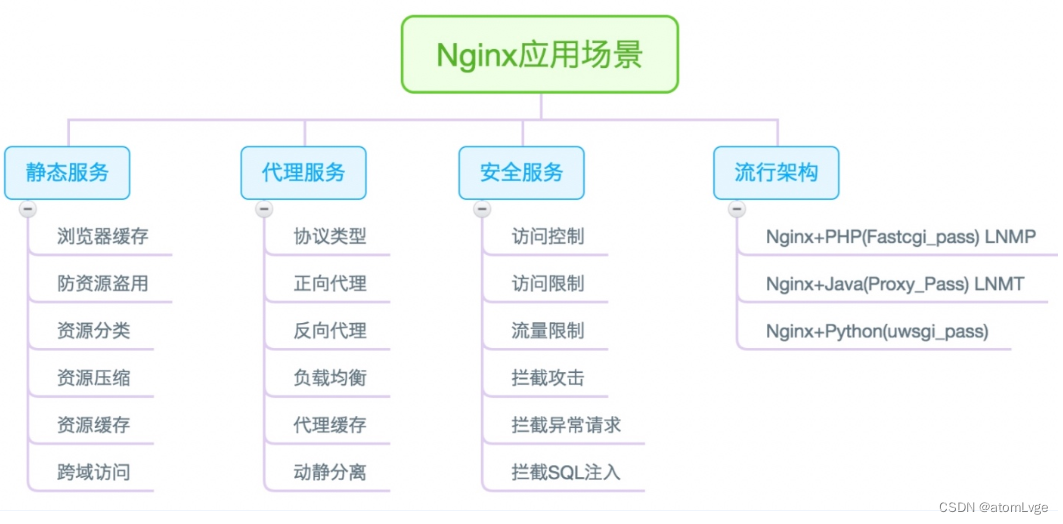
服务架构框架
LNMP  Linux Nginx MySQL PHP
LNMT  Linux Nginx MySQL Tomcat
LAMP  Linux Apache MySQL PHP
LNMP  Linux Nginx MySQL Python
Nginx快速安装
Nginx安装方式:
1.源码编译安装-->Nginx(1.版本随意2.安装复杂3.升级繁琐4.规范5.便于管理)
2.epel仓库-->Nginx(1.版本较低2.安装简单3.配置不易读)
3.官方仓库-->Nginx(1.版本较新2.安装简单3.配置易读)
安装依赖(按需)
yum install -y gcc gcc-c++ autoconf pcre pcre-devel make automake wget httpd-tools vim tree
配置官方yum源
[root@web01 yum.repos.d]# vim /etc/yum.repos.d/nginx.repo
[root@web01 yum.repos.d]#
[root@web01 yum.repos.d]# cat /etc/yum.repos.d/nginx.repo
[nginx-stable]
name=nginx stable repo
baseurl=http://nginx.org/packages/centos/$releasever/$basearch/
gpgcheck=1
enabled=1
gpgkey=https://nginx.org/keys/nginx_signing.key
module_hotfixes=true
#暂时取消epel源安装。防止产生缓存从epel源安装
[root@web01 yum.repos.d]# vim /etc/yum.repos.d/epel.repo
[epel]
name=Extra Packages for Enterprise Linux 7 - $basearch
baseurl=http://mirrors.aliyun.com/epel/7/$basearch
failovermethod=priority
#enabled=1
enabled=0
gpgcheck=0
gpgkey=file:///etc/pki/rpm-gpg/RPM-GPG-KEY-EPEL-7
安装Nginx
[root@web01 yum.repos.d]# yum install -y nginx
[root@web01 yum.repos.d]# rpm -qa |grep nginx
nginx-1.24.0-1.el7.ngx.x86_64

[root@web01 ~]# nginx -v
nginx version: nginx/1.24.0

[root@web01 yum.repos.d]# rpm -qc  nginx		#查看nginx服务的配置文件
/etc/logrotate.d/nginx
/etc/nginx/conf.d/default.conf
/etc/nginx/fastcgi_params
/etc/nginx/mime.types
/etc/nginx/nginx.conf
/etc/nginx/scgi_params
/etc/nginx/uwsgi_params
配置服务
[root@web01 yum.repos.d]# cat /etc/nginx/nginx.conf
#核心区块
user nginx; #启动nginx的虚拟用户,默认已经存在
worker_processes auto; #启动子进程的数量auto以cpu的内核数为准
error_log /var/log/nginx/error.log notice; #错误日志所在位置
pid /var/run/nginx.pid; #进程PID所存放的位置
#事件区块
events {
worker_connections 65536; #进程的最大连接数
}
#http模块
http {
include /etc/nginx/mime.types; #支持的媒体类型
default_type application/octet-stream; #默认如果媒体类型不存在则自动下载
log_format main '$remote_addr - $remote_user [$time_local] "$request" ' #客户端IP地址 客户端用户 时间 请求类型get post..
'$status $body_bytes_sent "$http_referer" '
#状态 字节大小 缓存
'"$http_user_agent" "$http_x_forwarded_for"';
#客户端信息 记录真实用户的访问地址
access_log /var/log/nginx/access.log main; #nginx的正常访问日志
sendfile on; #文件高效传输
#tcp_nopush on;
keepalive_timeout 65; #长连接超时时间
#gzip on; #传输是是否开启压缩默认开启
include /etc/nginx/conf.d/*.conf; #包含了conf.d下所有的conf文件配置。可以理解为将*.conf下的所有配置内容移动到了文件中
}
#主机配置文件(业务配置文件)
vim /etc/nginx/conf.d/game.conf
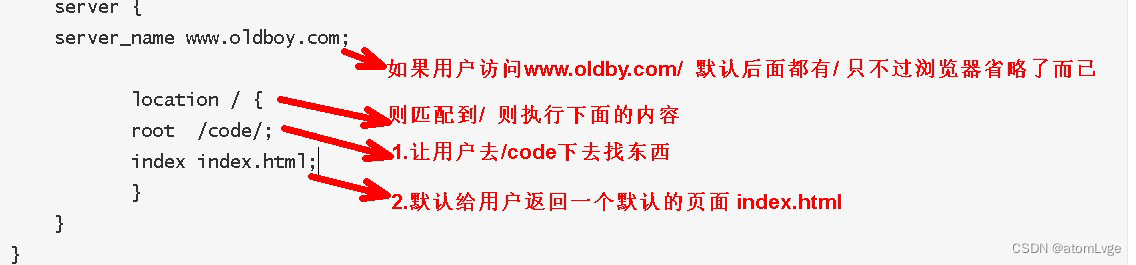
server {
listen 80;
server_name www.oldboy.com;
location / {
root /code/;
index index.html index.htm;
}
[root@web01 conf.d]# nginx -t #检测配置文件是否存在语法错误
nginx: the configuration file /etc/nginx/nginx.conf syntax is ok
nginx: configuration file /etc/nginx/nginx.conf test is successful
[root@web01 conf.d]# systemctl restart nginx #重启服务使配置生效
启动Nginx服务并开机自启
[root@web01 ~]# systemctl start nginx
[root@web01 ~]# systemctl enable nginx
Created symlink from /etc/systemd/system/multi-user.target.wants/nginx.service to /usr/lib/systemd/system/nginx.service.

#Nginx启动方式:
大部分软件两种启动方式:
一种是被systemctl所管理
systemctl start nginx
systemctl enable nginx

一种是没有被systemctl 管理
使用绝对路径运行
[root@web01 ~]# rpm -ql nginx
/usr/sbin/nginx
[root@web01 ~]# /usr/sbin/nginx			#绝对路径方式启动nginx
[root@web01 ~]# netstat -tunlp|grep nginx
tcp        0      0 0.0.0.0:80              0.0.0.0:*               LISTEN      6644/nginx: master
[root@web01 ~]# /usr/sbin/nginx -s stop 		#停止nginx
/usr/sbin/nginx -s reload						#重载nginx
/usr/sbin/nginx -s stop && /usr/sbin/nginx		#重启nginx
查看端口
#查看端口
[root@web01 ~]# netstat -tunlp
Active Internet connections (only servers)
Proto Recv-Q Send-Q Local Address           Foreign Address         State       PID/Program name
tcp        0      0 0.0.0.0:22              0.0.0.0:*               LISTEN      1317/sshd
tcp        0      0 127.0.0.1:25            0.0.0.0:*               LISTEN      1474/master
tcp        0      0 0.0.0.0:80              0.0.0.0:*               LISTEN      6608/nginx: master
Nginx配置多个业务
方式1:使用多IP地址方式
方式2:使用多端口方式
方式3:使用多域名方式


方式1.使用多个IP地址方式:
[root@web01 code]# ip add add 10.0.0.8/24 dev eth0
[root@web01 code]# ip a

[root@web01 code]# cat /etc/nginx/conf.d/game.conf
server {
    listen   10.0.0.7:80;
    server_name  _;

    location / {
        root   /code/;
        index  index.html index.htm;
    }
}

配置第二个业务:
[root@web01 conf.d]# cp game.conf game1.conf

[root@web01 conf.d]# cat game1.conf
server {
    listen   10.0.0.8:80;
    server_name  _;

    location / {
        root   /data/;
        index  index.html index.htm;
    }
}
[root@web01 conf.d]# mkdir -p /data
[root@web01 conf.d]# systemctl restart nginx
测试;浏览器访问10.0.0.8:80 10.0.0.7:80
方式2:使用多端口方式(80端口表示游戏1 81端口表示游戏2)
删除多IP配置业务
[root@web01 conf.d]#  rm -rf game1.conf
游戏1配置:
[root@web01 conf.d]# vim game.conf
server {
    listen   80;
    server_name  _;

    location / {
        root   /code/;
        index  index.html index.htm;
    }
}
 [root@web01 conf.d]# cp game.conf game1.conf

游戏2配置:
[root@web01 conf.d]# vim game1.conf
server {
    listen   81;
    server_name  _;

    location / {
        root   /data/;
        index  index.html index.htm;
    }
}
[root@web01 conf.d]# nginx -t
nginx: the configuration file /etc/nginx/nginx.conf syntax is ok
nginx: configuration file /etc/nginx/nginx.conf test is successful
[root@web01 conf.d]# systemctl restart nginx
[root@web01 conf.d]# netstat -tunlp
Active Internet connections (only servers)
Proto Recv-Q Send-Q Local Address           Foreign Address         State       PID/Program name
tcp        0      0 0.0.0.0:22              0.0.0.0:*               LISTEN      1317/sshd
tcp        0      0 127.0.0.1:25            0.0.0.0:*               LISTEN      1474/master
tcp        0      0 0.0.0.0:80              0.0.0.0:*               LISTEN      7278/nginx: master
tcp        0      0 0.0.0.0:81              0.0.0.0:*               LISTEN      7278/nginx: master
测试:浏览器访问不同端口
方式3:使用多域名方式
[root@web01 conf.d]# vim game.conf
server {
    listen   80;
    server_name  www.game.com;

    location / {
        root   /code/;
        index  index.html index.htm;
    }
}

[root@web01 conf.d]# vim game1.conf
server {
    listen   81;
    server_name  www.game1.com;

    location / {
        root   /data/;
        index  index.html index.htm;
    }
}
[root@web01 conf.d]# systemctl restart nginx
[root@web01 conf.d]#
[root@web01 conf.d]# netstat -tunlp
Active Internet connections (only servers)
Proto Recv-Q Send-Q Local Address           Foreign Address         State       PID/Program name
tcp        0      0 0.0.0.0:22              0.0.0.0:*               LISTEN      1317/sshd
tcp        0      0 127.0.0.1:25            0.0.0.0:*               LISTEN      1474/master
tcp        0      0 0.0.0.0:80              0.0.0.0:*               LISTEN      7393/nginx: master
测试:浏览器访问不同域名
```sh

ate       PID/Program name
tcp        0      0 0.0.0.0:22              0.0.0.0:*               LISTEN      1317/sshd
tcp        0      0 127.0.0.1:25            0.0.0.0:*               LISTEN      1474/master
tcp        0      0 0.0.0.0:80              0.0.0.0:*               LISTEN      7393/nginx: master
测试:浏览器访问不同域名


 1761
1761


 被折叠的 条评论
为什么被折叠?
被折叠的 条评论
为什么被折叠?
 到【灌水乐园】发言


