


一,前言
Eclipse创建一个项目后,都会为该项目创建一个.settings目录,可能很少有人会用到这个目录,所以它往往被大家忽略。
eclipse自动中settings里有一大堆文件,到底都有什么用的?
今天无聊就settings文件中的各个文件进行了归类,不了解的道友可以看看
文章较长,可以直接到感兴趣的段落,或者直接关键字搜索;
请原谅作者掌握的编程语言少,这里只研究Java相关的项目;
每一个文件仅仅做一个常见内容的简单介绍,这些知识多数来自于实践理解和网络搜索,可能会不全面,更详细的可以看相关的参考资料。
参考文章: http://www.iteye.com/topic/257120
http://blog.csdn.net/jmyue/article/details/11400779
二,项目在根目录下的文件
Eclipse项目根目录下通常有两个文件:.project和.classpath,.project是Eclipse项目必须有的文件,而.classpath是Java项目必须有的文件。这两个文件均是XML格式的文本文件,用普通文本编辑器即可打开。
1.文件 .project
.project描述了一个Eclipse项目。
典型内容
<?xml version="1.0" encoding="UTF-8"?>
<projectDescription>
    <!-- name里的内容代表项目名字,对应了Eclipse项目的名称,不是Maven的finalName -->
    <name>demo</name>
    <!-- 项目的注释 -->
    <comment></comment>
    <!-- 引用的项目的名字 -->
    <projects>
    </projects>
    <!-- 有序的列表,定义了一系列的构建命令(buildCommand) -->
    <buildSpec>
        <buildCommand>
            <!-- 项目构建命令的名字 -->
            <name>org.eclipse.wst.jsdt.core.javascriptValidator</name>
            <!-- 构建命令初始化时需要传递的参数(一般看到的都是空的) -->
            <arguments>
            </arguments>
        </buildCommand>
        <buildCommand>
            <name>org.eclipse.jdt.core.javabuilder</name>
            <arguments>
            </arguments>
        </buildCommand>
        <buildCommand>
            <name>org.eclipse.wst.common.project.facet.core.builder</name>
            <arguments>
            </arguments>
        </buildCommand>
        <buildCommand>
            <name>org.eclipse.m2e.core.maven2Builder</name>
            <arguments>
            </arguments>
        </buildCommand>
    </buildSpec>
    <!-- 项目中用到的一些特性的列表 -->
    <natures>
        <!-- 每一个特性的的名字 -->
        <nature>org.eclipse.jem.workbench.JavaEMFNature</nature>
        <nature>org.eclipse.wst.common.modulecore.ModuleCoreNature</nature>
        <nature>org.eclipse.jdt.core.javanature</nature>
        <nature>org.eclipse.m2e.core.maven2Nature</nature>
        <nature>org.eclipse.wst.common.project.facet.core.nature</nature>
        <nature>org.eclipse.wst.jsdt.core.jsNature</nature>
    </natures>
</projectDescription>
使用示例
1).Maven项目的配置
一个Maven项目要确保有如下的内容,如果没有,可以手工加上下面的BuildCommand和natures:
<projectDescription>
    <buildSpec>
        <buildCommand>
            <name>org.eclipse.m2e.core.maven2Builder</name>
            <arguments>
            </arguments>
        </buildCommand>
    </buildSpec>
    <natures>
        <nature>org.eclipse.m2e.core.maven2Nature</nature>
    </natures>
</projectDescription>
2).禁止Javascript的正确性校验
其实禁止正确性校验是一个不好的习惯,但很多人有这样的需求(唐僧:配置一下exclude路径多好啊,即能进行正确性校验又不会太影响速度),这里给出方案。删除如下的buildCommand即可,也可选择性的删除如下的nature:
<buildCommand>
    <name>org.eclipse.wst.jsdt.core.javascriptValidator</name>
    <arguments>
    </arguments>
</buildCommand>
<natures>
    <nature>org.eclipse.wst.jsdt.core.jsNature</nature>
</natures>加入如下的buildSpec、nature元素即可:
<buildSpec>
    <buildCommand>
        <name>org.eclipse.wst.common.project.facet.core.builder</name>
        <arguments>
        </arguments>
    </buildCommand>
</buildSpec>
<natures>
    <nature>org.eclipse.wst.common.modulecore.ModuleCoreNature</nature>
    <nature>org.eclipse.wst.common.project.facet.core.nature</nature>
</natures>
拷贝攻略
.project文件可以从同类型的项目中直接拷贝,但需要修改/projectDescription/name里的项目名称。
参考资料
2. 文件:.classpath
.classpath描述了一个Eclipse项目。
典型内容<?xml version="1.0" encoding="UTF-8"?>
<classpath>
<!-- 含义:src/main/java属于源码,编译后放到target/classes目录下 -->
<classpathentry kind="src" output="target/classes" path="src/main/java">
<attributes>
<attribute name="optional" value="true"/>
<attribute name="maven.pomderived" value="true"/>
</attributes>
</classpathentry>
<classpathentry excluding="**" kind="src" output="target/classes" path="src/main/resources">
<attributes>
<!-- 代表了配置是从POM.xml里来的,受maven管理,非maven项目可以去掉这个 -->
<attribute name="maven.pomderived" value="true"/>
</attributes>
</classpathentry>
<!-- 这里的including代表了目录下所有.java文件才会被处理,其他文件一概忽略,不会出现在target/test-classes目录下 -->
<classpathentry including="**/*.java" kind="src" output="target/test-classes" path="src/test/java">
<attributes>
<attribute name="optional" value="true"/>
<attribute name="maven.pomderived" value="true"/>
</attributes>
</classpathentry>
<classpathentry excluding="**" kind="src" output="target/test-classes" path="src/test/resources">
<attributes>
    <attribute name="maven.pomderived" value="true"/>
</attributes>
</classpathentry>
<!-- 这里代表使用标准的JavaSE-1.7 JDK,相比来说如果用default和直接写当前系统中安装的JDK是不推荐的 -->
<classpathentry kind="con" path="org.eclipse.jdt.launching.JRE_CONTAINER/org.eclipse.jdt.internal.debug.ui.launcher.StandardVMType/JavaSE-1.7">
<attributes>
<attribute name="maven.pomderived" value="true"/>
</attributes>
</classpathentry>
<!-- 代表了Maven中的dependencies也都放到classpath里 -->
<classpathentry kind="con" path="org.eclipse.m2e.MAVEN2_CLASSPATH_CONTAINER">
<attributes>
<attribute name="maven.pomderived" value="true"/>
<!-- web工程中把依赖的jar都放到输出的webapp里/WEB-INF/lib下面 -->
<attribute name="org.eclipse.jst.component.dependency" value="/WEB-INF/lib"/>
</attributes>
</classpathentry>
<!-- -->
<classpathentry kind="con" path="org.eclipse.jst.server.core.container/org.eclipse.jst.server.tomcat.runtimeTarget/Apache-Tomcat v7.0">
<attributes>
<attribute name="owner.project.facets" value="jst.web"/>
</attributes>
</classpathentry>
<!-- 统一的输出为target/classes -->
<classpathentry kind="output" path="target/classes"/>
</classpath>1)项目有test/resources或test/java目录,但是不识别为classpath
酌情加入如下的classpathentry:<classpathentry including="**/*.java" kind="src" output="target/test-classes" path="src/test/java" /> <classpathentry excluding="**" kind="src" output="target/test-classes" path="src/test/resources" />
2)项目是maven工程,但是构建路径貌似怎么也配置不对
Maven是约定优于配置(convention over configuration)的,但是.classpath是配置型的,一般不会出现这种情况,如果出现了,检查maven约定的类路径(比如src/main/java、org.eclipse.m2e.MAVEN2_CLASSPATH_CONTAINER)中是否有如下的元素:
<attributes> <attribute name="maven.pomderived" value="true"/> </attributes>
3)aven的依赖jar文件放不到/WEB-INF/lib里
确认或加入如下的配置:
<classpathentry kind="con" path="org.eclipse.m2e.MAVEN2_CLASSPATH_CONTAINER">
    <attributes>
        <attribute name="maven.pomderived" value="true"/>
        <attribute name="org.eclipse.jst.component.dependency" value="/WEB-INF/lib"/>
    </attributes>
</classpathentry>
4)界面配置方法
在项目Properties配置界面中,具体位置参考下图:
- 可移植的JDK配置

JDK配置
拷贝攻略
.classpath文件可以从同类型的项目中直接拷贝,有些目录没有的话,注意删掉对应的classpathentry,其他基本无需修改,如果有问题再考虑去改。但如果从别人的机器里拷贝,需要关注三点:
Java SDK的配置:如果Java SDK类型设置的是配置界面中的“Alternate JRE”,那么除非自己机器上装了对方机器名字一样的JDK(不是类型或者版本,而是Installed JREs配置中的名字),否则就需要修改JDK的配置。推荐使用配置界面中的“Execution Environment”来配置,避免绑定具体的JDK版本和实现,如
<classpathentry kind="con" path="org.eclipse.jdt.launching.JRE_CONTAINER/org.eclipse.jdt.internal.debug.ui.launcher.StandardVMType/JavaSE-1.7" />如果Web项目使用了Web容器且绑定了project facet,那么就需要考虑Web容器配置的问题了,以Apache-tomcat为例,需要增加
<classpathentry kind="con" path="org.eclipse.jst.server.core.container/org.eclipse.jst.server.tomcat.runtimeTarget/Apache-Tomcat v7.0" />,而"Apache-Tomecat v7.0"字符串需要与Eclipse Preferences里Server/Runtime Environments里的name一列保持一致。
参考资料:https://www.developer.com/java/ent/article.php/3639021/Eclipse-Tip-Use-the-Execution-Environment-to-Create-Portable-Java-Projects.htm
三、/.settings目录下的文件
Eclipse项目.settings目录下的配置比较杂,各种后缀名的都可以见到,绝大多数是文本文件,格式为properties(多数以.prefs为后缀名)或XML(多数以.*、.xml为文件名)格式的为主。下面挨个讲一些典型的文件。
1. 文件:.jsdtscope
.jsdtscope文件定义了web项目中的源码路径,也就意味着只有web project才会有这个配置。这些源码Eclipse会进行validate(如果validate没有禁用)。这个文件在实际开发中最大的价值在于定义JS文件的例外路径,在配置界面中配置的话挨个选很烦人。
典型内容
<?xml version="1.0" encoding="UTF-8"?>
<classpath>
    <classpathentry excluding="**/*.min.js|**/bower_components/*|**/custom/*|**/node_modules/*|**/target/**|**/vendor/*" kind="src" path="src/main/webapp"/>
    <classpathentry kind="con" path="org.eclipse.wst.jsdt.launching.JRE_CONTAINER"/>
    <classpathentry kind="con" path="org.eclipse.wst.jsdt.launching.WebProject">
        <attributes>
            <attribute name="hide" value="true"/>
        </attributes>
    </classpathentry>
    <classpathentry kind="con" path="org.eclipse.wst.jsdt.launching.baseBrowserLibrary"/>
    <classpathentry kind="output" path=""/>
</classpath>1.配置JS的例外(一般用于让Eclipse不校验第三方JS文件,避免开启JS校验后Eclipse假死)
在.jsdtscope文件的<classpathentry kind="src" path="src/main/webapp"/>增加excluding属性,写法见“典型内容”一节。
1)界面配置方法
这一部分在Eclipse不同版本里不一样,Eclipse 4.5及以后版本可以参考下面的配置,4.4.X版本(更早的版本没有考证)只能配置到具体项目中,不能全局配置。若针对具体项目配置,配置界面在项目的properties里的如下位置:
拷贝攻略
.jsdtscope文件可以从同类型的项目中直接拷贝,基本无需修改。
2. 文件:org.eclipse.core.resources.prefs
org.eclipse.core.resources.prefs文件其实就是规定项目内的文件的编码用的。一般来说一个项目里的文件编码需要一致,特别是文件文本内容本身无法指示文件本身编码的(比较绕,XML文件第一行能指示自身编码,CSS也有这个能力但用得不多),尽量不要多种编码同时存在(最好在编码规范中禁止多重编码同时存在的现象发生)。
典型内容
eclipse.preferences.version=1
encoding//src/main/java=UTF-8
encoding//src/main/resources=UTF-8
encoding//src/test/java=UTF-8
encoding//src/test/resources=UTF-8
encoding/<project>=UTF-8一般正常的项目打开后,应该看到是统一的编码,如果存在例外,可以对例外的文件进行转码,然后删除这个文件中例外的那一行。拷贝攻略
org.eclipse.core.resources.prefs文件可以从同类型的项目中直接拷贝,无需修改。3. 文件:org.eclipse.jdt.core.prefs
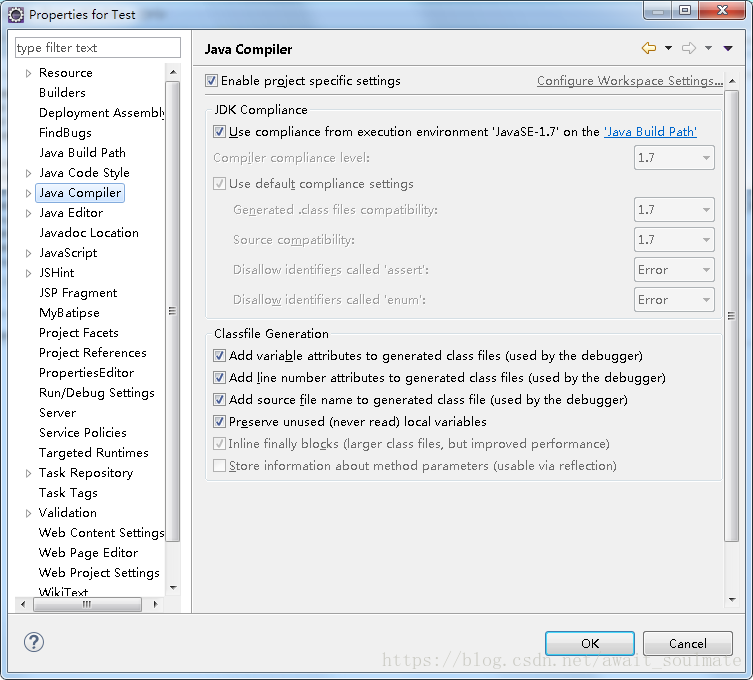
org.eclipse.jdt.core.prefs文件指定了一些Java编译的特性,比如Java版本之类的,看文件每一行的key能猜出具体的用处。典型内容
eclipse.preferences.version=1
org.eclipse.jdt.core.compiler.codegen.inlineJsrBytecode=enabled
org.eclipse.jdt.core.compiler.codegen.targetPlatform=1.7
org.eclipse.jdt.core.compiler.compliance=1.7
org.eclipse.jdt.core.compiler.problem.assertIdentifier=error
org.eclipse.jdt.core.compiler.problem.enumIdentifier=error
org.eclipse.jdt.core.compiler.problem.forbiddenReference=warning
org.eclipse.jdt.core.compiler.source=1.7如果项目中源文件版本不正确,编译出来的目标版本不对,那么可以在这里进行修改。界面中修改的话,可以参考:
.classpath的界面配制方法
拷贝攻略
org.eclipse.jdt.core.prefs文件可以从同类型的项目中直接拷贝,无需修改。
4. 文件:org.eclipse.m2e.core.prefs
org.eclipse.m2e.core.prefs是一些maven相关的配置。
典型内容
eclipse.preferences.version=1
activeProfiles=dev
resolveWorkspaceProjects=true
version=1一般在Maven项目开发时和生产环境中配置不一样,可以在pom.xml中指定不同的profile来实现,Eclipse项目开发时指定profile的话(比如指定名叫dev的profile),就可以配置这个文件的activeProfiles属性。如果在界面中配置,在这里:

拷贝攻略
org.eclipse.m2e.core.prefs文件可以从同类型的项目中直接拷贝,无需修改。
5. 文件:org.eclipse.wst.common.component
org.eclipse.wst.common.component文件规定了项目怎么组装成一个webapp,这里可以玩很多种组装方式。
典型内容
<?xml version="1.0" encoding="UTF-8"?>
<project-modules id="moduleCoreId" project-version="1.5.0">
    <wb-module deploy-name="inkfish-web">
        <wb-resource deploy-path="/" source-path="/target/m2e-wtp/web-resources"/>
        <wb-resource deploy-path="/" source-path="/src/main/webapp" tag="defaultRootSource"/>
        <wb-resource deploy-path="/WEB-INF/classes" source-path="/src/main/java"/>
        <wb-resource deploy-path="/WEB-INF/classes" source-path="/src/main/resources"/>
        <property name="context-root" value="inkfish-web"/>
        <property name="java-output-path" value="/inkfish-web/target/classes"/>
    </wb-module>
</project-modules>在某些项目中,从远程maven仓库下载zip组件(当然war组件最好,是maven自带支持的)解压并放到target,作为webapp一部分,就可以在这里修改组装webapp的方式。如果在界面中配置,在这里:

拷贝攻略
org.eclipse.wst.common.component文件不可直接拷贝,如需拷贝注意修改deploy-name、某些value等一些与项目名称相关的信息。
6. 文件:org.eclipse.wst.common.project.facet.core.xml
org.eclipse.wst.common.project.facet.core.xml指示了项目中启用那些facet及facet的版本。
典型内容
<?xml version="1.0" encoding="UTF-8"?>
<faceted-project>
  <runtime name="Apache Tomcat v8.0"/>
  <fixed facet="wst.jsdt.web"/>
  <installed facet="wst.jsdt.web" version="1.0"/>
  <installed facet="java" version="1.7"/>
  <installed facet="jst.web" version="3.1"/>
</faceted-project>界面配置在下面的位置:
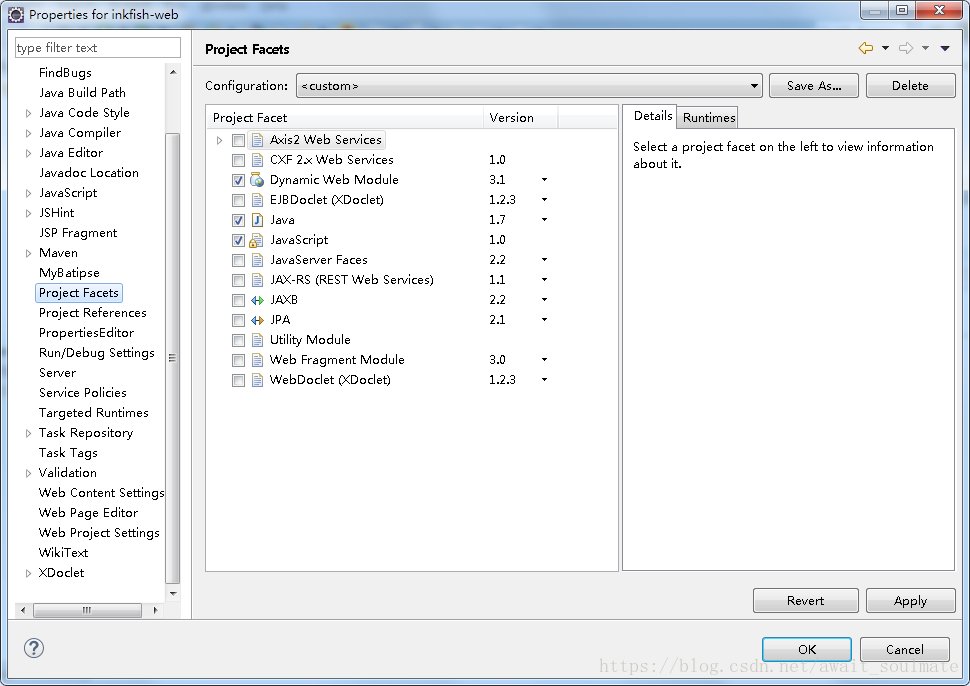
在实际使用中有时候在Eclipse的facet配置了以后又恢复回去了,总是配不成功,那么就可以直接修改这个文件。常见的比如servlet版本不匹配,那么就可以修改jst.web这个facet的version,如果java版本不对,那么可以修改java这个facet的version。
拷贝攻略
org.eclipse.wst.common.project.facet.core.xml文件可以从同类型的项目中直接拷贝,基本无需修改。
7. 文件:org.eclipse.wst.jsdt.ui.superType.container使用不多,无研究,略去。
典型内容
org.eclipse.wst.jsdt.launching.baseBrowserLibrary或者也见过org.eclipse.wst.jsdt.launching.JRE_CONTAINERorg.eclipse.wst.jsdt.ui.superType.name文件可以在项目间项目直接拷贝,无需修改。9. 文件:org.eclipse.wst.validation.prefs
使用不多,无研究,略去。
典型内容
disabled=06target
eclipse.preferences.version=1
拷贝攻略
org.eclipse.wst.validation.prefs文件可以在项目间项目直接拷贝,无需修改。
补充:
有的配置是前后关联的,不是调整一个配置文件就能完事的,比如修改web工程里的Java版本,可能需要修改好几个配置文件。


 1428
1428

 被折叠的 条评论
为什么被折叠?
被折叠的 条评论
为什么被折叠?
 到【灌水乐园】发言


