


什么是springboot?
springboot是spring快速开发脚手架,通过约定大于配置的方式,快速构建和启动spring项目
为什么要学习springboot?
springboot可以简化spring框架的复杂配置,不需要配置web.xml和spring.xml 。可以解决混乱的依赖管理问题,且 springboot内嵌Tomcat,运行
编写springboot项目的pom文件
<parent>
    <groupId>org.springframework.boot</groupId>
    <artifactId>spring-boot-starter-parent</artifactId>
    <version>2.0.0.RELEASE</version>
</parent>
添加依赖:springboot提供了该构件,里面对各种常用依赖(不是全部的依赖)的版本进行了管理,我们的项目需要以这个项目作为父工程,这样就不用担心版本依赖的问题
<dependencies>
    <dependency>
    <groupId>org.springframework.boot</groupId>
    <artifactId>spring-boot-starter-web</artifactId>
    </dependency>
</dependencies>
需要在pom文件中指定使用的springboot提供的自动配置依赖,称为 启动器,因为是web项目,这里我们引入的是web启动器
<properties>
    <java.version>1.8</java.version>
</properties>
管理jdk的版本
springboot的自动配置原理
重点查看@SpringBootApplication注解
@EnableAutoConfifiguratio :该注解在我们引入了pom依赖之后,会自动启用默认的配置,所以简化了我们自己的配置
自动配置的条件:
- 引入了相关的依赖
- 没有定义配置类,自定义配置类会使自动配置类失效
springboot 整合Spring MVC
拦截器是我们经常需要使用的,在springboot中该如何配置呢?
首先我们需要定义一个拦截器,然后创建一个类来实现WebMvcConfigurer接口
要想显示出拦截器的内容,还要配置日志的级别
logging.level.com.xxx=debug配置com包下的日志级别为debug
springboot 整合 JDBC
<dependency>
    <groupId>org.springframework.boot</groupId>
    <artifactId>spring-boot-starter-jdbc</artifactId>
    </dependency>
<dependency>
    <groupId>org.springframework.boot</groupId>
    <artifactId>spring-boot-starter-test</artifactId>
</dependency>
引入依赖,如果需要测试,则引入测试test
<dependency>
    <groupId>mysql</groupId>
    <artifactId>mysql-connector-java</artifactId>
    <version>5.1.46</version>
</dependency>
当然,还要引入数据库的驱动,springboot不知道我们用的什么数据库,这里我们选择的是Mysql
引入了JDBC启动器之后,springboot已经自动帮我们引入了连接池

什么是连接池?
数据库连接池负责分配、管理和释放数据库的连接
- 数据库连接复用:重复使用现有的数据库长连接,可以避免频繁建立连接,关闭的开销
- 统一的连接管理:释放空闲时间超过最大空闲时间的数据库连接,避免因为没有释放数据库连接而引起的数据库连接泄漏
HikariCP连接池的优点
HikariCP是由日本程序员开源的一个数据库连接池组件,代码非常轻量,并且速度非常的快。根据官方提供的数据,在i7,开启32个线程32个连接的情况下,进行随机数据库读写操作,HikariCP的速度是现在常用的C3P0数据库连接池的数百倍。所以在SpringBoot2.0中,官方也是推荐使用HikariCP。
# 连接四大参数
spring.datasource.url=jdbc:mysql://localhost:3306/springboot spring.datasource.username=root
spring.datasource.password=123
spring.datasource.driverClassName=com.mysql.jdbc.Driver
配置指定连接池的参数

整合jdbc,springboot自动创建了JdbcTemplate类
springboot整合mybatis(和后面整合mp做比较)
spring官方并没有提供Mybatis的启动器,所以需要导入版本号
<!--mybatis -->
<dependency>
    <groupId>org.mybatis.spring.boot</groupId>
    <artifactId>mybatis-spring-boot-starter</artifactId>
    <version>1.3.2</version>
</dependency>
mybatis基本没什么配置,但是可以配置一下别名扫描,简化代码。
如果需要使用SQL语句的话,需要配置mapper.xml的位置
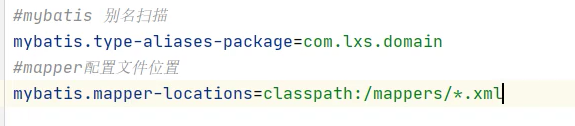

比如这里的映射文件
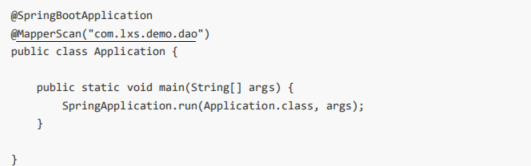
使用了mybatis框架,我们需要在启动类上加上mapper注解扫描,如果不加的话,需要在每个dao包下的接口加上注解@Mapper,所以建议在启动类添加mapper注解扫描
另外补充一句: mybatis 的实体类和数据库之间不支持 驼峰命名的转化
springboot 整合 tkMybatis (意思为:通用mybatis,后面还有Mybatis Plus)
使用mybatis时,最大的问题是,要写大量的重复SQL语句在xml中,除了特殊业务逻辑SQL语句之外,还有大量结构类似的CRUD语句。当数据库表结构改变时,对应的所有SQL以及实体都需要更改
- 通用mybatis(tk mybatis)
- mybatis plus,通能更加强大,后面讲解
注意事项:
1、表名 = 类名 , 字段名 = 属性名
2、表名可以使用 @Table(name="tablename")指定
3、列名可以使用 @Column(name="fieldName")指定
4、使用@Transient注解表示跟字段不进行映射,用于多表联查
不需要做任何配置就可以使用,Mp需要写配置类,在类上添加配置注解@Configuration
注意:实体类中的主键是一定要映射的,还需要表明主键的策略
@Table(name = "tb_user")
public class User implements Serializable {
    private static final long serialVersionUID = 1L;

    @Id
    @GeneratedValue(strategy = GenerationType.IDENTITY)
    private Long id;
@Id
@GeneratedValue(strategy = GenerationType.IDENTITY)
继承 mapper接口,就不用写基本的CRUD操作
tk mybatis少用,所以只介绍重点
springboot 整合 Mybatis Plus(经常用的框架Mp)
<dependency>
    <groupId>com.baomidou</groupId>
    <artifactId>mybatis-plus-boot-starter</artifactId>
    <version>3.3.2</version>
</dependency>
引入pom配置文件
使用yml配置文件 配置信息
在springboot中,推荐使用properties 或者 YAML 文件来完成配置,但是对于较复杂的数据结构来说,YAML又远远优于properties
编写实体类层
如果mysql自增主键,注解策略设置如下
@TableId(type = IdType.AUTO)
private Long id;
如果属性和表的列不关联,则需要设置注解@TableField

@TableField(exist = false)
还需要编写配置类

编写 dao 层 :继承的是BaseMapper<>接口,就不需要写基础的CRUD方法了
public interface UserMapper extends BaseMapper<User> { }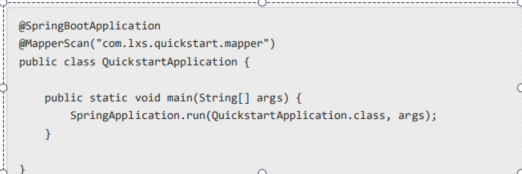
启动类中需要注解扫描mapper的包路径
使用MP的内置方法的删除方法(批量删除)
mapper.delete( new QueryWrapper <User> ( ). like( "name" ,"J" ) ); //将User表中的name属性中含有J的删除

还有另外一种写法
mapper.delete ( Wrappers.<User> query ( ) . like ("name","J" ) );

批量修改的功能,可以模仿上面的批量删除实现
mapper.update( null , Wrappers.<User>update( ).set ("email" , "xixi@163.com"). like( "name" , "J"))
另外一种写法
mapper.update(new User().setEmail("xixi@163.com "), Wrappers.<User>update( ). like( "name" , "J") )
复杂一点的查询
@Test
public void testSelect() {
   // //基本查询
   // System.out.println(mapper.selectOne(Wrappers.<User>query().eq("name", "Tom")));

   //投影查询
   mapper.selectList(new QueryWrapper<User>().select("id", "name")).forEach(user -> {
   System.out.println(user);

 });

}
mybatis plus 整合 pageHelper的配置类
引入pagehelper依赖
<dependency>
    <groupId>com.github.pagehelper</groupId>
    <artifactId>pagehelper</artifactId>
    <version>5.1.11</version>
</dependency>
mybatis plus 整合pageHelper的配置类,需要创建一个类,并且声明为配置类
@Configuration
@MapperScan("com.lxs.mybatisplus.samples.crud.mapper")
public class MybatisPlusConfig {
    @Bean
    public PageInterceptor pageInterceptor() {
        return new PageInterceptor();
}
映射文件
<select id="selectUserByPage2" resultType="user">
    <include refid="selectSql"></include>
    <where>
        <if test="age !=null">
            age = #{age}
        </if>
        <if test="email !=null">
            and email like '%${email}%'
        </if>
    </where>
</select>
测试:
pagehelper 其实实际传递两个参数,第一个是(当前的页数,以及当前页的行数),第二个是(查询的条件)


 711
711


 被折叠的 条评论
为什么被折叠?
被折叠的 条评论
为什么被折叠?
 到【灌水乐园】发言


