


Qwen家族最新一代大语言模型(LLM)Qwen3已正式上线Amazon Bedrock Marketplace及Amazon SageMaker JumpStart。
用户可部署参数规模涵盖0.6B、4B、8B和32B的Qwen3系列模型,在亚马逊云科技上构建、测试并扩展负责任的生成式AI应用。
本文将演示如何通过Amazon Bedrock Marketplace和Amazon SageMaker JumpStart,开始使用Qwen3模型。您可参照类似步骤部署该模型的蒸馏模型。
解决方案概览
作为Qwen家族的最新一代LLM,Qwen3模型提供了一套包含混合专家(MoE)模型的完整解决方案,在推理能力、指令遵循、Agent功能及多语言支持方面实现了突破性进展。其主要具备以下特性。
1.可在各类场景中提供最佳性能表现,特别支持在单一模型内实现思考模式与非思考模式间的无缝切换。
2.推理能力显著提升,在数学、代码生成及常识逻辑推理任务上,超越前代思考模式下的QwQ模型、非思考模式下的Qwen2.5指令模型。
3.高度契合人类偏好,在创意写作、角色扮演、多轮对话及指令遵循方面表现卓越,可提供更自然生动且更具沉浸感的对话体验。
4.具备专业级Agent能力,无论处于思考或非思考模式,均可精准调用外部工具,在复杂Agent任务中领先开源模型。
5.支持100余种语言及方言,多语言指令遵循与翻译能力出众。
准备条件
要部署Qwen3模型,请确保您已获得基于模型规模推荐的实例类型访问权限。
您可在Amazon Bedrock Marketplace及Amazon SageMaker JumpStart控制台中,查看这些实例推荐信息。为确认您已具备所需资源,请按以下步骤操作。
1.打开亚马逊云科技服务配额控制台。
2.在亚马逊云科技服务列表中,选择Amazon SageMaker。
3.检查您是否具有部署端点所需实例类型的充足配额。
4.确保目标亚马逊云科技区域中,至少有一个此类实例类型可用。
如有需要,您可申请提高配额,并联系您的亚马逊云科技账户团队以获取支持。
在Amazon Bedrock Marketplace中
部署Qwen3模型
通过Amazon Bedrock,Amazon Bedrock Marketplace为您提供100多款热门、新兴及专业领域基础模型(FM)的访问权限。要在Amazon Bedrock中访问Qwen3模型,请按以下步骤操作。
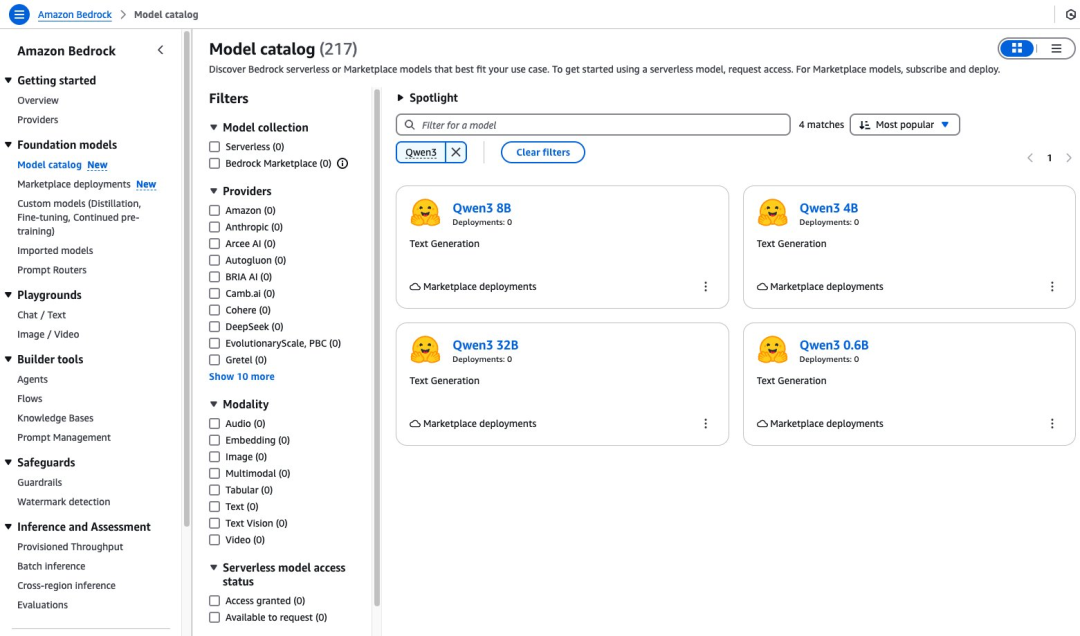
1.在Amazon Bedrock控制台的导航窗格,在“基础模型”下选择“模型目录”。
2.将提供商筛选为“Hugging Face”,然后选择一款Qwen3模型。本例选用Qwen3-32B模型。
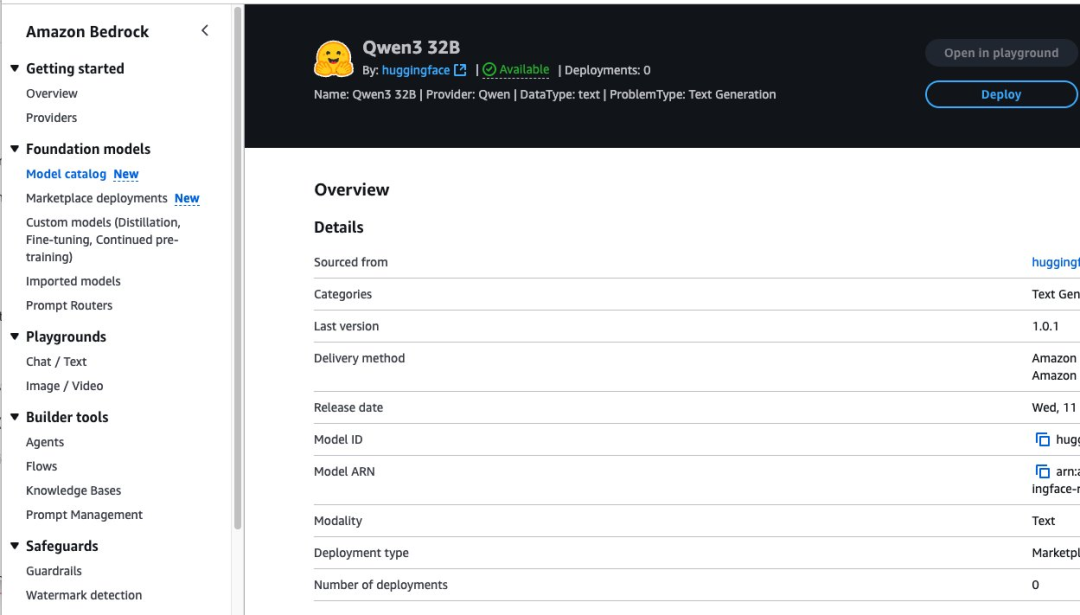
模型详情页面提供了关于该模型功能特性、定价体系及实施指南的关键信息,您可在其中找到详细使用说明,包括示例API调用以及用于集成的代码片段。
该页面还提供了部署选项和许可信息,帮助您在应用程序中顺利启用Qwen3-32B模型。
要开始使用Qwen3-32B模型,请选择“部署”。
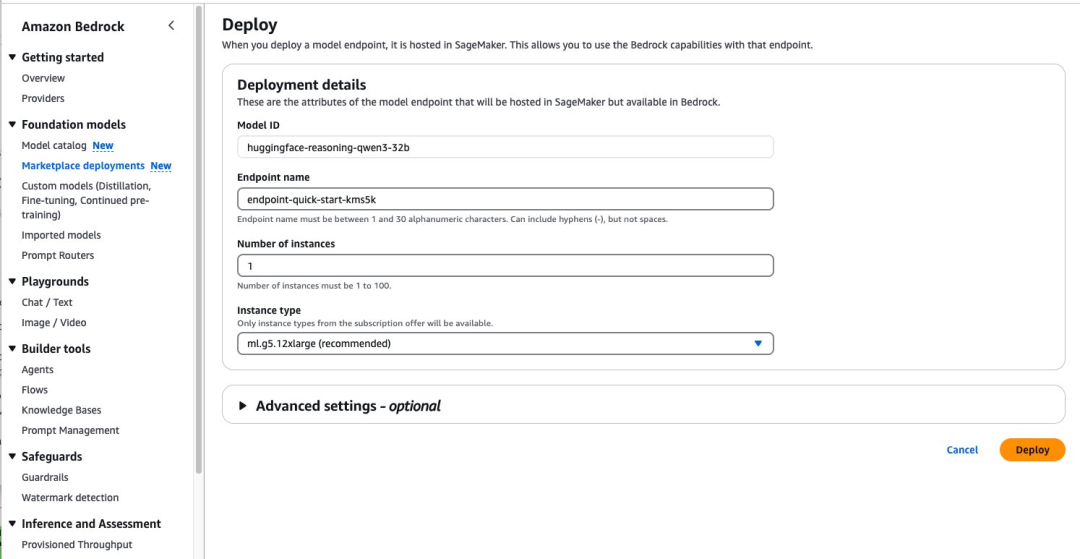
系统将提示您配置Qwen3-32B模型的部署详情,此时模型ID已预先填充好。
在“端点名称”位置输入端点名称,长度为1至50个字母数字字符。
在“实例数量”位置输入实例数量,范围为1至100个。
在“实例类型”位置选择您的实例类型。为使Qwen3-32B模型达到最佳性能,建议选用基于GPU的实例类型,如ml.g5-12xlarge。
如需部署该模型,请选择“部署”。
部署完成后,您可直接在Amazon Bedrock测试环境中,测试Qwen3-32B模型功能。
选择“在测试环境中打开”,即可进入交互式界面。在该界面中您可以尝试不同的提示词,并调整温度和最大长度等模型参数。
在将该模型集成到您的应用程序之前,这是探索模型推理能力和文本生成能力的绝佳方式。测试环境可提供即时反馈,助您了解模型对不同输入的响应情况,并让您微调提示词以获得最佳效果。您可通过UI在测试环境中快速测试该模型。但要通过任何Amazon Bedrock API以编程方式调用已部署的模型,您必须拥有端点的ARN。
01
通过Converse API启用推理型和非推理型回复
以下代码展示了如何根据具体应用场景,使用Converse API开启或关闭Qwen3模型推理功能。
默认情况下,Qwen3模型的推理功能处于开启状态,您也可以在提示词中使用/no_think命令来简化交互。当您在查询末尾添加该命令时,推理功能将被关闭,模型将直接提供答案。当您需要快速获取信息而无需获得解释、对相关主题已十分熟悉,或希望保持更快的对话节奏时,这一功能尤为实用。
撰写本文时,Converse API尚不支持Qwen3模型调用工具。如需了解如何在同一生成结果中同时使用推理功能和工具,请参阅后文Invoke_Model API示例部分。
import boto3from botocore.exceptions import ClientError
# Create a Bedrock Runtime client in the AWS Region you want to use.client = boto3.client("bedrock-runtime", region_name="us-west-2")
# Configurationmodel_id = ""  # Replace with Bedrock Marketplace endpoint arn
# Start a conversation with the user message.user_message = "hello, what is 1+1 /no_think"#remove /no_think to leave default reasoning onconversation = [    {        "role": "user",        "content": [{"text": user_message}],    }]
try:    # Send the message to the model, using a basic inference configuration.    response = client.converse(        modelId=model_id,        messages=conversation,        inferenceConfig={"maxTokens": 512, "temperature": 0.5, "topP": 0.9},    )
    # Extract and print the response text.    #response_text = response["output"]["message"]["content"][0]["text"]    #reasoning_content = response ["output"]["message"]["reasoning_content"][0]["text"]    #print(response_text, reasoning_content)    print(response)    except (ClientError, Exception) as e:    print(f"ERROR: Can't invoke '{model_id}'. Reason: {e}")
左右滑动查看完整示意
不启用默认推理功能,使用Converse API生成的回复如下。
{'ResponseMetadata': {'RequestId': 'f7f3953a-5747-4866-9075-fd4bd1cf49c4', 'HTTPStatusCode': 200, 'HTTPHeaders': {'date': 'Tue, 17 Jun 2025 18:34:47 GMT', 'content-type': 'application/json', 'content-length': '282', 'connection': 'keep-alive', 'x-amzn-requestid': 'f7f3953a-5747-4866-9075-fd4bd1cf49c4'}, 'RetryAttempts': 0}, 'output': {'message': {'role': 'assistant', 'content': [{'text': '\n\nHello! The result of 1 + 1 is **2**. 😊'}, {'reasoningContent': {'reasoningText': {'text': '\n\n'}}}]}}, 'stopReason': 'end_turn', 'usage': {'inputTokens': 20, 'outputTokens': 22, 'totalTokens': 42}, 'metrics': {'latencyMs': 1125}}左右滑动查看完整示意
启用默认推理功能,生成回复示例如下。此时,<think>标记会被自动解析,并填充到Converse API的reasoningContent字段中。
{'ResponseMetadata': {'RequestId': 'b6d2ebbe-89da-4edc-9a3a-7cb3e7ecf066', 'HTTPStatusCode': 200, 'HTTPHeaders': {'date': 'Tue, 17 Jun 2025 18:32:28 GMT', 'content-type': 'application/json', 'content-length': '1019', 'connection': 'keep-alive', 'x-amzn-requestid': 'b6d2ebbe-89da-4edc-9a3a-7cb3e7ecf066'}, 'RetryAttempts': 0}, 'output': {'message': {'role': 'assistant', 'content': [{'text': '\n\nHello! The sum of 1 + 1 is **2**. Let me know if you have any other questions or need further clarification! 😊'}, {'reasoningContent': {'reasoningText': {'text': '\nOkay, the user asked "hello, what is 1+1". Let me start by acknowledging their greeting. They might just be testing the water or actually need help with a basic math problem. Since it\'s 1+1, it\'s a very simple question, but I should make sure to answer clearly. Maybe they\'re a child learning math for the first time, or someone who\'s not confident in their math skills. I should provide the answer in a friendly and encouraging way. Let me confirm that 1+1 equals 2, and maybe add a brief explanation to reinforce their understanding. I can also offer further assistance in case they have more questions. Keeping it conversational and approachable is key here.\n'}}}]}}, 'stopReason': 'end_turn', 'usage': {'inputTokens': 16, 'outputTokens': 182, 'totalTokens': 198}, 'metrics': {'latencyMs': 7805}}左右滑动查看完整示意
02
使用Invoke_Model API在同一生成结果中
同时执行推理与函数调用
使用Qwen3模型时,您可以在同一生成结果中,同时输出清晰的推理过程以及精确的JSON工具调用信息。
迄今为止,传统推理模型往往只能让用户在两种模式中二选一:要么展示模型完整的思考过程,要么精确调用工具来完成任务。
示例代码如下。
messages = json.dumps( {    "messages": [        {            "role": "user",            "content": "Hi! How are you doing today?"        },         {            "role": "assistant",            "content": "I'm doing well! How can I help you?"        },         {            "role": "user",            "content": "Can you tell me what the temperate will be in Dallas, in fahrenheit?"        }    ],    "tools": [{        "type": "function",        "function": {            "name": "get_current_weather",            "description": "Get the current weather in a given location",            "parameters": {                "type": "object",                "properties": {                    "city": {                        "type":                            "string",                        "description":                            "The city to find the weather for, e.g. 'San Francisco'"                    },                    "state": {                        "type":                            "string",                        "description":                            "the two-letter abbreviation for the state that the city is in, e.g. 'CA' which would mean 'California'"                    },                    "unit": {                        "type": "string",                        "description":                            "The unit to fetch the temperature in",                        "enum": ["celsius", "fahrenheit"]                    }                },                "required": ["city", "state", "unit"]            }        }    }],    "tool_choice": "auto"})
response = client.invoke_model(    modelId=model_id,     body=body)print(response)model_output = json.loads(response['body'].read())print(json.dumps(model_output, indent=2))
左右滑动查看完整示意
生成回复如下。
{'ResponseMetadata': {'RequestId': '5da8365d-f4bf-411d-a783-d85eb3966542', 'HTTPStatusCode': 200, 'HTTPHeaders': {'date': 'Tue, 17 Jun 2025 18:57:38 GMT', 'content-type': 'application/json', 'content-length': '1148', 'connection': 'keep-alive', 'x-amzn-requestid': '5da8365d-f4bf-411d-a783-d85eb3966542', 'x-amzn-bedrock-invocation-latency': '6396', 'x-amzn-bedrock-output-token-count': '148', 'x-amzn-bedrock-input-token-count': '198'}, 'RetryAttempts': 0}, 'contentType': 'application/json', 'body': <botocore.response.StreamingBody object at 0x7f7d4a598dc0>}{ "id": "chatcmpl-bc60b482436542978d233b13dc347634", "object": "chat.completion", "created": 1750186651, "model": "lmi", "choices": [ { "index": 0, "message": { "role": "assistant", "reasoning_content": "\nOkay, the user is asking about the weather in San Francisco. Let me check the tools available. There's a get_weather function that requires location and unit. The user didn't specify the unit, so I should ask them if they want Celsius or Fahrenheit. Alternatively, maybe I can assume a default, but since the function requires it, I need to include it. I'll have to prompt the user for the unit they prefer.\n", "content": "\n\nThe user hasn't specified whether they want the temperature in Celsius or Fahrenheit. I need to ask them to clarify which unit they prefer.\n\n", "tool_calls": [ { "id": "chatcmpl-tool-fb2f93f691ed4d8ba94cadc52b57414e", "type": "function", "function": { "name": "get_weather", "arguments": "{\"location\": \"San Francisco, CA\", \"unit\": \"celsius\"}" } } ] }, "logprobs": null, "finish_reason": "tool_calls", "stop_reason": null } ], "usage": { "prompt_tokens": 198, "total_tokens": 346, "completion_tokens": 148, "prompt_tokens_details": null }, "prompt_logprobs": null}左右滑动查看完整示意
通过Amazon SageMaker JumpStart
部署Qwen3-32B模型
Amazon SageMaker JumpStart是一个机器学习中心,内置基础模型、算法以及预构建的机器学习解决方案,您只需轻点几下即可完成部署。
借助Amazon SageMaker JumpStart,您可以根据自身业务场景和数据,对预训练模型进行定制化调整,并通过UI或SDK将其投入生产环境。
通过Amazon SageMaker JumpStart部署Qwen3-32B模型有两种便捷方式:
1.使用直观易用的Amazon SageMaker JumpStart UI。
2.通过Amazon SageMaker Python SDK以编程方式实现。
下面将详细介绍这两种方法,助您选择最适合自身需求的方式。
01
通过Amazon SageMaker JumpStart UI
部署Qwen3-32B模型
按照以下步骤,使用Amazon SageMaker JumpStart完成部署Qwen3-32B模型。
1.在Amazon SageMaker控制台的导航面板中选择“Studio”。
2.首次使用的用户将会收到创建域的提示。
3.在Amazon SageMaker Studio控制台的导航面板中选择“JumpStart”。
模型浏览器会展示所有可用模型,并显示提供方名称和模型功能等详细信息。
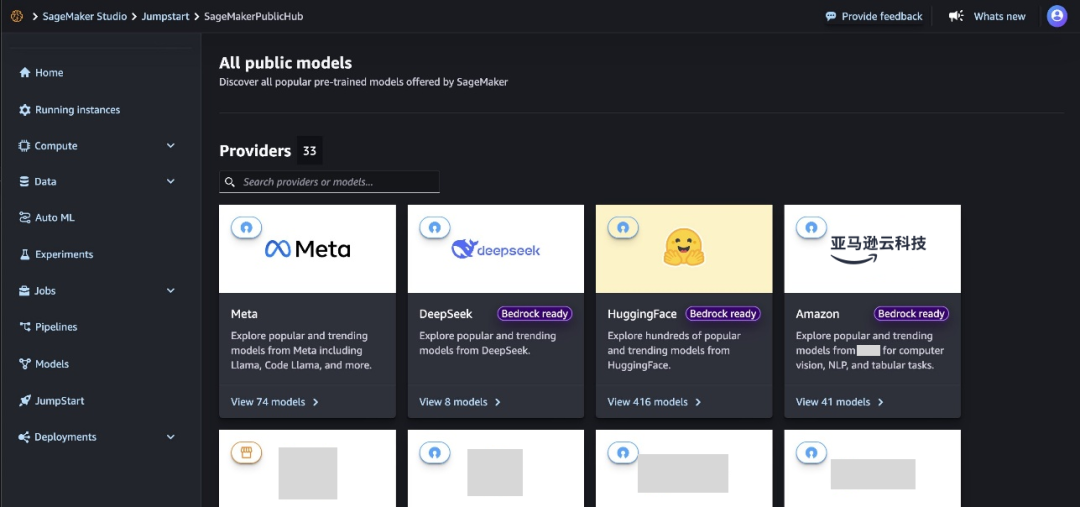
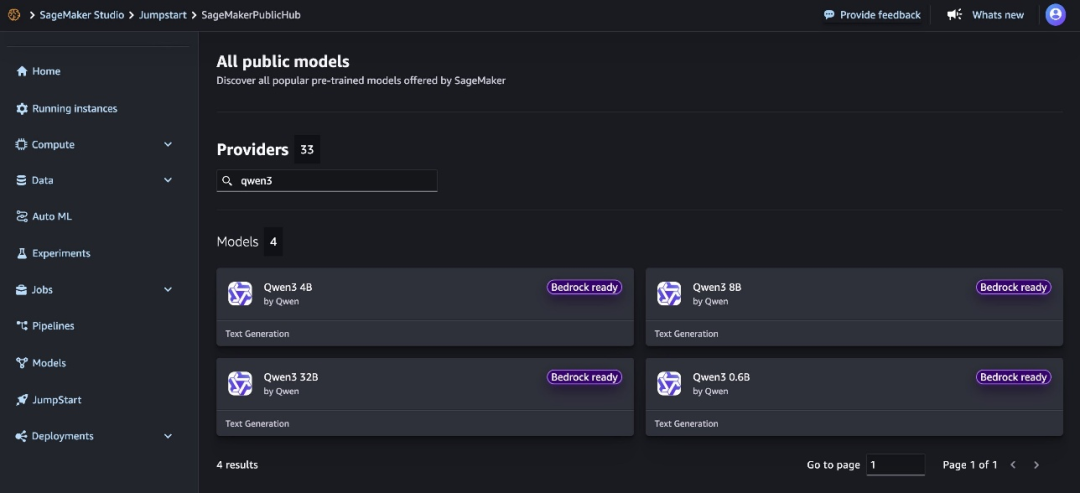
4.搜索“Qwen3”,即可查看Qwen3-32B模型卡片。
每个模型卡片均展示以下关键信息:
模型名称。
模型提供方名称。
任务类别,例如文本生成。
Amazon Bedrock适配标识(若适用),该标识表明此模型可注册至Amazon Bedrock,以便您通过Amazon Bedrock API调用该模型。
5.点击模型卡片,即可查看模型详情页。
模型详情页包含以下信息:
模型名称及提供方信息。
用于部署模型的“部署”按钮。
包含详细信息的“关于”和“笔记本”选项卡。
其中,“关于”选项卡包含重要信息,例如:
模型描述
许可证信息
技术规格
使用指南
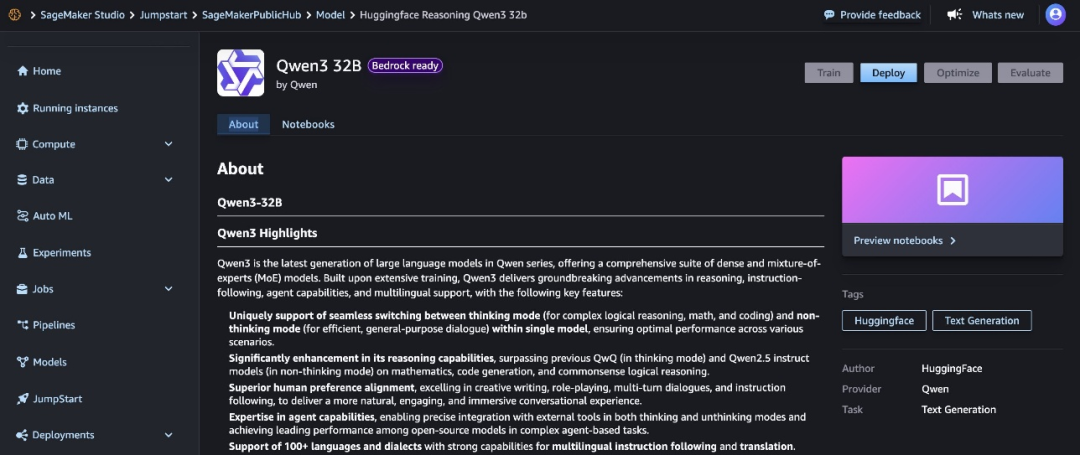
在部署该模型之前,建议您仔细查阅模型详情及许可条款,以确认其是否兼容您的应用场景。
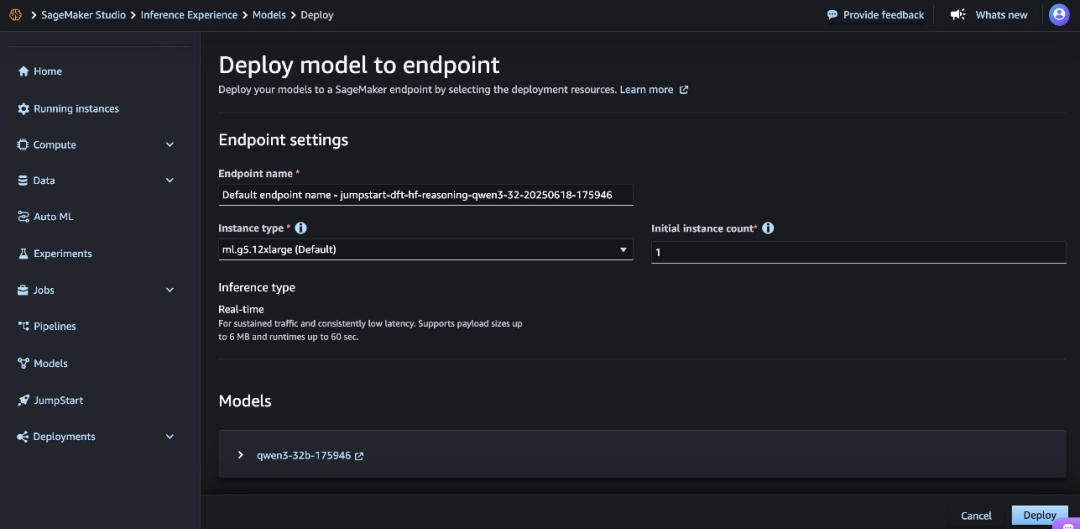
6.选择“部署”,继续进行部署操作。
7.对于“端点名称”,可使用系统自动生成的名称,也可自定义名称。
8.对于“实例类型”,请选择一种实例类型,默认为ml.g6-12xlarge。
9.对于“初始实例数量”,请输入实例数量,默认数量为1。
选择合适的实例类型和数量对于成本和性能优化至关重要。请监控部署情况,根据需要调整这些设置。在“推理类型”选项中,“实时推理”为默认选项,该选项针对持续流量和低延迟进行了优化。
10.仔细检查所有配置以确保准确性。对于此模型,强烈建议您遵循Amazon SageMaker JumpStart的默认设置,并确保网络隔离功能保持启用状态。
11.选择“部署”以部署该模型。
部署过程可能需要几分钟才能完成。
部署完成后,您的端点状态将变更为“运行中”。此时,模型已准备好通过该端点接收推理请求。Amazon SageMaker控制台的“端点”页面会显示相关指标和状态信息,因此您可在该页面监控部署进度。
完成部署后,您可以使用Amazon SageMaker运行时客户端调用模型,并将其与您的应用程序集成。
02
使用Amazon SageMaker Python SDK
部署Qwen3-32B模型
要使用Amazon SageMaker Python SDK部署Qwen3-32B模型,您必须安装Amazon SageMaker Python SDK,并确保已设置好必要的亚马逊云科技权限和环境。
以下分步代码示例展示了如何通过编程方式,部署Qwen3-32B模型并进行推理。
!pip install --force-reinstall --no-cache-dir sagemaker==2.235.2
from sagemaker.serve.builder.model_builder import ModelBuilder from sagemaker.serve.builder.schema_builder import SchemaBuilder from sagemaker.jumpstart.model import ModelAccessConfig from sagemaker.session import Session import logging
sagemaker_session = Session()artifacts_bucket_name = sagemaker_session.default_bucket() execution_role_arn = sagemaker_session.get_caller_identity_arn()
# Changed to Qwen32B modeljs_model_id = "huggingface-reasoning-qwen3-32b"gpu_instance_type = "ml.g5.12xlarge"
response = "Hello, I'm a language model, and I'm here to help you with your English."
sample_input = {    "inputs": "Hello, I'm a language model,",    "parameters": {        "max_new_tokens": 128,         "top_p": 0.9,         "temperature": 0.6    }}
sample_output = [{"generated_text": response}]
schema_builder = SchemaBuilder(sample_input, sample_output)
model_builder = ModelBuilder(     model=js_model_id,     schema_builder=schema_builder,     sagemaker_session=sagemaker_session,     role_arn=execution_role_arn,     log_level=logging.ERROR )
model = model_builder.build()
predictor = model.deploy(    model_access_configs={js_model_id: ModelAccessConfig(accept_eula=True)},     accept_eula=True)
predictor.predict(sample_input)
左右滑动查看完整示意
您可以向预测器发起更多请求。
new_input = {"inputs": "What is Amazon doing in Generative AI?","parameters": {"max_new_tokens": 64, "top_p": 0.8, "temperature": 0.7},}
prediction = predictor.predict(new_input)print(prediction
左右滑动查看完整示意
以下是一些用于增强部署代码的错误处理方法和最佳实践。
# Enhanced deployment code with error handlingimport backoffimport botocoreimport logging
logging.basicConfig(level=logging.INFO)logger = logging.getLogger(__name__)@backoff.on_exception(backoff.expo,                      (botocore.exceptions.ClientError,),                     max_tries=3)def deploy_model_with_retries(model_builder, model_id):try:        model = model_builder.build()        predictor = model.deploy(            model_access_configs={model_id:ModelAccessConfig(accept_eula=True)},            accept_eula=True)return predictor    except Exception as e:        logger.error(f"Deployment failed: {str(e)}")raisedef safe_predict(predictor, input_data):try:return predictor.predict(input_data)except Exception as e:        logger.error(f"Prediction failed: {str(e)}")return None
左右滑动查看完整示意
清理
为避免产生不必要的费用,请完成以下步骤清理资源。
01
删除Amazon Bedrock Marketplace部署资源
如果您是通过Amazon Bedrock Marketplace部署的模型,请完成以下资源清理步骤。
1.在Amazon Bedrock控制台导航窗格的“基础模型”下,选择“Marketplace部署”。
2.在“托管部署”部分,找到您要删除的端点。
3.选择该端点,然后在“操作”菜单中选择“删除”。
4.核实以下端点详细信息,确保您要删除的是正确端点。
端点名称
模型名称
端点状态
5.选择“删除”以删除该端点。
6.在删除确认对话框中,查看警告信息,输入confirm,然后选择“删除”以永久移除该端点。
02
删除Amazon SageMaker JumpStart预测器
如果让已部署的Amazon SageMaker JumpStart模型持续运行,将会产生费用。为了停止产生费用,请使用以下代码删除端点。
predictor.delete_model()predictor.delete_endpoint()左右滑动查看完整示意
更多信息,请参阅《删除端点和资源》。
《删除端点和资源》
https://docs.aws.amazon.com/sagemaker/latest/dg/realtime-endpoints-delete-resources.html
总结
本文探讨了如何通过Amazon Bedrock Marketplace和Amazon SageMaker JumpStart,访问并部署Qwen3模型。该模型既支持全参数模型,也支持其蒸馏模型,您可以根据具体应用场景选择最合适的模型规模。
您可访问Amazon SageMaker Studio中的Amazon SageMaker JumpStart或Amazon Bedrock Marketplace,开启体验之旅。
更多信息,您可参阅以下内容:
《利用Amazon Bedrock工具集成Amazon SageMaker JumpStart模型》
《Amazon SageMaker JumpStart预训练模型》
《Amazon SageMaker JumpStart基础模型》
《Amazon BedrockMarketplace》
《Amazon SageMaker JumpStart入门指南》
《利用Amazon Bedrock工具集成Amazon SageMaker JumpStart模型》
https://aws.amazon.com/blogs/machine-learning/use-amazon-bedrock-tooling-with-amazon-sagemaker-jumpstart-models/
《Amazon SageMaker JumpStart预训练模型》
https://docs.aws.amazon.com/sagemaker/latest/dg/studio-jumpstart.html
《Amazon SageMaker JumpStart基础模型》
https://docs.aws.amazon.com/sagemaker/latest/dg/jumpstart-foundation-models.html
《Amazon BedrockMarketplace》
https://docs.aws.amazon.com/bedrock/latest/userguide/amazon-bedrock-marketplace.html
《Amazon SageMaker JumpStart入门指南》
https://aws.amazon.com/sagemaker/jumpstart/getting-started/
Qwen3系列大语言模型具备卓越的通用性和性能,成为亚马逊云科技基础模型产品组合中的一大有力补充。
无论您是构建用于内容生成、分析还是复杂推理任务的应用程序,Qwen3模型凭借其先进的架构设计和超长的上下文窗口,都能成为满足您生成式AI需求的理想之选。
本篇作者

Niithiyn Vijeaswaran
亚马逊云科技第三方模型科学团队专家级解决方案架构师,专注于生成式AI,主要研究领域为亚马逊云科技人工智能加速器(Amazon Neuron)。他拥有计算机科学与生物信息学学士学位。

Avan Bala
亚马逊云科技解决方案架构师,专注于面向DevOps的人工智能与机器学习领域。他拥有马里兰大学计算机科学学士学位,辅修数学与统计学专业。Avan尤其擅长新兴人工智能技术相关项目。

Mohhid Kidwai
亚马逊云科技解决方案架构师,专注于为中小型企业提供生成式AI和机器学习解决方案。他拥有北卡罗来纳州立大学计算机科学学士学位,辅修生物科学专业。

Yousuf Athar
亚马逊云科技解决方案架构师,专注于生成式AI以及人工智能与机器学习领域。他拥有信息技术专业学士学位,主攻云计算方向。他致力于协助客户将先进的生成式AI功能集成到自身系统中,助力客户推动创新并提升竞争优势。

John Liu
拥有14年产品管理和10年投资组合经理经验。在亚马逊云科技担任Amazon Bedrock首席产品经理,此前负责亚马逊云科技Web3与区块链产品。

Rohit Talluri
亚马逊云科技生成式AI GTM专家。他与顶尖的生成式AI模型开发者、战略客户、核心人工智能与机器学习合作伙伴以及亚马逊云科技服务团队携手合作,基于亚马逊云科技服务,共同推动下一代人工智能、机器学习及加速计算技术的发展。Rohit曾任企业解决方案架构师,并担任过亚马逊云科技并购咨询业务的全球解决方案负责人。

Varun Morishetty
Amazon SageMaker JumpStart和Amazon Bedrock Marketplace团队的软件工程师。Varun拥有美国东北大学计算机科学专业学士学位。

星标不迷路,开发更极速!
关注后记得星标「亚马逊云开发者」
听说,点完下面4个按钮
就不会碰到bug了!

点击阅读原文查看博客!获得更详细内容!


 9600
9600

 被折叠的 条评论
为什么被折叠?
被折叠的 条评论
为什么被折叠?
 到【灌水乐园】发言


