


设置Cockpit服务(WEB界面管理Node服务器)自动启动
重启host主机后发现之前用的那个web管理主机的界面访问不了了,翻了一下文档,发现其实那个功能是一个叫cockpit的服务提供的,默认没有设置开机自动启动,所以重新设置一下这个服务:
- [root@node1 ~]# systemctl enable cockpit
- [root@node1 ~]# systemctl start cockpit
- [root@node1 ~]# systemctl status cockpit
- 鈼[0m cockpit.service - Cockpit Web Service
- Loaded: loaded (/usr/lib/systemd/system/cockpit.service; static; vendor preset: disabled)
- Active: active (running) since Mon 2018-04-23 10:49:27 CST; 4s ago
- Docs: man:cockpit-ws(8)
- Process: 2598 ExecStartPre=/usr/sbin/remotectl certificate –ensure –user=root –group=cockpit-ws –selinux-type=etc_t (code=exited, status=0/SUCCESS)
- Main PID: 2603 (cockpit-ws)
[root@node1 ~]# systemctl enable cockpit

[root@node1 ~]# systemctl start cockpit

[root@node1 ~]# systemctl status cockpit

鈼[0m cockpit.service - Cockpit Web Service

   Loaded: loaded (/usr/lib/systemd/system/cockpit.service; static; vendor preset: disabled)

   Active: active (running) since Mon 2018-04-23 10:49:27 CST; 4s ago

     Docs: man:cockpit-ws(8)

  Process: 2598 ExecStartPre=/usr/sbin/remotectl certificate --ensure --user=root --group=cockpit-ws --selinux-type=etc_t (code=exited, status=0/SUCCESS)

 Main PID: 2603 (cockpit-ws)
部署NTP服务器及虚机自动同步时间
在ovirt-engine服务器上部署ntp服务,让所有的虚机从engine服务器上自动同步时间
1.安装ntp服务
- # yum install -y ntp
# yum install -y ntp2.设置ntp服务开机自动启动
- # systemctl enable ntpd
- # systemctl start ntpd
# systemctl enable ntpdsystemctl start ntpd
虚拟机上设置时间自动同步
Windows系统:

CentOS7系统:
- # yum install ntp //安装ntp服务
- # systemctl enable ntpd //开机启动服务
- # systemctl start ntpd //启动服务
- # timedatectl set-timezone Asia/Shanghai //更改时区
- # timedatectl set-ntp yes //启用ntp同步
- # vi /etc/ntp.conf //注释掉原有的server开头行,增加server 10.41.58.26
- # ntpq -p //同步时间
# yum install ntp //安装ntp服务systemctl enable ntpd //开机启动服务
systemctl start ntpd //启动服务
timedatectl set-timezone Asia/Shanghai //更改时区
timedatectl set-ntp yes //启用ntp同步
vi /etc/ntp.conf //注释掉原有的server开头行,增加server 10.41.58.26
ntpq -p //同步时间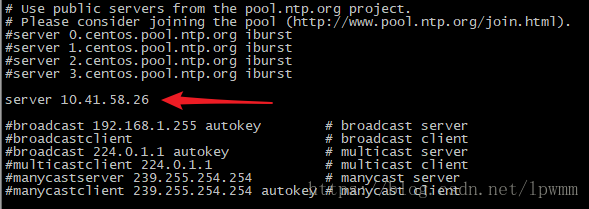
调整虚拟机时区偏移设置
新建的虚机有个时区与配置不同的提示,需要修改一下相关设置


更新方法:
直接在engine服务器上修改默认时区设置:
- # engine-config -s DefaultGeneralTimeZone=‘Asia/Shanghai’
- # systemctl restart ovirt-engine
# engine-config -s DefaultGeneralTimeZone='Asia/Shanghai'systemctl restart ovirt-engine
重启ovirt-engine服务后在后台新增虚拟机可以看到时区已经默认为+8了

Ubuntu17.10及其他不支持的Guest操作系统安装ovirt guest agent
根据官方文档,虚拟机中Guest OS只支持以下操作系统发行版本:
Supported Guest Distributions
Once oVirt is running and you have configured a Host, you can proceed to install any number of supported operating systems as guest virtual machines.
| Operating System | Architecture | SPICE support | |
|---|---|---|---|
| Red Hat Enterprise Linux 3 | 32-bit, 64-bit | Yes | |
| Red Hat Enterprise Linux 4 | 32-bit, 64-bit | Yes | |
| Red Hat Enterprise Linux 5 | 32-bit, 64-bit | Yes | |
| Red Hat Enterprise Linux 6 | 32-bit, 64-bit | Yes | |
| Red Hat Enterprise Linux 7 | 64-bit | Yes | |
| SUSE Linux Enterprise Server 10 [1] | 32-bit, 64-bit | No | |
| SUSE Linux Enterprise Server 11 [2] | 32-bit, 64-bit | No | |
| Ubuntu 12.04 (Precise Pangolin LTS) | 32-bit, 64-bit | Yes | |
| Ubuntu 12.10 (Quantal Quetzal) | 32-bit, 64-bit | Yes | |
| Ubuntu 13.04 (Raring Ringtail) | 32-bit, 64-bit | Yes | |
| Ubuntu 13.10 (Saucy Salamander) | 32-bit, 64-bit | Yes | |
| Windows XP Service Pack 3 and newer | 32-bit | Yes | |
| Windows 7 | 32-bit, 64-bit | Yes | |
| Windows 8 | 32-bit, 64-bit | No | |
| Windows 10[3] | 32-bit, 64-bit | Yes | |
| Windows Server 2003 Service Pack 2 and newer | 32-bit, 64-bit | Yes | |
| Windows Server 2008 | 32-bit, 64-bit | Yes | |
| Windows Server 2008 R2 | 64-bit | Yes | |
| Windows Server 2012 R2 | 64-bit | No | |
| Windows Server 2016 | 64-bit | No |
[1] select Other Linux for the guest type in the user interface
[2] SPICE drivers (QXL) are not supplied by Red Hat. Distribution’s vendor may provide SPICE drivers.
[3] 64-bit only. SPICE upstream drivers are also available
对于更高版本的Ubuntu或者其他Linux发型版本,可以参照官方的文档从github上下载源代码自行编译,下面是官方提供的编译流程,下面的示例对应的是在Ubuntu 12.04上进行的编译操作:
Building from source
Packages for Ubuntu 12.04 do no longer exist, so you will have to build from source:
- Install dependencies
# sudo apt-get updatesudo apt-get install -y pkg-config pep8 libtool usermode python-ethtool git autoconf make
- Clone Git repository
# cd /tmpgit clone https://github.com/oVirt/ovirt-guest-agent.git
- Select a version to build
# cd ovirt-guest-agentgit checkout 1.0.14 //在Lubuntu 17.10上没有进行这一步检出老版本的操作
- Configure, build and install
# ./autogen.sh./configure –prefix=/usr –without-sso
make
sudo make install
sudo chmod +x /usr/share/ovirt-guest-agent/ovirt-guest-agent.py
- Create an Upstart script to start the service when booting
# sudo sh -c 'echo "description \"oVirt Guest Agent\"

start on local-filesystems

stop on runlevel [!2345]

respawn

exec /usr/share/ovirt-guest-agent/ovirt-guest-agent.py

" > /etc/init/ovirt-guest-agent.conf'
- Reboot or start the service manually
# sudo service ovirt-guest-agent start
Troubleshooting
The web admin interface may take some time to start displaying the memory usage and other types of information. If you find that after some time this information has not been populated, restart the VM by performing a shut down or power off, power on, and verify that the service is started by running. A reboot of the virtual machine did not seem to resolve the issue.
转载于:https://blog.csdn.net/lpwmm/article/details/80047802


 2045
2045

 被折叠的 条评论
为什么被折叠?
被折叠的 条评论
为什么被折叠?
 到【灌水乐园】发言


