


在前面一章中总结了下将GridView与ObjectDataSource结合来显示、修改、删除、分页、排序数据集,在本章中,将使用GridView与DetailsView结合来构成一个Master/Detail结构,实现显示、插入、更新、删除数据。
DetailsView控件可以用于显示、编辑、删除一条数据或是用来向数据库插入一条数据。当与GridView或DropDowmList控件一起使用时,可以快速的创建一个Master/Detail结构。请看下面的示例:
<%--******GridView***********--%>
<asp:GridView ID="GridView1" runat="server" DataSourceID="ObjectDataSource1" CellPadding="4" AllowPaging="True" AllowSorting="True" AutoGenerateColumns="False" AutoGenerateDeleteButton="True" AutoGenerateSelectButton="true" DataKeyNames="CategoryId" EnableSortingAndPagingCallbacks="False" PageSize="6" onselectedindexchanged="GridView1_SelectedIndexChanged" onpageindexchanged="GridView1_PageIndexChanged" onpageindexchanging="GridView1_PageIndexChanging">
<FooterStyle BackColor="#CCCC99" />
<RowStyle BackColor="#F7F7DE" />
<SelectedRowStyle BackColor="#CE5D5A" Font-Bold="True" ForeColor="White" />
<PagerStyle BackColor="#F7F7DE" ForeColor="Black" HorizontalAlign="Right" />
<HeaderStyle BackColor="#6B696B" Font-Bold="True" ForeColor="White" />
<AlternatingRowStyle BackColor="White" />
<Columns>
<asp:BoundField DataField="CategoryID" HeaderText="Id" ReadOnly="True" SortExpression="CategoryID" />
<asp:BoundField DataField="Name" HeaderText="Name" SortExpression="Name" />
<asp:BoundField DataField="Description" HeaderText="Description" SortExpression="Description" />
</Columns>
</asp:GridView>
<%--*********DetailsView********--%>
<asp:DetailsView ID="DetailsView1" runat="server" AutoGenerateRows="False" DataKeyNames="CategoryID" DataSourceID="ObjectDataSource1" Height="50px" DefaultMode="Insert" Width="125px" AutoGenerateEditButton="true" AutoGenerateInsertButton="true">
<Fields>
<asp:BoundField DataField="Name" HeaderText="Name" SortExpression="Name" />
<asp:BoundField DataField="Description" HeaderText="Description" SortExpression="Description" />
</Fields>
</asp:DetailsView>
<%--*********ObjectDataSource********--%>
<asp:ObjectDataSource ID="ObjectDataSource1" runat="server"
DeleteMethod="DelteCategory" InsertMethod="InsertCategory"
SelectMethod="GetCategories" TypeName="CategoryService"
UpdateMethod="UpdateCategory" SortParameterName="orderBy">
</asp:ObjectDataSource>
效果图:
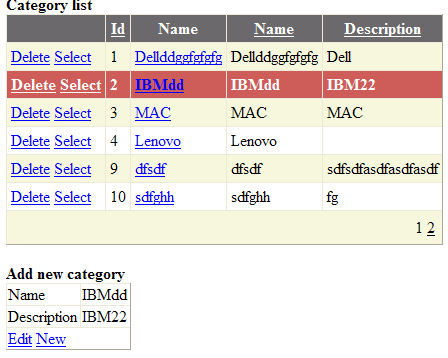 在上面的示例中,GridView和DetailsView使用了同一个数据源,在GridView中将AutoGenerateSelectButton属性设置为true,这样做的目的是当选择GridView中的一个项目时,在DetailsView中显示该项的详细信息并可以对其修改。为了这一目的,我们需要实现onselectedindexchanged事件,因为DetailsView的默认模式是插入模式,现在要在点击GridView中一项时将DetailsView的模式设置为为其他模式:
protected void GridView1_SelectedIndexChanged(object sender, EventArgs e)
{
DetailsView1.ChangeMode(DetailsViewMode.ReadOnly);
DetailsView1.PageIndex = GridView1.PageIndex * GridView1.PageSize + GridView1.SelectedIndex;
}
因为GridView实现了分页功能,因此在上面的方法中,要使用GridVeiw的PageIndex和PageSize来决定DetailsView当前的页面索引。
在上面的示例中,当点击自动产生的Select命令时,就会选择所在行。如果不想要这个自动生成的Select命令,而是希望在选择某一列(如名称)时,同样实现选中该行的目的,可以使用下面的方法(注意属性CommandName):
<asp:TemplateField HeaderText="Name">
<ItemTemplate>
<asp:LinkButton ID="LinkButton1" CommandName="Select" Runat="Server"> <%# Eval("Name") %> </asp:LinkButton>
</ItemTemplate>
</asp:TemplateField>


 1380
1380

 被折叠的 条评论
为什么被折叠?
被折叠的 条评论
为什么被折叠?
 到【灌水乐园】发言


