


提示:作者部署的kubernetes版本: v1.20.15,使用的docker版本:19.03.3。最开始用的docker版本是20.3.x,最后版本不一致,退回来的。
文章目录
1 准备工作
(1)硬件环境
master(2C/4G,cpu核心数要求大于2)		192.168.54.51		docker、kubeadm、kubelet、kubectl、flannel
node01(2C/2G)							192.168.54.52      docker、kubeadm、kubelet、kubectl、flannel
node02(2C/2G)							192.168.54.53	    docker、kubeadm、kubelet、kubectl、flannel
(2)环境配置,每个节点都需要执行
//所有节点,关闭防火墙规则,关闭selinux,关闭swap交换
systemctl stop firewalld
systemctl disable firewalld
setenforce 0
iptables -F
swapoff -a						#交换分区必须要关闭


//修改主机名
hostnamectl set-hostname master        #master节点执行
hostnamectl set-hostname node01       #node01节点执行
hostnamectl set-hostname node02       #node02节点执行

//所有节点修改hosts文件
vim /etc/hosts
192.168.54.51 master
192.168.54.52 node01
192.168.54.53 node02

//调整内核参数
cat > /etc/sysctl.d/kubernetes.conf << EOF
net.bridge.bridge-nf-call-ip6tables=1            #开启网桥模式,可将网桥的流量传递给iptables链
net.bridge.bridge-nf-call-iptables=1
net.ipv6.conf.all.disable_ipv6=1                  #关闭ipv6协议
net.ipv4.ip_forward=1
EOF

//生效参数
sysctl --system
以上比较简单,照这做就行,就不截图了。
2 所有节点安装docker
(1)配置yum源,所有节点都需要执行
CentOS-Base.repo
# CentOS-Base.repo
#
# The mirror system uses the connecting IP address of the client and the
# update status of each mirror to pick mirrors that are updated to and
# geographically close to the client.  You should use this for CentOS updates
# unless you are manually picking other mirrors.
#
# If the mirrorlist= does not work for you, as a fall back you can try the
# remarked out baseurl= line instead.
#
#

[base]
name=CentOS-$releasever - Base
mirrorlist=http://mirrorlist.centos.org/?release=$releasever&arch=$basearch&repo=os&infra=$infra
baseurl=https://mirrors.tuna.tsinghua.edu.cn/centos/$releasever/os/$basearch/
#baseurl=http://mirror.centos.org/centos/$releasever/os/$basearch/
gpgcheck=1
gpgkey=file:///etc/pki/rpm-gpg/RPM-GPG-KEY-CentOS-7

#released updates
[updates]
name=CentOS-$releasever - Updates
mirrorlist=http://mirrorlist.centos.org/?release=$releasever&arch=$basearch&repo=updates&infra=$infra
baseurl=https://mirrors.tuna.tsinghua.edu.cn/centos/$releasever/updates/$basearch/
#baseurl=http://mirror.centos.org/centos/$releasever/updates/$basearch/
gpgcheck=1
gpgkey=file:///etc/pki/rpm-gpg/RPM-GPG-KEY-CentOS-7

#additional packages that may be useful
[extras]
name=CentOS-$releasever - Extras
mirrorlist=http://mirrorlist.centos.org/?release=$releasever&arch=$basearch&repo=extras&infra=$infra
baseurl=https://mirrors.tuna.tsinghua.edu.cn/centos/$releasever/extras/$basearch/
#baseurl=http://mirror.centos.org/centos/$releasever/extras/$basearch/
gpgcheck=1
gpgkey=file:///etc/pki/rpm-gpg/RPM-GPG-KEY-CentOS-7

#additional packages that extend functionality of existing packages
[centosplus]
name=CentOS-$releasever - Plus
mirrorlist=http://mirrorlist.centos.org/?release=$releasever&arch=$basearch&repo=centosplus&infra=$infra
baseurl=https://mirrors.tuna.tsinghua.edu.cn/centos/$releasever/centosplus/$basearch/
#baseurl=http://mirror.centos.org/centos/$releasever/centosplus/$basearch/
gpgcheck=1
enabled=0
gpgkey=file:///etc/pki/rpm-gpg/RPM-GPG-KEY-CentOS-7
docker-ce.repo
[docker-ce-stable]
name=Docker CE Stable - $basearch
baseurl=https://mirrors.aliyun.com/docker-ce/linux/centos/$releasever/$basearch/stable
enabled=1
gpgcheck=1
gpgkey=https://mirrors.aliyun.com/docker-ce/linux/centos/gpg

[docker-ce-stable-debuginfo]
name=Docker CE Stable - Debuginfo $basearch
baseurl=https://mirrors.aliyun.com/docker-ce/linux/centos/$releasever/debug-$basearch/stable
enabled=0
gpgcheck=1
gpgkey=https://mirrors.aliyun.com/docker-ce/linux/centos/gpg

[docker-ce-stable-source]
name=Docker CE Stable - Sources
baseurl=https://mirrors.aliyun.com/docker-ce/linux/centos/$releasever/source/stable
enabled=0
gpgcheck=1
gpgkey=https://mirrors.aliyun.com/docker-ce/linux/centos/gpg

[docker-ce-test]
name=Docker CE Test - $basearch
baseurl=https://mirrors.aliyun.com/docker-ce/linux/centos/$releasever/$basearch/test
enabled=0
gpgcheck=1
gpgkey=https://mirrors.aliyun.com/docker-ce/linux/centos/gpg

[docker-ce-test-debuginfo]
name=Docker CE Test - Debuginfo $basearch
baseurl=https://mirrors.aliyun.com/docker-ce/linux/centos/$releasever/debug-$basearch/test
enabled=0
gpgcheck=1
gpgkey=https://mirrors.aliyun.com/docker-ce/linux/centos/gpg

[docker-ce-test-source]
name=Docker CE Test - Sources
baseurl=https://mirrors.aliyun.com/docker-ce/linux/centos/$releasever/source/test
enabled=0
gpgcheck=1
gpgkey=https://mirrors.aliyun.com/docker-ce/linux/centos/gpg

[docker-ce-nightly]
name=Docker CE Nightly - $basearch
baseurl=https://mirrors.aliyun.com/docker-ce/linux/centos/$releasever/$basearch/nightly
enabled=0
gpgcheck=1
gpgkey=https://mirrors.aliyun.com/docker-ce/linux/centos/gpg

[docker-ce-nightly-debuginfo]
name=Docker CE Nightly - Debuginfo $basearch
baseurl=https://mirrors.aliyun.com/docker-ce/linux/centos/$releasever/debug-$basearch/nightly
enabled=0
gpgcheck=1
gpgkey=https://mirrors.aliyun.com/docker-ce/linux/centos/gpg

[docker-ce-nightly-source]
name=Docker CE Nightly - Sources
baseurl=https://mirrors.aliyun.com/docker-ce/linux/centos/$releasever/source/nightly
enabled=0
gpgcheck=1
gpgkey=https://mirrors.aliyun.com/docker-ce/linux/centos/gpg
kubernetes.repo,这个yum配置是为了后面k8s的安装做的准备,如果只是docker的安装,可以不配置这个文件。
[kubernetes]
name=Kubernetes
baseurl=https://mirrors.aliyun.com/kubernetes/yum/repos/kubernetes-el7-x86_64
enabled=1
gpgcheck=0
repo_gpgcheck=0
gpgkey=https://mirrors.aliyun.com/kubernetes/yum/doc/yum-key.gpg https://mirrors.aliyun.com/kubernetes/yum/doc/rpm-package-key.gpg
以上三个yum源配置文件修改好之后,执行下面的命令
yum clean all && yum makecache #yum源配置生效
(2)安装docker,所有节点都需要执行
由于上面已经修改了yum源,所以安装比较快。
yum install docker-ce-19.03.3 docker-ce-cli-19.03.3 containerd.io
修改镜像地址
cat > /etc/docker/daemon.json <<EOF
{
  "registry-mirrors": ["https://6ijb8ubo.mirror.aliyuncs.com"],
  "exec-opts": ["native.cgroupdriver=systemd"],
  "log-driver": "json-file",
  "log-opts": {
    "max-size": "100m"
  },
  "insecure-registries":["https://hub.kgc.com"]
}
EOF
重启docker服务
systemctl daemon-reload
systemctl restart docker.service
systemctl enable docker.service

docker info | grep "Cgroup Driver"
Cgroup Driver: systemd
3 所有节点安装kubeadm,kubelet和kubectl
由于在第2节中配置过了k8s的yum源,咱们就可以直接安装,执行如下命令
yum install -y kubelet-1.20.15 kubeadm-1.20.15 kubectl-1.20.15

//开机自启kubelet
systemctl enable kubelet.service
#K8S通过kubeadm安装出来以后都是以Pod方式存在,即底层是以容器方式运行,所以kubelet必须设置开机自启
4 部署K8S集群
//查看初始化需要的镜像,这里可以方便离线安装
kubeadm config images list
(1)修改集群配置文件
k8s服务都可以用yaml文件来定义,下面就定义一下初始化的配置文件
apiVersion: kubeadm.k8s.io/v1beta2
bootstrapTokens:
- groups:
  - system:bootstrappers:kubeadm:default-node-token
  token: abcdef.0123456789abcdef
  ttl: 24h0m0s
  usages:
  - signing
  - authentication
kind: InitConfiguration
localAPIEndpoint:
  advertiseAddress: 192.168.54.51              #配置成master的IP
  bindPort: 6443                                           #可以使用默认值,不用修改
nodeRegistration:
  criSocket: /var/run/dockershim.sock
  name: master
  taints:
  - effect: NoSchedule
    key: node-role.kubernetes.io/master
---
apiServer:
  timeoutForControlPlane: 4m0s
apiVersion: kubeadm.k8s.io/v1beta2
certificatesDir: /etc/kubernetes/pki
clusterName: kubernetes
controllerManager: {}
dns:
  type: CoreDNS
etcd:
  local:
    dataDir: /var/lib/etcd
imageRepository: registry.cn-hangzhou.aliyuncs.com/google_containers
kind: ClusterConfiguration
kubernetesVersion: v1.20.15         #指定kubernetes版本号
networking:
  dnsDomain: cluster.local
  podSubnet: 10.244.0.0/16         #指定pod网段,10.244.0.0/16用于匹配flannel默认网段
  serviceSubnet: 10.96.0.0/16      #指定service网段
scheduler: {}
---
apiVersion: kubeproxy.config.k8s.io/v1alpha1
kind: KubeProxyConfiguration
featureGates:
SupportIPVSProxyMode: true
mode: ipvs                   #把默认的kube-proxy调度方式改为ipvs模式
(2)初始化集群
这步耗时较长,请耐心等待
初始化的join命令先保存下来,后面要用
//初始化
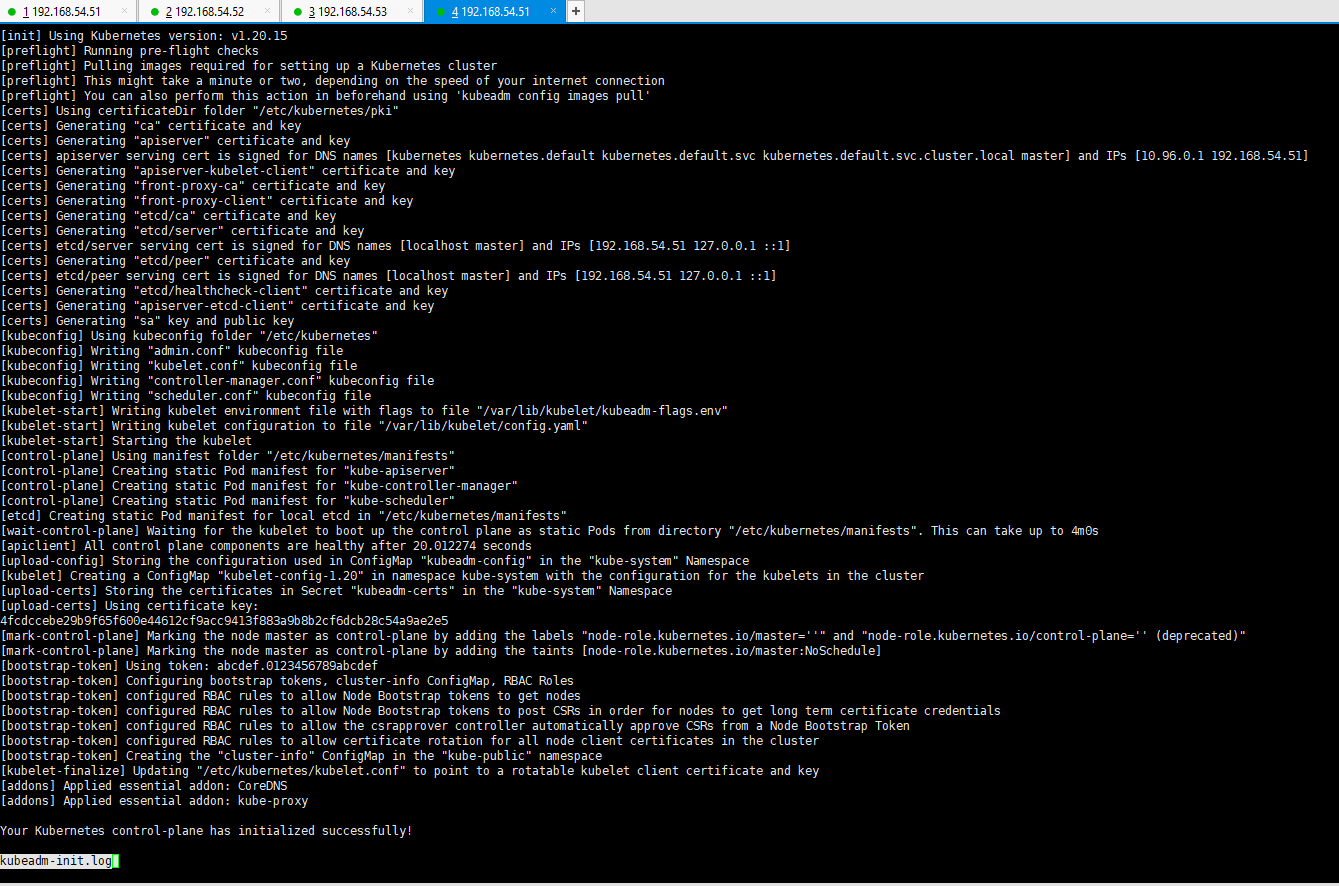
kubeadm init --config=kubeadm-config.yaml --upload-certs | tee kubeadm-init.log
#--experimental-upload-certs 参数可以在后续执行加入节点时自动分发证书文件,k8sV1.16版本开始替换为 --upload-certs
#tee kubeadm-init.log 用以输出日志
//查看 kubeadm-init 日志
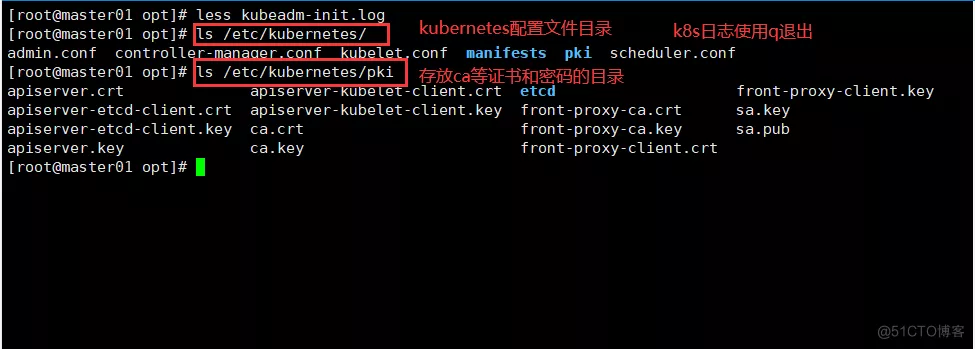
less kubeadm-init.log
//kubernetes配置文件目录
ls /etc/kubernetes/

//存放ca等证书和密码的目录
ls /etc/kubernetes/pki
执行完成初始化命令之后,正常的话,可以看到如下提示
提示:
......
Your Kubernetes control-plane has initialized successfully!

To start using your cluster, you need to run the following as a regular user:

 mkdir -p $HOME/.kube
 sudo cp -i /etc/kubernetes/admin.conf $HOME/.kube/config
 sudo chown $(id -u):$(id -g) $HOME/.kube/config

You should now deploy a pod network to the cluster.
Run "kubectl apply -f [podnetwork].yaml" with one of the options listed at:
 https://kubernetes.io/docs/concepts/cluster-administration/addons/

Then you can join any number of worker nodes by running the following on each as root:

kubeadm join 192.168.54.51:6443 --token rc0kfs.a1sfe3gl4dvopck5 \
   --discovery-token-ca-cert-hash sha256:864fe553c812df2af262b406b707db68b0fd450dc08b34efb73dd5a4771d37a2
(3)设定kubectl
kubectl需经由API server认证及授权后方能执行相应的管理操作,kubeadm 部署的集群为其生成了一个具有管理员权限的认证配置文件 /etc/kubernetes/admin.conf,它可由 kubectl 通过默认的 “$HOME/.kube/config” 的路径进行加载。
mkdir -p $HOME/.kube
cp -i /etc/kubernetes/admin.conf $HOME/.kube/config
chown $(id -u):$(id -g) $HOME/.kube/config
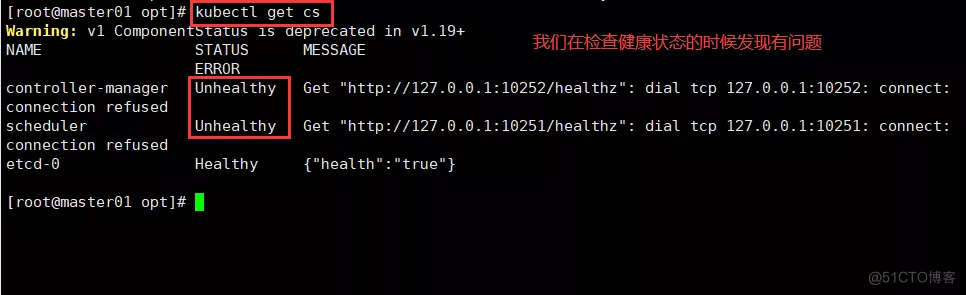
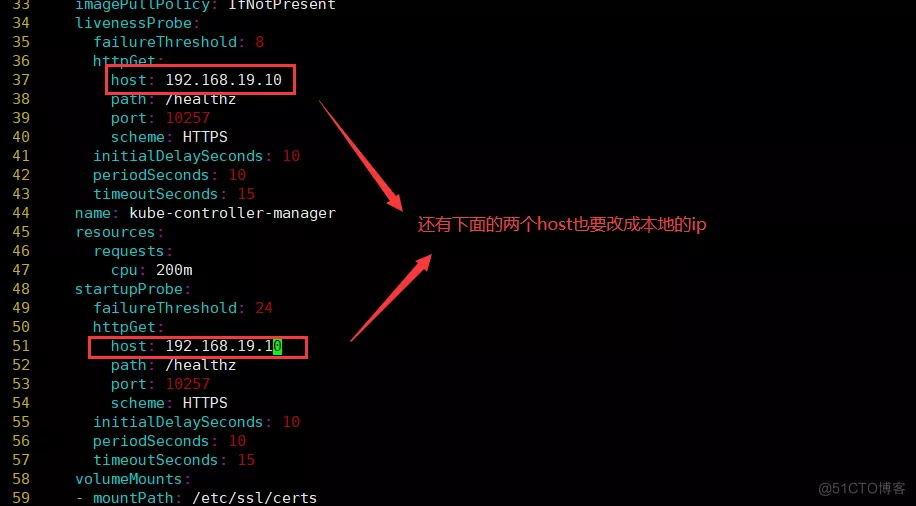
//如果 kubectl get cs 发现集群不健康,更改以下两个文件
vim /etc/kubernetes/manifests/kube-scheduler.yaml
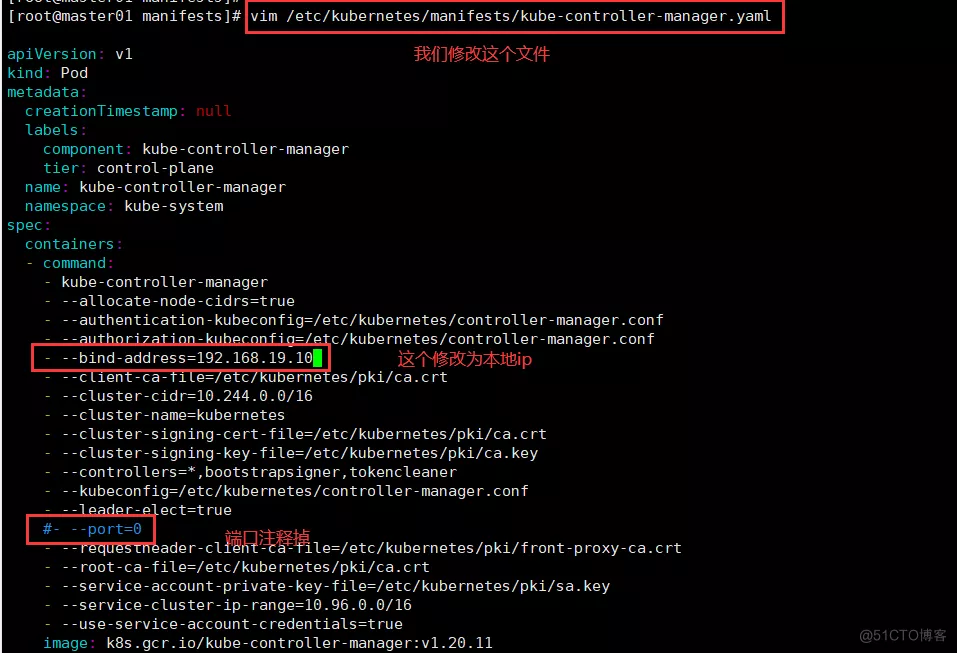
vim /etc/kubernetes/manifests/kube-controller-manager.yaml
# 修改如下内容
把--bind-address=127.0.0.1变成--bind-address=192.168.80.10 #修改成k8s的控制节点master01的ip
把httpGet:字段下的hosts由127.0.0.1变成192.168.54.51(有两处)
#- --port=0 # 搜索port=0,把这一行注释掉
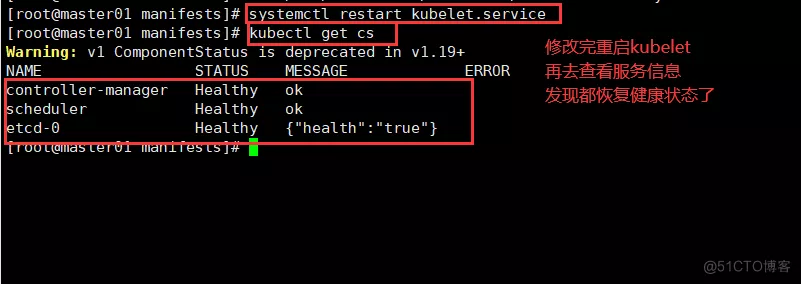
systemctl restart kubelet


5 所有节点部署网络插件flannel
配置kube-flannel.yaml文件
---
apiVersion: policy/v1beta1
kind: PodSecurityPolicy
metadata:
  name: psp.flannel.unprivileged
  annotations:
    seccomp.security.alpha.kubernetes.io/allowedProfileNames: docker/default
    seccomp.security.alpha.kubernetes.io/defaultProfileName: docker/default
    apparmor.security.beta.kubernetes.io/allowedProfileNames: runtime/default
    apparmor.security.beta.kubernetes.io/defaultProfileName: runtime/default
spec:
  privileged: false
  volumes:
  - configMap
  - secret
  - emptyDir
  - hostPath
  allowedHostPaths:
  - pathPrefix: "/etc/cni/net.d"
  - pathPrefix: "/etc/kube-flannel"
  - pathPrefix: "/run/flannel"
  readOnlyRootFilesystem: false
  runAsUser:
    rule: RunAsAny
  supplementalGroups:
    rule: RunAsAny
  fsGroup:
    rule: RunAsAny
  allowPrivilegeEscalation: false
  defaultAllowPrivilegeEscalation: false
  allowedCapabilities: ['NET_ADMIN', 'NET_RAW']
  defaultAddCapabilities: []
  requiredDropCapabilities: []
  hostPID: false
  hostIPC: false
  hostNetwork: true
  hostPorts:
  - min: 0
    max: 65535
  seLinux:
    rule: 'RunAsAny'
---
kind: ClusterRole
apiVersion: rbac.authorization.k8s.io/v1
metadata:
  name: flannel
rules:
- apiGroups: ['extensions']
  resources: ['podsecuritypolicies']
  verbs: ['use']
  resourceNames: ['psp.flannel.unprivileged']
- apiGroups:
  - ""
  resources:
  - pods
  verbs:
  - get
- apiGroups:
  - ""
  resources:
  - nodes
  verbs:
  - list
  - watch
- apiGroups:
  - ""
  resources:
  - nodes/status
  verbs:
  - patch
---
kind: ClusterRoleBinding
apiVersion: rbac.authorization.k8s.io/v1
metadata:
  name: flannel
roleRef:
  apiGroup: rbac.authorization.k8s.io
  kind: ClusterRole
  name: flannel
subjects:
- kind: ServiceAccount
  name: flannel
  namespace: kube-system
---
apiVersion: v1
kind: ServiceAccount
metadata:
  name: flannel
  namespace: kube-system
---
kind: ConfigMap
apiVersion: v1
metadata:
  name: kube-flannel-cfg
  namespace: kube-system
  labels:
    tier: node
    app: flannel
data:
  cni-conf.json: |
    {
      "name": "cbr0",
      "cniVersion": "0.3.1",
      "plugins": [
        {
          "type": "flannel",
          "delegate": {
            "hairpinMode": true,
            "isDefaultGateway": true
          }
        },
        {
          "type": "portmap",
          "capabilities": {
            "portMappings": true
          }
        }
      ]
    }
  net-conf.json: |
    {
      "Network": "10.244.0.0/16",
      "Backend": {
        "Type": "vxlan"
      }
    }
---
apiVersion: apps/v1
kind: DaemonSet
metadata:
  name: kube-flannel-ds
  namespace: kube-system
  labels:
    tier: node
    app: flannel
spec:
  selector:
    matchLabels:
      app: flannel
  template:
    metadata:
      labels:
        tier: node
        app: flannel
    spec:
      affinity:
        nodeAffinity:
          requiredDuringSchedulingIgnoredDuringExecution:
            nodeSelectorTerms:
            - matchExpressions:
              - key: kubernetes.io/os
                operator: In
                values:
                - linux
      hostNetwork: true
      priorityClassName: system-node-critical
      tolerations:
      - operator: Exists
        effect: NoSchedule
      serviceAccountName: flannel
      initContainers:
      - name: install-cni-plugin
        image: rancher/mirrored-flannelcni-flannel-cni-plugin:v1.1.0
        command:
        - cp
        args:
        - -f
        - /flannel
        - /opt/cni/bin/flannel
        volumeMounts:
        - name: cni-plugin
          mountPath: /opt/cni/bin
      - name: install-cni
        image: rancher/mirrored-flannelcni-flannel:v0.18.1
        command:
        - cp
        args:
        - -f
        - /etc/kube-flannel/cni-conf.json
        - /etc/cni/net.d/10-flannel.conflist
        volumeMounts:
        - name: cni
          mountPath: /etc/cni/net.d
        - name: flannel-cfg
          mountPath: /etc/kube-flannel/
      containers:
      - name: kube-flannel
        image: rancher/mirrored-flannelcni-flannel:v0.18.1
        command:
        - /opt/bin/flanneld
        args:
        - --ip-masq
        - --kube-subnet-mgr
        resources:
          requests:
            cpu: "100m"
            memory: "50Mi"
          limits:
            cpu: "100m"
            memory: "50Mi"
        securityContext:
          privileged: false
          capabilities:
            add: ["NET_ADMIN", "NET_RAW"]
        env:
        - name: POD_NAME
          valueFrom:
            fieldRef:
              fieldPath: metadata.name
        - name: POD_NAMESPACE
          valueFrom:
            fieldRef:
              fieldPath: metadata.namespace
        - name: EVENT_QUEUE_DEPTH
          value: "5000"
        volumeMounts:
        - name: run
          mountPath: /run/flannel
        - name: flannel-cfg
          mountPath: /etc/kube-flannel/
        - name: xtables-lock
          mountPath: /run/xtables.lock
      volumes:
      - name: run
        hostPath:
          path: /run/flannel
      - name: cni-plugin
        hostPath:
          path: /opt/cni/bin
      - name: cni
        hostPath:
          path: /etc/cni/net.d
      - name: flannel-cfg
        configMap:
          name: kube-flannel-cfg
      - name: xtables-lock
        hostPath:
          path: /run/xtables.lock
执行一下命令安装插件
kubectl apply -f kube-flannel.yaml
6 将node节点加入到集群
将master节点下/etc/kubernetes/admin.conf 分别拷贝至node01和node02节点的 /etc/kubernetes目录下面,执行一下命令
该条命令是在初始化集群的时候生成的,直接拷贝下来执行即可。
kubeadm join 192.168.54.51:6443 --token rc0kfs.a1sfe3gl4dvopck5 \
    --discovery-token-ca-cert-hash sha256:864fe553c812df2af262b406b707db68b0fd450dc08b34efb73dd5a4771d37a2

到此可以简单部署几个应用试试
//在master节点查看节点状态
kubectl get nodes

kubectl get pods -n kube-system
NAME                             READY   STATUS    RESTARTS   AGE
coredns-bccdc95cf-c9w6l          1/1     Running   0          71m
coredns-bccdc95cf-nql5j          1/1     Running   0          71m
etcd-master                      1/1     Running   0          71m
kube-apiserver-master            1/1     Running   0          70m
kube-controller-manager-master   1/1     Running   0          70m
kube-flannel-ds-amd64-kfhwf      1/1     Running   0          2m53s
kube-flannel-ds-amd64-qkdfh      1/1     Running   0          46m
kube-flannel-ds-amd64-vffxv      1/1     Running   0          2m56s
kube-proxy-558p8                 1/1     Running   0          2m53s
kube-proxy-nwd7g                 1/1     Running   0          2m56s
kube-proxy-qpz8t                 1/1     Running   0          71m
kube-scheduler-master            1/1     Running   0          70m


//测试 pod 资源创建
kubectl create deployment nginx --image=nginx

kubectl get pods -o wide
NAME                     READY   STATUS    RESTARTS   AGE   IP           NODE     NOMINATED NODE   READINESS GATES
nginx-554b9c67f9-zr2xs   1/1     Running   0          14m   10.244.1.2   node01   <none>           <none>

//暴露端口提供服务
kubectl expose deployment nginx --port=80 --type=NodePort

kubectl get svc
NAME         TYPE        CLUSTER-IP     EXTERNAL-IP   PORT(S)        AGE
kubernetes   ClusterIP   10.96.0.1      <none>        443/TCP        25h
nginx        NodePort    10.96.15.132   <none>        80:32698/TCP   4s

//测试访问
curl http://node01:32698

//扩展3个副本
kubectl scale deployment nginx --replicas=3
kubectl get pods -o wide
NAME                     READY   STATUS    RESTARTS   AGE   IP           NODE     NOMINATED NODE   READINESS GATES
nginx-554b9c67f9-9kh4s   1/1     Running   0          66s   10.244.1.3   node01   <none>           <none>
nginx-554b9c67f9-rv77q   1/1     Running   0          66s   10.244.2.2   node02   <none>           <none>
nginx-554b9c67f9-zr2xs   1/1     Running   0          17m   10.244.1.2   node01   <none>
7 安装kuboard界面
按照kuboard官方教程进行安装
kubectl apply -f https://addons.kuboard.cn/kuboard/kuboard-v3.yaml
# 您也可以使用下面的指令,唯一的区别是,该指令使用华为云的镜像仓库替代 docker hub 分发 Kuboard 所需要的镜像
# kubectl apply -f https://addons.kuboard.cn/kuboard/kuboard-v3-swr.yaml
查看状态
[root@node1 ~]# kubectl get pods -n kuboard
NAME                               READY   STATUS    RESTARTS   AGE
kuboard-agent-2-65bc84c86c-r7tc4   1/1     Running   2          28s
kuboard-agent-78d594567-cgfp4      1/1     Running   2          28s
kuboard-etcd-fh9rp                 1/1     Running   0          67s
kuboard-etcd-nrtkr                 1/1     Running   0          67s
kuboard-etcd-ader3                 1/1     Running   0          67s
kuboard-v3-645bdffbf6-sbdxb        1/1     Running   0          67s
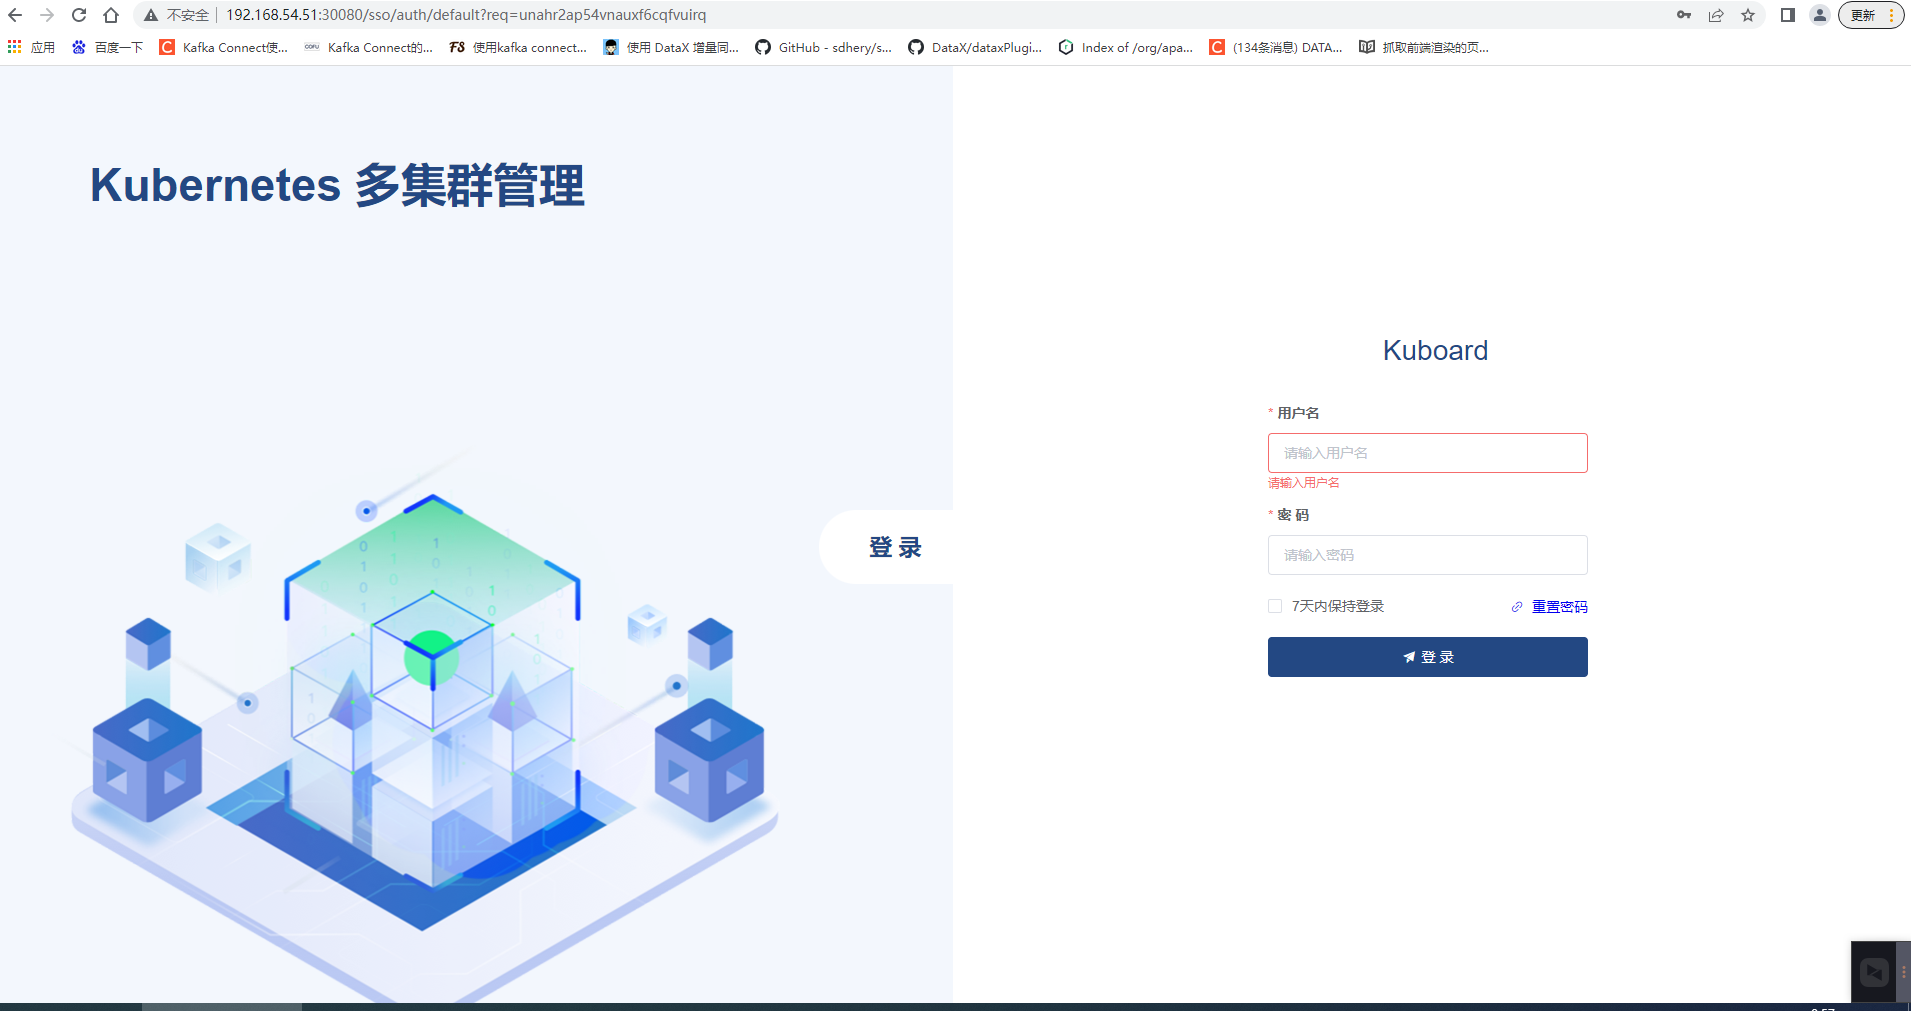
访问 Kuboard
在浏览器中打开链接 http://your-node-ip-address:30080
输入初始用户名和密码,并登录
用户名: admin
密码: Kuboard123
看到下面的界面,就算安装成功了。
可以在界面中,按照提示,导入k8s集群,就OK了。本文采用的是kubeadm方式安装,只需要将master中的/etc/kubernetes/admin.conf文件中的内容拷贝至对用的导入框,即可完成集群的导入功能。
8 常见问题排查
问题1
The connection to the server localhost:8080 was refused - did you specify the right host or port?
问题分析
环境变量
原因:kubernetes master没有与本机绑定,集群初始化的时候没有绑定,此时设置在本机的环境变量即可解决问题。
解决方式
步骤一:设置环境变量
具体根据情况,此处记录linux设置该环境变量
方式一:编辑文件设置
	   vim /etc/profile
	   在底部增加新的环境变量 export KUBECONFIG=/etc/kubernetes/admin.conf
方式二:直接追加文件内容
	echo "export KUBECONFIG=/etc/kubernetes/admin.conf" >> /etc/profile
步骤二:使生效
source /etc/profile


 822
822

 被折叠的 条评论
为什么被折叠?
被折叠的 条评论
为什么被折叠?
 到【灌水乐园】发言


