


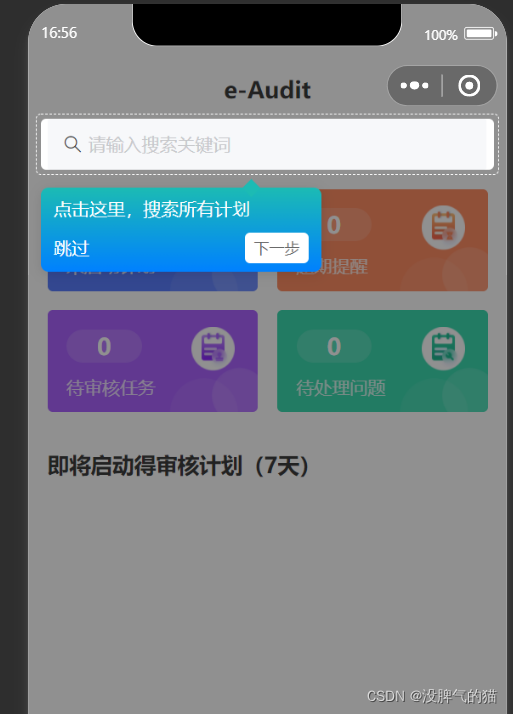
实现效果展示
实现步骤
第一步(新建组件)
组件代码
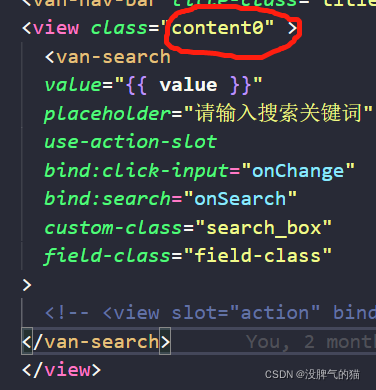
<!--wxml-->
<view class="guide" wx:if="{{showGuide}}">
  <view style="{{guideStyle}}" class="guide-box">
    <view class="tips guide-step-tips" style="{{tipPosition}}">
      <view class="text">{{ guideList[index].tips }}</view>
      <view class="tool-btn">
        <text bind:tap="skip">跳过</text>
        <view class="next" style="" bind:tap="next">下一步</view>
      </view>
    </view>
    <view class="arrow" style="{{arrowTop}}"></view>
  </view>
  <!-- 遮罩层,防止点击 -->
  <view class="v-model"></view>
</view>
/* wxss */
.v-model {
    position: fixed;
    left: 0;
    top: 0;
    width: 100%;
    height: 100%;
    z-index: 1000;
}
.guide {
    z-index: 1001;
}
.guide-box {
    position: absolute;
    z-index: 10001;
    transition: all 0.2s;

}
.guide-box::before {
    content: '';
    height: 100%;
    width: 100%;
    border: 1px dashed #fff;
    border-radius: 8rpx;
    position: absolute;
    top: -8rpx;
    left: -8rpx;
    padding: 7rpx;
}
.arrow {
    height: 20rpx;
    width: 20rpx;
    background: #1cbbb4;
    position: absolute;
    top: 144rpx;
    left: 45%;
    transform: rotate(45deg);
}
.tips {
    width: 400rpx;
    background: linear-gradient(180deg, #1cbbb4, #0081ff);
    box-shadow: 0px 2px 9px 0px rgba(0, 0, 0, 0.1);
    color: #fff;
    position: absolute;
    top: 152rpx;
    left: -50%;
    padding: 15rpx 20rpx;
    font-size: 28rpx;
    border-radius: 12rpx;
}
 .tool-btn {
     display: flex;
     justify-content: space-between;
     align-items: center;
     padding-right: 0rpx;
     margin-top: 20rpx;
 }
 .next {
     background: #fff;
     height: 48rpx;
     width: 100rpx;
     text-align: center;
     border-radius: 8rpx;
     color: #666;
     line-height: 48rpx;
     font-size: 24rpx
 }
//json
{
    "component": true,
    "usingComponents": {}
}
// components/xky-guideStep/xky-guideStep.js
Component({
/**
* 组件的属性列表
*/
properties: {
step: {
type: Object,
default: () => {},
},
},
/**
* 组件的初始数据
*/
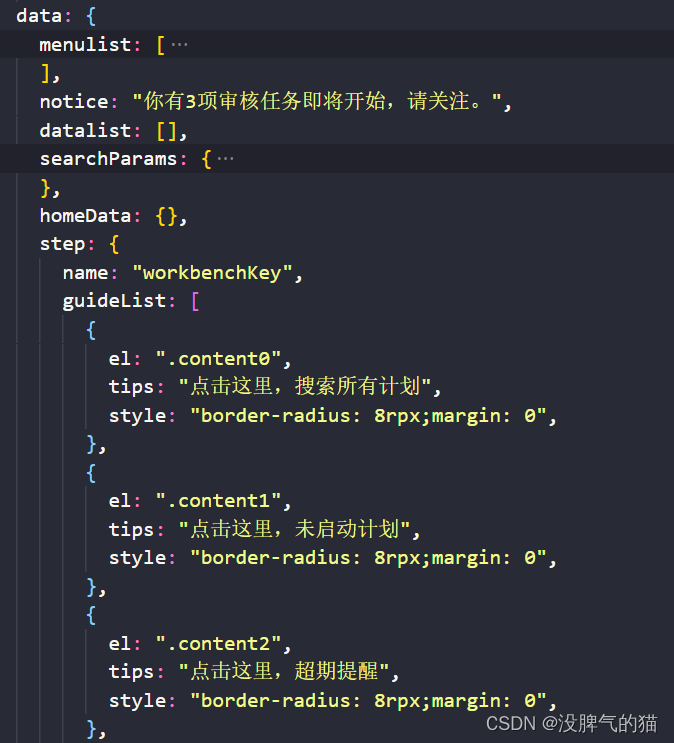
data: {
stepName: "step", //该提示步骤的名称,用于不在重复展示
guideList: [],
index: 0, // 当前展示的索引
showGuide: true, // 是否显示引导
guideStyle: "", // 默认样式
arrowTop: "", //步骤提示三角形的定位
tipPosition: "", //步骤提示的定位
systemInfo: "", //屏幕宽度高度等信息
tipWidth: 200, //步骤提示默认的宽度
},
/**
* 组件的方法列表
*/
methods: {
// 展示新手提示
viewTips(data, scrollTop) {
console.log(data, scrollTop);
let {
systemInfo,
tipWidth,
index,
guideList,
arrowTop,
tipPosition,
guideStyle,
} = this.data;
if (data) {
console.log(systemInfo);
// 如果dom宽度大于或者等于窗口宽度,需要重新调整dom展示宽度
let newWidth = systemInfo.windowWidth - 20;
if (data.width >= newWidth) {
data.width = newWidth;
}
// 如果距离左边为0,自动增加一点左边距
if (data.left == 0) {
data.left = 10;
}
let domRW = systemInfo.windowWidth - data.left;
let left = 0;
// 如果dom距离右边没有tips的宽度大的话,就要让tips向左便宜
if (domRW < tipWidth) {
left = domRW - tipWidth - 30;
}
// const index = index;
// 步骤条展示的高度需要加上屏幕滚动的高度
data.top += scrollTop;
// 根据实际情况需要滚动到展示区域
wx.pageScrollTo({
scrollTop: data.top > 20 ? data.top - 20 : 0,
duration: 100,
});
let obj = Object.assign(guideList[index], data);
// 设置三角形高度
let arrArrowTop = data.height + 9;
arrowTop = "top:" + arrArrowTop + "px;";
// 设置提示框定位
tipPosition = "top:" + (arrArrowTop + 5) + "px;left:" + left + "px;";
// 重新设置guideList的值
guideList.splice(index, 1, obj);
guideStyle = this.getStyle();
console.log(arrowTop, tipPosition, guideList, guideStyle);
this.setData({
arrowTop,
tipPosition,
guideList,
guideStyle,
});
} else {
index += 1;
this.setData({
index,
});
this.getDomInfo();
}
},
// 获取步骤提示的主要样式
getStyle() {
const { guideList, index } = this.data;
const { width, height, left, top, style } = guideList[index];
let newstyle = "width:" + width + "px;";
newstyle += "height:" + height + "px;";
newstyle += "left:" + left + "px;";
newstyle += "top:" + top + "px;";
newstyle +=
"box-shadow: rgb(33 33 33 / 80%) 0px 0px 0px 0px, rgb(33 33 33 / 50%) 0px 0px 0px 5000px;";
newstyle += style;
return newstyle;
},
// 获取dom信息
getDomInfo() {
const { guideList, index } = this.data;
console.log(guideList, index);
const { el } = guideList[index];
console.log(el);
// const query = wx.createSelectorQuery().in(this.$root);
const query = wx.createSelectorQuery();
// console.log(query);
setTimeout(() => {
query.select(el).boundingClientRect();
query.selectViewport().scrollOffset();
var _this = this;
query.exec(function (res) {
console.log("打印demo的元素的信息", res);
let data = res[0]; // #the-id节点的上边界坐标
let scrollTop = res[1].scrollTop; // 显示区域的竖直滚动位置
_this.viewTips(data, scrollTop);
});
}, 10);
},
skip() {
this.setData({
showGuide: false,
});
wx.setStorageSync(this.data.stepName, "true");
},
// 下一步
next() {
let { index, guideList, stepName } = this.data;
if (index === guideList.length - 1) {
this.setData({
showGuide: false,
});
wx.setStorageSync(stepName, "true");
} else {
index += 1;
this.setData({
index,
});
this.getDomInfo();
}
},
},
lifetimes: {
attached: function () {
console.log(this.properties);
const { step } = this.properties;
let { guideList, stepName } = this.data;
guideList = step.guideList;
stepName = step.name;
// const systemInfo = wx.getSystemInfoSync();
// systemInfo = systemInfo;
this.setData({
guideList,
stepName,
systemInfo: wx.getSystemInfoSync(),
});
const guide = wx.getStorageSync(step.name);
if (!guide) {
this.getDomInfo();
} else {
this.setData({
showGuide:false,
});
// this.showGuide = false;
}
},
detached: function () {
// 在组件实例被从页面节点树移除时执行
},
},
});
组件引入
在需要的页面,通过配置json文件引入
{
  "usingComponents": {
    "van-notice-bar": "@vant/weapp/notice-bar/index",
    "guideStep":"../../components/xky-guideStep/xky-guideStep"
    //注意组件引用的路径
  }
}
组件使用
在需要页面的wxml中引入,然后js文件的data配置中step属性。
注意:在页面需要高亮的部分,需要在节点中添加class。
<guideStep step="{{step}}"> </guideStep>
 <!--组件可以放在任意位置,建议放在页面的底部  -->
组件也可以在不同的页面复用,使用方法一样。


 5488
5488

 被折叠的 条评论
为什么被折叠?
被折叠的 条评论
为什么被折叠?
 到【灌水乐园】发言


