


virtualBox安装centos7并配置nginx php mysql运行环境
一:virtualBox安装centos7并进行基础设置
1.下载dvd.iso安装文件,下载地址:https://www.centos.org/download/
我选择的是DVD.iso的版本,大家自行查询三个版本的不同,对于我来说DVD版本已经够了,最好用迅雷下载,本地下载太慢了
2.系统(设置)->启动顺序改为光驱软驱硬盘
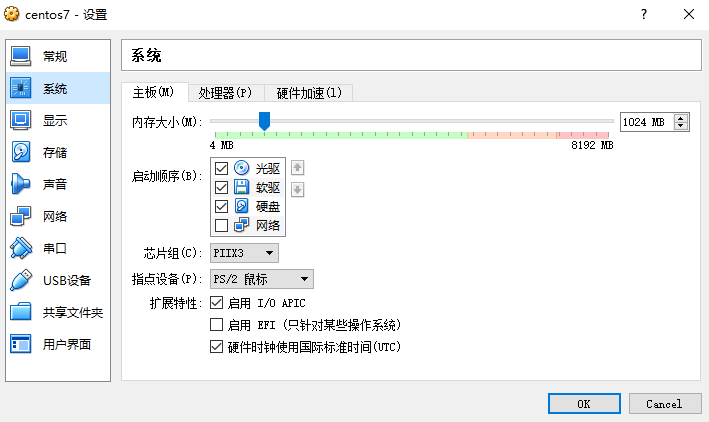
3.存储(设置)->点击盘片,选择之前下载的.iso文件
4.网络设置为桥接模式,主机与虚拟机可以互通
几种网络模式的介绍:https://www.douban.com/group/topic/15558388/
5.点击启动进入系统安装
6.最小化安装、虚拟硬盘自动分区,设置root密码
7.安装成功后,重新启动
8.最简安装的系统不存在ifconfig命令,我们在系统上安装一下
yum provides ifconfig 或 yum whatprovides ifconfig
查询到ifconfig命令是依赖于 net-tools软件的,所以我们来安装net-tools软件
yum install -y net-tools
测试到ifconfig命令可以用了(之前可以用ip addr命令代替)
9:初始wget软件安装
yum install -y wget
10:初始安装killall命令,nginx及其他服务启动关闭时会使用
yum install psmisc
11:如有需要,需设置静态IP启用,以后重启就可以一直用这个IP了,由于我自己公司网络配置,我没有设置。
vi /etc/sysconfig/network-scripts/ifcfg-****文件
BOOTPROTO="dhcp"修改为BOOTPROTO="static"
添加:IPADDR=10.200.79.123 设置的静态 ip地址
重启网络服务:service network restart
然后因为设置静态IP的原因出现了网络连接不上的问题,经解决:公司网段设置的问题,导致主机和虚拟机不在同一个网段,但是不影响互相访问,公司内的同事也可以访问我的虚拟机
二:搭建 nginx
参考地址:https://blog.csdn.net/faith306/article/details/78541974
根据文章安装完成后,启动nginx的过程中遇到几个问题
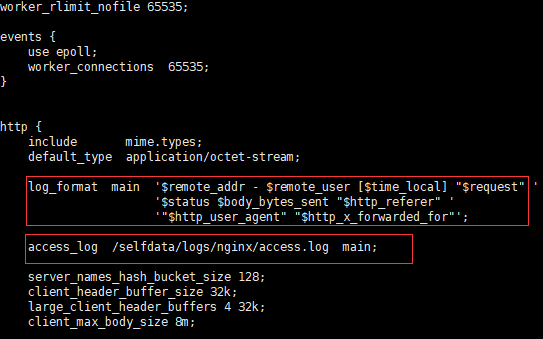
1.log_format main的定义问题,错误如下:
[root@bogon rewrite]# /selfdata/server/nginx-1.12.2/sbin/nginx
nginx: [emerg] unknown log format "main" in /selfdata/server/nginx-1.12.2/nginx.conf:26
上面文章中没有main的定义,并且log_format定义在access_log使用main的下面,更改为
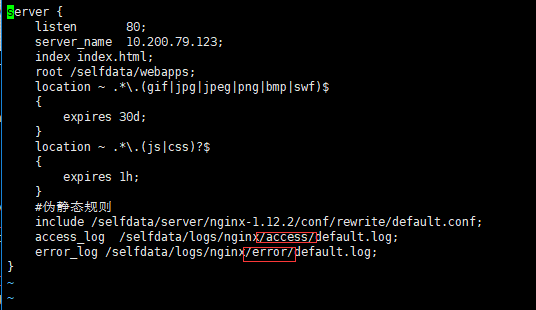
2.不存在日志文件夹的问题
[root@bogon rewrite]# /selfdata/server/nginx-1.12.2/sbin/nginx
nginx: [emerg] open() "/selfdata/logs/nginx/access/default.log" failed (2: No such file or directory)
这里是因为:/selfdata/logs/nginx/文件夹下面access文件夹不存在导致的,创建即可,之所以需要这个文件夹,是因为在nginx的服务器配置conf/vhosts/default.conf配置文件中配置了这个日志的地址。access和error文件夹都要创建
3.nginx程序目录下不存在log目录需要创建
[root@bogon nginx]# /selfdata/server/nginx-1.12.2/sbin/nginx
[root@bogon nginx]# nginx: [emerg] open() "/selfdata/server/nginx-1.12.2/logs/nginx.pid" failed (2: No such file or directory)
经网上查询,需要配置nginx程序对应的配置文件。而且需要创建logs文件夹,nginx目录下初始化安装完时里面是没有这个目录的。
[root@bogon nginx-1.12.2]# mkdir logs
[root@bogon nginx-1.12.2]# /selfdata/server/nginx-1.12.2/sbin/nginx -c /selfdata/server/nginx-1.12.2/nginx.conf
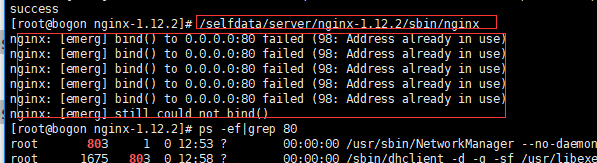
4.然后启动,又显示80端口被占用。
[root@bogon nginx-1.12.2]# /selfdata/server/nginx-1.12.2/sbin/nginx
nginx: [emerg] bind() to 0.0.0.0:80 failed (98: Address already in use)
nginx: [emerg] bind() to 0.0.0.0:80 failed (98: Address already in use)
nginx: [emerg] bind() to 0.0.0.0:80 failed (98: Address already in use)
nginx: [emerg] bind() to 0.0.0.0:80 failed (98: Address already in use)
nginx: [emerg] bind() to 0.0.0.0:80 failed (98: Address already in use)
nginx: [emerg] still could not bind()
我分两步来解决
第一:首先移除防火墙的影响,不管有没有影响。参考地址:https://blog.csdn.net/zyhlearnjava/article/details/71908529
~~~防止文章丢失,我再抄一遍:
[root@localhost ~]# yum install iptables-services
[root@localhost ~]# systemctl mask firewalld.service
[root@localhost ~]# systemctl enable iptables.service
[root@localhost ~]# systemctl enable ip6tables.service
进入iptables配置80端口,因为nginx默认是由80端口访问
[root@localhost ~]# vi /etc/sysconfig/iptables
这是配置信息:
# Generated by iptables-save v1.4.21 on Fri May 12 21:28:29 2017
*filter
:INPUT ACCEPT [0:0]
:FORWARD ACCEPT [0:0]
:OUTPUT ACCEPT [6:696]
-A INPUT -m state --state RELATED,ESTABLISHED -j ACCEPT
-A INPUT -p icmp -j ACCEPT
-A INPUT -i lo -j ACCEPT
-A INPUT -p tcp -m state --state NEW -m tcp --dport 22 -j ACCEPT
-A INPUT -p tcp -m state --state NEW -m tcp --dport 21 -j ACCEPT(我给vsftpd配置的端口)
-A INPUT -p tcp -m state --state NEW -m tcp --dport 80 -j ACCEPT(给nginx配置的端口,原样输入就行了)
-A INPUT -p tcp -m state --state NEW -m tcp --dport 30000:30999 -j ACCEPT
-A INPUT -j REJECT --reject-with icmp-host-prohibited
-A FORWARD -j REJECT --reject-with icmp-host-prohibited
COMMIT
# Completed on Fri May 12 21:28:29 2017
然后:wq,保存退出就行了;
重启iptables,配置才生效;
[root@localhost ~]# systemctl restart iptables.service
开启防火墙,不管你开没有,再开一遍:
[root@localhost ~]# systemctl start firewalld
开启http访问
[root@localhost ~]# firewall-cmd --permanent --add-service=http
加入80端口
[root@localhost ~]# firewall-cmd --permanent --zone=trusted --add-port=80/tcp
~~~抄完了
之后还是报错
第二步:
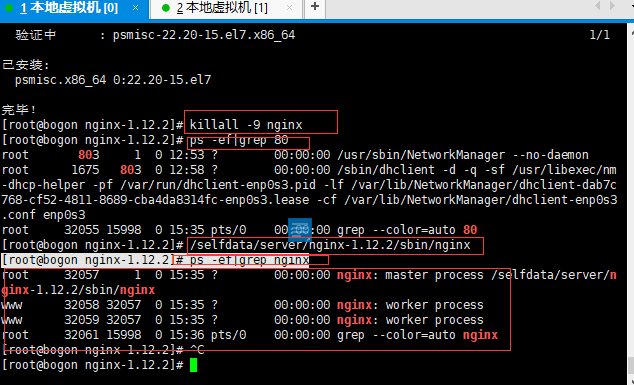
[root@bogon nginx-1.12.2]# killall -9 nginx
[root@bogon nginx-1.12.2]# /selfdata/server/nginx-1.12.2/sbin/nginx
[root@bogon nginx-1.12.2]# ps -ef|grep nginx
启用成功了
将nginx加入服务和开机启动的操作没有实践成功,开启的过程中报错了,所以我没加,先忽略的这部分
三:下载并安装PHP
用上面文章参考安装失败了,查阅资料。参考另一个地址:https://blog.csdn.net/xiao_zhui/article/details/72556781;该文章主要是参考安装组件部分,php编译安装之前需要这些组件支持
我再复制下来,
yum -y install libxml2
yum -y install libxml2-devel
yum -y install openssl
yum -y install openssl-devel
yum -y install curl
yum -y install curl-devel
yum -y install libjpeg
yum -y install libjpeg-devel
yum -y install libpng
yum -y install libpng-devel
yum -y install freetype
yum -y install freetype-devel
yum -y install pcre
yum -y install pcre-devel
yum -y install libxslt
yum -y install libxslt-devel
yum -y install bzip2
yum -y install bzip2-devel
# ./configure --prefix=/selfdata/server/php-7.1.11 --with-config-file-path=/selfdata/server/php-7.1.11/etc --with-curl --with-freetype-dir --with-gd --with-gettext --with-iconv-dir --with-kerberos --with-libdir=lib64 --with-libxml-dir --with-mysqli --with-openssl --with-pcre-regex --with-pdo-mysql --with-pdo-sqlite --with-pear --with-png-dir --with-jpeg-dir --with-xmlrpc --with-xsl --with-zlib --with-bz2 --with-mhash --enable-fpm --enable-pdo --enable-bcmath --enable-libxml --enable-inline-optimization --enable-gd-native-ttf --enable-mbregex --enable-mbstring --enable-opcache --enable-pcntl --enable-shmop --enable-soap --enable-sockets --enable-sysvsem --enable-sysvshm --enable-xml --enable-zip --enable-calendar
# make
# make install
# cp /selfdata/package/php-7.1.11/php.ini-production /selfdata/server/php-7.1.11/etc/php.ini
# cd /selfdata/server/php-7.1.11/etc
# cp php-fpm.conf.default php-fpm.conf
# cd /selfdata/server/php-7.1.11/etc/php-fpm.d
# cp www.conf.default www.conf
# vi  /selfdata/server/php-7.1.11/etc/php-fpm.conf
~~修改内容
pid= /selfdata/server/php-7.1.11/var/run/php-fpm.pid
~~~内容结束
#vi  /selfdata/server/php-7.1.11/etc/php-fpm.d/www.conf
~~~内容
user = www
group = www
listen = 127.0.0.1:9000
pm.max_children = 100
pm.start_servers = 20
pm.min_spare_servers = 5
pm.max_spare_servers = 35
~~~内容
四:mysql安装
mysql第一次安装时直接按照第一篇参考资料安装的,直接文件夹安装的,遇到了很多的错误,而且最后始终是提醒缺少PID文件,并且启用不起来,而且没有错误日志,实在没办法,选择了卸载,重新安装,重新啊安装采用的yum安装的
1.卸载原有mysql残余,在网络查询如何完全下载
2.yum mysql安装参考:
https://www.linuxidc.com/Linux/2016-09/135288.htm
3.安装完成之后需要进行初始的访问设置,用户设置这些
参考:
https://blog.csdn.net/java_raylu/article/details/73196737https://blog.csdn.net/u010072512/article/details/51802472


 被折叠的 条评论
为什么被折叠?
被折叠的 条评论
为什么被折叠?
 到【灌水乐园】发言


