


一、效果演示及分析
我们直接看两幅图。如下:
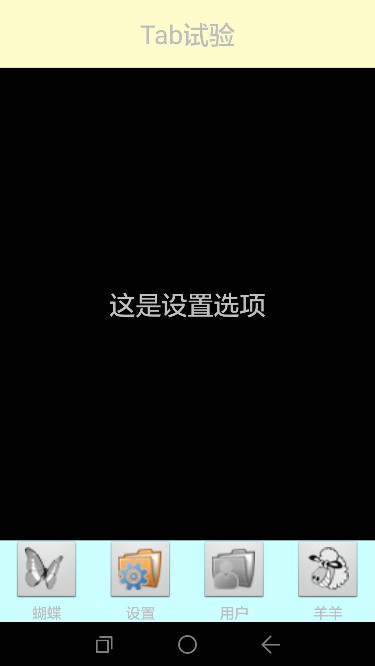

上两幅图实现的效果就是:
(1)手指左右滑动时,中间的布局呈现不同的效果。而且下面的按钮也会做相应的改变。
(2)我们也可以不左右滑动,直接点击下面的按钮来改变中间的布局。
这就是android开发中经常要用到的Tab效果,可以最大限度的使用屏幕资源。中间的View可以显示复杂又不同的界面效果。这里为了学习上的简洁,我每一个界面都只是实现了一个TextView效果而已,但这足以将利用ViewPager实现Tab的原理将清楚了。
我们很容易想到,上面的布局可以由线程布局来完成,上、中、下分别是三个线性布局,而下面的一个布局里面装了四个按钮而已。因此编写布局并不难,下面我们就开始书写吧。
二、准备相应的资源
我们只需要准备一些图片即可,即每一个按钮都有两种状态,暗色和亮色。简单利用PS就可以处理了。
三、开始写实际的代码
(1)首先我们把上面和下面的布局构建完成。
上面的布局就是 一个线性布局,中间放了一个TextView而已。我们起名为top.xml,代码很简单,如下:
 1 <LinearLayout xmlns:android="http://schemas.android.com/apk/res/android"
 2     xmlns:tools="http://schemas.android.com/tools"
 3     android:layout_width="match_parent"
 4     android:layout_height="65dp"
 5     android:background="#fffccc"
 6     android:gravity="center">
 7
 8     <TextView
 9         android:layout_width="wrap_content"
10         android:layout_height="wrap_content"
11         android:text="Tab试验"
12         android:textSize="25dp"/>
13
14 </LinearLayout>
下面的布局采用一个总的线性布局安水平方向摆放四个布局,每一个布局里再放置相应的图片和文字。我们起名为bottum.xml。代码如下:
 1 <LinearLayout xmlns:android="http://schemas.android.com/apk/res/android"
 2     xmlns:tools="http://schemas.android.com/tools"
 3     android:layout_width="match_parent"
 4     android:layout_height="wrap_content"
 5     android:background="#ccffff"
 6     >
 7
 8    <LinearLayout
 9        android:id="@+id/lay_hudie"
10        android:layout_width="0dp"
11        android:layout_height="match_parent"
12        android:layout_weight="1"
13        android:orientation="vertical"
14        android:gravity="center">
15
16        <ImageButton
17            android:id="@+id/ibtn_hudie"
18            android:layout_width="wrap_content"
19            android:layout_height="wrap_content"
20            android:clickable="false"
21            android:src="@drawable/hudie"/>
22        <TextView
23            android:layout_width="wrap_content"
24            android:layout_height="wrap_content"
25            android:text="蝴蝶"/>
26            "
27    </LinearLayout>
28
29       <LinearLayout
30           android:id="@+id/lay_set"
31        android:layout_width="0dp"
32        android:layout_height="match_parent"
33        android:layout_weight="1"
34        android:orientation="vertical"
35        android:gravity="center">
36
37        <ImageButton
38            android:id="@+id/ibtn_set"
39             android:clickable="false"
40            android:layout_width="wrap_content"
41            android:layout_height="wrap_content"
42            android:src="@drawable/set"/>
43        <TextView
44            android:layout_width="wrap_content"
45            android:layout_height="wrap_content"
46            android:text="设置"/>
47
48    </LinearLayout>
49       <LinearLayout
50           android:id="@+id/lay_user"
51        android:layout_width="0dp"
52        android:layout_height="match_parent"
53        android:layout_weight="1"
54        android:orientation="vertical"
55        android:gravity="center">
56
57        <ImageButton
58            android:id="@+id/ibtn_user"
59             android:clickable="false"
60            android:layout_width="wrap_content"
61            android:layout_height="wrap_content"
62            android:src="@drawable/user"/>
63        <TextView
64            android:layout_width="wrap_content"
65            android:layout_height="wrap_content"
66            android:text="用户"/>
67
68    </LinearLayout>
69       <LinearLayout
70           android:id="@+id/lay_yang"
71        android:layout_width="0dp"
72        android:layout_height="match_parent"
73        android:layout_weight="1"
74        android:orientation="vertical"
75        android:gravity="center">
76
77        <ImageButton
78            android:id="@+id/ibtn_yang"
79            android:clickable="false"
80            android:layout_width="wrap_content"
81            android:layout_height="wrap_content"
82            android:src="@drawable/yang"/>
83        <TextView
84            android:layout_width="wrap_content"
85            android:layout_height="wrap_content"
86            android:text="羊羊"/>
87
88    </LinearLayout>
89
90 </LinearLayout>
注意:ImageButton里的点击事件要设定为false。这是因为在后面我们要对它的父view,即相应的LinearLayout设置点击事件,为了保证点击事件一定能被LinearLayout捕捉到,所以要将ImageButton的点击事件设定为false。否则,如果你点击ImageButton那一部分的屏幕区域,因为它是 放在LinearLayout里面,所以点击事件先被LinearLayout捕捉。但是LinearLayout发现他里面有一个按钮也是可以处理点击事件的,就会把点击事件传递给它处理(这是android里的规定)。但是我们却没有给ImageButton设定点击事件,因为就会造成点击事件不响应。所以为了让点击事件不向下传递,我们就将按钮的点击事件设为fasle,即让它不能处理点击事件。而TextView是本身就不能响应点击事件的,因为我们不用对它设定。
(2)搭建主界面,其中就包括ViewPager
现在我们将主界面的头和尾(即上面写的),以及中间的ViewPager搭建起来。取名为activity_main.xml代码也很简单,如下:
 1 <LinearLayout xmlns:android="http://schemas.android.com/apk/res/android"
 2     xmlns:tools="http://schemas.android.com/tools"
 3     android:layout_width="match_parent"
 4     android:layout_height="match_parent"
 5     android:orientation="vertical"
 6     >
 7
 8 <include layout="@layout/top"/>
 9
10     <android.support.v4.view.ViewPager
11         android:id="@+id/vp"
12         android:layout_width="match_parent"
13         android:layout_height="0dp"
14         android:layout_weight="1" >
15     </android.support.v4.view.ViewPager>
16
17     <include layout="@layout/bottum"/>"
18 </LinearLayout>
注意:在这里我们应当记住,include语句是怎样引入布局的。还有ViewPager是怎样引入的。
(3)编写所有的Tab界面
从效果图上,我们可以看到Tab界面有4个(即中间黑色每滑动一次就出现不同的TextView)。很简单,我们编写四个就可以了,分别命名为Tab01.xml,Tab02.xml,Tab03.xml,Tab04.xml。代码如下:
 1 <LinearLayout xmlns:android="http://schemas.android.com/apk/res/android"
 2     xmlns:tools="http://schemas.android.com/tools"
 3     android:layout_width="match_parent"
 4     android:layout_height="match_parent"
 5     android:gravity="center">
 6
 7     <TextView
 8         android:layout_width="wrap_content"
 9         android:layout_height="wrap_content"
10         android:text="这是一只蝴蝶"
11         android:textSize="25dp"/>
12
13 </LinearLayout>
其他的一样,就是把中间的TextView显示的字改了一下而已。我就不重复了。
(4)写入活动中展示出来。
这一步还是比较复杂的。具体包括,要为按钮设定点击事件,要为ViewPager写适配器,并且要为它编写Item改变时的事件。具体看代码:
  1 import java.util.ArrayList;
  2 import java.util.List;
  3 import java.util.zip.Inflater;
  4 import android.os.Bundle;
  5 import android.app.Activity;
  6 import android.support.v4.view.PagerAdapter;
  7 import android.support.v4.view.ViewPager;
  8 import android.support.v4.view.ViewPager.OnPageChangeListener;
  9 import android.view.LayoutInflater;
 10 import android.view.Menu;
 11 import android.view.View;
 12 import android.view.View.OnClickListener;
 13 import android.view.ViewGroup;
 14 import android.widget.ImageButton;
 15 import android.widget.LinearLayout;
 16
 17 public class MainActivity extends Activity implements OnClickListener{
 18
 19
 20     private ViewPager vp;
 21
 22     private PagerAdapter mAdapter;//适配器
 23
 24     private List<View> mViews = new ArrayList<View>();//数据集
 25
 26     private LinearLayout mlay1;
 27     private LinearLayout mlay2;
 28     private LinearLayout mlay3;
 29     private LinearLayout mlay4;
 30
 31     private ImageButton img1;
 32     private ImageButton img2;
 33     private ImageButton img3;
 34     private ImageButton img4;
 35
 36
 37
 38     protected void onCreate(Bundle savedInstanceState) {
 39         super.onCreate(savedInstanceState);
 40         setContentView(R.layout.activity_main);
 41
 42         initView();
 43
 44         initEvent();//用来 初始化点击事件
 45
 46
 47     }
 48
 49
 50
 51     //初始化点击事件
 52     private void initEvent() {
 53
 54
 55         mlay1.setOnClickListener(this);
 56         mlay2.setOnClickListener(this);
 57         mlay3.setOnClickListener(this);
 58         mlay4.setOnClickListener(this);
 59
 60   //设置滑动ViewPager时的事件
 61
 62         vp.setOnPageChangeListener(new OnPageChangeListener() {
 63
 64
 65             //主要在这个方法里操作,当选中相应的view时一系列的响应事件
 66             public void onPageSelected(int arg0) {
 67
 68                 resetImg();
 69                 int item = vp.getCurrentItem();
 70                 switch(item){
 71
 72                 case 0:
 73                     img1.setImageResource(R.drawable.hudie2);
 74                     break;
 75                 case 1:
 76                     img2.setImageResource(R.drawable.set2);
 77                     break;
 78                 case 2:
 79                     img3.setImageResource(R.drawable.user2);
 80                     break;
 81                 case 3:
 82                     img4.setImageResource(R.drawable.yang2);
 83                     break;
 84                 }
 85
 86             }
 87
 88
 89             public void onPageScrolled(int arg0, float arg1, int arg2) {
 90                 // TODO Auto-generated method stub
 91
 92             }
 93
 94
 95             public void onPageScrollStateChanged(int arg0) {
 96                 // TODO Auto-generated method stub
 97
 98             }
 99         });
100     }
101
102
103
104     //该方法初始化各个view
105     private void initView() {
106
107         vp = (ViewPager) findViewById(R.id.vp);
108
109         //获取底部的各个线性布局
110         mlay1 = (LinearLayout) findViewById(R.id.lay_hudie);
111         mlay2 = (LinearLayout) findViewById(R.id.lay_set);
112         mlay3 = (LinearLayout) findViewById(R.id.lay_user);
113         mlay4 = (LinearLayout) findViewById(R.id.lay_yang);
114
115
116         //获取各个imageView
117         img1 = (ImageButton) findViewById(R.id.ibtn_hudie);
118         img2 = (ImageButton) findViewById(R.id.ibtn_set);
119         img3 = (ImageButton) findViewById(R.id.ibtn_user);
120         img4 = (ImageButton) findViewById(R.id.ibtn_yang);
121
122
123         //下面将view加入到数据集中
124         View v1 = LayoutInflater.from(this).inflate(R.layout.tab01, null);
125         View v2 = LayoutInflater.from(this).inflate(R.layout.tab02, null);
126         View v3 = LayoutInflater.from(this).inflate(R.layout.tab03, null);
127         View v4 = LayoutInflater.from(this).inflate(R.layout.tab04, null);
128
129         mViews.add(v1);
130         mViews.add(v2);
131         mViews.add(v3);
132         mViews.add(v4);
133
134
135         //然后再根据数据集配置适配器
136
137         mAdapter = new PagerAdapter() {
138
139
140             //销毁item
141             public void destroyItem(ViewGroup container, int position,
142                     Object object) {
143
144                 container.removeView(mViews.get(position));
145             }
146
147
148             //初始化item
149             public Object instantiateItem(ViewGroup container, int position) {
150
151                 View view = mViews.get(position);
152                 container.addView(view);
153                 return view;
154             }
155
156
157             //TODO
158             //这个方法是什么意思,有待进一步查解
159             public boolean isViewFromObject(View arg0, Object arg1) {
160
161                 return arg0 == arg1;
162             }
163
164
165             //获得适配的总数目
166             public int getCount() {
167
168                 return mViews.size();
169             }
170         };
171
172
173         //为ViewPager设置适配器
174
175         vp.setAdapter(mAdapter);
176
177
178     }
179
180
181
182
183     //点击事件,会把执行点击的控件传进来,即view
184     public void onClick(View v) {
185         resetImg();
186         switch(v.getId()){
187
188         case R.id.lay_hudie:
189             vp.setCurrentItem(0);//设置ViewPager当前的view
190             img1.setImageResource(R.drawable.hudie2);
191             break;
192         case R.id.lay_set:
193             vp.setCurrentItem(1);//设置ViewPager当前的view
194             img2.setImageResource(R.drawable.set2);
195             break;
196         case R.id.lay_user:
197             vp.setCurrentItem(2);//设置ViewPager当前的view
198             img3.setImageResource(R.drawable.user2);
199             break;
200         case R.id.lay_yang:
201             vp.setCurrentItem(3);//设置ViewPager当前的view
202             img4.setImageResource(R.drawable.yang2);
203             break;
204
205         }
206     }
207
208     //该方法用来将图片还原到初始状态
209     private  void resetImg(){
210         img1.setImageResource(R.drawable.hudie);
211         img2.setImageResource(R.drawable.set);
212         img3.setImageResource(R.drawable.user);
213         img4.setImageResource(R.drawable.yang);
214     }
215 }
好了,所有的工作完成了,我们可以运行程序看看效果了。
四、总结
来看看编写代码的过程中,有那些重要的android知识。
(1)在一个布局中引入另外一个布局,可采用如下语句:
<include layout="@layout/top"/>
(2)在布局中书写ViewPager的代码,关键是要记住它的包名:
<android.support.v4.view.ViewPager
        android:id="@+id/vp"
        android:layout_width="match_parent"
        android:layout_height="0dp"
        android:layout_weight="1" >
</android.support.v4.view.ViewPager>
(3)ViewPager的适配器,除了书写它默认的两个方法外,还要重写如下两个方法:
 public void destroyItem(ViewGroup container, int position,
                    Object object)
 public Object instantiateItem(ViewGroup container, int position)
(4)当ViewPager状态发生改变时,我们想做出一系列响应,应该设置监听接口,并主要在onPageSelected进行操作。例如:
 1 vp.setOnPageChangeListener(new OnPageChangeListener() {
 2
 3
 4             //主要在这个方法里操作,当选中相应的view时一系列的响应事件
 5             public void onPageSelected(int arg0) {
 6 int item = vp.getCurrentItem();
 7                 switch(item){
 8                 case 0:
 9                     img1.setImageResource(R.drawable.hudie2);
10                     break;
11                 case 1:
12                     img2.setImageResource(R.drawable.set2);
13                     break;
14                 case 2:
15                     img3.setImageResource(R.drawable.user2);
16                     break;
17                 case 3:
18                     img4.setImageResource(R.drawable.yang2);
19                     break;
20
21             }
22             public void onPageScrolled(int arg0, float arg1, int arg2) {
23             }
24                         public void onPageScrollStateChanged(int arg0) {
25
26             }
27         });
28     }


 96
96


 被折叠的 条评论
为什么被折叠?
被折叠的 条评论
为什么被折叠?
 到【灌水乐园】发言


