


内容目录
起因解决方案一、开发环境二、创建Windows Service三、创建Service控制窗体程序四、运行Service控制窗体程序总结
起因
在平时部署Windows Service时,通过命令行部署服务太费劲了,总想着有没有想桌面程序那样的方式,点个按钮就能完成所有操作的了。此想法由来已久,只是事情比较多,最近总算有时间了,在此想法的驱使下,最终有了这篇文章的诞生。
解决方案
一、开发环境
操作系统:Windows 10 X64
开发环境:VS2013
编程语言:C#
.NET版本:.NET Framework 4.0
目标平台:X86
二、创建Windows Service
1、新建一个Windows Service,并将项目名称改为“WindowsServiceDemo”,如下图所示:

2、重命名服务文件Service1.cs为ServideDemo.cs,弹出“重命名选择”提示框选择“是”。

3、选中服务文件ServiceDemo.cs,点击“查看代码”按钮,跳转至编辑代码页面。

4、在代码编辑也,编辑服务代码如下:


using System;
using System.Collections.Generic;
using System.ComponentModel;
using System.Data;
using System.Diagnostics;
using System.IO;
using System.Linq;
using System.ServiceProcess;
using System.Text;
using System.Threading.Tasks;

namespace WindowsServiceDemo
{
    public partial class ServiceDemo : ServiceBase
    {
        public ServiceDemo()
        {
            InitializeComponent();
        }

        protected override void OnStart(string[] args)
        {
            // TODO:在此处添加代码以启动服务。
            ServiceLog(@"E:\ServiceDemoLog.txt", String.Format("{0},服务启动!", DateTime.Now.ToString("yyyy-MM-dd HH:mm:ss")));
        }

        protected override void OnStop()
        {
            // TODO:在此处添加代码以执行停止服务所需的关闭操作。
            ServiceLog(@"E:\ServiceDemoLog.txt", String.Format("{0},服务停止!", DateTime.Now.ToString("yyyy-MM-dd HH:mm:ss")));
        }

        private void ServiceLog(String path, String Context)
        {
            using (FileStream stream = new FileStream(path, FileMode.Append))
            using (StreamWriter writer = new StreamWriter(stream))
            {
                writer.WriteLine(Context);
            }
        }
    }
}
5、右键单击ServiceDemo.cs,单击“查看设计器”。在设计器上右键单击,点击“添加安装程序”。

6、程序安装文件ProjectInstaller.cs,包含一个“serviceProcessInstaller”和“serviceInstaller”组件。

7、serviceInstaller组件右键单击,选择“属性”。修改“ServiceName”为“ServiceDemo”,修改“Description”为“服务例子”;修改“StartType”为“Manual”。

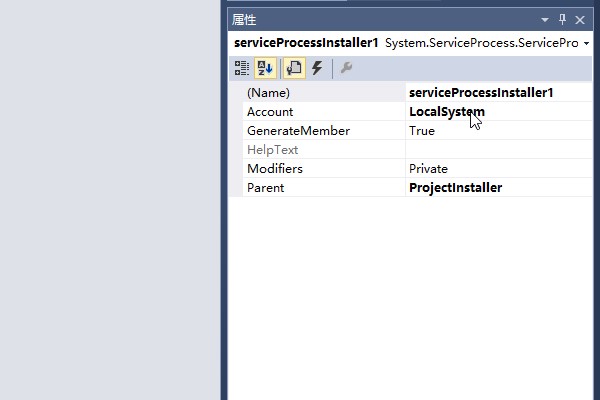
8、serviceProcessInstaller组件单击,选择“属性”。修改“Account”为“LocalSystem”。
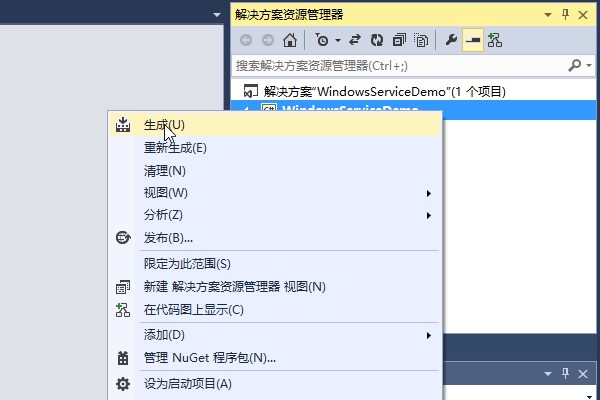
9、右键单击WindowsServiceDemo项目文件,选择“生成”。服务创建成功。
三、创建Service控制窗体程序
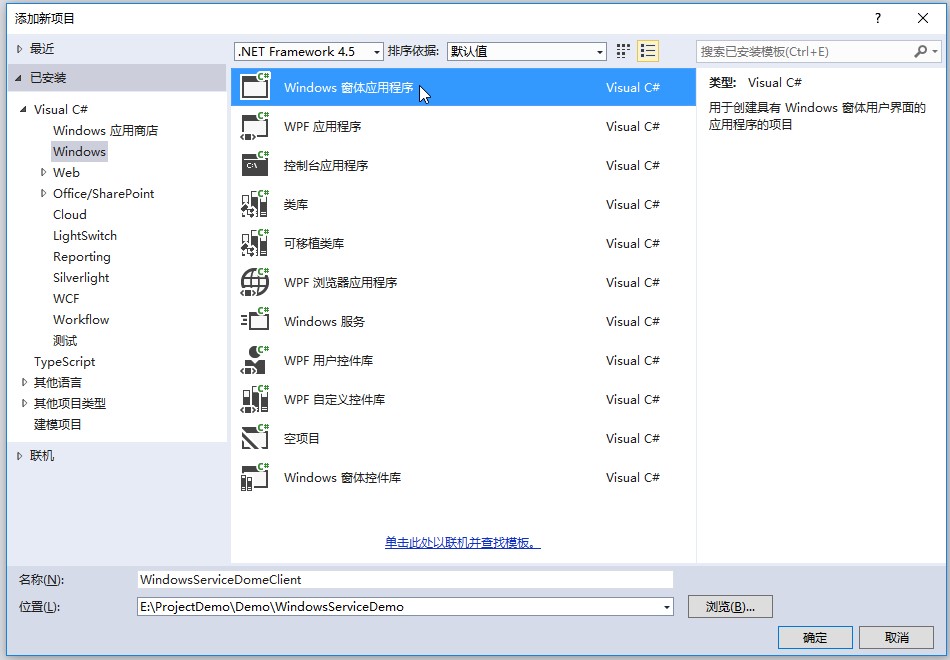
1、新建一个名为WindowsServiceDemoClient的Windows窗体程序。
2、设计窗体功能组件,如下图:

3、引入命名空间“System.ServiceProcess”和“System.Configuration.Install”,点击不同按钮实现按钮功能,代码如下
using System;
using System.Collections;
using System.Collections.Generic;
using System.ComponentModel;
using System.Configuration.Install;
using System.Data;
using System.Drawing;
using System.Linq;
using System.ServiceProcess;
using System.Text;
using System.Threading.Tasks;
using System.Windows.Forms;

namespace WindowsServiceDomeClient
{
    public partial class Form1 : Form
    {
        private readonly String serviceFilePath = String.Format("{0}\\WindowsServiceDemo.exe", Application.StartupPath);
        private readonly String serviceName = "ServiceDemo";

        public Form1()
        {
            InitializeComponent();
            ServiceState();
        }

        private void btnInstaller_Click(object sender, EventArgs e)
        {
            if (IsServiceExisted(serviceName)) UninstallService(serviceName);
            InstallService(serviceFilePath);
            ServiceState();
        }

        private void btnStart_Click(object sender, EventArgs e)
        {
            if (IsServiceExisted(serviceName)) StartService(serviceName);
            ServiceState();
        }

        private void btnStop_Click(object sender, EventArgs e)
        {
            if (IsServiceExisted(serviceName)) StopService(serviceName);
            ServiceState();
        }

        private void btnUninstaller_Click(object sender, EventArgs e)
        {
            if (IsServiceExisted(serviceName))
            {
                StopService(serviceName);
                UninstallService(serviceFilePath);
            }
            ServiceState();
        }

        /// <summary>
        /// 设置当前服务状态
        /// </summary>
        private void ServiceState()
        {
            String state = "--";
            if (!IsServiceExisted(serviceName))
            {
                state = "服务未安装";
            }
            else
            {
                ServiceController service = new ServiceController(serviceName);
                switch (service.Status)
                {
                    case ServiceControllerStatus.ContinuePending:
                        break;
                    case ServiceControllerStatus.PausePending:
                        break;
                    case ServiceControllerStatus.Paused:
                        state = "服务已暂停";
                        break;
                    case ServiceControllerStatus.Running:
                        state = "服务已启动";
                        break;
                    case ServiceControllerStatus.StartPending:
                        break;
                    case ServiceControllerStatus.StopPending:
                        break;
                    case ServiceControllerStatus.Stopped:
                        state = "服务未启动";
                        break;
                    default:
                        break;
                }
            }
            lblServiceState.Text = state;
        }

        #region /-- 服务内部方法 --/

        /// <summary>
        /// 判断服务是否存在
        /// </summary>
        /// <param name="name"></param>
        /// <returns></returns>
        private Boolean IsServiceExisted(String name)
        {
            ServiceController[] service = ServiceController.GetServices();
            foreach (var item in service)
            {
                if (item.ServiceName.ToLower() == serviceName.ToLower())
                {
                    return true;
                }
            }
            return false;
        }

        /// <summary>
        /// 安装服务
        /// </summary>
        /// <param name="serviceFilePath"></param>
        private void InstallService(String serviceFilePath)
        {
            using (AssemblyInstaller installer = new AssemblyInstaller())
            {
                installer.UseNewContext = true;
                installer.Path = serviceFilePath;
                IDictionary savedState = new Hashtable();
                installer.Install(savedState);
                installer.Commit(savedState);
            }
        }

        /// <summary>
        /// 卸载服务
        /// </summary>
        /// <param name="serviceFilePath"></param>
        private void UninstallService(String serviceFilePath)
        {
            using (AssemblyInstaller installer = new AssemblyInstaller())
            {
                installer.UseNewContext = true;
                installer.Path = serviceFilePath;
                installer.Uninstall(null);
            }
        }

        /// <summary>
        /// 启动服务
        /// </summary>
        /// <param name="serviceName"></param>
        private void StartService(String serviceName)
        {
            //using (ServiceController service = new ServiceController(serviceName)){
            //    if (service.Status == ServiceControllerStatus.Stopped) {
            //        service.Start();
            //    }
            //}
            ServiceController service = new ServiceController(serviceName);
            if (service.Status == ServiceControllerStatus.Stopped)
            {
                service.Start();
                service.WaitForStatus(ServiceControllerStatus.Running);
                service.Close();
            }
        }

        /// <summary>
        /// 停止服务
        /// </summary>
        /// <param name="ServiceName"></param>
        private void StopService(String serviceName)
        {
            //using(ServiceController service = new ServiceController(serviceName)){
            //    if(service.Status == ServiceControllerStatus.Running){
            //        service.Stop();
            //    }
            //}
            ServiceController service = new ServiceController(serviceName);
            if (service.Status == ServiceControllerStatus.Running)
            {
                service.Stop();
                service.WaitForStatus(ServiceControllerStatus.Stopped);
                service.Close();
            }
        }

        #endregion
    }
}
4、为了在Windows窗体程序中安装、卸载Windows服务,需要在Windows窗体程序中引入已经生成的WindowsServiceDemo服务。

5、安装Windows服务需要UAC中Administrator的权限,右键WindowsServiceDemoClient“添加”-“新建项”,添加“应用程序清单文件”,app.manifest文件。

6、修改为

7、右键单击WindowsServiceDemoClient项目文件,选择“生成”。操作服务客户端创建成功。
四、运行Service控制窗体程序
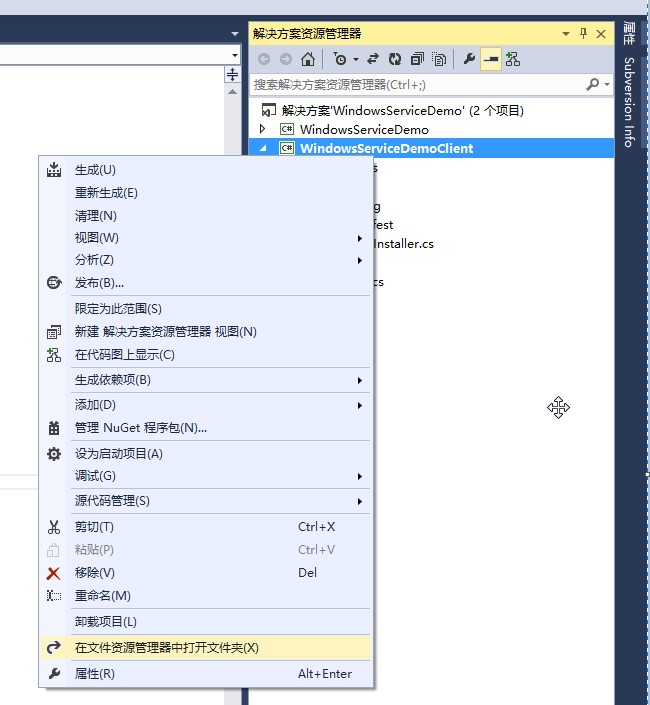
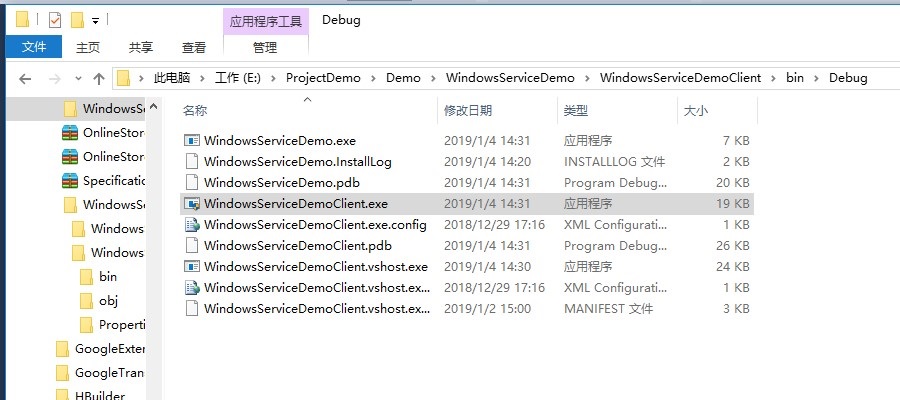
1、右键“WindowsServiceDemoClient”窗体程序“在文件资源管理器中打开文件夹”。
2、在“bin”-“Debug”中找到WindowsServiceDemoClient.exe双击打开。
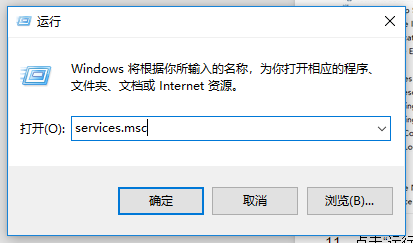
3、在“开始”-“Windows系统”-“运行”,输入“services.msc”打开服务列表。
4、点击“安装服务”,服务安装成功,手动刷新服务列表,ServiceDemo显示出来。
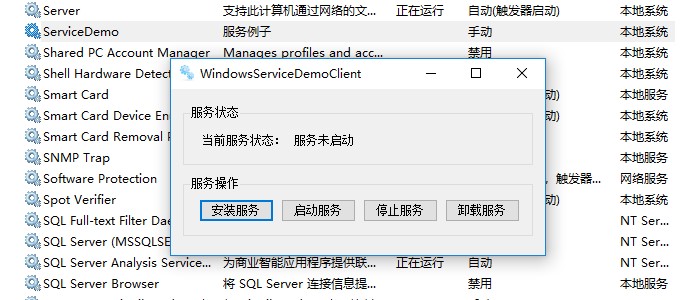
5、点击“启动服务”,服务启动成功,手动刷新服务列表,ServiceDemo状态显示“正在运行”。

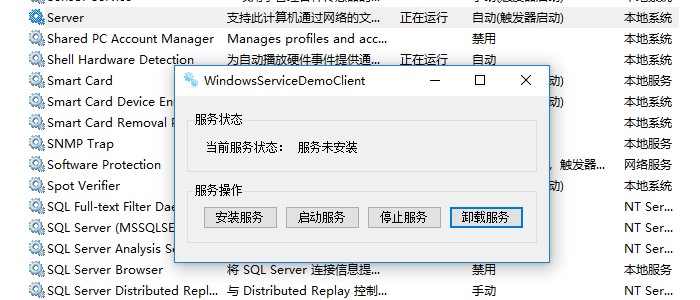
6、点击“停止服务”,服务停止成功,手动刷新服务列表,ServiceDemo状态置空了。

7、点击“卸载服务”,服务卸载成功,手动刷新服务列表,ServiceDemo不存在了。
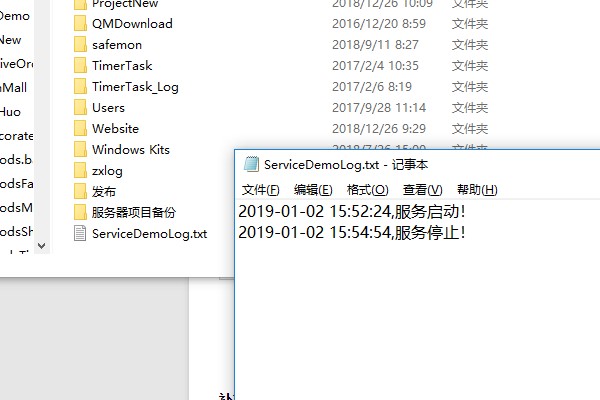
8、以下为服务启动和停止时写入“E:\ServiceDemoLog.txt”中的日志信息。
总结
到此文章完成,也算了了一个小小的心愿,O(∩_∩)O哈哈~
以后继续加油吧,写更好的文章。拜拜~


 1万+
1万+


 被折叠的 条评论
为什么被折叠?
被折叠的 条评论
为什么被折叠?
 到【灌水乐园】发言


