


 本文详细介绍了如何在服务器上设置固定IP、安装SSL证书、使用Certbot获取LetsEncrypt证书,以及通过Docker部署和配置Derp服务,同时涉及Tailscale的Accesscontrols设置。
一、安装需求
1. 需要一台固定ip服务器和域名,把域名解析到服务器,然后安装tailscale
2. 在服务器生成SSL证书,证书获取:Let's Encrypt 公益证书 Certbot Instructions | Certbot
2.1 安装snapd,安装certbot需要
sudo apt update
sudo apt install snapd
2.2安装certbot
sudo snap install --classic certbot2.3获取证书,下面方法只针对下面命令有效:域名需要能访问,比如你的域名是example.com,那么它会在域名的根目录生成一个文件,然后能访问,访问地址类似于:http://www.example.com/.well-known/acme-challenge/rSBeoZjsO3JkCGP2IrGZ9T3POjQDml95Uzl2KjBjkuY
sudo certbot certonly --webroot回车后填入域名,填入域名根目录
完成后显示类似下面的页面,在目录中fullchain.pem就是crt,privkey.pem就是key:

3.安装docker服务(小白最好弄个宝塔服务器面板,一键全能部署及管理,方便)
二、安装derp
国内服务商有防火墙的记得开放端口3478,8443,3478需要开放udp协议:
docker run -d \
--name derp \
--restart=always \
-p 0.0.0.0:3478:3478/udp \
-p 0.0.0.0:8443:8443 \
-v /etc/letsencrypt/live/derper.example.com/fullchain.pem:/app/certs/example.com.crt \
-v /etc/letsencrypt/live/derper.example.com/privkey.pem:/app/certs/example.com.key \
-v /var/run/tailscale/tailscaled.sock:/var/run/tailscale/tailscaled.sock \
-e DERP_DOMAIN=derper.example.com \
-e DERP_ADDR=:8443 \
-e DERP_CERT_MODE=manual \
-e DERP_VERIFY_CLIENTS=true \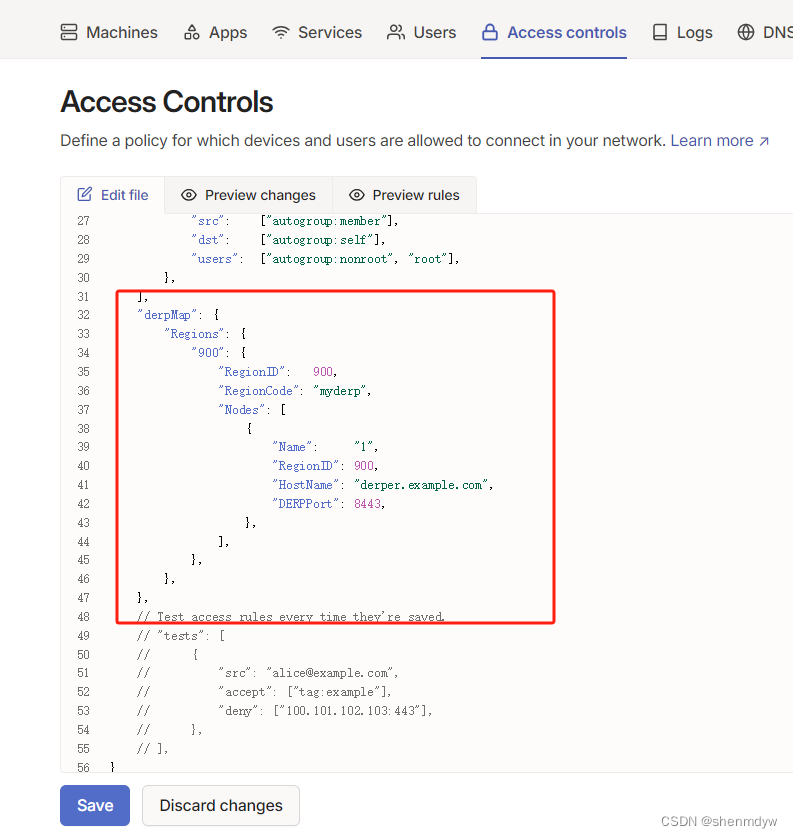
fredliang/derper:latest然后去tailscale Access controls 修改配置,增加下面一项即可:
代码:
// Example/default ACLs for unrestricted connections.
{
	// Declare static groups of users. Use autogroups for all users or users with a specific role.
	// "groups": {
	//  	"group:example": ["alice@example.com", "bob@example.com"],
	// },

	// Define the tags which can be applied to devices and by which users.
	// "tagOwners": {
	//  	"tag:example": ["autogroup:admin"],
	// },

	// Define access control lists for users, groups, autogroups, tags,
	// Tailscale IP addresses, and subnet ranges.
	"acls": [
		// Allow all connections.
		// Comment this section out if you want to define specific restrictions.
		{"action": "accept", "src": ["*"], "dst": ["*:*"]},
	],

	// Define users and devices that can use Tailscale SSH.
	"ssh": [
		// Allow all users to SSH into their own devices in check mode.
		// Comment this section out if you want to define specific restrictions.
		{
			"action": "check",
			"src":    ["autogroup:member"],
			"dst":    ["autogroup:self"],
			"users":  ["autogroup:nonroot", "root"],
		},
	],
	"derpMap": {
		"Regions": {
			"900": {
				"RegionID":   900,
				"RegionCode": "myderp",
				"Nodes": [
					{
						"Name":     "1",
						"RegionID": 900,
						"HostName": "derper.example.com",
						"DERPPort": 8443,
					},
				],
			},
		},
	},
	// Test access rules every time they're saved.
	// "tests": [
	//  	{
	//  		"src": "alice@example.com",
	//  		"accept": ["tag:example"],
	//  		"deny": ["100.101.102.103:443"],
	//  	},
	// ],
}
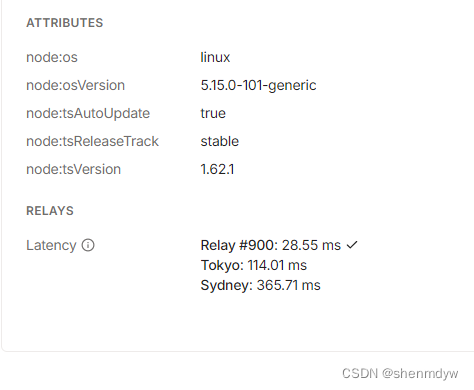
保存后去admin machines 点开服务器查看,有900表示成功了


 3570
3570

 被折叠的 条评论
为什么被折叠?
被折叠的 条评论
为什么被折叠?
 到【灌水乐园】发言


