spring学习笔记(六)springboot 配置

2.4 properties文件配置乱码问题

application.properties

#properties的配置文件默认是utf-8编码的,所以需要编码转换
person.age=19
person.birth=2019/12/12
person.boss=false
person.dog.name=dog
person.dog.age=2
person.last-name=张三
person.maps.v1=kd
person.maps.v2=34

执行测试后

中文乱码解决方法:

再次执行:

2.5 @ConfigrationProperties与@Value的区别

@Component
//@ConfigurationProperties(prefix = "person")
@Data
public class Person {

    /**
     *  <bean class = "person">
     *      <property name= "lastName" value= "字面量/${key}从环境变量、配置文件中获取值/#{SpEl}"</property>
     *  </bean>
     */
    @Value("${person.last-name}")
    private String lastName;
    @Value("#{11*2}")
    private Integer age;
    @Value("false")
    private Boolean boss;
    private Date birth;

    private Map<String, Object> maps;
    private List<Object> list;
    private Dog dog;

}

 运行测试:

比较:

 @ConfigurationProperties@Value
功能批量注入配置文件中的属性

一个个指定 

松散语法支持不支持
SpEl表达式不支持支持
JsR303数据校验支持

不支持  

复杂类型(map,list等)支持不支持

松散语法:属性值多种形式展示:last-name,lastName,last_name(都表示lastName)

JsR303数据校验:

@Component
@ConfigurationProperties(prefix = "person")
@Data
@Validated
public class Person {

    /**
     *  <bean class = "person">
     *      <property name= "lastName" value= "字面量/${key}从环境变量、配置文件中获取值/#{SpEl}"</property>
     *  </bean>
     */
//    @Value("${person.last-name}"
    //birth必须是邮箱格式
    @Email
    private String lastName;

运行测试:

 配置文件yaml还是properties他们都能获取值;

如果说,我们只是在某个业务逻辑中徐娅萍获取一下配置文件中的某项值,使用@Value

如果说,我们专门编写了一个javaBean来和配置文件进行映射,我们就直接使用@ConfigurationProperties;

package com.atguigu.springboot.controller;

import org.springframework.beans.factory.annotation.Value;
import org.springframework.stereotype.Controller;
import org.springframework.web.bind.annotation.RequestMapping;
import org.springframework.web.bind.annotation.ResponseBody;
import org.springframework.web.bind.annotation.RestController;

@RestController
public class HelloController {

    @Value("${person.last-name}")
    String name;


    @RequestMapping("/sayHello")
    public String sayHello() {
        return "Hello," + name;
    }

}

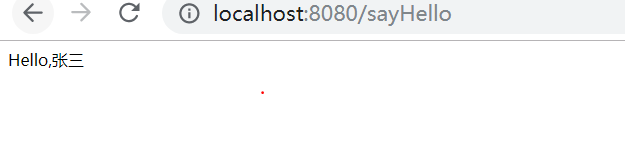
重启spring后访问http://localhost:8080/sayHello

  • 0
    点赞
  • 0
    收藏
    觉得还不错? 一键收藏
  • 0
    评论
Spring Boot 是一个快速开发框架,它提供了一系列的工具和插件,可以快速构建一个企业级的应用程序。而 Shiro 是一个强大而灵活的安全框架,可以提供身份验证、授权、密码加密、会话管理等功能。CAS 是一个单点登录(SSO)协议,可以实现用户在多个应用系统中使用同一个身份验证。 下面是一个简单的 Spring Boot + Shiro + CAS 的示例应用程序: 1. 创建一个 Spring Boot 应用程序,并添加依赖: ```xml <dependency> <groupId>org.springframework.boot</groupId> <artifactId>spring-boot-starter-web</artifactId> </dependency> <dependency> <groupId>org.apache.shiro</groupId> <artifactId>shiro-spring-boot-web-starter</artifactId> <version>1.5.3</version> </dependency> <dependency> <groupId>org.jasig.cas.client</groupId> <artifactId>cas-client-core</artifactId> <version>3.6.0</version> </dependency> ``` 2. 配置 Shiro: ```java @Configuration public class ShiroConfig { @Bean public CasRealm casRealm() { CasRealm realm = new CasRealm(); realm.setCasServerUrlPrefix("https://cas.example.com/cas"); realm.setCasService("https://myapp.example.com/cas"); realm.setDefaultRoles("user"); realm.setRoleAttributeNames("memberOf"); return realm; } @Bean public DefaultWebSecurityManager securityManager() { DefaultWebSecurityManager manager = new DefaultWebSecurityManager(); manager.setRealm(casRealm()); return manager; } @Bean public ShiroFilterFactoryBean shiroFilter() { ShiroFilterFactoryBean filter = new ShiroFilterFactoryBean(); filter.setSecurityManager(securityManager()); filter.setLoginUrl("https://cas.example.com/cas/login?service=https://myapp.example.com/cas"); filter.setSuccessUrl("/home"); filter.setUnauthorizedUrl("/403"); filter.setFilterChainDefinitionMap(Collections.singletonMap("/**", "authc")); return filter; } } ``` 3. 配置 CAS: ```java @Configuration public class CasConfig { @Bean public CasAuthenticationFilter casAuthenticationFilter() { CasAuthenticationFilter filter = new CasAuthenticationFilter(); filter.setCasServerLoginUrl("https://cas.example.com/cas/login"); filter.setServerName("https://myapp.example.com/cas"); filter.setAuthenticationSuccessHandler(authenticationSuccessHandler()); filter.setAuthenticationFailureHandler(authenticationFailureHandler()); return filter; } @Bean public SimpleUrlAuthenticationSuccessHandler authenticationSuccessHandler() { SimpleUrlAuthenticationSuccessHandler handler = new SimpleUrlAuthenticationSuccessHandler(); handler.setDefaultTargetUrl("/home"); handler.setAlwaysUseDefaultTargetUrl(true); return handler; } @Bean public SimpleUrlAuthenticationFailureHandler authenticationFailureHandler() { SimpleUrlAuthenticationFailureHandler handler = new SimpleUrlAuthenticationFailureHandler(); handler.setDefaultFailureUrl("/login?error=true"); return handler; } @Bean public FilterRegistrationBean<CasAuthenticationFilter> casFilterRegistrationBean() { FilterRegistrationBean<CasAuthenticationFilter> registration = new FilterRegistrationBean<>(); registration.setFilter(casAuthenticationFilter()); registration.addUrlPatterns("/*"); registration.setName("CAS Authentication Filter"); registration.setOrder(1); return registration; } @Bean public ServletListenerRegistrationBean<SingleSignOutHttpSessionListener> singleSignOutHttpSessionListener() { ServletListenerRegistrationBean<SingleSignOutHttpSessionListener> registration = new ServletListenerRegistrationBean<>(); registration.setListener(new SingleSignOutHttpSessionListener()); registration.setOrder(2); return registration; } @Bean public ServletRegistrationBean<Servlet> casValidationServletRegistrationBean() { ServletRegistrationBean<Servlet> registration = new ServletRegistrationBean<>(); registration.setServlet(new Cas20ProxyReceivingTicketValidationFilter()); registration.addUrlMappings("/cas/*"); registration.setName("CAS Validation Filter"); registration.setOrder(3); return registration; } } ``` 4. 创建一个 HomeController: ```java @Controller public class HomeController { @GetMapping("/home") public String home() { return "home"; } @GetMapping("/403") public String error403() { return "403"; } } ``` 5. 创建一个 CAS 认证服务器: ```java @SpringBootApplication public class CasServerApplication { public static void main(String[] args) { SpringApplication.run(CasServerApplication.class, args); } } ``` 6. 创建一个 CAS 客户端: ```java @SpringBootApplication @EnableScheduling public class CasClientApplication { public static void main(String[] args) { SpringApplication.run(CasClientApplication.class, args); } } ``` 这就是一个简单的 Spring Boot + Shiro + CAS 的示例应用程序。

“相关推荐”对你有帮助么?

  • 非常没帮助
  • 没帮助
  • 一般
  • 有帮助
  • 非常有帮助
提交
评论
添加红包

请填写红包祝福语或标题

红包个数最小为10个

红包金额最低5元

当前余额3.43前往充值 >
需支付:10.00
成就一亿技术人!
领取后你会自动成为博主和红包主的粉丝 规则
hope_wisdom
发出的红包
实付
使用余额支付
点击重新获取
扫码支付
钱包余额 0

抵扣说明:

1.余额是钱包充值的虚拟货币,按照1:1的比例进行支付金额的抵扣。
2.余额无法直接购买下载,可以购买VIP、付费专栏及课程。

余额充值