


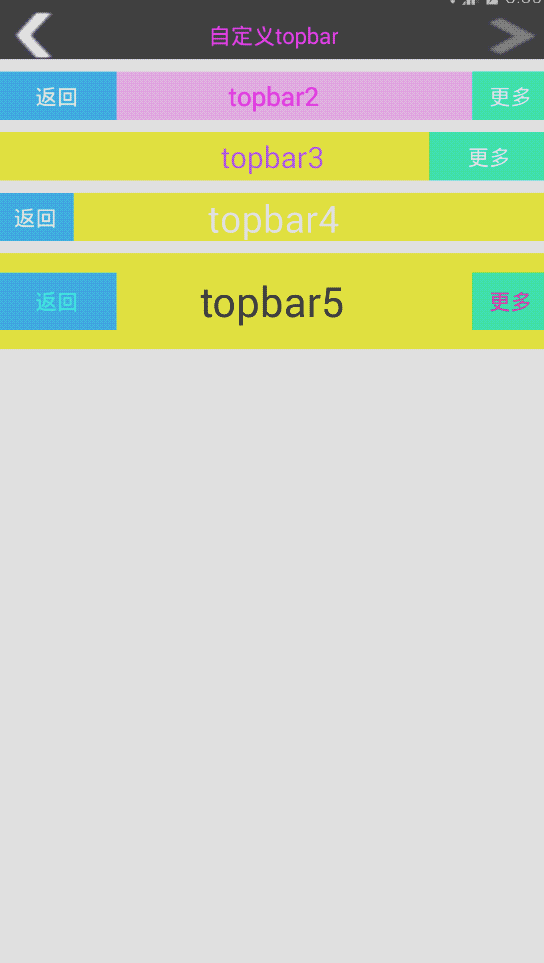
效果图:
1、定义自己的属性文件attrs.xml
2、自定义view,将自定义的属性和view绑定起来
3、使用接口实现点击事件的回调
4、实现按钮的隐藏和显示方法
代码:
1、定义自己的属性文件attrs.xml
attrs.xml :
<?xml version="1.0" encoding="utf-8"?>
<resources>
    <declare-styleable name="TopBar">

        <attr name="titleText" format="string" />
        <attr name="titleTextSize" format="dimension" />
        <attr name="titleColor" format="color" />

        <attr name="leftTextColor" format="color" />
        <attr name="leftBackground" format="reference|color" />
        <attr name="leftText" format="string" />
        <attr name="leftheight" format="dimension" />
        <attr name="leftwidth" format="dimension" />

        <attr name="rightTextColor" format="color" />
        <attr name="rightBackground" format="reference|color" />
        <attr name="rightText" format="string" />
        <attr name="rightheight" format="dimension" />
        <attr name="rightwidth" format="dimension" />
    </declare-styleable>
</resources>
2、自定义view,将自定义的属性和view绑定起来
TopBar.java:
package com.example.eventbus.customtopbar;

import android.annotation.TargetApi;
import android.content.Context;
import android.content.res.TypedArray;
import android.graphics.drawable.Drawable;
import android.os.Build;
import android.util.AttributeSet;
import android.view.Gravity;
import android.view.View;
import android.widget.Button;
import android.widget.RelativeLayout;
import android.widget.TextView;

/**
 * Created by LHD on 2016/5/31.
 */
public class TopBar extends RelativeLayout {

    private int mLeftTextColor;
    private int mRightTextColor;
    private Drawable mLeftBackground;
    private Drawable mRightBackground;
    private String mLeftText;
    private String mRightText;

    private float mLeftHeight;
    private float mLeftWidth;
    private float mRightHeight;
    private float mRightWidth;

    private float mTitleTextSize;
    private int mTitleTextColor;
    private String mTitle;

    private Button mLeftButton;
    private Button mRightButton;
    private TextView mTitleView;

    private LayoutParams mLeftParams;
    private LayoutParams mRightParams;
    private LayoutParams mTitleParams;

    private topbarClickListener mListener;

    @TargetApi(Build.VERSION_CODES.JELLY_BEAN)
    public TopBar(Context context, AttributeSet attrs) {
        super(context, attrs);
        //将attr.xml中定义的declare-styleable的所有属性的值存储到TypedArray中
        TypedArray ta = context.obtainStyledAttributes(attrs, R.styleable.TopBar);
        //从TypedArray中取出对应的值来为要设置的属性赋值
        mLeftText = ta.getString(R.styleable.TopBar_leftText);
        mLeftTextColor = ta.getColor(R.styleable.TopBar_leftTextColor, 0);
        mLeftBackground = ta.getDrawable(R.styleable.TopBar_leftBackground);
        mLeftHeight = ta.getDimension(R.styleable.TopBar_leftheight, 0);
        mLeftWidth = ta.getDimension(R.styleable.TopBar_leftwidth, 0);

        mRightHeight = ta.getDimension(R.styleable.TopBar_rightheight, 0);
        mRightWidth = ta.getDimension(R.styleable.TopBar_rightwidth, 0);
        mRightText = ta.getString(R.styleable.TopBar_rightText);
        mRightTextColor = ta.getColor(R.styleable.TopBar_rightTextColor, 0);
        mRightBackground = ta.getDrawable(R.styleable.TopBar_rightBackground);

        mTitleTextSize = ta.getDimension(R.styleable.TopBar_titleTextSize, 10);
        mTitleTextColor = ta.getColor(R.styleable.TopBar_titleColor, 0);
        mTitle = ta.getString(R.styleable.TopBar_titleText);
        //获取完TypeArray的值后,一般要调用recyle方法来避免重新创建的时候的错误
        //资源回收
        ta.recycle();

        mLeftButton = new Button(context);
        mRightButton = new Button(context);
        mTitleView = new TextView(context);
        //为创建的组件元素赋值,值就来源于我们在引用的xml文件中给对应属性的赋值
        mLeftButton.setTextColor(mLeftTextColor);
        mLeftButton.setBackground(mLeftBackground);
        mLeftButton.setText(mLeftText);
        mLeftButton.setHeight((int) mLeftHeight);
        mLeftButton.setWidth((int) mLeftWidth);

        mRightButton.setHeight((int) mRightHeight);
        mRightButton.setWidth((int) mRightWidth);
        mRightButton.setTextColor(mRightTextColor);
        mRightButton.setBackground(mRightBackground);

        mRightButton.setText(mRightText);

        mTitleView.setText(mTitle);
        mTitleView.setTextColor(mTitleTextColor);
        mTitleView.setTextSize(mTitleTextSize);
        mTitleView.setGravity(Gravity.CENTER);

        //为组建元素设置相应的布局元素
        mLeftParams = new LayoutParams(LayoutParams.WRAP_CONTENT,
                LayoutParams.WRAP_CONTENT);
        mLeftParams.addRule(RelativeLayout.ALIGN_PARENT_LEFT, TRUE);
        mLeftParams.addRule(RelativeLayout.CENTER_VERTICAL, TRUE);
        //添加到ViewGroup
        addView(mLeftButton, mLeftParams);

        mRightParams = new LayoutParams(LayoutParams.WRAP_CONTENT,
                LayoutParams.WRAP_CONTENT);
        mRightParams.addRule(RelativeLayout.ALIGN_PARENT_RIGHT, TRUE);
        mRightParams.addRule(RelativeLayout.CENTER_VERTICAL, TRUE);
        addView(mRightButton, mRightParams);

        mTitleParams = new LayoutParams(LayoutParams.WRAP_CONTENT, LayoutParams.MATCH_PARENT);
        mTitleParams.addRule(RelativeLayout.CENTER_IN_PARENT, TRUE);
        mTitleParams.addRule(RelativeLayout.CENTER_VERTICAL, TRUE);
        addView(mTitleView, mTitleParams);

        mLeftButton.setOnClickListener(new OnClickListener() {
            @Override
            public void onClick(View v) {
                if (mListener!=null){
                    mListener.leftClick();
                }
            }
        });
        mRightButton.setOnClickListener(new OnClickListener() {
            @Override
            public void onClick(View v) {
                if (mListener!=null){
                    mListener.rightClick();
                }
            }
        });

    }

    public void setOnTopbarClickListener(topbarClickListener mListener) {
        this.mListener = mListener;
    }

    public void setButtonVisable(int id, boolean flag) {
        if (flag) {
            if (id == 0) {
                mLeftButton.setVisibility(View.VISIBLE);
            } else {
                mRightButton.setVisibility(View.VISIBLE);
            }
        } else {
            if (id == 0) {
                mLeftButton.setVisibility(View.GONE);
            } else {
                mRightButton.setVisibility(View.GONE);
            }
        }
    }


}
3、使用接口实现点击事件的回调
定义 topbarClickListener.java:
package com.example.eventbus.customtopbar;

/**
 * Created by LHD on 2016/5/31.
 */
public interface topbarClickListener {
    //左按钮点击事件
    void leftClick();

    //右按钮点击事件
    void rightClick();
}
在TopBar.java里:
1、声明一个接口对象
private topbarClickListener mListener;
2、将接口对象传递到点击事件里
 mLeftButton.setOnClickListener(new OnClickListener() {
            @Override
            public void onClick(View v) {
                if (mListener!=null){
                    mListener.leftClick();
                }
            }
        });
        mRightButton.setOnClickListener(new OnClickListener() {
            @Override
            public void onClick(View v) {
                if (mListener!=null){
                    mListener.rightClick();
                }
            }
        });
3、实现自定义view的点击事件监听方法:
public void setOnTopbarClickListener(topbarClickListener mListener) {
        this.mListener = mListener;
    }
4、实现按钮的隐藏和显示方法
根据id和flag决定左边和右边的按钮的隐藏和显示
id = 0代表左边的按钮 id = 1代表右边的按钮
flag = true代表显示 flag= false代表隐藏
 public void setButtonVisable(int id, boolean flag) {
        if (flag) {
            if (id == 0) {
                mLeftButton.setVisibility(View.VISIBLE);
            } else {
                mRightButton.setVisibility(View.VISIBLE);
            }
        } else {
            if (id == 0) {
                mLeftButton.setVisibility(View.GONE);
            } else {
                mRightButton.setVisibility(View.GONE);
            }
        }
    }
布局文件:
activity_main.xml:
<?xml version="1.0" encoding="utf-8"?>
<LinearLayout xmlns:android="http://schemas.android.com/apk/res/android"
    xmlns:app="http://schemas.android.com/apk/res-auto"
    android:layout_width="match_parent"
    android:layout_height="match_parent"
    android:orientation="vertical"
    android:background="#fff">

    <com.example.eventbus.customtopbar.TopBar
        android:id="@+id/mytopbar"
        android:layout_width="match_parent"
        android:layout_height="40dp"
        android:background="#323040"

        app:leftBackground="@drawable/back"
        app:leftTextColor="#fff"

        app:rightBackground="@drawable/triangle"
        app:rightTextColor="#fff"


        app:titleColor="#f0f"
        app:titleText="自定义topbar"
        app:titleTextSize="12sp">

    </com.example.eventbus.customtopbar.TopBar>

    <com.example.eventbus.customtopbar.TopBar
        android:id="@+id/mytopbar2"
        android:layout_width="match_parent"
        android:layout_height="40dp"
        android:layout_below="@id/mytopbar"
        android:layout_marginTop="10dp"
        android:background="#faf"

        app:leftBackground="#3af"
        app:leftText="返回"
        app:leftTextColor="#fff"
        app:leftwidth="100dp"
        app:leftheight="40dp"

        app:rightBackground="#0fa"
        app:rightText="更多"
        app:rightTextColor="#fff"

        app:titleColor="#f0f"
        app:titleText="topbar2"
        app:titleTextSize="14sp">

    </com.example.eventbus.customtopbar.TopBar>

    <com.example.eventbus.customtopbar.TopBar
        android:id="@+id/mytopbar3"
        android:layout_width="match_parent"
        android:layout_height="40dp"
        android:layout_below="@id/mytopbar2"
        android:layout_marginTop="10dp"
        android:background="#ff0"

        app:leftBackground="#3af"
        app:leftText="返回"
        app:leftTextColor="#fff"

        app:rightBackground="#0fa"
        app:rightText="更多"
        app:rightTextColor="#fff"
        app:rightheight="40dp"
        app:rightwidth="100dp"

        app:titleColor="#a5f"
        app:titleText="topbar3"
        app:titleTextSize="16sp">

    </com.example.eventbus.customtopbar.TopBar>

    <com.example.eventbus.customtopbar.TopBar
        android:id="@+id/mytopbar4"

        android:layout_width="match_parent"
        android:layout_height="40dp"
        android:layout_below="@id/mytopbar2"
        android:layout_marginTop="10dp"
        android:background="#ff0"

        app:leftBackground="#3af"
        app:leftText="返回"
        app:leftTextColor="#fff"

        app:rightBackground="#0fa"
        app:rightText="更多"
        app:rightTextColor="#fff"
        app:rightheight="40dp"
        app:rightwidth="100dp"

        app:titleColor="#fff"
        app:titleText="topbar4"
        app:titleTextSize="20sp">

    </com.example.eventbus.customtopbar.TopBar>
    <com.example.eventbus.customtopbar.TopBar
        android:id="@+id/mytopbar5"
        android:layout_width="match_parent"
        android:layout_height="80dp"
        android:layout_below="@id/mytopbar2"
        android:layout_marginTop="10dp"
        android:background="#ff0"

        app:leftBackground="#3af"
        app:leftText="返回"
        app:leftTextColor="#4ff"
        app:leftheight="40dp"
        app:leftwidth="100dp"

        app:rightBackground="#0fa"
        app:rightText="更多"
        app:rightTextColor="#f0a"
        app:rightheight="40dp"
        app:rightwidth="40dp"

        app:titleColor="#000"
        app:titleText="topbar5"
        app:titleTextSize="22sp">

    </com.example.eventbus.customtopbar.TopBar>


</LinearLayout>
MainActivity.java:
package com.example.eventbus.customtopbar;

import android.os.Bundle;
import android.support.v7.app.AppCompatActivity;
import android.widget.Toast;

public class MainActivity extends AppCompatActivity{

    private TopBar topBar1;
    private TopBar topBar2;
    private TopBar topBar3;
    private TopBar topBar4;
    private TopBar topBar5;

    @Override
    protected void onCreate(Bundle savedInstanceState) {
        super.onCreate(savedInstanceState);
        setContentView(R.layout.activity_main);
        init();
    }

    private void init() {
        topBar1 = (TopBar) findViewById(R.id.mytopbar);
        topBar2 = (TopBar) findViewById(R.id.mytopbar2);
        topBar3 = (TopBar) findViewById(R.id.mytopbar3);
        topBar4 = (TopBar) findViewById(R.id.mytopbar4);
        topBar5 = (TopBar) findViewById(R.id.mytopbar5);

        //注意不要使用topBar1.setOnClickListener(this);+switch case的写法,不然会报错,
        //而是应该直接使用自定义的setOnTopbarClickListener来实现点击事件
        topBar1.setOnTopbarClickListener(new topbarClickListener() {
            @Override
            public void leftClick() {
                Toast.makeText(MainActivity.this, "点击了返回1", Toast.LENGTH_SHORT).show();
            }

            @Override
            public void rightClick() {
                Toast.makeText(MainActivity.this, "点击了更多1", Toast.LENGTH_SHORT).show();
            }
        });
        topBar2.setOnTopbarClickListener(new topbarClickListener() {
            @Override
            public void leftClick() {
                Toast.makeText(MainActivity.this, "点击了返回2", Toast.LENGTH_SHORT).show();
            }

            @Override
            public void rightClick() {
                Toast.makeText(MainActivity.this, "点击了更多2", Toast.LENGTH_SHORT).show();
            }
        });
        topBar3.setOnTopbarClickListener(new topbarClickListener() {
            @Override
            public void leftClick() {
                Toast.makeText(MainActivity.this, "点击了返回3", Toast.LENGTH_SHORT).show();
            }

            @Override
            public void rightClick() {
                Toast.makeText(MainActivity.this, "点击了更多3", Toast.LENGTH_SHORT).show();
            }
        });
        topBar4.setOnTopbarClickListener(new topbarClickListener() {
            @Override
            public void leftClick() {
                Toast.makeText(MainActivity.this, "点击了返回4", Toast.LENGTH_SHORT).show();
            }

            @Override
            public void rightClick() {
                Toast.makeText(MainActivity.this, "点击了更多4", Toast.LENGTH_SHORT).show();
            }
        });
        topBar5.setOnTopbarClickListener(new topbarClickListener() {
            @Override
            public void leftClick() {
                Toast.makeText(MainActivity.this, "点击了返回5", Toast.LENGTH_SHORT).show();
            }

            @Override
            public void rightClick() {
                Toast.makeText(MainActivity.this, "点击了更多5", Toast.LENGTH_SHORT).show();
            }
        });

        topBar3.setButtonVisable(0, false);
        topBar4.setButtonVisable(1,false);
    }
}


 62
62

 被折叠的 条评论
为什么被折叠?
被折叠的 条评论
为什么被折叠?
 到【灌水乐园】发言


