


1,创建自己Bittray账号
如果你在https://bintray.com/signup这个网站上注册的账号那就尴尬了。

这个是以组织的名义注册的。是要求付费激活的,我一个不小心申请了一个,给你们看看。

个人注册的地址是:https://bintray.com/signup/oss
长这样的:

注册好像不能用QQ和163邮箱,反正我是没有注册成功的,最后我用了gmail邮箱。
个人账号登录进去之后是这样的,没有那个激活倒计时。

2,项目中引入bintray-release
a,在项目的build.gradle中加入
dependencies {
        classpath 'com.android.tools.build:gradle:2.3.0'
        //引入bintray-release
        classpath 'com.novoda:bintray-release:0.3.4'
        // NOTE: Do not place your application dependencies here; they belong
        // in the individual module build.gradle files
}apply plugin: 'com.novoda.bintray-release'//添加
publish{
repoName = 'TestMaven'//不指明,默认是上传到maven
userOrg = 'siyer-wu' //bintray 账户名
groupId = 'com.siyer.test'//jcenter上的路径
artifactId = 'testJCenter'//项目名称
publishVersion = '1.0'//版本号
desc = "这是一个测试的项目jar"
}3,在JCenter中创建仓库和包
创建仓库:
创建之后我这里有2个仓库了


仓库的Name可以写maven(上传的时候不指定的话默认仓库名是maven),也可以不写maven我这就创建了一个不是maven,Type我选择maven,Licenses我选择的是Apache-2.
创建包:

需要注意的是这里的Name要和我们Project中配置的artifactId 一致,否则会上传失败。
4,上传Module
在Termainal执行命令
gradlew clean build bintrayUpload -PbintrayUser=BINTRAY_USERNAME -PbintrayKey=BINTRAY_KEY -PdryRun=false在JCenter查看自己的APIKEY:

如果你按照上面的做,应该能上传成功了。

然后进入JCenter页面看看我们刚上传的Library。

在TestMaven中真的有诶。
好了大功告成,但是你在JCenter中根本引用不了,但是也不是不可用。你可以这么引用它:
在工程的builde.gradle中加入:
allprojects {
    repositories {
        jcenter()
        //加入
        maven { url 'https://dl.bintray.com/siyer-wu/TestMaven' }
}ependencies {
compile fileTree(dir: 'libs', include: ['*.jar'])
compile 'com.android.support:appcompat-v7:23.4.0'
compile 'com.android.support.constraint:constraint-layout:+'
compile 'com.android.support:design:23.4.0'
//加入
compile 'com.siyer.test:testJCenter:1.0'
testCompile 'junit:junit:4.12'
testCompile 'org.robolectric:robolectric:3.3.2'
}那如果想直接在JCenter中引用就好了,不需要自己定义Maven仓库地址,直接compile就可以。
进入上传Lib的详细信息页面:

直接提交申请就可以了,然后就是等消息了。JCenter会通过右上角的小邮箱提示你结果。
有个细节:
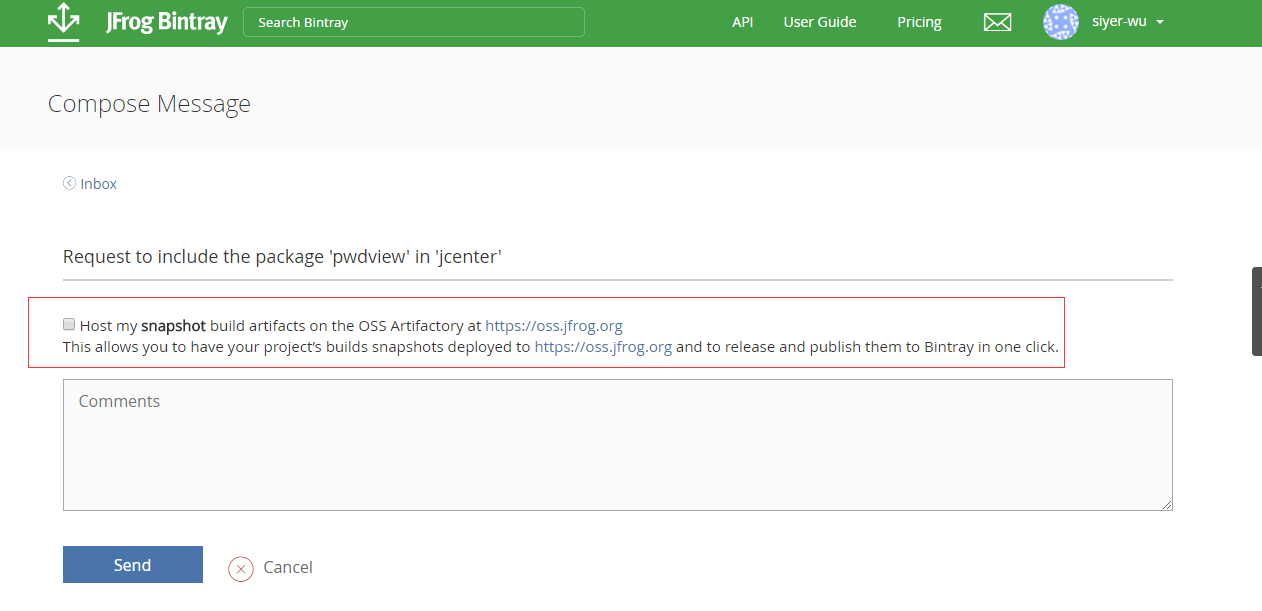
红框框的地方。
jcenter是不提供snapshot版本发布的,如果需要托管snapshot版本,需要在申请时勾上“Host my snapshot build artifacts on the OSS Artifactory
at”的选项,这样审核通过后,可以使用bintray的账号登陆https://oss.jfrog.org,并且可以将snapshot版本托管到jfrog。
什么是snapshot版本,查看这里
realse版本和snapshot版本选择:查看这里
5,遇到的坑
* What went wrong:
Execution failed for task ':payecoPayPlugin:mavenAndroidJavadocs'.
> Javadoc generation failed. Generated Javadoc options file (useful for troubleshooting): 'E:\Users\Siy\testASWorkSpace\MyApplication\payecoPayPlugin\build\tmp
\mavenAndroidJavadocs\javadoc.options'
这个错误是JavaDoc错误,有可能是中文问题也有可能是不识别的javaDoc标签,这两个问题我都遇到了。
如果是中文问题在root的Gradle加入:
allprojects {
      tasks.withType(Javadoc) {
        options{
            encoding "UTF-8"
            charSet 'UTF-8'
            links "http://docs.oracle.com/javase/7/docs/api"
        }
    }
}
* What went wrong:
Execution failed for task ':payecoPayPlugin:bintrayUpload'.
> org.apache.http.conn.HttpHostConnectException: Connection to https://api.bintray.com refused* What went wrong:
Execution failed for task ':payecoPayPlugin:bintrayUpload'.
> Could not create package 'siyer-wu/maven/testJCentr': HTTP/1.1 400 Bad Request [message:Please enter a valid VCS URL for your OSS package.]这个问题是没有在仓库下面创建package.
另一种方法:查看这里
官方的方法:查看这里


 2504
2504

 被折叠的 条评论
为什么被折叠?
被折叠的 条评论
为什么被折叠?
 到【灌水乐园】发言


