


提示:文章写完后,目录可以自动生成,如何生成可参考右边的帮助文档
文章目录
前言
openstack使用cloud-init的userdata插件满足新建windows10云主机自动挂载nfs且重启不丢失的业务需求
详细讲一个这个需求,就是openstack新建windows10云主机时,这个新的云主机能自动挂载特定配置的nfs盘到机器上,同时挂载两个,一个是公共盘,一个是私有盘。类似于把nfs当一个自动登陆的网盘一样。
一、技术方案
主要方案就是cloud-init的userdata+windows的注册表+powershell
二、步骤
1.脚本获取
这个mount脚本是阿里云的脚本改的
原有脚本地址:https://help.aliyun.com/zh/ens/mount-an-nfs-file-system-on-a-windows-ens-instance
修改的部分是将开机自启动的run的注册表从HKCU改成了HKLM
#ps1_sysnative
[CmdletBinding()]
Param(
#挂载点
[string]$url="100.125.255.100\test",
#挂载Windows盘符
[string]$drive="M"
)
#获取当前执行时间
$now = Get-Date
#指定log文件的场所 当前执行目录
$logPath="C:\"
#设定log文件名
$logName = "executLog"
$logFileName= $logName + "_" + $now.ToString("yyyy-MM-dd")+".log"
$logInfo = $now.ToString("yyyy-MM-dd HH:mm:ss.fff") + " "
#log 全路径设定
$logPathFile = Join-Path $logPath $logFileName
Write-Output ($logInfo+"挂载路径:"+$url+" 挂载盘符:"+$drive)
Write-Output ($logInfo+"挂载路径:"+$url+" 挂载盘符:"+$drive) | Out-File -FilePath $logPathFile -Encoding default -Append
$nfs=Get-WindowsOptionalFeature -Online -FeatureName  NFS-Administration
if($nfs.installed){
$nas_start = (Get-Item HKLM:\Software\Microsoft\Windows\CurrentVersion\Run).GetValueNames().Contains("nas_run")
Write-Output ($logInfo+":开机自启动>>"+$nas_start)
Write-Output ($logInfo+":开机自启动>>"+$nas_start) | Out-File -FilePath $logPathFile -Encoding default -Append
if(!$nas_start){
Write-Output ($logInfo+":设置开机自启动")
Write-Output ($logInfo+":设置开机自启动") | Out-File -FilePath $logPathFile -Encoding default -Append
$nas_script_path = $myinvocation.mycommand.definition
$run_script = "powershell -file "+ $nas_script_path +" -url "+ $url +" -drive "+ $drive
$nas_run = "nas_run"
$nas_run_result = New-ItemProperty -Path "HKLM:\Software\Microsoft\Windows\CurrentVersion\Run" -Name $nas_run  -PropertyType String -Value $run_script -ErrorAction Continue -ErrorVariable run_err_msg
if($err_msg){
Write-Output ($logInfo +"设置开机自启动返回结果失败:" +$run_err_msg)
Write-Output ($logInfo +"设置开机自启动返回结果失败:" +$run_err_msg) | Out-File -FilePath $logPathFile -Encoding default -Append
}else{
Write-Output ($logInfo +"设置开机自启动完成:" +$nas_run_result)
Write-Output ($logInfo +"设置开机自启动完成:" +$nas_run_result) | Out-File -FilePath $logPathFile -Encoding default -Append
}
}
Write-Output ($logInfo+"已存在nfs-client,挂载nfs挂载点")
Write-Output ($logInfo+"已存在nfs-client,挂载nfs挂载点") | Out-File -FilePath $logPathFile -Encoding default -Append
$nfs_url = "mount -o  nolock -o  mtype=hard -o  timeout=60 \\$url ${drive}:"
Write-Output ($logInfo + ":开始挂载nas "+$nfs_url)
Write-Output ($logInfo + ":开始挂载nas "+$nfs_url) | Out-File -FilePath $logPathFile -Encoding default -Append
$reslut = cmd /c $nfs_url
Write-Output ($logInfo+$reslut)
Write-Output ($logInfo+$reslut) | Out-File -FilePath $logPathFile -Encoding default -Append
}else{
Write-Output ($logInfo +":没有安装nfs-client,进行安装&注册表配置 运行完成请重启")
Write-Output ($logInfo +":没有安装nfs-client,进行安装&注册表配置 运行完成请重启") | Out-File -FilePath $logPathFile -Encoding default -Append
Enable-WindowsOptionalFeature -Online -FeatureName  NFS-Administration
$lock_path = Test-Path HKLM:\SOFTWARE\Microsoft\ClientForNFS\CurrentVersion\Users\Default\Mount
if($lock_path){
$lock = (Get-Item HKLM:\SOFTWARE\Microsoft\ClientForNFS\CurrentVersion\Users\Default\Mount).GetValueNames().Contains("Locking")
if(!$lock){
$lock_result = New-ItemProperty  -Path "HKLM:\SOFTWARE\Microsoft\ClientForNFS\CurrentVersion\Users\Default\Mount" -Name "Locking" -PropertyType DWord -Value 1 -ErrorAction Continue -ErrorVariable err_msg
if($err_msg){
Write-Output ($logInfo +"注册表配置完成返回结果失败:" +$err_msg)
Write-Output ($logInfo +"注册表配置完成返回结果失败:" +$err_msg) | Out-File -FilePath $logPathFile -Encoding default -Append
}else{
Write-Output ($logInfo +"注册表配置完成返回结果为:" +$lock_result)
Write-Output ($logInfo +"注册表配置完成返回结果为:" +$lock_result) | Out-File -FilePath $logPathFile -Encoding default -Append
}
}
}else{
Write-Output "不存在注册表HKEY_LOCAL_MACHINE\SOFTWARE\Microsoft\ClientForNFS\CurrentVersion\Users\Default\Mount项请自行生成"
Write-Output "不存在注册表HKEY_LOCAL_MACHINE\SOFTWARE\Microsoft\ClientForNFS\CurrentVersion\Users\Default\Mount项请自行生成" | Out-File -FilePath $logPathFile -Encoding default -Append
}


$id_path = Test-Path HKLM:\SOFTWARE\Microsoft\ClientForNFS\CurrentVersion\Default
if ($id_path){
$gid = (Get-Item HKLM:\SOFTWARE\Microsoft\ClientForNFS\CurrentVersion\Default).GetValueNames().Contains("AnonymousGID")
$uid = (Get-Item HKLM:\SOFTWARE\Microsoft\ClientForNFS\CurrentVersion\Default).GetValueNames().Contains("AnonymousUID")
if (!$gid){
$gid_result = New-ItemProperty -Path "HKLM:\SOFTWARE\Microsoft\ClientForNFS\CurrentVersion\Default" -Name "AnonymousGID" -PropertyType DWord -Value 0   -ErrorAction Continue -ErrorVariable gid_err_msg
if($gid_err_msg){
Write-Output ($logInfo +"注册表配置完成返回结果失败:" +$gid_err_msg)
Write-Output ($logInfo +"注册表配置完成返回结果失败:" +$gid_err_msg) | Out-File -FilePath $logPathFile -Encoding default -Append
}else{
Write-Output ($logInfo +"注册表配置完成返回结果为:" +$gid_result)
Write-Output ($logInfo +"注册表配置完成返回结果为:" +$gid_result) | Out-File -FilePath $logPathFile -Encoding default -Append
}
}
if (!$uid){
$uid_result = New-ItemProperty -Path "HKLM:\SOFTWARE\Microsoft\ClientForNFS\CurrentVersion\Default" -Name "AnonymousUID" -PropertyType DWord -Value 0  -ErrorAction Continue -ErrorVariable uid_err_msg
if($uid_err_msg){
Write-Output ($logInfo +"注册表配置完成返回结果失败:" +$uid_err_msg)
Write-Output ($logInfo +"注册表配置完成返回结果失败:" +$uid_err_msg) | Out-File -FilePath $logPathFile -Encoding default -Append
}else{
Write-Output ($logInfo +"注册表配置完成返回结果为:" +$uid_result)
Write-Output ($logInfo +"注册表配置完成返回结果为:" +$uid_result) | Out-File -FilePath $logPathFile -Encoding default -Append
}
}
}else{
Write-Output ($logInfo +"不存在注册表HKEY_LOCAL_MACHINE\SOFTWARE\Microsoft\ClientForNFS\CurrentVersion\Default项请自行生成")
Write-Output ($logInfo +"不存在注册表HKEY_LOCAL_MACHINE\SOFTWARE\Microsoft\ClientForNFS\CurrentVersion\Default项请自行生成") | Out-File -FilePath $logPathFile -Encoding default -Append
}
$nas_start = (Get-Item HKLM:\Software\Microsoft\Windows\CurrentVersion\Run).GetValueNames().Contains("nas_run")
Write-Output ($logInfo+":开机自启动>>"+$nas_start)
Write-Output ($logInfo+":开机自启动>>"+$nas_start) | Out-File -FilePath $logPathFile -Encoding default -Append
if(!$nas_start){
Write-Output ($logInfo+":设置开机自启动")
Write-Output ($logInfo+":设置开机自启动") | Out-File -FilePath $logPathFile -Encoding default -Append
$nas_script_path = $myinvocation.mycommand.definition
$run_script = "powershell -file "+ $nas_script_path +" -url "+ $url +" -drive "+ $drive
$nas_run = "nas_run"
$nas_run_result = New-ItemProperty -Path "HKLM:\Software\Microsoft\Windows\CurrentVersion\Run" -Name $nas_run  -PropertyType String -Value $run_script -ErrorAction Continue -ErrorVariable run_err_msg
if($err_msg){
Write-Output ($logInfo +"设置开机自启动返回结果失败:" +$run_err_msg)
Write-Output ($logInfo +"设置开机自启动返回结果失败:" +$run_err_msg) | Out-File -FilePath $logPathFile -Encoding default -Append
}else{
Write-Output ($logInfo +"设置开机自启动完成:" +$nas_run_result)
Write-Output ($logInfo +"设置开机自启动完成:" +$nas_run_result) | Out-File -FilePath $logPathFile -Encoding default -Append
}
}
$nfs_url = "mount -o  nolock -o  mtype=hard -o  timeout=60 \\$url ${drive}:"
Write-Output ($logInfo + ":开始挂载nas "+$nfs_url)
Write-Output ($logInfo + ":开始挂载nas "+$nfs_url) | Out-File -FilePath $logPathFile -Encoding default -Append
$result = cmd /c $nfs_url
Write-Output ($logInfo  +":nas挂载结束"  +$result)
Write-Output ($logInfo  +":nas挂载结束"  +$result) | Out-File -FilePath $logPathFile -Encoding default -Append
Write-Output ($logInfo  +":设置结束")
Write-Output ($logInfo  +":设置结束") | Out-File -FilePath $logPathFile -Encoding default -Append
}
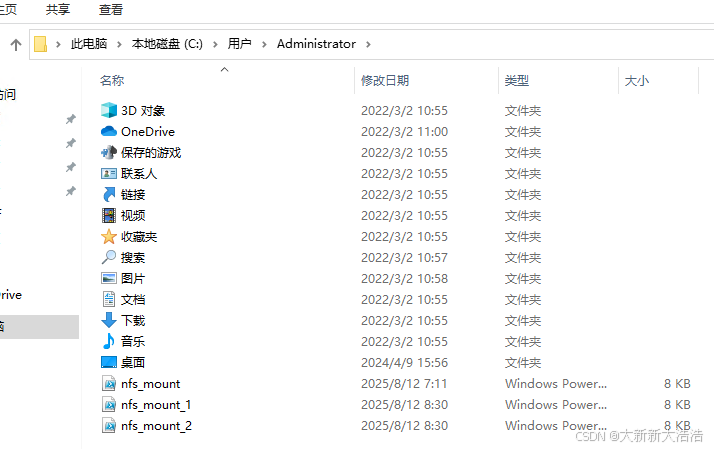
2.上传脚本
上传脚本到administrator用户的目录下
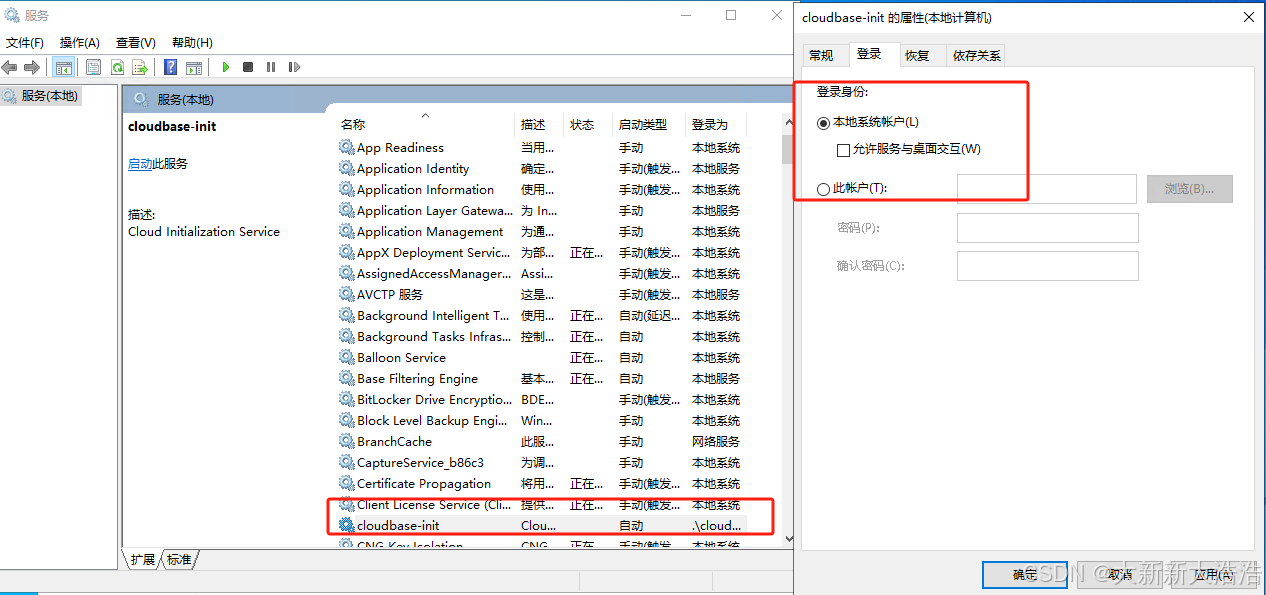
3. cloudbase-init服务调整
cloudbase-int服务调整的登录身份为“本地系统账户”
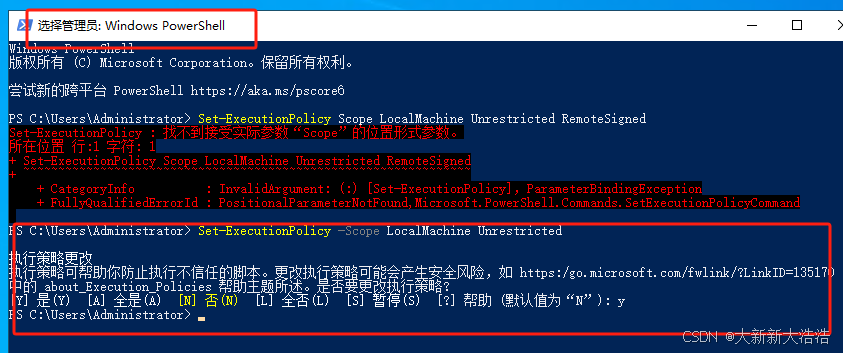
4. 管理员运行powershell调整脚本权限
Set-ExecutionPolicy -Scope LocalMachine Unrestricted
5. 修改cloud-init的配置,增加userdata的插件
metadata_services=
新增,cloudbaseinit.plugins.common.userdata.UserDataPlugin
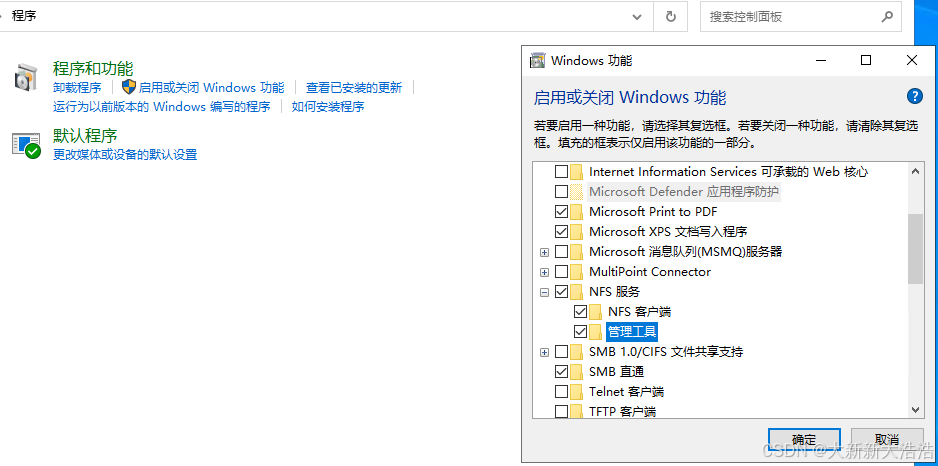
6.打开nfs功能
7. 关机制作快照
8. 创建云主机,在配置处增加nfs的挂载配置
不同的环境下只需要修改url后的nfs文件夹IP+地址即可,我这里镜像中放了三个mount脚本,最多仅支持开机挂载3个nfs,可以根据自己的需求增删,不同mount脚本里面的nas_run 、logName 参数要修改成不同的。
#ps1_sysnative
powershell -file C:\Users\Administrator\nfs_mount_1.ps1 -url 10.0.10.240\private\3d8aa37f-b13b-4aee-a580-e1533ae756ec -drive M;

powershell -file C:\Users\Administrator\nfs_mount.ps1 -url 10.0.10.240\shared -drive Z;
9. 创建成功后,检查注册表
检查注册表
注册表地址:计算机\HKEY_LOCAL_MACHINE\SOFTWARE\Microsoft\Windows\CurrentVersion\Run

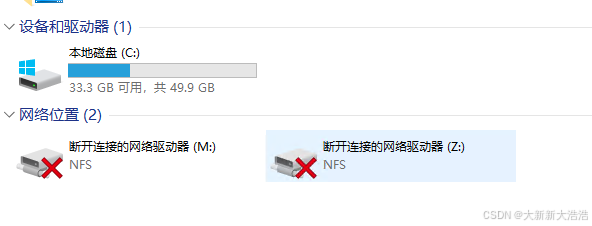
这里显示断开 但是实际使用没有问题
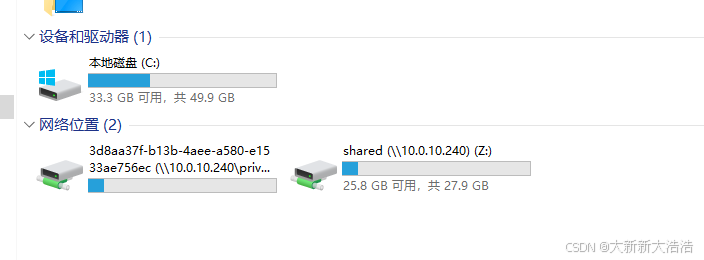
9. 重启机器,检查重启后的挂载情况
重启后检查,挂载正常
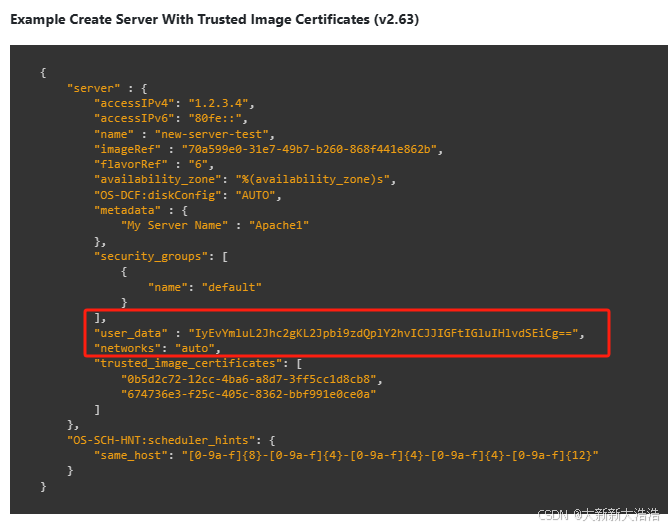
10.使用接口创建
接口地址:https://docs.openstack.org/api-ref/compute/#create-server
参数信息:得转一下base64再放进去
| Name | In | Type | Description |
|---|---|---|---|
| user_data (Optional) | body | string | Configuration information or scripts to use upon launch. Must be Base64 encoded. Restricted to 65535 bytes. Note The null value allowed in Nova legacy v2 API, but due to the strict input validation, it isn’t allowed in Nova v2.1 API. |
example:
总结
自己搞起来很费劲,对window这些权限啊注册表啊啥的完全没摸过,最终还是站在了阿里工程师的肩膀上,嘿嘿


 2万+
2万+

 被折叠的 条评论
为什么被折叠?
被折叠的 条评论
为什么被折叠?
 到【灌水乐园】发言


